


Easily move your data from Klaviyo To Snowflake to enhance your analytics capabilities. With Hevo’s intuitive pipeline setup, data flows in real-time—check out our 1-minute demo below to see the seamless integration in action!
Klaviyo is the best out there for seamlessly integrating with Shopify-powered online stores. It has several email automation and customer database management features that help you keep and engage lost customers.
Snowflake’s Data Cloud is built on a cutting-edge data platform that is delivered as Software-as-a-Service (SaaS). Snowflake provides Data Storage, Processing, and Analytic Solutions that are faster, easier to use, and more flexible than traditional options.
This article explains two different methods to set up Klaviyo to Snowflake integration in a few easy steps. In addition to that, it also describes Klaviyo and Snowflake briefly.
Table of Contents
What is Klaviyo and Why is It a Must-Have for Marketers?
Klaviyo is a powerful email and SMS marketing platform designed for e-commerce businesses. It helps brands personalize customer experiences and drive sales through data-driven campaigns.
Key features
- Customizable Templates: Easily design and customize emails to match your brand.
- Advanced Segmentation: Target specific customer groups based on behaviors, purchase history, or demographics.
- Automated Flows: Set up workflows for abandoned cart reminders, welcome series, and post-purchase follow-ups.
- Analytics and Reporting: Gain insights into customer engagement and campaign performance.
- Integrations: Seamlessly connects with e-commerce platforms like Shopify, WooCommerce, and Magento for real-time data syncing.
Unlock the full potential of your Klaviyo data by migrating it to Snowflake! Gain advanced analytics, faster querying, and scalable storage, empowering you to turn customer insights into impactful strategies. Try Hevo and equip your team to:
- Integrate data from 150+ sources(60+ free sources).
- Simplify data mapping with an intuitive, user-friendly interface.
- Instantly load and sync your transformed data into Snowflake.
Choose Hevo and see why Deliverr says- “The combination of Hevo and Snowflake has worked best for us. ”
Get Started with Hevo for FreeWhat is Snowflake?
Snowflake is a fully managed SaaS that provides one platform for data warehousing, data lakes, data engineering, data science, and data application development while ensuring the secure sharing and consumption of real-time/shared data. It offers a cloud-based data storage and analytics service called data warehouse-as-a-service. Organizations can use it to store and analyze data using cloud-based hardware and software.
Key Features of Snowflake
- Data Governance and Compliance: Advanced security features incorporate end-to-end encryption, complying with regulations.
- Multi-cluster shared data architecture: It allows point-to-point scaling of computing resources independent of storage.
- Separate Storage anad Compute: Optimizes cost performance with the ability to independently scale storage and compute.
- Data Security with Sharing: Enables data sharing in real-time without losing privacy and security.
Why Integrate Klaviyo to Snowflake?
When combined, Klaviyo and Snowflake can offer great benefits for companies who want to improve their marketing and data analysis efforts. Here are a few examples from the real world to show how this connection can benefit you :
1. Centralized Data Management
By integrating Klaviyo with Snowflake, businesses can centralize all customer data in one place, including email campaigns, customer interactions, and purchase histories. This integrated approach allows data to be analyzed and decisions made more effectively.
2. Enhanced Customer Segmentation
Using Snowflake to access valuable customer data, companies can build more granular customer segments based on behavior, preferences, and demographics. This, in turn, results in campaigns with a wider focus that drive higher engagement and conversion rates.
3. Improved Marketing Analytics
Integrating Klaviyo with Snowflake enables advanced analytics capabilities, allowing businesses to analyze campaign performance in real-time. This realization is useful to advertisers, who can make their campaigns more effective and spending more efficient.
4. Data-Driven Personalization
Klaviyo’s marketing automation and Snowflake’s data processing bring together the capability to deliver personalized content at scale. Such an individualized approach creates a great customer experience and builds brand loyalty.
5. Seamless Data Flow
The integration means that Klaviyo and Snowflake talk to each other continuously, so the data is always updated in real-time, and marketing teams are always working with the most up-to-date information.

What is the Easiest Way to Perform Klaviyo to Snowflake Data Migration?
The easiest way to perform Klaviyo to Snowflake migration is by using automated platforms like Hevo. Hevo lets you connect with more than 150+ sources seamlessly without requiring any technical expertise. Connect your Klaviyo source with Snowflake destination by following these two simple steps:
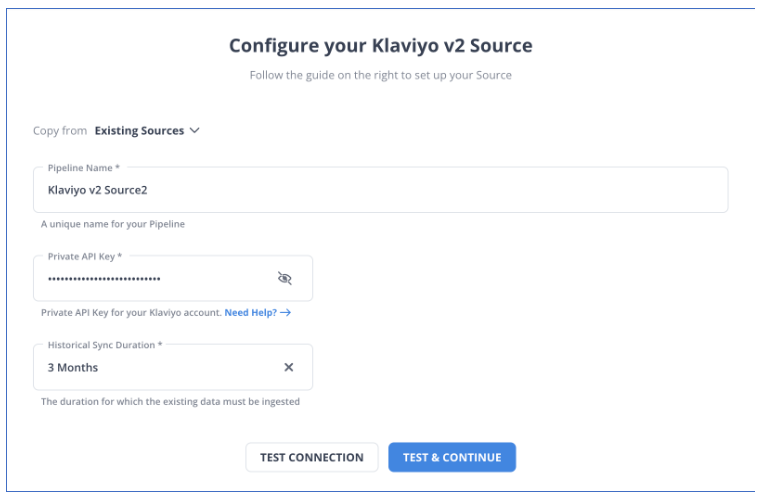
Step 1: Configure Klaviyo as your source.
Step 2: Connect Snowflake as your destination.

And you are Done! Wasn’t that super easy and fast? Try more such migrations easily with Hevo and experience the ease of quick and stress-free data migration.
Conclusion
This article talks about the distinct ways for Setting up Klaviyo to Snowflake integration. It also gives an overview of Klaviyo and Snowflake.
Hevo offers a No-code Data Pipeline that can automate your data transfer process, hence allowing you to focus on other aspects of your business like Analytics, Marketing, Customer Management, etc.
This platform allows you to transfer data from 150+ sources (including 40+ Free Sources) such as Klaviyo and Cloud-based Data Warehouses like Snowflake, Google BigQuery, etc. It will provide you with a hassle-free experience and make your work life much easier.
Want to take Hevo for a spin? Sign up for a 14-day free trial and experience the feature-rich Hevo suite firsthand. You can also have a look at the unbeatable pricing that will help you choose the right plan for your business needs.
FAQ
What is the ETL tool for Snowflake?
Popular ETL tools for Snowflake include Hevo Data, Talend, Fivetran, Matillion, and AWS Glue. These tools allow seamless data extraction, transformation, and loading into Snowflake from various data sources.
How do I import a database into Snowflake?
To import a database into Snowflake, extract the data from your source, store it in a supported cloud storage (like AWS S3, Azure Blob, or GCS), and use Snowflake’s COPY INTO command to load the data into tables. You can also use Snowpipe for continuous loading.
What type of data is stored in Klaviyo?
Klaviyo stores marketing and customer data, including contact information, email campaign performance, purchase history, website behavior, and engagement metrics used for personalized marketing campaigns and audience segmentation.

Share it with your connections.
-
 Share To X
-
 Share To LinkedIn
-
 Share To Facebook
-
 Copy Link


