


Unlock the full potential of your Mailchimp data by integrating it seamlessly with Redshift. With Hevo’s automated pipeline, get data flowing effortlessly—watch our 1-minute demo below to see it in action!
While Mailchimp does provide its own native tools for data analysis and visualization, migrating marketing campaign data from Mailchimp to Redshift opens up several new possibilities: You can combine data from other marketing data sources and obtain meaningful insights to optimize your email marketing efforts and have complete control over your email marketing data.
In this article, we will briefly discuss Mailchimp and Redshift. We will discuss in-depth two methods that you can use to move your data from Mailchimp to Redshift.
Table of Contents
Understanding Mailchimp

Mailchimp is a marketing automation platform that is particularly known for its email marketing service. It is currently one of the most popular online marketing tools, sending out over 10 billion emails each month. Mailchimp allows its users to initiate, execute and manage their online marketing campaigns from a central dashboard. Users are provided with an array of tools to carry out their marketing campaigns from assistance in crafting emails and newsletters to helping design landing pages and scheduling automation.
Understanding Redshift

Redshift is an analytics and data warehousing service developed by Amazon. It’s a part of the Amazon Web Services (AWS) platform. The very same platform that Amazon.com itself is built upon. Redshift was developed to house a wide scale of data volumes in order to cater to a wide range of data warehousing needs. The service is also built on a relational database paradigm, giving users the ability to run SQL-like queries and searches on vast troves of data with quick turnaround times on results. Redshift has also been engineered to integrate with a number of other applications via different methods to facilitate data migrations from their native systems in order to take advantage of Redshift’s abilities.
Method 1: Manually Load the Data from Mailchimp to Redshift Using the Mailchimp API
This method will require the services of at least one member of your team who is proficient in developing code and has experience in working with APIs. This can be time and effort-intensive.
Method 2: Using Hevo to Load Data from Mailchimp to Redshift
Hevo can help you export data from Mailchimp to Redshift in real time free of charge, without writing a single line of code. Learn how to migrate your data with an automated pipeline and save your company loads of time.
Method 1: Manually Load the Data from Mailchimp to Redshift Using the Mailchimp API
Step 1: Extract
- To get data from Mailchimp, you’ll have to interact with Mailchimp’s API.
- The Mailchimp API provides endpoints for retrieving, modifying, and otherwise manipulating data that pertains to your marketing and email campaigns.
- Mailchimp uses a RESTful API, which means that you can interact with it by using tools such as Postman or Curl to make HTTP requests to the API’s endpoints. For instance, to retrieve data on a particular campaign, run the following:
GET https://<dc>.api.mailchimp.com/3.0/campaigns/{campaign ID}
However, while applications like Postman will allow you to run and test various requests on the many endpoints, your team will have to develop executable scripts or cron jobs to automate the data retrieval. Thankfully, the Mailchimp Developer Documentation is a handy resource that will provide your developer with all of the info they require to build an effective script to automatically pull the data.
Step 2: Transform
Being a RESTful API, the data returned from Mailchimp will be in the JSON format, as displayed in the following example of campaign data (returned from the earlier GET request example):
{

  "id": "5496235ed846",

  "type": "regular",

  "create_time": "2020-03-15T14:40:36+00:00",

  "archive_url": "http://eepurl.com/xxxx",

  "status": "save",

  "emails_sent": 0,

  "send_time": "",

  "content_type": "template",

  "recipients": {

    "list_id": "57afe96172",

    "segment_text": ""

  },

  "settings": {

    "subject_line": "Do I have a Deal for you!",

    "title": "Bobby’s Snake Farm",

    "from_name": "Bobby",

    "reply_to": "bobby@bobbysfarm.com",

    "use_conversation": false,

    "to_name": "",

    "folder_id": 0,

    "authenticate": true,

    "auto_footer": false,

    "inline_css": false,

    "auto_tweet": false,

    "fb_comments": false,

    "timewarp": false,

    "template_id": 100,

    "drag_and_drop": true

  },

  "tracking": {

    "opens": true,

    "html_clicks": true,

    "text_clicks": false,

    "goal_tracking": true,

    "ecomm360": true,

    "google_analytics": true,

    "clicktale": ""

  },

  "delivery_status": {

    "enabled": false

  },

  "_links": [

    {

      "rel": "parent",

      "href": "https://usX.api.mailchimp.com/3.0/campaigns",

      "method": "GET",

      "targetSchema": "https://api.mailchimp.com/schema/3.0/Campaigns/Collection.json",

      "schema": "https://api.mailchimp.com/schema/3.0/CollectionLinks/Campaigns.json"

    },

    {

      "rel": "self",

      "href": "https://usX.api.mailchimp.com/3.0/campaigns/42694e9e57",

      "method": "GET",

      "targetSchema": "https://api.mailchimp.com/schema/3.0/Campaigns/Instance.json"

    },

    {

      "rel": "delete",

      "href": "https://usX.api.mailchimp.com/3.0/campaigns/42694e9e57",

      "method": "DELETE"

    },

    {

      "rel": "cancel_send",

      "href": "https://usX.api.mailchimp.com/3.0/campaigns/42694e9e57/actions/cancel-send",

      "method": "POST"

    },

    {

      "rel": "feedback",

      "href": "https://usX.api.mailchimp.com/3.0/campaigns/42694e9e57/feedback",

      "method": "GET",

      "targetSchema": "https://api.mailchimp.com/schema/3.0/Campaigns/Feedback/Collection.json"

    }

  ]

}
However, Redshift is based on an RDBS (Relational Database System) architecture and, as such, will not accept data in the JSON format as it is incompatible. Consequently, data returned from Mailchimp will have to be converted to a format that is readily accessible by Redshift. We would recommend the humble CSV (Comma Separated Values) format. Fortunately, there are numerous applications and solutions available for this task.

Step 3: Load
In order to load the data from Mailchimp to Redshift, it has to be done in two stages:
PART 1: Upload the Data Files to an Amazon S3 Bucket
- Log in to S3 and create a bucket
- Sign in to the AWS Management Console; open the Amazon S3 Console
https://console.aws.amazon.com/s3/ . - Click Create Bucket and enter a name for the bucket.
- Select a region. And Click Create.

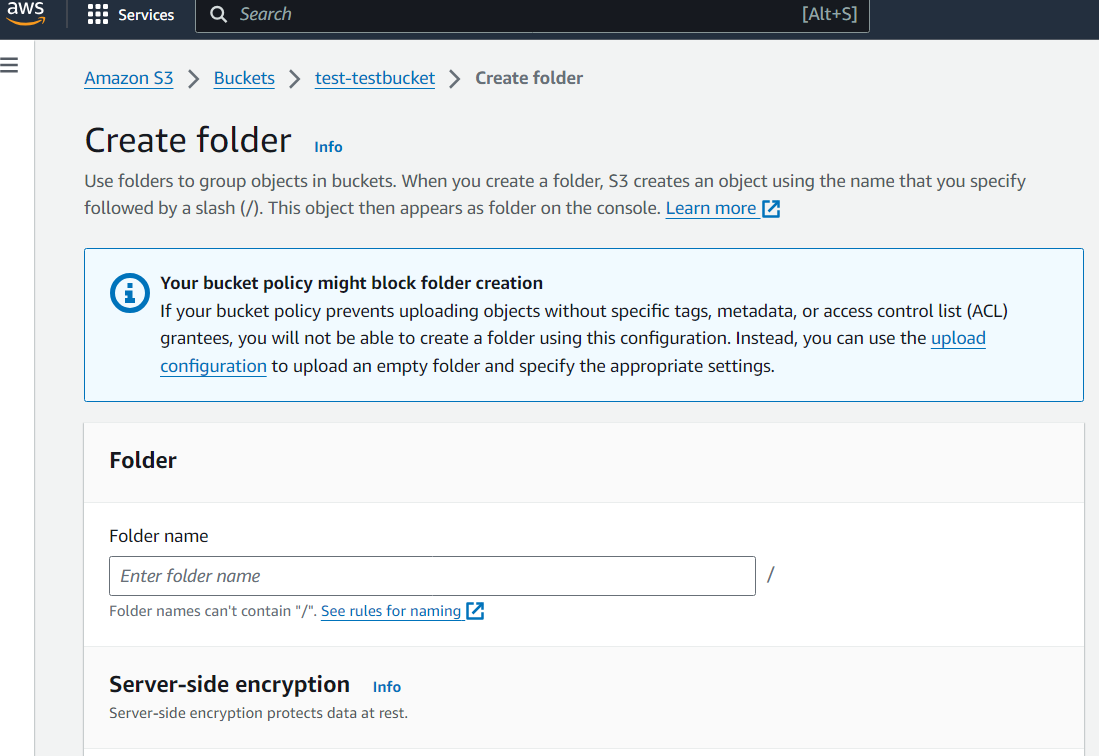
2. Create a folder within the new bucket
- Click the bucket you just created.
- Select Actions > Create Folder.
- Name the new folder (Eg: “load”).
Note: Amazon will charge you for storing items in the bucket. The pricing information is given in Amazon S3 Pricing.
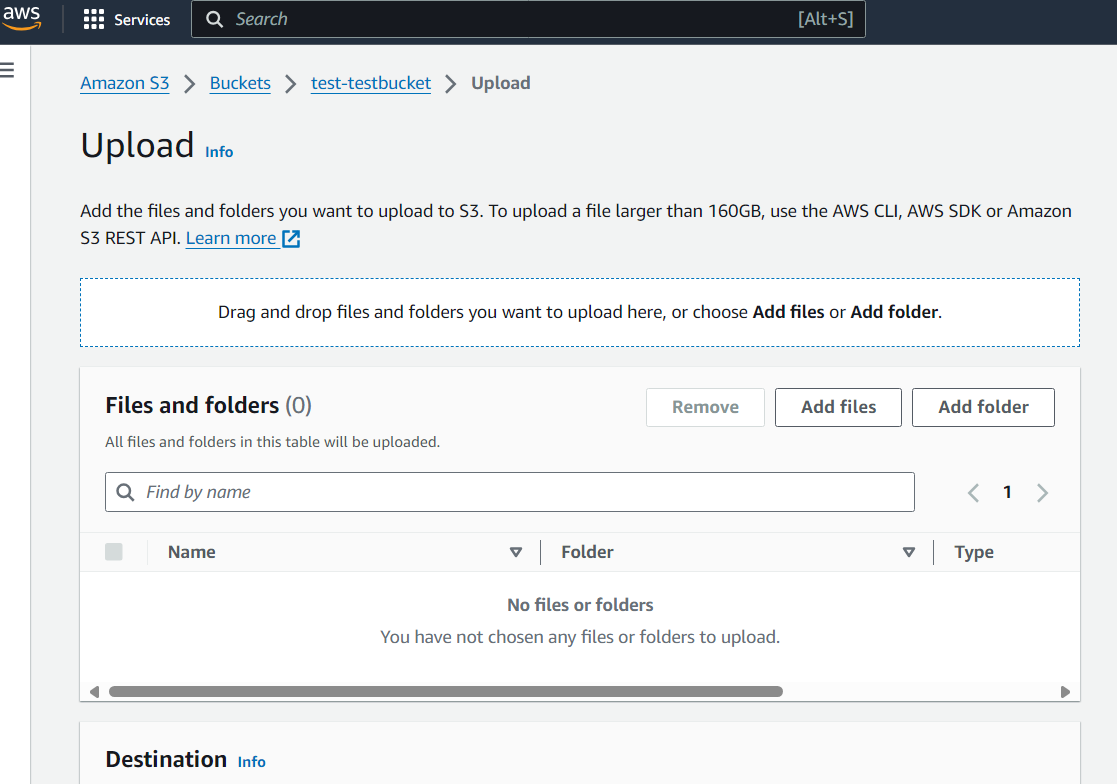
3. Upload the files to the new folder.
- Click the New folder and then click Upload.
- A Select Files Wizard will appear there; click Add Files to open a file selection dialog box.
- Select the CSV Files and then click Start Upload.
PART 2: Copying the Data from S3 to Redshift
- To load the data from the files uploaded to S3 into the Redshift database, use the COPY command as shown.
COPY table_name FROM 's3://<your-bucket-name>/load/file_name.csv' credentials 'aws_access_key_id=<Your-Access-Key-ID>;aws_secret_access_key=<Your-Secret-Access-Key>' CSV; You will need to ensure that tables have been prepared in Redshift that matches that of the incoming data. If the CSV file has a different layout or arrangement then this may trigger errors. The following code illustrates the command to replicate the column layout.
COPY table_name col1, col2, col3, col4) FROM 's3://<your-bucket-name>/load/file_name.csv'
credentials 'aws_access_key_id=<Your-Access-Key-ID>;aws_secret_access_key=<Your-Secret-Access-Key>' CSV;
If you wish, you may ignore the file header rows in the CSV files, but this must be specified in the COPY command using the IGNOREHEADER1 specifier. Eg:
COPY table_name col1, col2, col3, col4) FROM 's3://<your-bucket-name>/load/file_name.csv'
credentials 'aws_access_key_id=<Your-Access-Key-ID>;aws_secret_access_key=<Your-Secret-Access-Key>' CSV
 IGNOREHEADER1;
If properly executed, your data should now be accessible in your Redshift database.
Limitations with Using the Mailchimp API for Data Migration from Mailchimp to Redshift
- Developing code requires substantial investments of time and effort.
- Apart from merely being written, the code must be tested, debugged, and maintained for the entirety of its lifespan to preserve its proper function.
These limitations bring us to our second method: an automated pipeline such as Hevo.
Once integrated, Hevo will immediately begin migrating data from Mailchimp to your Redshift table, allowing you to access your data immediately. Hevo ensures that all your data from Mailchimp is automatically mapped to its relevant tables in Redshift.
Method 2: Using Hevo to Load Data from Mailchimp to Redshift
Hevo focuses on two simple steps to move your data from Mailchimp to Redshift:
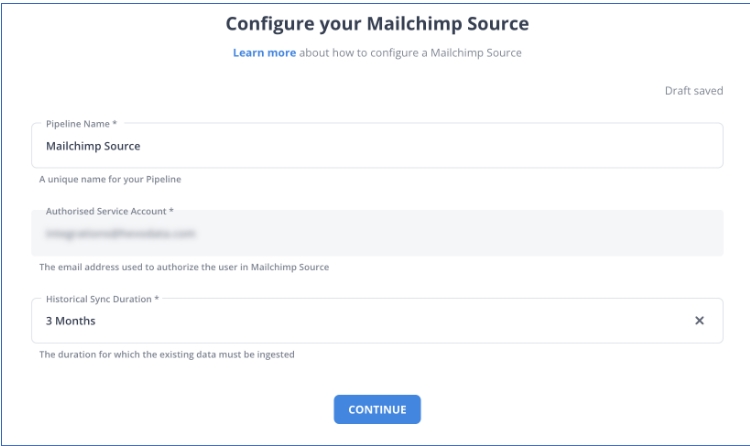
STEP 1: Configure Source
- Connect Hevo Data with Mailchimp by providing a unique name for your Pipeline, along with details about your authorized Mailchimp account. You can also choose the historical sync duration for your Mailchimp data.
STEP 2: Configure Destination
- Complete Mailchimp to Redshift migration by providing your destination name, account name, region of your account, database username and password, database and schema name, and the Data Warehouse name.

Check Out What Makes Hevo Amazing:
- Secure: Hevo has a fault-tolerant architecture that ensures that the data is handled in a secure, consistent manner with zero data loss.
- Schema Management: Hevo takes away the tedious task of schema management & automatically detects schema of incoming data and maps it to the destination schema.
- Minimal Learning: Hevo, with its simple and interactive UI, is extremely simple for new customers to work on and perform operations.
- Hevo Is Built To Scale: As the number of sources and the volume of your data grows, Hevo scales horizontally, handling millions of records per minute with very little latency.
- Incremental Data Load: Hevo allows the transfer of data that has been modified in real-time. This ensures efficient utilization of bandwidth on both ends.
- Live Support: The Hevo team is available round the clock to extend exceptional support to its customers through chat, email, and support calls.
- Live Monitoring: Hevo allows you to monitor the data flow and check where your data is at a particular point in time.
Key Takeaways
- Mailchimp does not allow combining native data with other data from your marketing efforts, nor does it enable complex SQL queries.
- Redshift, however, provides for these missing abilities, thus enabling deeper insights and analysis and higher levels of business intelligence.
- Hevo can play a significant role in helping you derive timely insights from your Mailchimp data by ensuring a seamless and secure data migration.
Schedule a personalized demo with Hevo to set up your pipelines effortlessly.
What is your preferred approach to moving data from Mailchimp to Redshift? Do let us know in the comments section below.
FAQs
1) How do I copy a CSV file to Redshift?
The easiest way to do this is to upload the file to an Amazon S3 bucket. You can follow Redshift documentation for this. After this, you can use the COPY command to tell Redshift to pull the file from the S3 bucket and load it into your table.
2) How do I load data from JSON to Redshift?
Step 1: Create and upload JSON file to S3
Step 2: Create JSONPath File
Step 3: Load data into Redshift
3) How do I connect Mailchimp to Data Studio?
To do this, first access the connector. Log in with your Google account, which is the same one you’re using on Data Studio. Then, click on Authorize and log in to your Mailchimp account. Then, authorize the permissions needed to use the connector.
4) How do I connect to a Redshift data warehouse?
One of the easiest ways to connect to a Redshift database would be to use an automated data pipeline like Hevo that you can set up in minutes and start migrating your data. Another way would be to do it manually. Read about connecting to Amazon Redshift Serverless
Simplify your data analysis with Hevo today! Sign Up here for a 14-day free trial!

Share it with your connections.
-
 Share To X
-
 Share To LinkedIn
-
 Share To Facebook
-
 Copy Link


