


Are you looking for a step-by-step approach to set up MySQL BinLog Based Replication? This article will give you a brief overview of MySQL BinLog Based Replication and log files. You will also get to know how you can set up your MySQL BinLog Based Replication using two methods.
Moreover, the limitations in the case of the manual method will also be discussed in further sections. After getting into the steps, let’s also take a look at what is MySQL BinLog Based Replication and the need for it.
Table of Contents
Methods to Setup MySQL BinLog Based Replication
This article delves into both the manual and using Hevo methods in depth. You will also see some of the pros and cons of these approaches and will be able to pick the best method based on your use case. Below are the two methods:
Consider using Hevo Data for automated, no-code MySQL BinLog replication with advanced monitoring and error-handling capabilities, saving you time and reducing complexity.
Still not sure? See how Postman, the world’s leading API platform, used Hevo to save 30-40 hours of developer efforts monthly and found a one-stop solution for all its data integration needs.
Get Started with Hevo for FreeMethod 1: The Easiest Way to Setup MySQL BinLog-Based Replication-Using Hevo
Here’s how simple it is to set up MySQL BinLog Based Replication with Hevo:
Step 1: Authenticate and connect your MySQL data source and enable binlog replication.
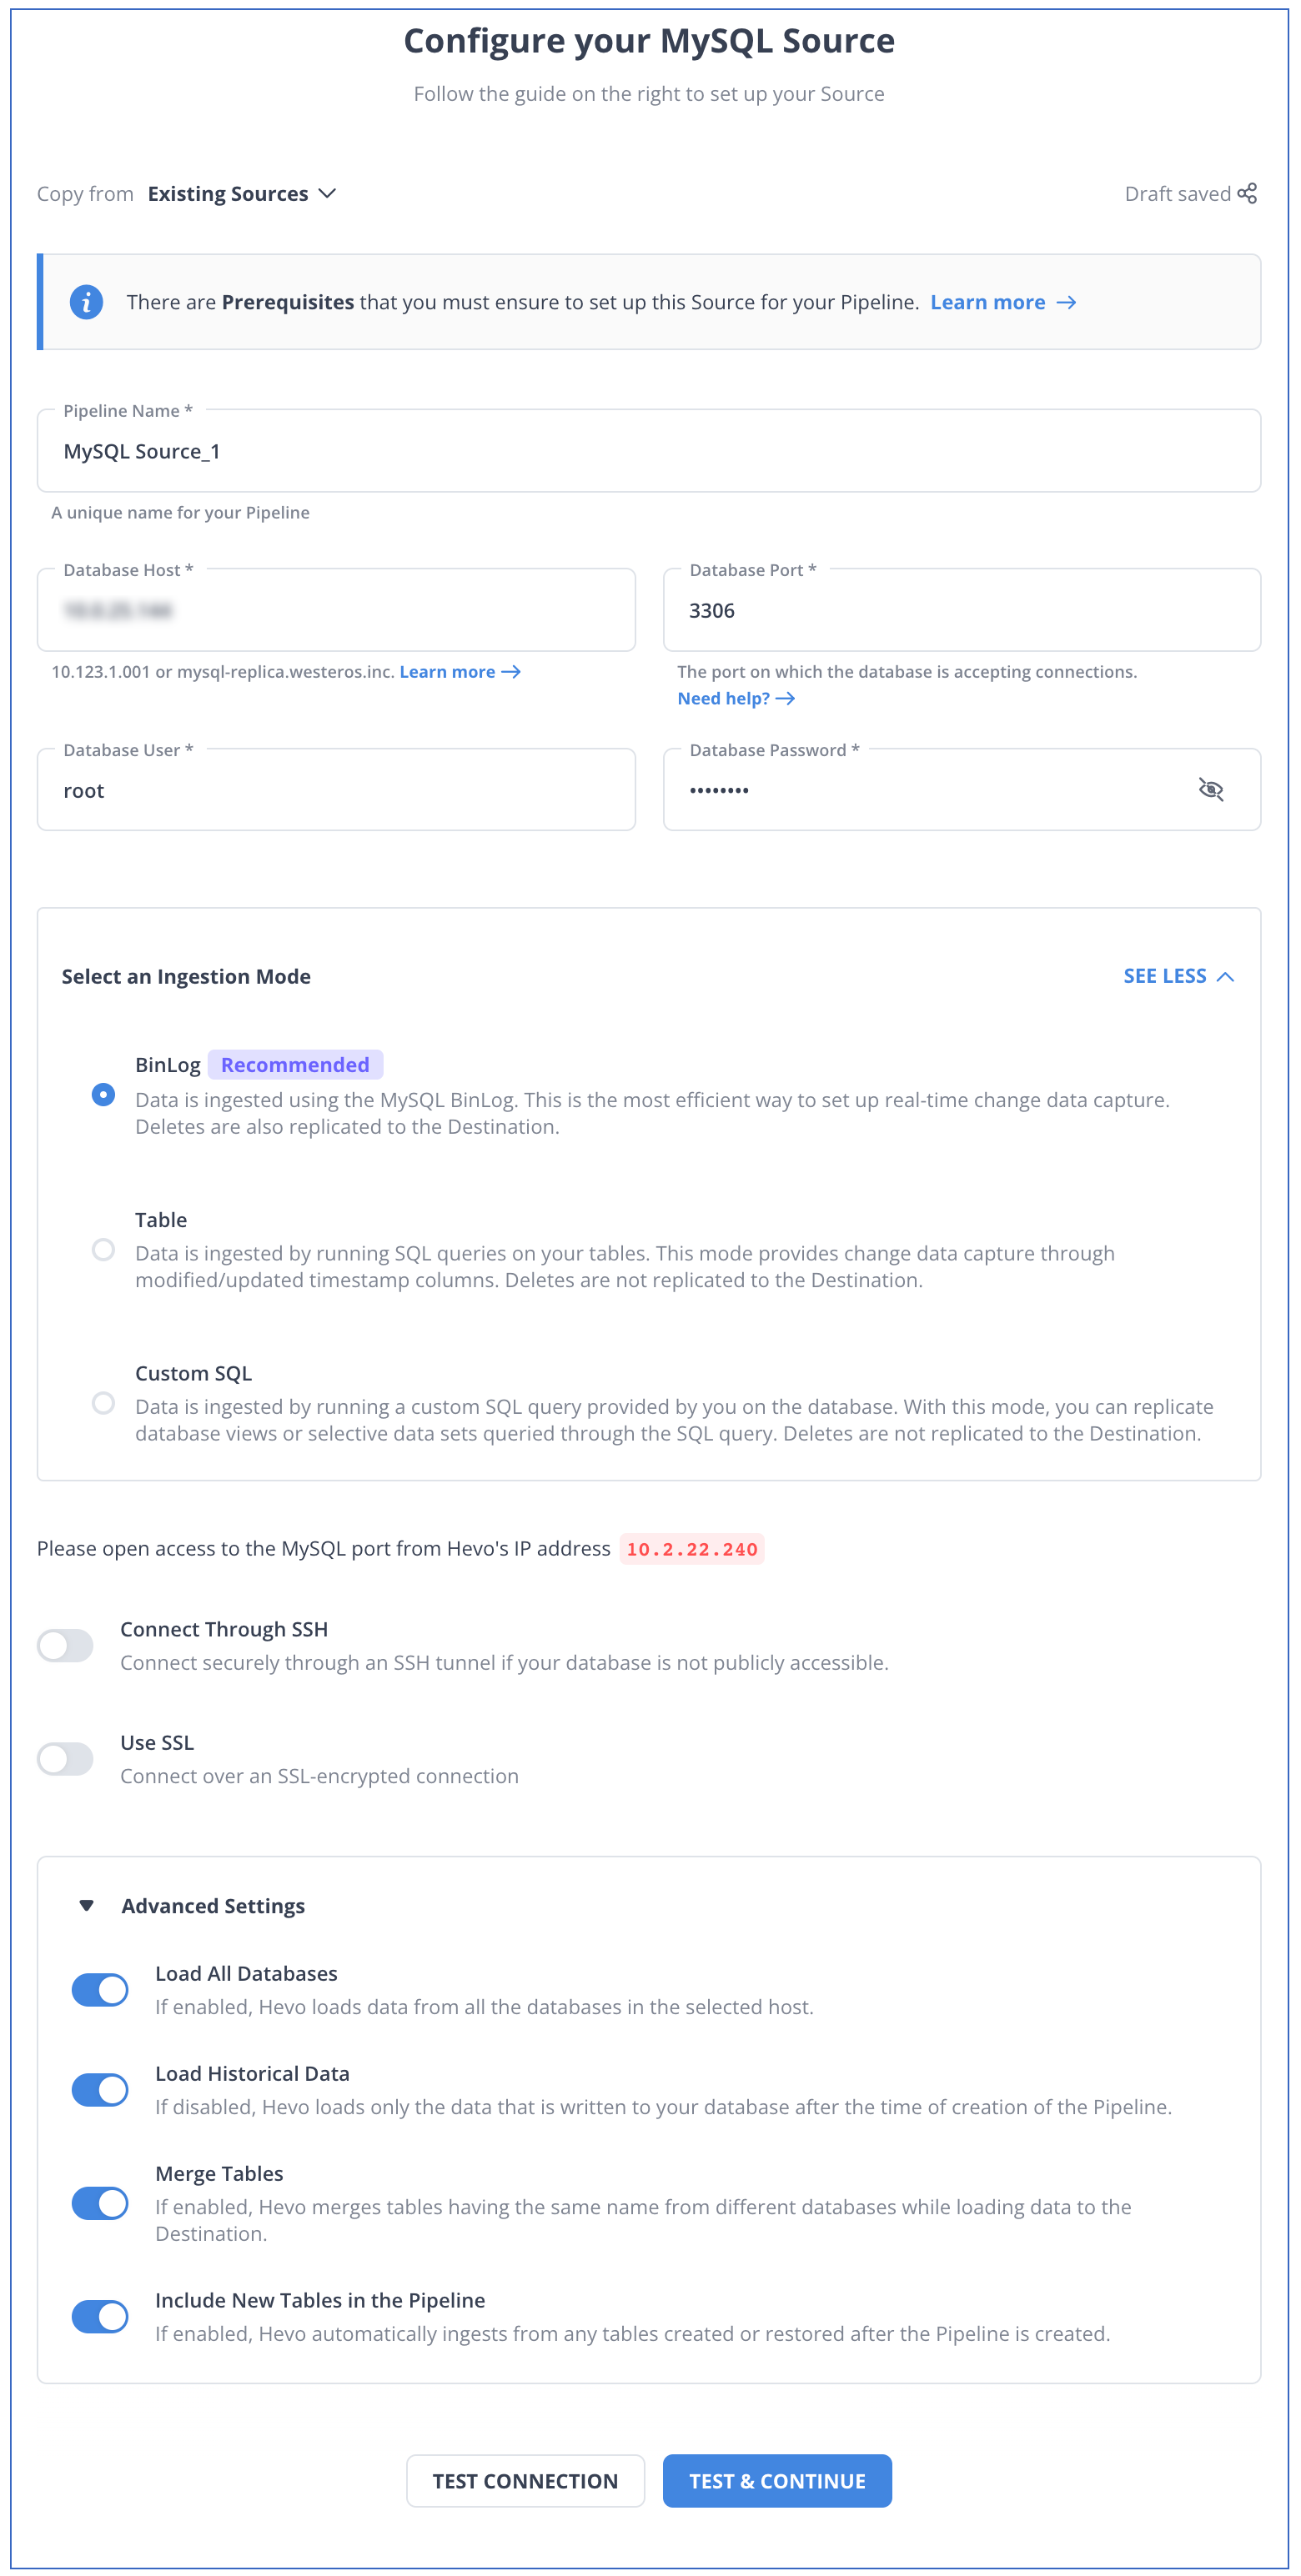
Learn more about configuring MySQL from our documentation.
Here are more reasons to try Hevo:
- Architecture that offers zero-data loss: Hevo has a fault-tolerant architecture that ensures that the data is handled in a secure, consistent manner with zero data loss.
- Schema Management: Hevo takes away the tedious task of schema management & automatically detects the schema of incoming data and maps it to the destination schema.
- Incremental Data Load: Hevo allows the transfer of data that has been modified in real-time. This ensures efficient utilization of bandwidth on both ends.
Experience the power and simplicity of implementing MySQL Binlog Based Replication by signing up for a 14-day free trial with Hevo.
Method 2: Setting up MySQL BinLog-Based Replication Manually
You can follow these steps to manually set up MySQL BinLog Based Replication. The steps to set up MySQL Binlog Based Replication are as follows:
- Step 1: Enable Binary Logging and Configure Master
- Step 2: User Creation for Replication
- Step 3: Getting Binary Log Coordinates from the Replication Master
- Step 4: Creating a Data Snapshot
- Step 5: Replication Slave Configuration
- Step 6: Master Configuration on the Slave
- Step 7: Replication Setup between a New Master and Slaves
- Step 8: Replication Setup with Existing Data
Step 1: Enable Binary Logging and Configure Master
This step is about enabling binary log and configuring a unique server ID on the master. This needs to be accomplished using log-bin & server-id options available in the configuration file at {mysqld] section. Each server whether it is a master or slave of the replication structure needs to be configured with a unique server id.
- You will need to shut down the MySQL server to edit the my.cnf or my.ini file.
- Here is how you can add log-bin & server-id options to enable the binary logging
[mysqld] log-bin=mysql-bin server-id=1
- Once the changes are done to the configuration file, you will need to restart the server.
Step 2: User Creation for Replication
We will need to have the slave user accounts defined on the master server by granting ‘replication slave’ permissions.
- To create a new user account, use the CREATE USER command
mysql> CREATE USER ‘username’@’%.domain.com’ IDENTIFIED BY ‘password’;
- Newly or existing created accounts should have replication privileges granted
mysql> GRANT REPLICATION SLAVE ON *.* TO ‘username’@’%. domain.com’;
Step 3: Getting Binary Log Coordinates from the Replication Master
To start the replication process, we should know the master’s current coordinates within its binary log to configure the slave.
To find the master binary log coordinates, follow below steps:
- Get started with a session on the master. With the command-line client, execute the FLUSH TABLES WITH READ LOCK statement:
mysql> FLUSH TABLES WITH READ LOCK;
This will flush all tables and block write statements.
- Execute the SHOW MASTER STATUS statement in another session to obtain the current binary log file name and position:
mysql>SHOW MASTER STATUS;

These are replication coordinates in the form of bin log file & position as shown in the above example. These values will need to be used while configuring the slaves.


Step 4: Creating a Data Snapshot
We can create a dump of all the tables and or databases at the master server and import the same on the slave by using mysqldump. This will need to be performed before the replication task gets started.
In this command, the data is dumped into the file ‘repl_dbdump.db’ with –master-data option:
shell> mysqldump --all-databases --master-data > repl_dbdump.db- The command
mysqldumpis used to create a backup of MySQL databases. - The
--all-databasesflag specifies that all databases in the MySQL server will be backed up. - The
--master-dataoption adds replication information to the dump, which is useful for setting up a replication slave. - The output of the backup is redirected and saved to a file named
repl_dbdump.db. - This file can be used later to restore the databases or set up replication in MySQL.
- If you want to exclude any tables in the database, use –ignore-table option.
- If you want to name only specific databases which you want to be dumped, use the –databases option
Step 5: Replication Slave Configuration
Similar to the master, the slaves will also need to be set up with a unique server id so that it does not conflict. The same process will need to be followed to edit the configuration file as indicated in Step 1 with regard to server id.
For example:
[mysqld]

server-id=2
Once you are done with making the changes to the configuration file, restart the respective slave. There is no need to activate binary logging on the slave but if you want to, then it can also be used as a master to other slaves.
Step 6: Master Configuration on the Slave
In order to configure the slave to communicate with the master for replication, set up the slave with the required connection information. The following statements will need to be executed to accomplish the same.
mysql> CHANGE MASTER TO

-> MASTER_HOST='master_host_name',

-> MASTER_USER='replication_user_name',

-> MASTER_PASSWORD='replication_password',

-> MASTER_LOG_FILE='recorded_log_file_name',

-> MASTER_LOG_POS=recorded_log_position;- The
CHANGE MASTER TOcommand is used to configure a MySQL replication slave to connect to a master server. MASTER_HOSTspecifies the hostname or IP address of the master server that the slave will replicate from.MASTER_USERandMASTER_PASSWORDare the credentials used for the replication user to access the master server.MASTER_LOG_FILEindicates the binary log file on the master server from which the slave will start replicating.MASTER_LOG_POSspecifies the position in the binary log file where replication should begin, allowing the slave to catch up from that point.
The following step would be needed depending on whether you have a dump to import or not.
Step 7: Replication Setup between a New Master and Slaves
If you have no snapshot of a previous database to import, then a new master is to be used for the replication.
By starting the slave & executing CHANGE MASTER TO statement, you need to set up replication between a new master and the slave.
Next, perform the above step on each slave.
Step 8: Replication Setup with Existing Data
When setting up replication with existing data, the snapshot needs to be sent from the master to the slave. This has to be performed before the replication process is started.
By considering that we have used mysqldump
- Start the slave, using the –skip-slave-start option. This will not trigger the replication
- Import the dump file:
shell> mysql < fulldb.dump
With this, the slave connects to the master to replicate data updates.
The data available on slaves can be utilized continuously for analytics purposes. With this approach, the binary log will need to be observed for any changes in the data as per the events and replicate only those events based on the position id.
We can also set up a scheduling job that notifies each time the data is updated and ensures fresh data is available for analytics purposes.


Challenges of Building a Custom Setup
There are some limitations of building a custom setup for MySQL replication binlog:
- Manually configuring & writing customs scripts becomes effort-intensive. Like explained above, this approach needs many tedious steps to work hand in hand.
- The process described above is time-consuming. If you are working on projects with tight deadlines, then building the entire setup manually is not advised.
- Since each step is manually coded, the system is quite brittle. You will need to continuously monitor the infrastructure and ensure that the data replicated is consistent and accurate.
- In case you need to apply any data enrichment or transformation before replicating the data to your destination, then you will need to build additional code to achieve this. If you are replicating data from MySQL to a data warehouse like Redshift, BigQuery, or Snowflake, for data analytics purposes, this can be a huge bottleneck.
An alternative to going through all these hardships will be to use a cloud-based data automated pipeline tool like Hevo which can execute MySQL BinLog Based Replications in a matter of a few clicks.
Why do We Need to Use binary logs?
- Replication: The binary log on a replication source server records data changes and is meant to be sent to replicas. The source sends the information in the binary log to replicas and reproduces those transactions so that the same data changes that were made on the source can be made.
- Data Recovery: Events recorded after the backup are re-executed once the backup is restored. They update the databases from the point of the backup. Thus, data can be recovered by MySQL binlog replication troubleshooting if such a need arises.
The binary logging format decides how events are recorded in the binary log. Binary logs support row-based, mixed-base, and statement-based formats. When replicating using the Binlog format in MySQL, you must keep in mind the MySQL version you are using.
The binlog_format server system variable controls the logging format of the MySQL server. You can set this variable with global or session scope.
Learn More About:
Conclusion
This article gives you comprehensive guidance for MySQL replication setup through three methods. You can perform MySQL master-slave replication using the manual method or you can use Hevo to make your task simpler.
Hevo is the only real-time ELT No-code Data pipeline platform that cost-effectively automates data pipelines that are flexible to your needs.
Additionally, Hevo helps you clean, transform and enrich data both before and after replicating the database, ensuring that you have analysis-ready data in your warehouse at any point.
Businesses can use automated platforms like Hevo Data to set this integration and handle the ETL process. It helps you directly transfer data from a source of your choice to a Data Warehouse, Business Intelligence tools, or any other desired destination in a fully automated and secure manner without having to write any code and will provide you a hassle-free experience.
Sign up for the 14-day free trial today to give Hevo a try.
FAQ on MySQL BinLog Based Replication
How does MySQL binlog replication work?
MySQL Binlog replication works on the Master-Slave approach. The master records changes in a binary log (binlog). Slaves read this log and apply the database changes using IO and SQL threads.
Is it safe to delete MySQL binlog files?
Deleting binlog files is safe if you no longer need them for replication or point-in-time recovery. However, it must be done carefully to avoid disrupting replication or losing recovery data.
What is the difference between binlog-do-DB and replicate-do-DB?
binlog-do-db: The master-side setting specifies which databases to log.
replicate-do-db: The slave-side setting specifies which databases’ changes need to be replicated.
What is the difference between MySQL redo log and binlog?
Redo Log: Used for crash recovery, specific to InnoDB.
Binlog: Used for replication and point-in-time recovery, server-wide.
Share your experience of setting up MySQL BinLog Based Replication in the comments section below!
Share it with your connections.
-
 Share To LinkedIn
-
 Share To Facebook
-
 Share To X
-
 Copy Link


