


In eCommerce platforms, the customer journey is complicated. They use a variety of devices, including smartphones and computers, to browse numerous websites, review platforms, and research things before making a purchase. If you want to target a specific group of people, use marketing solutions like Outbrain, that leverage emails, SMS, search engine ads, and remarketing to efficiently target potential buyers. You can learn more about product demand trends by looking at ad impressions, click-through rates, conversion rates, and search histories on marketing platforms.
In this article, you will learn how to Integrate Outbrain to Redshift. You will also learn about Outbrain and Redshift and their key features.
Table of Contents
What is Outbrain?

Outbrain is a large content discovery and native-advertising platform that connects publishers with advertisers for more audience engagement. Advanced algorithms will then assess the behavior and interests of users and deliver recommended content on publisher websites, hence keeping the reader connected to relevant articles, videos, and other media sources of non-intrusive native ads, which are more appealing with higher rates of engagement.
Key Features of Outbrain
- Data-Driven Insights: With advanced algorithms and analytics, Outbrain ensures that the relevant content gets recommended to its users based on their behavior.
- Customized targeting options: Users will be able to personalize advertising efforts by division of audiences and targeted campaigns based on their interests.
- Performance Tracking: Advertisers can monitor the performance of their campaign live to make relevant adjustments to maximize engagement and return on investment.
What is Amazon Redshift?

Amazon Redshift is a fully managed petabyte-scale Data Warehousing service that is hosted in the cloud, which means that administrative tasks like backup creation, security, and configuration are all automated. You can start with a few gigabytes of data and scale up to a petabyte or more with it. Amazon Redshift divides data into clusters that may be analyzed simultaneously. As a result, Amazon Redshift data may be rapidly and simply accessible. Each node can be accessed individually by users and apps.
A range of SQL-based clients, as well as a variety of Data Sources and Data Analytics tools, can be used with Amazon Redshift. It has a well-designed architecture that makes working with a number of Business Intelligence tools easier.
Key Features of Amazon Redshift
Here are some key features of Amazon Redshift:
- Column-oriented Databases: Data can be grouped into rows or columns in a database. A high percentage of OLTP databases are row-orientation databases. To put it another way, these systems are designed to handle a large number of small activities like DELETE, UPDATE, and so on.
- Secure End-to-End Data Encryption: Data privacy and security requirements apply to all businesses and organizations, and encryption is one of the most critical parts of data protection. For data in transit, Amazon Redshift uses SSL encryption, and for data at rest, it uses hardware-accelerated AES-256 encryption.
- Massively Parallel Processing (MPP): MPP is a distributed design technique that uses a “divide and conquer” strategy across numerous processors to process huge data collections.
- Cost-effective: The most cost-effective Cloud Data Warehousing option is Amazon Redshift. Traditional on-premise warehousing is projected to be a tenth of the expense. There are no hidden expenses for consumers; they simply pay for the services they use.
- Scalability: Amazon’s Redshift is simple to use and scales to meet your demands. You can modify the number or type of nodes in your Data Warehouse with a few clicks or a simple API call, and scale up or down as needed.
Why Integrate Outbrain to Redshift?
The most challenging aspect of Outbrain’s marketing efforts for marketers is the money wasted on redundant adverts. Take, for example, out-of-stock product advertisements, which waste a lot of money. This challenge is solved by feeding Outbrain with vital data from other platforms. The lack of particular data is a significant reason why your Outbrain marketing campaigns aren’t generating more income.
All of this information cannot be sent to Outbrain in its native form. Collect relevant data and properly analyze it in a data warehouse before using the information to launch Outbrain marketing campaigns. Amazon Redshift aids in the extraction of useful information from enormous amounts of data. You can build a new cluster in a few minutes using AWS’s simple interface, and you won’t have to worry about managing infrastructure.
Method 1: Outbrain to Redshift Integration Using Hevo
Hevo Data, an Automated Data Pipeline, provides you with a hassle-free solution to connect Outbrain to Redshift within minutes with an easy-to-use no-code interface. Hevo is fully managed and completely automates the process of not only loading data from Outbrain but also enriching the data and transforming it into an analysis-ready form without having to write a single line of code.
GET STARTED WITH HEVO FOR FREEMethod 2: Outbrain to Redshift Integration Manually
This method would be time-consuming and somewhat tedious to implement. Users will have to write custom codes to enable two processes, streaming data from Outbrain and ingesting data into Amazon Redshift. This method is suitable for users with a technical background.
Method 1: Outbrain to Redshift Integration Using Hevo
Step 1: Configure Outbrain as a Source

Step 2: Configure Amazon Redshift as a Destination

Hence your data will be replicated from Outbrain to Redshift.
Method 2: Outbrain to Redshift Integration Manually
Step 1: Get Data out of Outbrain
The first step in Outbrain to Redshift Integration is to get the data. The RESTful Amplify API from Outbrain allows you to extract data about marketers, campaigns, performance, and more. With a call like GET/reports/marketers/[id]/content, you can create an API call that specifies performance metrics like impressions, clicks, clickthrough rate, and cost. To limit, filter, and sort the results, you can use any of a dozen alternative options.
Step 2: Sample the Data
The following is an example of a JSON response from an API query for performance data:
{
    "results": [
        {
            "metadata":
            {
                "id": "00f4b02153ee75f3c9dc4fc128ab041962",
                "text": "Yet another promoted link",
                "creationTime": "2017-11-26",
                "lastModified": "2017-11-26",
                "url": "http://money.outbrain.com/2017/11/26/news/economy/crash-disaster/",
                "status": "APPROVED",
                "enabled": true,
                "cachedImageUrl": "http://images.outbrain.com/imageserver/v2/s/gtE/n/plcyz/abc/iGYzT/plcyz-f8A-158x114.jpg",
                "campaignId": "abf4b02153ee75f3cadc4fc128ab0419ab",
                "campaignName": "Boost 'ABC' Brand",
                "archived": false,
                "documentLanguage": "EN",
                "sectionName": "Economics",
            },
            "metrics":
            {
                "impressions": 18479333,
                "clicks": 58659,
                "conversions": 12,
                "spend": 9187.16,
                "ecpc": 0.16,
                "ctr": 0.32,
                "conversionRate": 0.02,
                "cpa": 765.6
            }
        }
    ],
    "totalResults": 27830,
    "summary": {
        "impressions": 1177363701,
        "clicks": 2615150,
        "conversions": 2155,
        "spend": 455013.97,
        "ecpc": 0.17,
        "ctr": 0.22,
        "conversionRate": 0.08,
        "cpa": 211.14
    },
    "totalFilteredResults": 1,
    "summaryFiltered": {
        "impressions": 18479333,
        "clicks": 58659,
        "conversions": 12,
        "spend": 9187.16,
        "ecpc": 0.16,
        "ctr": 0.32,
        "conversionRate": 0.02,
        "cpa": 765.6
    }
}
Step 3: Prepare the Data
You’ll need to construct a schema for your data tables if you don’t already have a data structure in which to store the data you obtain in Outbrain to Redshift Integration. Then, for each value in the response, you must identify a predefined datatype (INTEGER, DATETIME, etc.) and create a table to receive it. The documentation for each endpoint should inform you what fields are available and what data types they relate to.
Step 4: Load data into Redshift
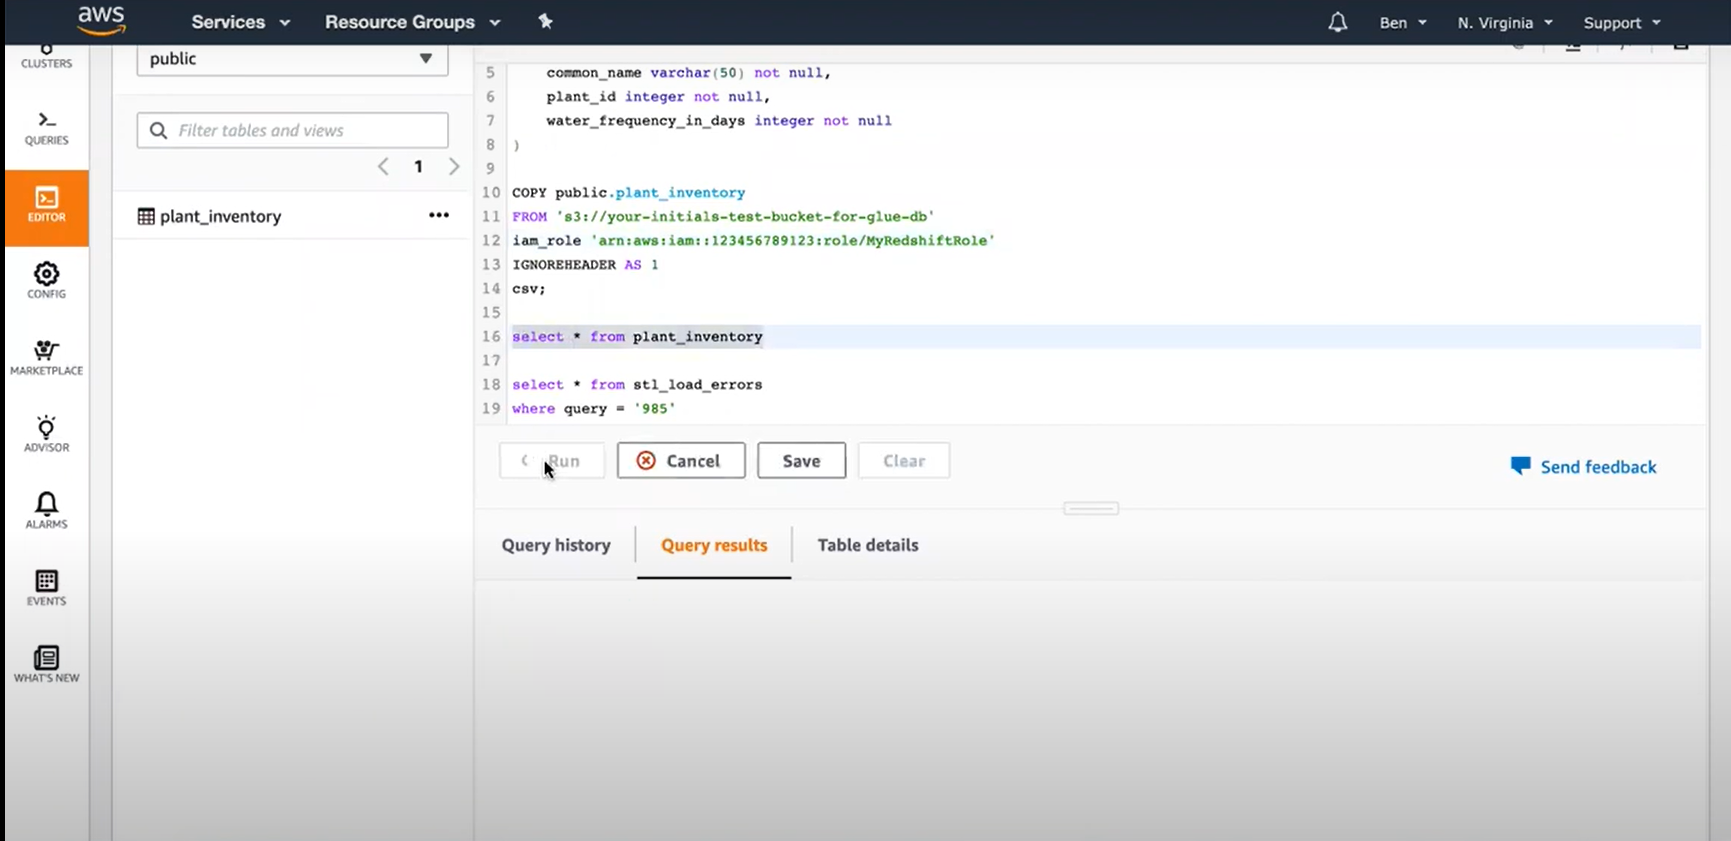
Use the CREATE TABLE statement in the Redshift data warehouse to set up a table to receive all of the data after you know all of the columns you want to put.
After that, you must move your data. Building INSERT statements to add data to your Redshift table row by row may appear to be the simplest option. Redshift isn’t designed for inserting data one row at a time, therefore that would be a mistake. If you have a large amount of data to input, it’s better to transfer it to Amazon S3 and then load it into Redshift with the COPY command.
Step 5: Keeping Outbrain Data Up to Date
Now, after gathering the data and putting it into your data warehouse, the problem is how to update it in a neat way without reloading everything, because that would be doing it all over again so what to do is one can use key fields like “updated at” or “created at” to track changes and fetch only new or updated records. You’ll probably want to set up your script to run on a schedule, maybe via a cron job. It will also need some periodic maintenance; the code needs to be modified perhaps if the Outbrain API changes, the type of fields change, or users need different data.

Conclusion
In this article, you learned two methods of Integrating Outbrain to Redshift. The first method was using Hevo and the second was manually transferring data. You also learned why you need to integrate Outbrain to Redshift.
Hevo Data will automate your data transfer process, hence allowing you to focus on other aspects of your business like Analytics, Customer Management, etc. This platform allows you to transfer data from 100+ data sources to Cloud-based Data Warehouses like Snowflake, Google BigQuery, Amazon Redshift, etc. Try a 14-day free trial and experience the feature-rich Hevo suite firsthand. Also checkout our unbeatable pricing to choose the best plan for your organization.
Frequently Asked Questions
1. Can I track the performance of my Outbrain campaigns using Redshift?
Yes, you can load Outbrain’s performance data from campaigns into Redshift and then run SQL queries to analyze key metrics, create dashboards for monitoring performance, and so on.
2. What is the best way to handle large datasets from Outbrain in Redshift?
In the case of large datasets, it may be great to process the load in batch mode using queries that would be optimized to take advantage of Redshift’s Massively Parallel Processing.
3. Do I need coding knowledge to integrate Outbrain with Redshift?
Basic coding or scripting might be required in setting up custom ETL processes. However, many no-code or low-code ETL solutions exist that make the integration much smoother.

Share it with your connections.
-
 Share To X
-
 Share To LinkedIn
-
 Share To Facebook
-
 Copy Link


