


Automating tasks in data analysis can save time and improve productivity, especially when managing routine operations. With Amazon Redshift’s Data API and EventBridge, Redshift Schedule Query becomes straightforward, helping you efficiently run repeated queries without manual input.
This guide will walk you through scheduling SQL queries using both the Amazon Redshift console and AWS CLI. Additionally, we’ll cover how to view previous runs and enable notifications for the successful completion of your scheduled SQL tasks.
Table of Contents
What is Amazon Redshift?

Redshift is a part of Amazon Web Service, a cloud-based data warehouse service designed by Amazon to handle large data and make it easy to discover new insights from them. Its operations enable you to query and combine exabytes of Structured and Semi-Structured data across various Data Warehouses, Operational Databases, and Data Lakes.
A fully managed No-code Data Pipeline platform like Hevo Data helps you integrate and load data from 150+ different sources (including 60+ free sources) to a Data Warehouse such as Amazon Redshift or Destination of your choice in real-time in an effortless manner. Ensure seamless data migration using features like:
- Seamless integration with your desired data warehouse, such as Redshift.
- Transform and map data easily with drag-and-drop features.
- Real-time data migration to leverage AI/ML features of Redshift.
Still not sure? See how Postman, the world’s leading API platform, used Hevo to save 30-40 hours of developer efforts monthly and found a one-stop solution for all its data integration needs.
Get Started with Hevo for FreeOther Features of Redshift
- Redshift also lets you save your queried results to your S3 data lake using open formats like Apache Parquet from which additional analysis can be done on your data from other Amazon Web Services such as EMR, Athena, and SageMaker.
- Redshift is built on industry-standard SQL with functionalities to manage large datasets, support high-performance analysis, provide reports, and perform large-scaled database migrations.
What is SQL Query Scheduling?
A Scheduler can be described as a piece of software that is used for the coordination and execution of different processes by administering its available resources. The Query Scheduler tool allows you to schedule your SQL queries or statements based on a time interval and the number of executions needed, the subsequent results of the query can also be written to an output file.
The results are formatted as text and the Query Scheduler will keep on running and executing your scheduled queries as long as the process is active and the database connection is valid.
Scheduling is a very rewarding technique to have and is useful when running SQL queries during non-business hours, helps in loading data using COPY statements when required especially at night, you can use UNLOAD to unload data at regular intervals without having to do it by yourself, for deleting older data from tables to keep it clean, refreshing materialized views manually at regular stops, performing backup for tables, etc.
Also, read about Federated Queries Redshift to work seamlessly with your Redshift Data.
Scheduling SQL Queries on Redshift
Amazon Redshift allows users to use the Amazon Redshift Console and AWS Command Line Interface (AWS CLI) to schedule SQL queries/carry out routine maintenance tasks and perform Redshift Schedule Query.
The scheduling of SQL statements can be done using Amazon EventBridge and Amazon Redshift Data API and the queried scheduled results will be available for 24 hours after running the SQL statements on Redshift.
In the next section, you will be shown how to schedule SQL queries from the Redshift console and through the AWS CLI but first, Amazon EventBridge is explained as this is what will be needed to schedule and run the SQL statements.
What is Amazon EventBridge?
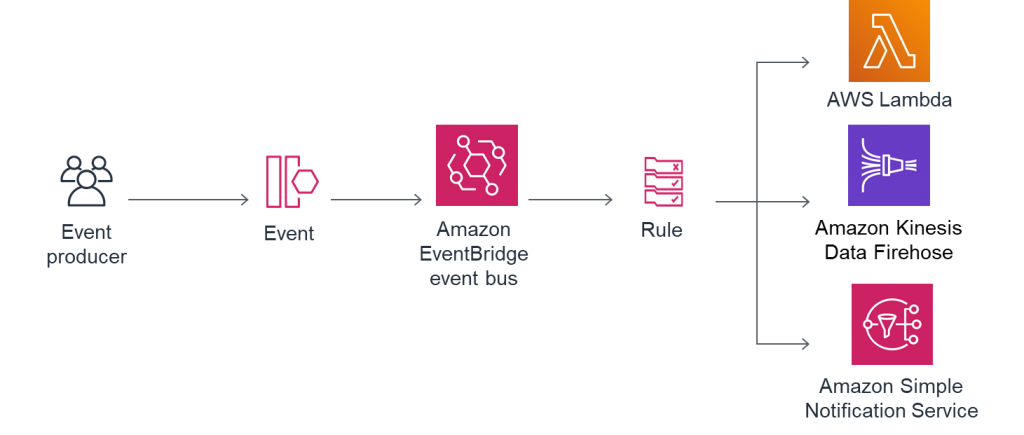
EventBridge is an Amazon product described as a serverless event bus that makes it easy for you to build event-driven applications at scale using events generated from the connection of your applications to data from different sources. It enables the streaming of real-time data which can be obtained from applications, Software-as-a-Service (SaaS) platforms, AWS services, and routes including Amazon Redshift clusters.
Whenever a schedule is created using the Amazon Redshift console, an EventBridge rule is also created with the specific schedule attached to target login details, Amazon Redshift cluster information, and SQL command run. This is made easy as Redshift integrates with EventBridge, allowing you to schedule your SQL statements that occur regularly, therefore, building event-driven applications.


Conditions for Performing Redshift Schedule Query
To be able to schedule SQL queries on Redshift and perform Redshift Schedule Query, you will need to correctly configure the AWS Identity and Access Management (IAM) user, the IAM role, and the AWS secret. The AWS IAM user is used to create the schedule and access the schedule history while the AWS secret is used to store the database username and password.
The points below show you how to effectively perform the setup to make sure the prerequisites are met:
- Ensure the IAM user for which the schedule will be created has the AmazonEventBridgeFullAccess IAM policy attached to it and should also have appropriate access to Amazon Redshift as per their role. The placeholder {USER_NAME} is used to refer to this user.
- Use AWS Secrets Manager to store the database credentials that will be used for running the scheduled SQL statement.
- Create an IAM role for the Amazon Redshift service with the Redshift Customizable option and attach the AmazonRedshiftDataFullAccess AWS managed policy to it. Make sure that the role has the following trust relationships added to it as seen below:
{
      "Sid": "S1",
      "Effect": "Allow",
      "Principal": {
        "Service": "events.amazonaws.com"
      },
      "Action": "sts:AssumeRole"
    }
Also, ensure to add the following permissions to the AssumeRole to see the schedule history list. Edit the {ACCOUNT_ID} to put in your AWS account ID and {USER_NAME} with the IAM user set up as seen below:
{
      "Sid": "S2",
      "Effect": "Allow",
      "Principal": {
        "AWS": "arn:aws:iam::{ACCOUNT_ID}:user/{USER_NAME}"
      },
      "Action": "sts:AssumeRole"
}- Grant the IAM user AssumeRole permissions on the IAM role you created to view the schedule history:
{
    "Version": "2012-10-17",
    "Statement": [
        {
            "Sid": "S3",
            "Effect": "Allow",
            "Action": "sts:AssumeRole",
          "Resource": "arn:aws:iam::{ACCOUNT_ID}:role/{ROLE_NAME}"
        }
    ]
}
Redshift Schedule Query: Scheduling SQL Queries Redshift: Using Console
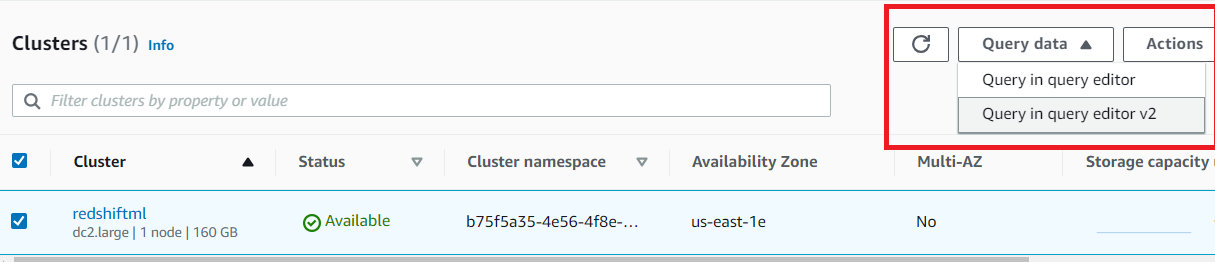
Amazon Redshift console can be used to extract data from a table on a regular interval into Amazon Simple Storage Service (Amazon S3) by scheduling an UNLOAD command to run the export of this data from the tables to the data lake on Amazon S3. To use the console to perform Redshift Schedule Query, do the following:
- Step 1: Sign in to the console. Ensure that the IAM user has been granted the necessary permission.
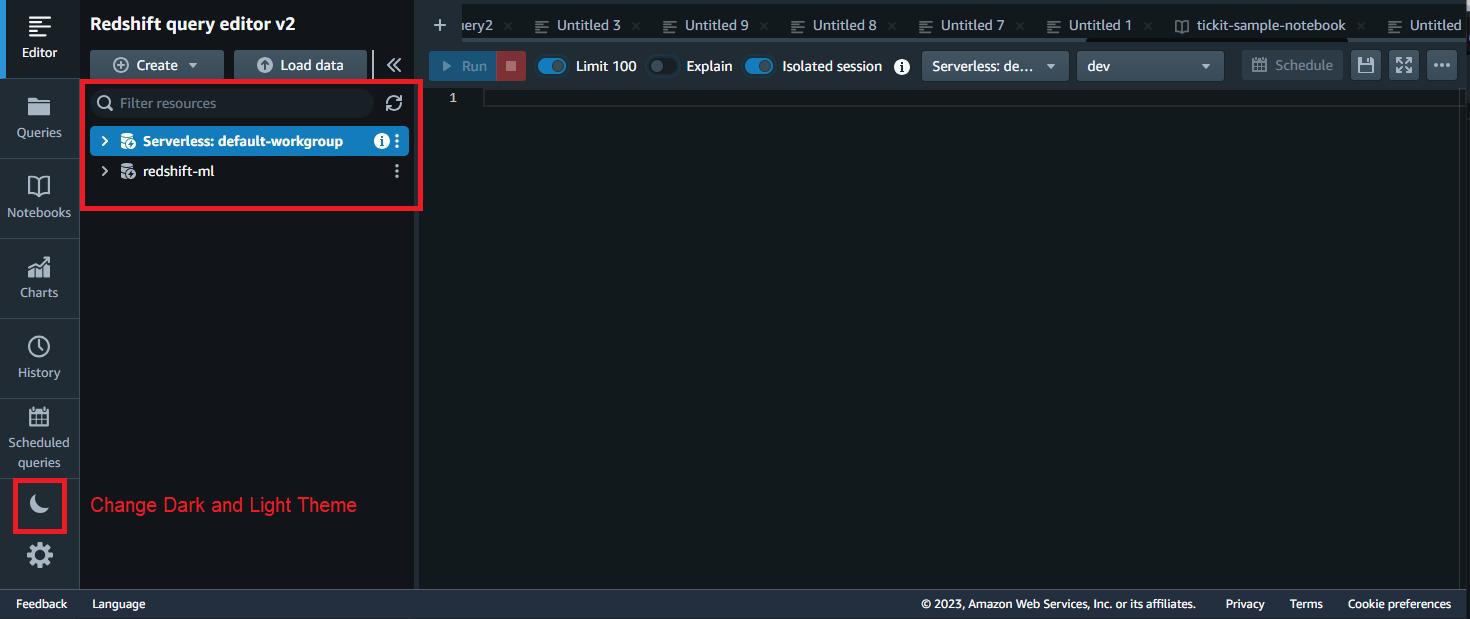
- Step 2: On the Amazon Redshift console, open the query editor and type in the sample code below.
unload ('select * from edw.trxns')
to 's3://mybucket/'
iam_role 'arn:aws:iam::{ACCOUNT_ID}:role/{ROLE_NAME_2}'
PARQUET
PARTITION BY (trxn_dt);
;- Step 3: After typing the code, select Schedule.

- Step 4: Choose the role you created earlier in the Scheduler permission section for the IAM role as seen in the image below. The image covers steps 4 – 7.

- Step 5: Select AWS Secrets Manager for Authentication.
- Step 6: Choose the Secret which contains the database username and password which you configured as a condition for scheduling.
- Step 7: Enter a name for the Database name.
- Step 8: Enter a name for the query in the Query Information section for the Scheduled query name as seen below.

- Step 9: Enter the SQL code in the SQL query box as shown above.
- Step 10: Select Run Frequency for Schedule query by in the Scheduling options section as seen below. The image below covers steps 10 – 13.

- Step 11: Select an option of your choice for Repeat by from the drop-down menu example Day.
- Step 12: Repeat every is used to select an option for the number of times the scheduled SQL query will run. In the image above, it indicates the number of days as Day was selected earlier and it must be an integer from 1-999.
- Step 13: For Repeat at the time (UTC), enter a time of your choice as seen above.
- Step 14: Finally, you can choose to enable notifications via email or texting in the Monitoring section using Amazon Simple Notification Service (Amazon SNS).
This is how you can perform Redshift Schedule Query using Amazon Redshift Console.


Redshift Schedule Query: Scheduling SQL Queries on Redshift Using the AWS CLI
SQL statements can be scheduled through the AWS CLI using EventBridge and the Amazon Redshift Data API. The example below is used to set up a schedule to refresh a materialized view on Amazon Redshift. This will give you a comprehensive overview of the complete process involved in performing Redshift Schedule Query using the AWS CLI:
- Step 1: Create an event rule using the scheduled-refresh command
- Step 2: Create a JSON object that contains the Amazon Redshift Data API parameters:
- Enter the ARN of your Amazon Redshift cluster
- Enter the ARNs for the RoleArn and the SecretManagerArn fields.
- Enter the database name and the SQL statement to be scheduled for the database and SQL fields.
- Enter a name for the StatementName field.
- Set the WithEvent parameter to true to enable events to be sent to you after SQL statements have been executed. These events can also be used to trigger other SQL statements if needed.
- Step 3: Create an event target AWS CLI using the JSON file created in the previous steps.
aws events put-targets --cli-input-json file://data.jsonA sample JSON object with the API parameters as listed above is shown in the code below.
{
"Rule": "scheduled-refresh-xxxxxxxxxxxx",
"EventBusName": "default",
"Targets":
[
{
"Id": "scheduled-refresh-xxxxxxxxxxxx",
"Arn": "arn:aws:redshift:us-east-1:{ACCOUNT_ID}:cluster:{REDSHIFT_CLUSTER_IDENTIFIER}",
"RoleArn": "arn:aws:iam::{ACCOUNT_ID}:role/{ROLE_NAME}",
"RedshiftDataParameters":
{
"SecretManagerArn": "arn:aws:secretsmanager:us-east-1:{ACCOUNT_ID}:secret:{SECRET_NAME-xxxxxx}",
"Database": "dev",
"Sql": "REFRESH MATERIALIZED VIEW xxxxxxxxxxxx;",
"StatementName": "refresh-xxxxxxxxxxxx",
"WithEvent": true
}
}
]
Below are a few sample AWS CLI commands that can be used to schedule SQL tasks in Redshift:
- Use the CLI command below to list all targets for a particular rule:
aws events list-targets-by-rule --rule <rule-name> - For the removal of a target from a specific rule, use the following:
aws events remove-targets --rule <rule-name> --ids 2 - To delete a specific rule, use the code below:
aws events delete-rule --name <rule-name>- For the listing of all rules, use the CLI command:
aws events list-rules- To see the schedule history for a particular scheduled SQL statement, use:
aws redshift-data list-statements --status ALL --statement-name <statement-name>This is how you can perform Redshift Schedule Query using AWS CLI.
Take a look at how you can set up Python Redshift Connection and make working with Redshift easier than ever!
How to Review SQL Status and Results
Having set up your schedule, the SQL queries can be seen on the Schedules tab of the details page of your cluster, the navigation pane showing the Scheduled query list, or on the Scheduled queries tab of the query editor.
To be able to see the SQL Status and results of your scheduled queries using the Scheduled queries tab, perform the following steps:
- On the Scheduled queries tab, select the schedule name to see more details about the scheduled query.

- The ID which can be used to retrieve the SQL statement results, start and end time, status, and elapsed time are all seen for each of the previously run scheduled SQL statements in the Schedule history section as shown in the image below. To retrieve the SQL results, use the AWS CLI with the respective assumed role created.

- Run the command below on the command line using the IAM user configured to assume the role created.
aws sts assume-role --role-arn "arn:aws:iam::{Account_ID}:role/{Role_Name}" --role-session-name AWSCLI-SessionThe code above gives a result similar to the one below:
{
    "Credentials": {
        "AccessKeyId": "XXXXXXXXXXXX",
        "SecretAccessKey": "XXXXXXXXXXXXXXXXX",
        "SessionToken": "xxxxxxxxxxxxxxxxxxxxx”
        "Expiration": "2020-10-09T17:13:23+00:00"
    },
    "AssumedRoleUser": {
        "AssumedRoleId": "XXXXXXXXXXXXXXXXX:AWSCLI-Session",
        "Arn": "arn:aws:sts::{Account_ID}:assumed-role/{Role_Name}/AWSCLI-Session"
    }
}- The access key, secret access key, and the session token are obtained from the preceding results which are then used to create three environment variables to assume the IAM role by running the following commands.
export AWS_ACCESS_KEY_ID=RoleAccessKeyID
export AWS_SECRET_ACCESS_KEY=RoleSecretKey
export AWS_SESSION_TOKEN=RoleSessionToken- Run the command below to retrieve the results of the SQL statement. Replace ID with the ID from the schedule history on the console.
aws redshift-data get-statement-result --id xxxxxx-xxxx-xxxx-xxxx-xxxxxxxxxxxx --region us-east-1 Conclusion
This article has taken a comprehensive look into how to schedule SQL queries/statements using Amazon Redshift and perform Redshift Schedule Query. It showed how this can be done on the Amazon Redshift console and through the AWS Command Line Interface (AWS CLI). It further gave snippets of code that can be used in different scenarios when trying to schedule query statements and looked into how you can view the scheduled SQL queries results.
For a convenient and easy method for scheduling your SQL queries, Hevo Data can be used to efficiently manage your database to perform repeated or concurrent operations thereby retrieving valuable insight from them and taking your productivity to the next level.
Sign up for a 14-day free trial and simplify your data integration process. Check out the pricing details to understand which plan fulfills all your business needs.
FAQ on Redshift Schedule Query Simplified
1. Can we schedule queries in Redshift?
Yes, you can schedule queries using Amazon Redshift’s integration with AWS Lambda and Amazon CloudWatch Events.
2. What is query scheduling?
It refers to automating the execution of queries at specified times or intervals.
3. Can you query data in Redshift?
Yes, you can query data in Redshift using SQL through various tools or interfaces, such as SQL Workbench/J or the Redshift Query Editor.

Share it with your connections.
-
 Share To LinkedIn
-
 Share To Facebook
-
 Share To X
-
 Copy Link


