Customers are the lifeblood of every business. Competing simply on products and services is no longer enough; companies must also deliver for their customers in other ways. Transforming customer experiences and creating value across all touchpoints requires Data Analysis of customer data residing in your warehouse. To put your visions into action at the front line, you need to feed these data insights into operational applications like Zendesk.
In this guide, you will learn how to connect Redshift to Zendesk. The steps include connecting Redshift to Zendesk using CSV export/import to transfer your data, which, at times, gets messy and annoying. A much simpler and easier way is to use Hevo to sync data from Redshift in just a few clicks.
Table of Contents
What is Amazon Redshift?
Amazon Redshift became the first generation of Cloud-based Data Warehouse to mark a move away from on-premise Data Warehouse Systems. It is based on MPP technology from ParAccel, which itself is a fork of the popular Postgres open-source database. Redshift was an instant hit among companies, primarily because it brought immediate access to a fully-managed, petabyte-scale, cost-effective data solution for analyzing large volumes of data without having to maintain hardware resources.
Today, Redshift is the fastest-growing service on Amazon Web Services (AWS) and is used by tens of thousands of customers worldwide to process exabytes (1018 bytes) of data daily. It provides an innovative approach to query execution that seamlessly combines database operators in each query fragment. Amazon Redshift also automates common administrative tasks like provisioning, configuration, monitoring, backup, and security, so that you can focus on high-value tasks.
Exporting your data from Redshift and Zendesk doesn’t have to be complex. Relax and go for a seamless migration using Hevo’s no-code platform. With Hevo, you can:
- Effortlessly extract data from 150+ connectors.
- Tailor your data needs with features like drag-and-drop and custom Python scripts.
- Achieve lightning-fast data loading into your desired destination, making your data analysis-ready.
Try to see why customers like Eagle Point and Harmoney have upgraded to a powerful data and analytics stack by incorporating Hevo!
Get Started with Hevo for FreeBusiness Benefits of Using Amazon Redshift
- Easy Deployment: Every business can set up and deploy its AWS Redshift Data Warehouse in a matter of just minutes. AWS delivers high performance with gigabyte to petabyte-scale scalability at a fraction of the cost of what other Cloud-based Data Warehouses offer.
- Massively Parallel Processing: Amazon Redshift Data Warehouse features a powerful combination of massively parallel processing and columnar data storage to provide efficient storage and optimum query performance across large datasets. It distributes table rows to multiple compute nodes so that data can be processed in parallel, and uses columnar data storage to reduce your overall I/O requirements.
- Concurrency Scalability: Amazon Redshift cluster nodes can be added with more processing power when you need it. To handle burst workloads and concurrent queries, Amazon Redshift can automatically and transparently add more concurrency scaling resources without burning a hole in your pocket.
- Real-time Data Analytics: Redshift supports Real-time Data Streaming with external streaming providers such as Kafka or Kinesis. It can ingest real-time data and process it super quickly using services like AWS Glue, AWS QuickSight, and AWS Sagemaker. For additional details, please see one of our other blog posts, Real-Time Redshift Analytics: 5 Simple Steps to Get Started.
- Native Integration with AWS: Redshift databases take full advantage of Amazon’s cloud server infrastructure and the AWS ecosystem to work seamlessly with the rest of the tools from AWS. This can include data storage and backups to AWS S3, streaming ingestion from Kinesis and MSK, Redshift ML, federated queries to Aurora and RDS operational databases, and many more.
What is Zendesk?
Zendesk is an omnichannel, cloud-based customer support platform that places customer convenience above all. It enables quicker and easier interaction between businesses and customers so that businesses can profit from effortless customer experiences and grow on channels that bring in higher customer satisfaction, faster resolution times, and better all-around customer experiences.
Using Zendesk, you and your workgroup can track and record one-on-one conversations or customer support requests, received through phone, chat, email, and social media. Zendesk offers a plethora of tools to tailor your offerings and meet your customer expectations through web and mobile self-service, communities, virtual agents, automated chat dialogues, and chatbots.
Business Benefits of Using Zendesk
- Ticketing System: Zendesk is a one-stop solution to converge all your customer support requests from any source and manage them from one location. You can bring in customer requests from various sources with a unified channel API, and provide them with the same fabulous experience no matter what channel they use.
- Knowledge Base: A knowledge base is a self-service library to help your customers find quality answers to their questions instantly without having to contact an agent. Having a quality knowledge base helps your agents free up time and focus more on solving complex and serious issues rather than the repetitive job of addressing FAQs.
- Automation Bots: Zendesk leverages AI to provide answer bots for your customers. This functionality can be set up in minutes and reduces your agent’s repetitive work of collecting customer information like name, email, issue type, and more.
- Reporting & Analytics: Zendesk Explore is a native reporting and analytics service to dig deep into metrics and make decisions that boost growth. Zendesk Explore provides powerful, built-in reports to visualize key information on your customers and your support resources.
- Community Forums: Strong customer relationships thrive on active and engaging communities that help customers voice their concerns and receive answers from other compeers. Zendesk provides community forums through Zendesk Gather where your customers can talk and help each other instead of constantly relying on your support team.
Redshift to Zendesk Integration: Why Sync Data From Redshift to Zendesk?
- One of the most important steps in meeting and exceeding customer expectations is to have a single customer view by linking various data sources and bringing together data on a single customer. While ETL has helped businesses aggregate customer data into their warehouses, it’s essential for your business teams to have that customer data right at their fingertips, in their preferred tools, to be able to drive operational decisions, more so in real-time every day.
- Generating vital insights from customer data in Redshift and using them in your everyday tools like Zendesk paves a way for more personalized omnichannel interaction that results in better business performance. Putting data insights in the hands of your business teams boosts revenue, expands the share of customer wallets, and enables them to be more attentive to the needs of customers. This ultimately drives a holistic customer experience.
- By syncing data from Redshift to Zendesk, you can activate customer insights and deliver relevant marketing journeys and experiences based on customers’ app use or past interactions. Consider a scenario where a customer who signed up for a free trial on your website a few days ago calls you. He/she is interested in becoming a paid user and evaluating the usefulness of your premium product. Using the Amazon Redshift to Zendesk connector, you and your teams will be able to access and share key information, in real-time, regardless of whether the person is continuing from a previous conversation or starting a new one.
- Redshift to Zendesk integration syncs data from Redshift (which in turn is acquired from various channels) to Zendesk, so that your sales and support team can prioritize customer tickets according to the risk of churn, upsell, and so on, and provide the necessary attention your customers need. With the Redshift Zendesk integration, they’ll be able to get insight into the status of customers’ pending tickets and resolve them faster by gaining full visibility into where the customer query has been stopped.
Steps to Set Up Redshift to Zendesk Integration
Replicating data from Redshift to Zendesk helps your teams prioritize customer support tickets and prevent churns well ahead of time. This directly contributes to higher customer retention. Here are two ways to integrate Redshift Zendesk platforms.
Using CSV Files to Manually Connect Redshift to Zendesk
Step 1: Exporting Redshift Data Into CSV Using UNLOAD Command
A quick way to export Redshift table data into a CSV file format is by using the UNLOAD command. This command can be used in your Redshift query editor to natively unload your table data into an S3 bucket.
UNLOAD ('SELECT * FROM Hevo)
to 's3://mybucket/unload/'
IAM_ROLE 'arn:aws:iam::<aws-account-id>:role/<role-name>'
CSV;
Here, the UNLOAD command unloads “Hevo” table data and writes it to the S3 target bucket path s3://mybucket/unload/. To be able to do so successfully, you would need an IAM role that has write access to Amazon S3, which we specify in the third line. The last line specifies the data format in which we wish to export Redshift tales. For our case, we intend to export the data in CSV format, so we have specified the CSV keyword.
Amazon Redshift to Zendesk integration offers plenty of other options to format your exported data as well as specify the type of data being exported. These can be defined in your UNLOAD command code as follows:
UNLOAD ('select-statement')
TO 's3://object-path/name-prefix'
authorization
[ option [ ... ] ]

where option is
{ [ FORMAT [ AS ] ] CSV | PARQUET | JSON
| PARTITION BY ( column_name [, ... ] ) [ INCLUDE ]
| MANIFEST [ VERBOSE ]
| HEADER
| DELIMITER [ AS ] 'delimiter-char'
| FIXEDWIDTH [ AS ] 'fixedwidth-spec'
| ENCRYPTED [ AUTO ]
| BZIP2
| GZIP
| ZSTD
| ADDQUOTES
| NULL [ AS ] 'null-string'
| ESCAPE
| ALLOWOVERWRITE
| CLEANPATH
| PARALLEL [ { ON | TRUE } | { OFF | FALSE } ]
| MAXFILESIZE [AS] max-size [ MB | GB ]
| ROWGROUPSIZE [AS] size [ MB | GB ]
| REGION [AS] 'aws-region' }
| IAM_ROLE { default | 'arn:aws:iam::<AWS account-id>:role/<role-name>' }
For exporting large volumes of data, you can compress your data and export it as a single file. This saves costs and reduces storage footprint.
To do this, you can use GZIP and PARALLEL OFF options to compress your exported data in GZIP format and prevent AWS Redshift from exporting it in parallel mode. This results in a single file output at your S3 target bucket location.
UNLOAD ('SELECT * FROM Hevo)
to 's3://mybucket/unload/'
IAM_ROLE 'arn:aws:iam::<aws-account-id>:role/<role-name>'
CSV GZIP PARALLEL OFF;
Once exported, the file becomes available in your S3 bucket and can be downloaded into your local system.
Step 2: Integrate Redshift with Zendesk by Exporting Redshift Data Using AWS CLI
Amazon Web Services CLI also allows you to execute SQL queries and download CSV files for your existing Redshift tables. You can find installation instructions for the AWS Redshift CLI on the following documentation page – Installing or updating the latest version of the AWS CLI.
Upon a successful installation, you can query and export your Redshift table data into a CSV file using the following command:
aws redshift-data execute-statement
    --cluster-identifier hevo_cluster
    --database hevo_database
    --secret arn:aws:secret:us-west-1:167025718026:secret:hevo_secret_key
    --sql "select * from Hevo"
When you execute the following command, you will receive an ID for your SQL statement. You can use this ID (by replacing hevo_sql_id) in the below command and download your Redshift table data as CSV.
aws redshift-data get-statement-result --id hevo_sql_idStep 3: Importing CSV Files to Zendesk From Redshift
Zendesk requires you to import CSV files that contain Zendesk required field data. Zendesk supports three different flavors of CSV files:
- CSV file with tickets
- CSV file with ticket comments
- CSV file with Knowledge Base
For the scope of this blog, we’ll be importing and using CSV files with tickets. This CSV file with tickets must include the following header columns:
- TicketId
- Subject
- Description
- Type
- Status
- Priority
- AgentEmail
- AgentName
- ContactEmail
- ContactName
- CreatedTime
- UpdatedTime
Including or excluding these optional header columns:
- Tags
- DepartmentName
- ContactPhone
- CompanyName
- ClosedTime
- Attachments
While preparing your CSV files, please bear in mind that:
- Your CSV file size should not exceed 1 GB.
- All CSV files must contain the necessary header rows.
- All CSV files must have a comma as a delimiter.
- For data spanning multiple lines, use double-quote marks (“).
- Headers must be written in English and begin with a capital letter.
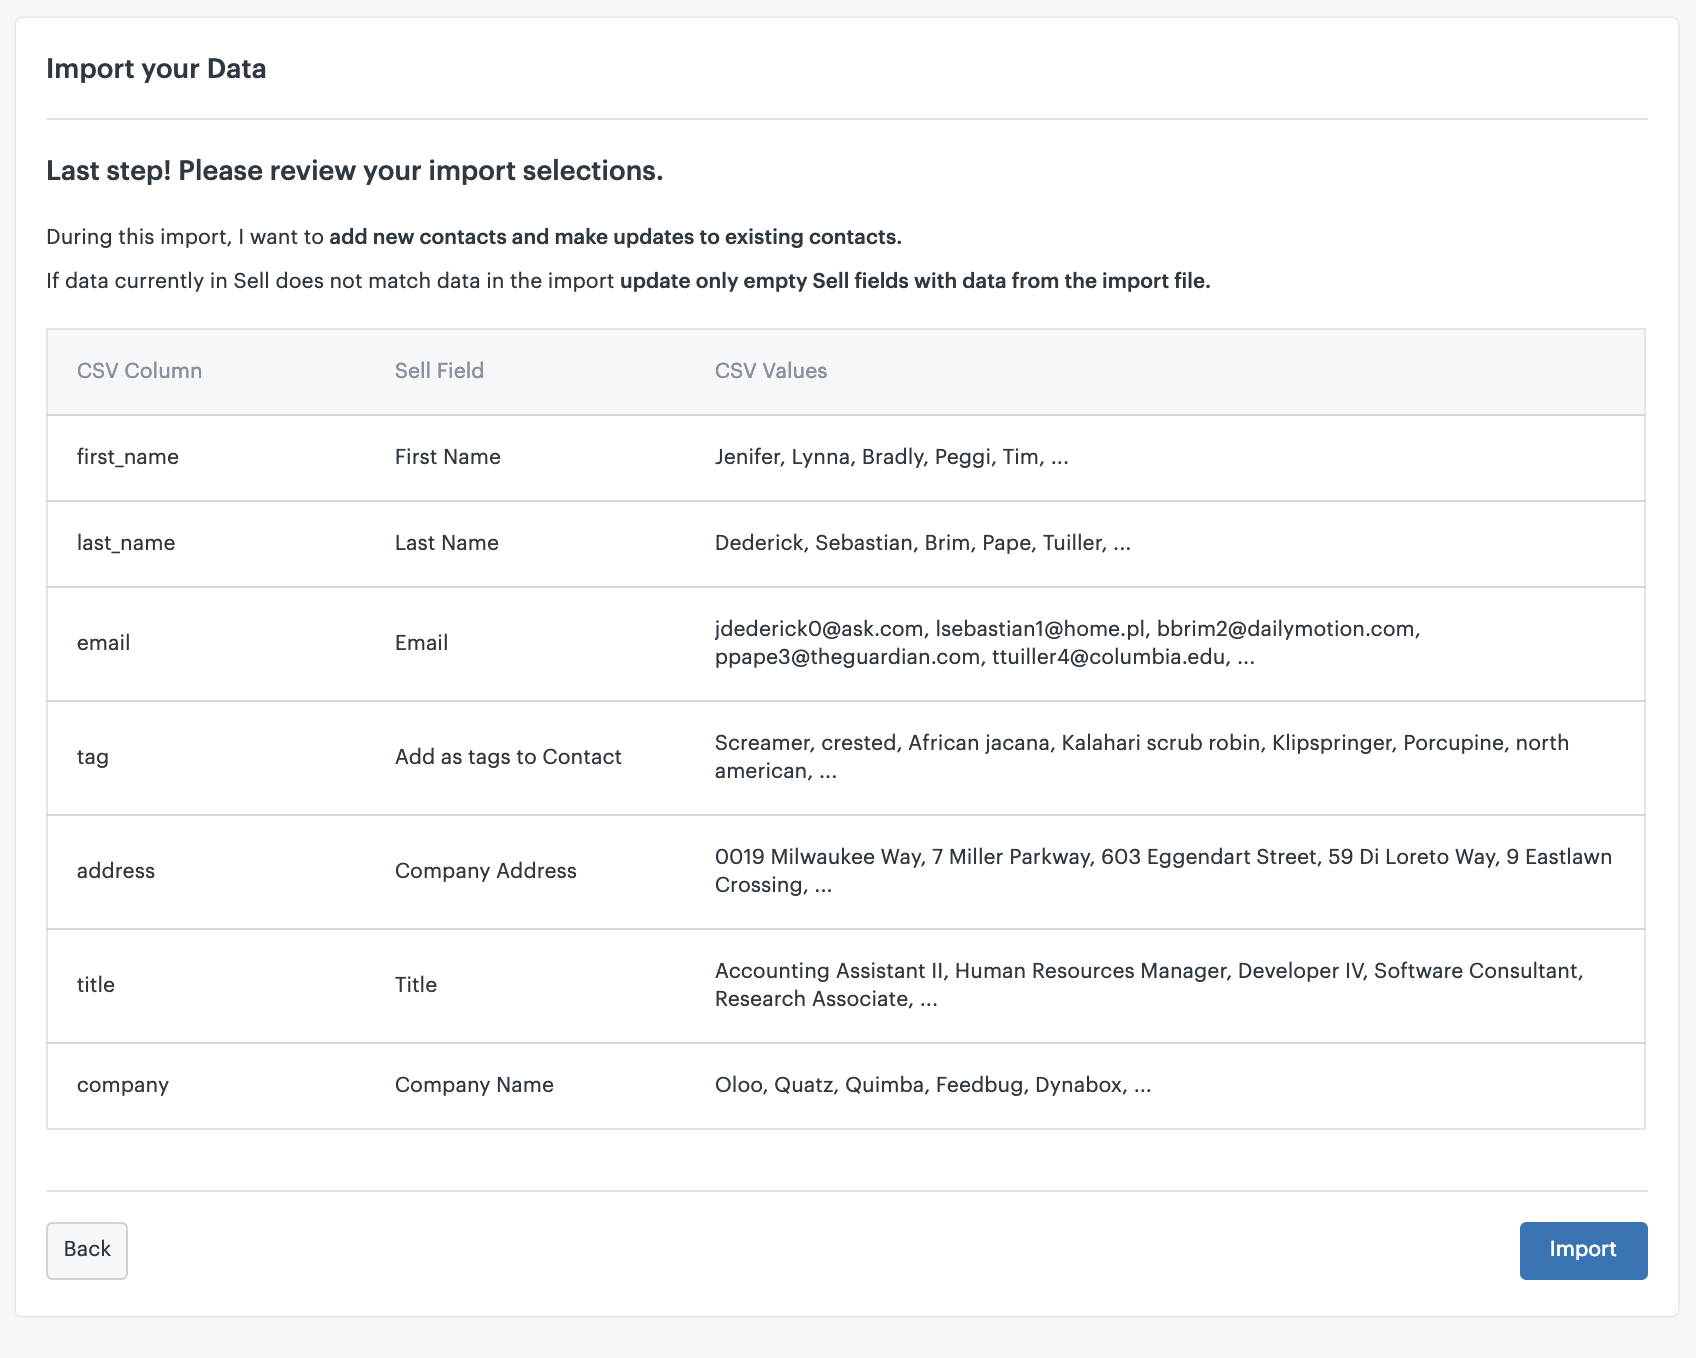
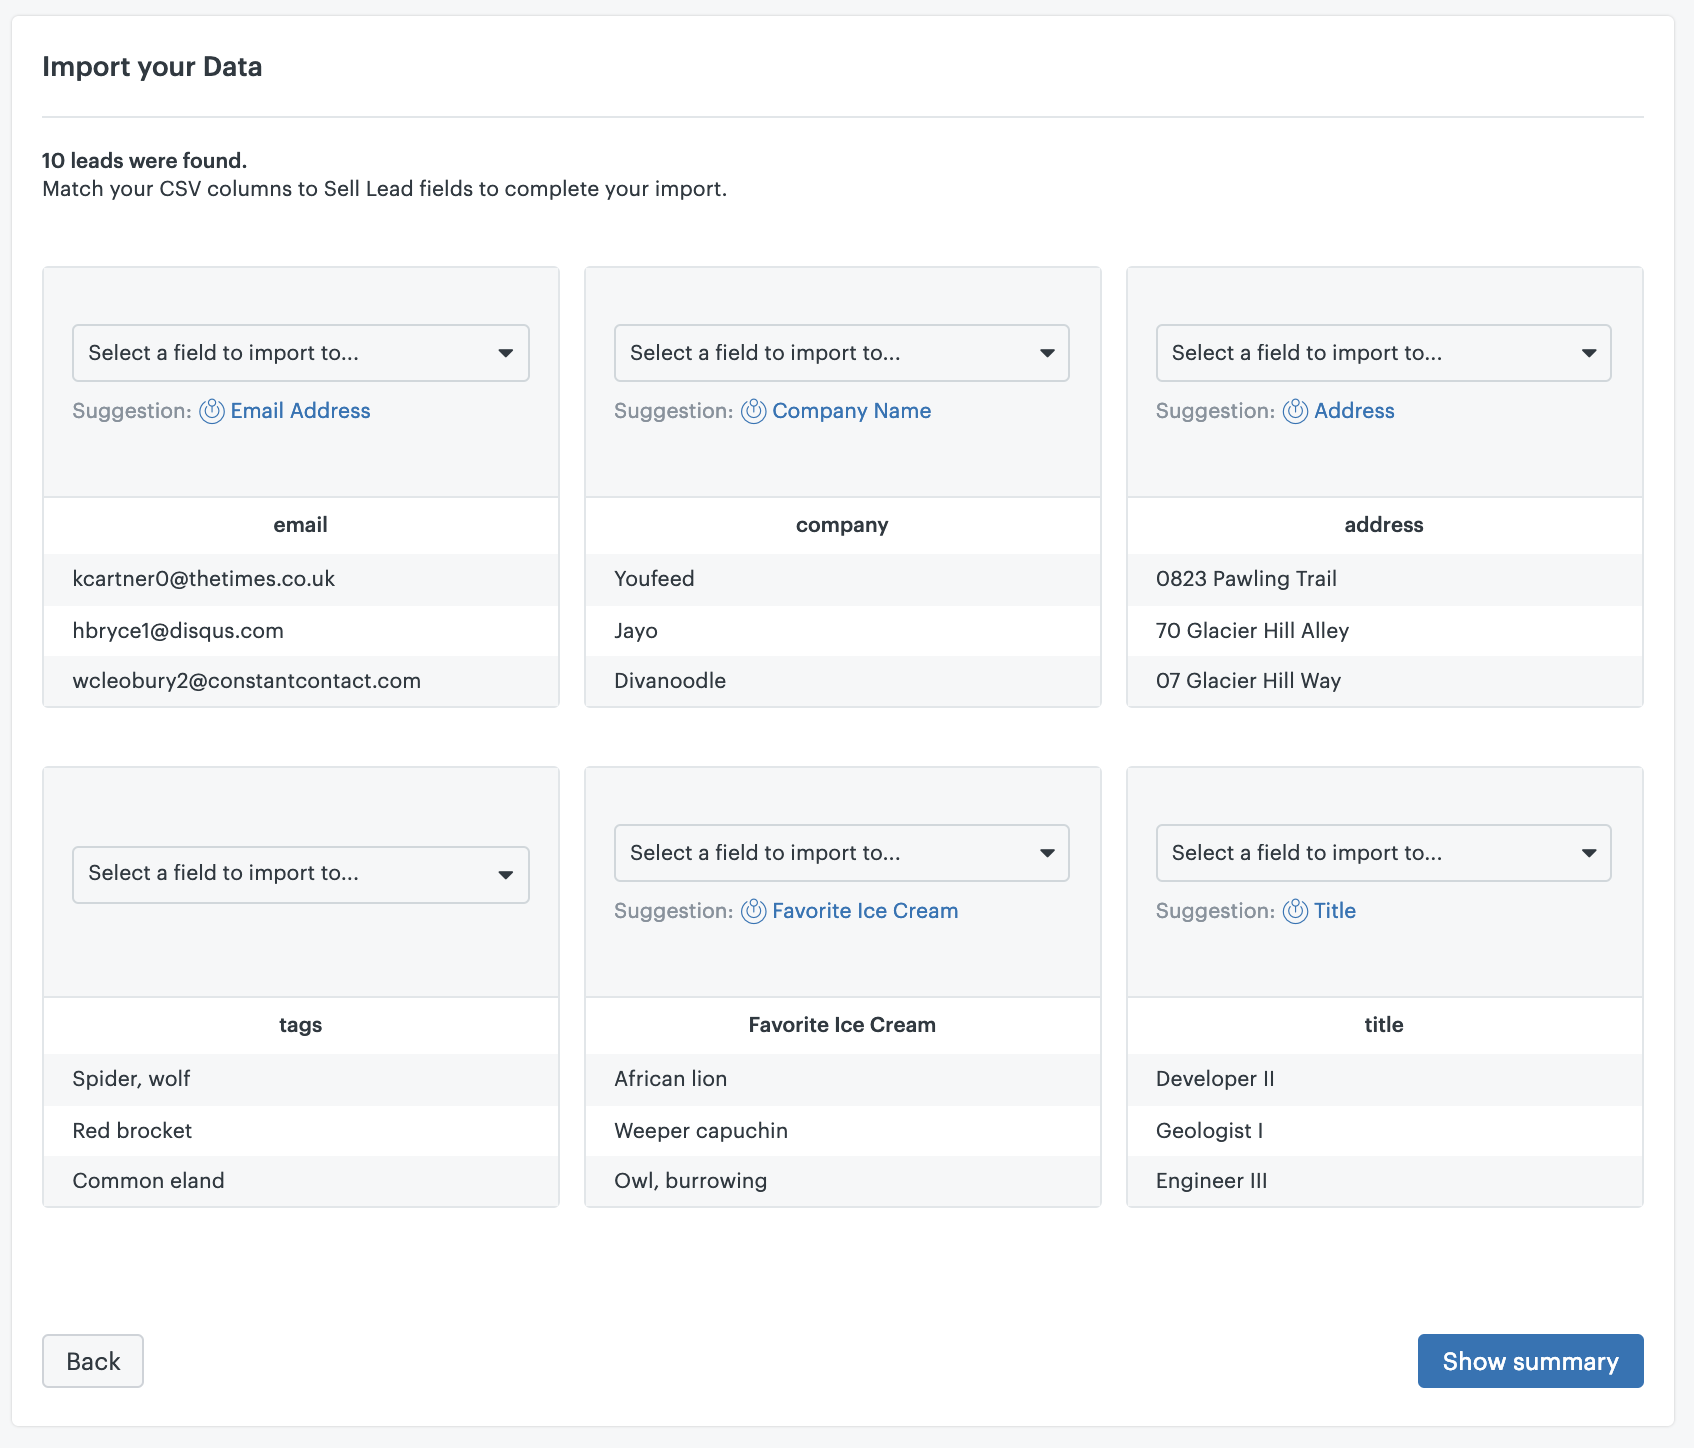
Once all your CSV files have met all requirements, you can visit the Help Desk Migration website and begin your import.
Choose Zendesk as the destination platform and enter your company’s Zendesk URL. Select which records to migrate and map ticket fields. You can start a Free Demo Migration to obtain a quote and see if the data transferred successfully.
Limitations of Using CSV Export/Import Option For Redshift Zendesk Integration
- Manually exporting and importing Redshift data in the form of CSV files from Redshift to Zendesk isn’t a feasible process in the long run. Moreover, it is a one-time process that requires you to repeat the same set of steps if your data changes and you wish to work with updated data in your Zendesk platform. During the process, you may also encounter inescapable errors, such as duplicate Zendesk tickets or customer records. To square things up, you require befitting solutions and mechanisms that don’t eat up your resources and time, nor keep you engaged in a constant cycle of low-value tasks.
- With Hevo, you don’t have to do the legwork of capturing and transferring CSV files from Redshift repetitively. Hevo offers a fully automated Data Sync from Redshift with options to deduplicate the data and directly load it to the target destination. Explore what Hevo has to offer to streamline Data Sync from Redshift.
Using Hevo to Automate Data Sync from Redshift
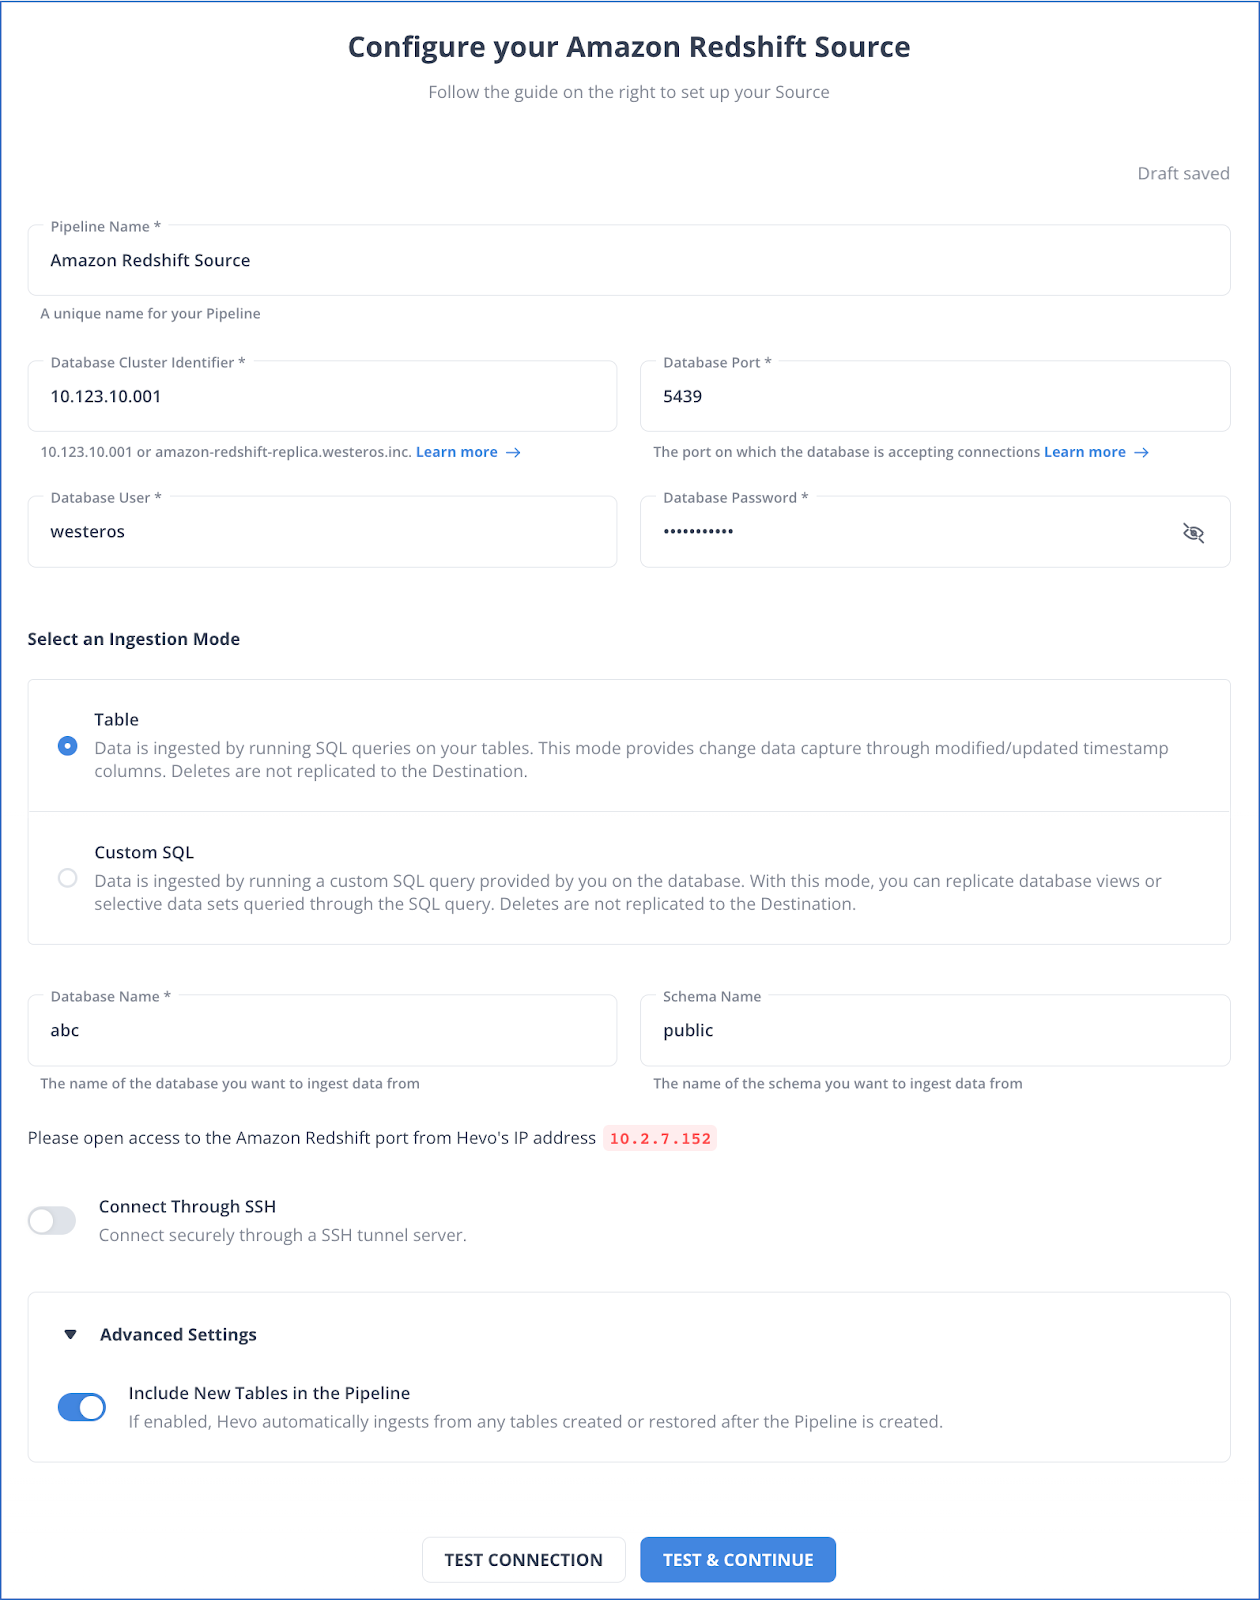
Step 1: Configure Redshift as your Source
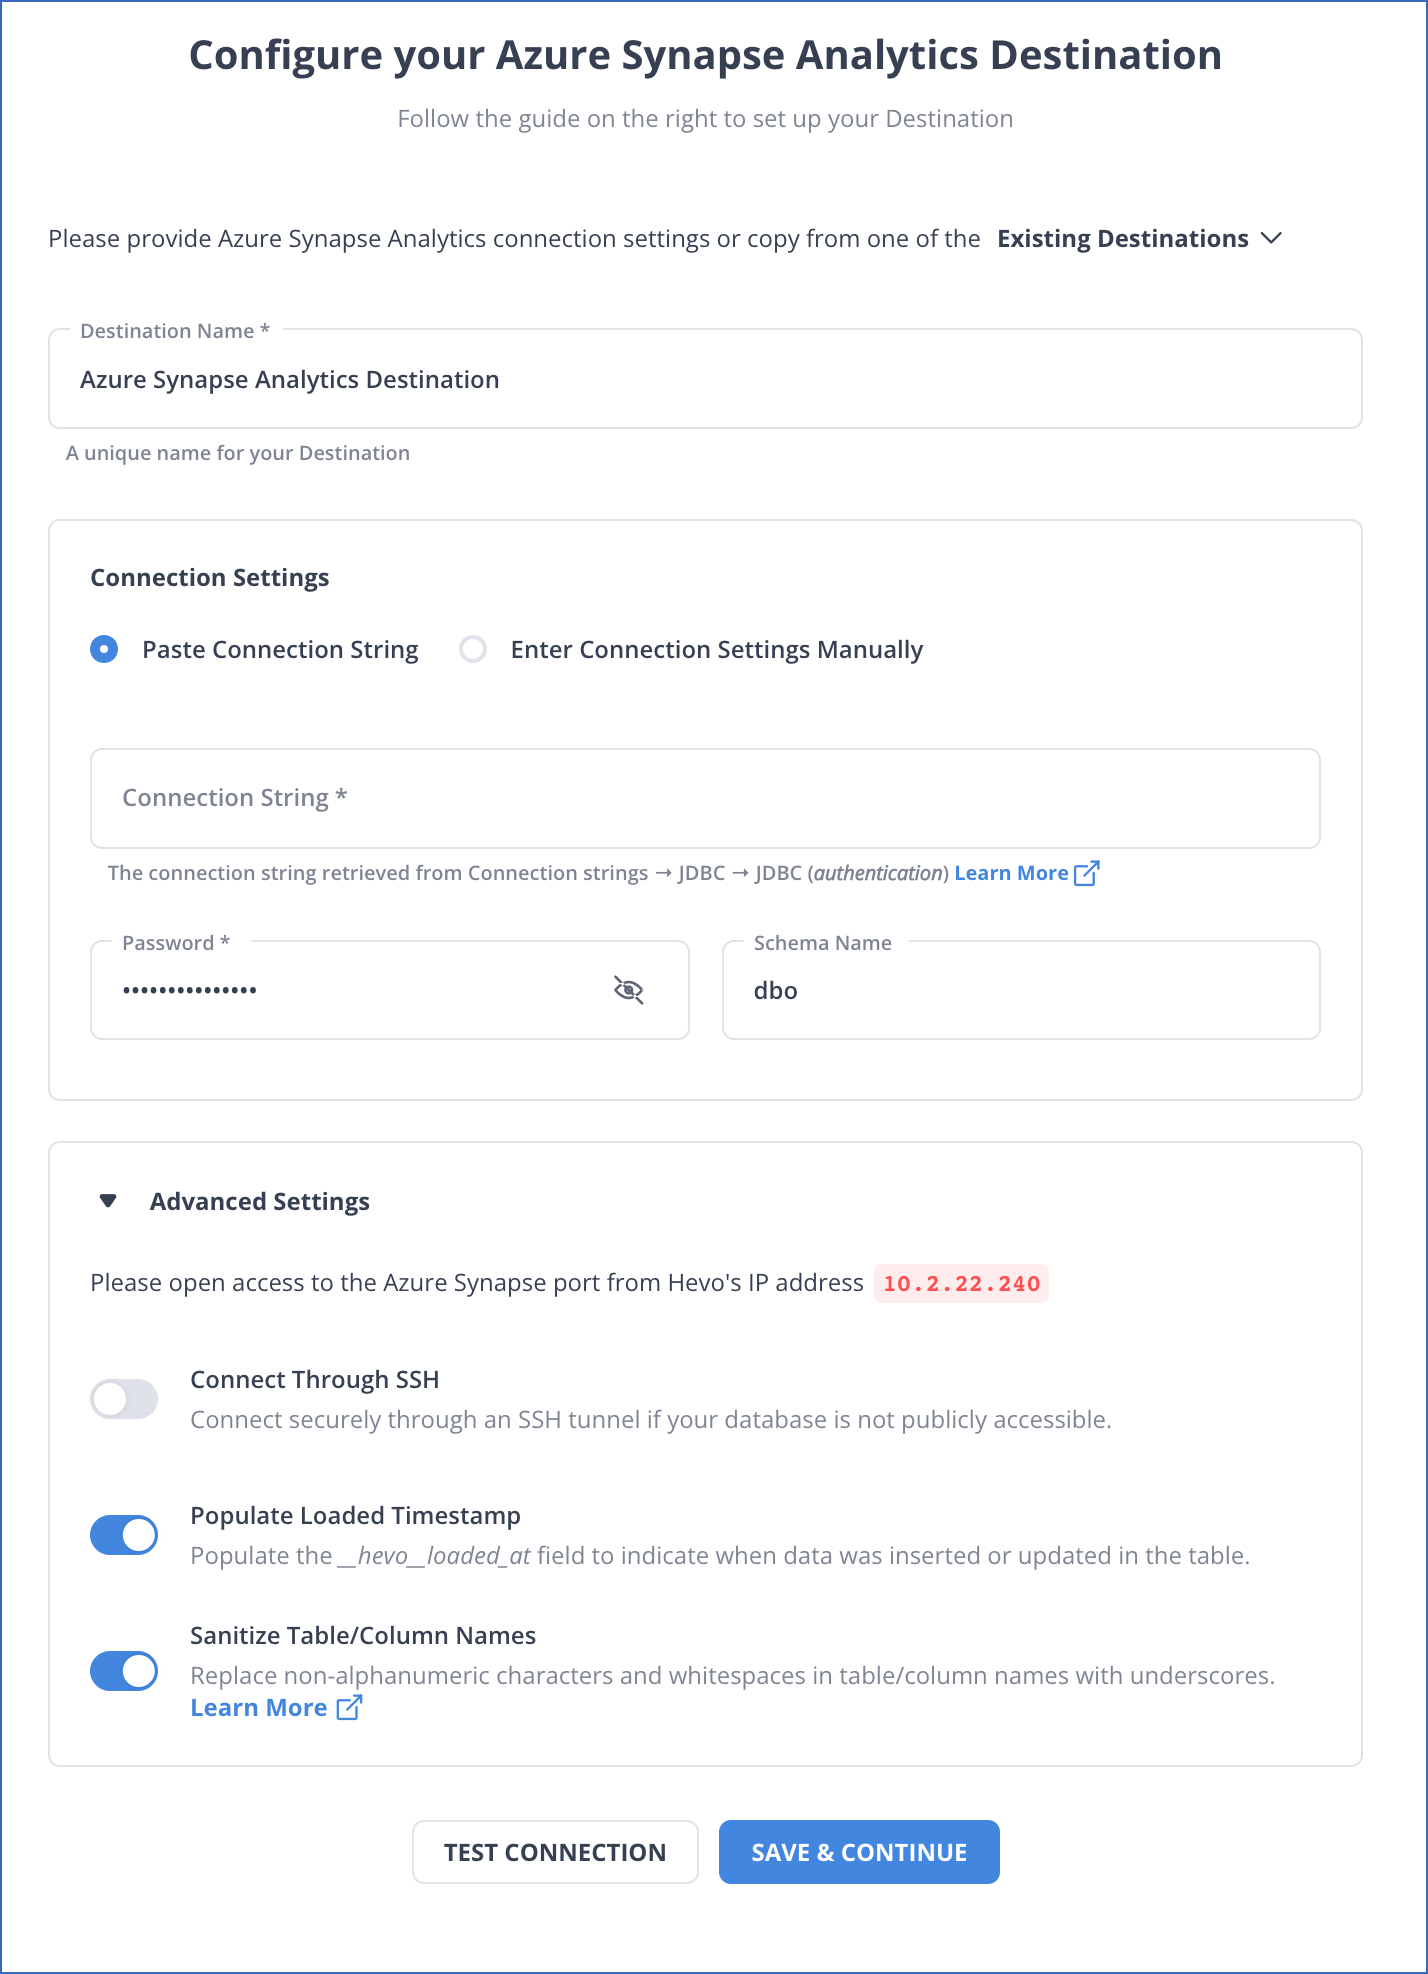
Step 2: Configure your Desired Destination
Hevo supports a wide range of destinations where you can replicate your Redshift data.
For example, you can configure Azure Synapse as your desired destination.
What Makes Hevo Amazing?
- Secure: Hevo has a fault-tolerant architecture that ensures that the data is handled in a secure, consistent manner with zero data loss.
- Auto Schema Mapping: Hevo takes away the tedious task of schema management & automatically detects the schema of incoming data from Salesforce and replicates it to the destination schema.
- Quick Setup: Hevo with its automated features, can be set up in minimal time. Moreover, with its simple and interactive UI, it is extremely easy for new customers to work on and perform operations.
- Incremental Data Load: Hevo allows the transfer of data that has been modified in real-time. This ensures efficient utilization of bandwidth on both ends.
- Live Support: The Hevo team is available round the clock to extend exceptional support to its customers through chat, email, and support calls.


Conclusion
This guide discussed how to sync data from Redshift to Zendesk using CSV export/import, which is cumbersome, complicated, and a one-time effect. You also learned about syncing data in real-time from Redshift using Hevo.
Hevo Data can seamlessly perform data export from Redshift in real-time. Hevo’s fault-tolerant architecture ensures a consistent and secure transfer of your Redshift data. It will make your life easier and make data transfer hassle-free.
Sign up for a 14-day free trial and simplify your data integration process. Check out the pricing details to understand which plan fulfills all your business needs.
Frequently Asked Questions
1. How do I add content to Zendesk?
You can add content by creating articles in the Zendesk Guide, submitting support tickets, or posting in the community forum.
2. Where is AWS Redshift data stored?
Data in AWS Redshift is stored in a distributed manner across nodes within a Redshift cluster.
3. How do I push data from Redshift to S3?
Use the UNLOAD command in Redshift to export data to an Amazon S3 bucket, specifying the S3 location, IAM role, and other parameters.
Share it with your connections.
-
 Share To X
-
 Share To LinkedIn
-
 Share To Facebook
-
 Copy Link