

When starting a business online, it would be great to have a platform with easy-to-use tools to help you design and build your website with secure hosting. Squarespace is an excellent Content Management System that allows you to customize your website with simple drag-and-drop functionalities, themes, eCommerce features, etc. However, there are a few features missing that can enhance your website’s performance. WordPress is exactly such a one-stop solution is an immensely popular website-building platform for creating and managing business websites, blogs, eCommerce stores, portfolios, forums, and more.
Using the Squarespace WordPress Integration, you can keep using your Squarespace website with WordPress-added functionality on a new subdomain. This allows you to use the same domain name to design a WordPress website and customize it using WordPress themes and Plugins. In this article, you will learn how to effortlessly set up the Squarespace WordPress Integration for your Squarespace website.
Table of Contents
What is Squarespace?

Squarespace is an easy-to-use Software as a Service (SaaS) application for hosting, designing, and managing websites. Launched in 2004, Squarespace started out as a platform for creating brochure-style websites with no requirement for web development skills. Over the years, Squarespace has evolved into a popular website creation tool offering SEO tools, GSuite & PayPal Integrations, eCommerce functionalities, and even assists you in running Email Marketing Campaigns.
Optimize and track your website performance by integrating Squarespace with Google Seach Console.
What is WordPress?

WordPress is a Content Management System(CMS) i.e., a Website Creation Platform with a user-friendly interface that makes it super easy to build and manage websites. It is an Open-Source software, meaning it comes under the GNU General Public License, thereby making it freely available for anyone to download and modify. Since its initial release in 2003 as a Blogging Platform, WordPress has continuously evolved, allowing you to create Online Portfolios, e-commerce Stores, Business Sites, forums, etc.
WordPress uses a database to store and organize everything from post and page content to user accounts and website URLs., thereby making it a very fast, reliable, and powerful tool for online publishing. WordPress was designed with Performance, Security, and Search Engine Optimization (SEO) in mind. Read about SEO Analysis Tools and save your time from dreary data analysis. These are important factors for virtually any website, regardless of size or focus. WordPress offers thousands of themes that you can use to personalize the look and feel of your website in minutes. You can also improve the functionality of your site by installing WordPress plugins. Learn more about WordPress Website Builders to boost the performance of your Storefront.
Ditch the manual process of connecting your WordPress to a data warehouse and choose Hevo’s no-code platform to streamline your data migration. With Hevo:
- Easily migrate different data types like CSV, JSON, etc.
- 150+ connectors like REST API(including 60+ free sources).
- Eliminate the need for manual schema mapping with the auto-mapping feature.
Experience Hevo and see why 2000+ data professionals, including customers such as Thoughtspot, Postman, and many more, have rated us 4.3/5 on G2.
Get Started with Hevo for FreeWhy do you need a Squarespace WordPress Integration?
Here are a few use cases where you may require a Squarespace WordPress Integration:
- Compared to Squarespace, WordPress provides a vast sea of plugins for everything you can think of such as Social Media Share Buttons, Advertisement Management, etc.
- For eCommerce stores, Squarespace has a limited number of payment gateways namely Stripe, PayPal, and Apple Pay as compared to the huge list of WordPress Payment Gateways. Plus, by using the Squarespace WordPress Integration you can take full advantage of tons of plugins purely focused on eCommerce stores on WordPress.
- In comparison to WordPress, Squarespace charges 2-3% transaction fee on top of credit card processing fees that you can easily avoid by setting the eCommerce store page on the WordPress subdomain via the Squarespace WordPress Integration.
- Lastly, WordPress gives you 100% ownership of your content and files whereas Squarespace limits you in exporting Product Pages, Index Pages, Event Pages, Drafts, Product Blocks, Custom CSS, etc.
Steps to Set up Squarespace WordPress Integration
You can easily set up the Squarespace WordPress Connection on the same domain name by creating a subdomain for WordPress. For instance, if your Squarespace website looks like “mysamplewebsite.com”, then to add a blogging page via WordPress you can get a subdomain that looks like “blog.mysamplewebsite.com”.
To seamlessly set up your Squarespace WordPress Integration, follow these steps given below:
- Step 1: Buy WordPress Hosting
- Step 2: Create your Subdomain
- Step 3: Installing WordPress on your Subdomain
- Step 4: Design your WordPress Website
- Step 5: Complete the Squarespace WordPress Websites Connection
Step 1: Buy WordPress Hosting
Squarespace provides free hosting, although to run your WordPress Website, you need a suitable host. You can do an in-depth analysis to select the hosting service according to your budget, user reviews, and the features it offers. To get an overview of the several hosting services available, check out the article listing the Best WordPress Hosting Service Providers. While selecting the host, remember to look for a reputable hosting company with good security and some ability to scale.
Step 2: Create your Subdomain
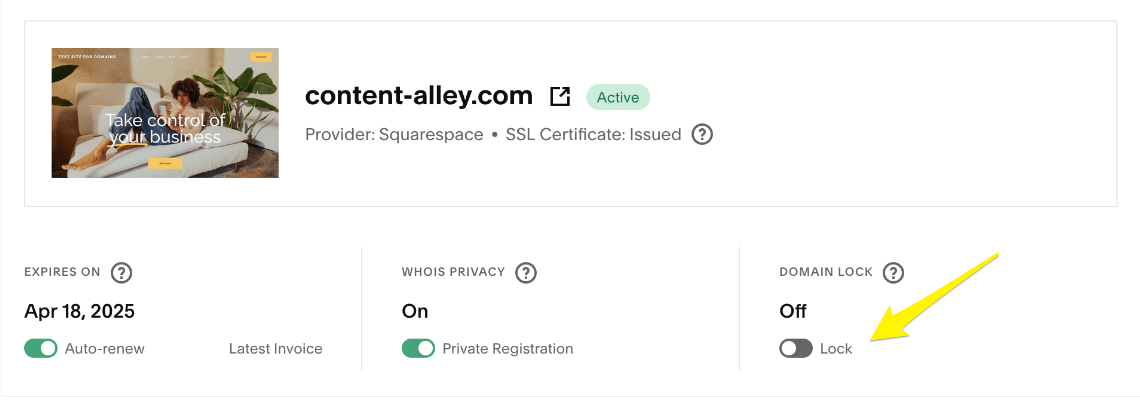
After purchasing the hosting service for the Squarespace WordPress Integration, you can now transfer your Squarespace domain name to your new hosting service provider. Before doing that, ensure that your domain is unlocked if not done already. To do the same, log in to your Squarespace account and navigate to Menu > Settings > Domains. Scroll down and uncheck the Lock Domain option.
Now, you can start creating the subdomain for your WordPress website. The subdomain will allow you to build completely new websites without creating a separate domain. For example, you can install WordPress on the blog subdomain “blog.mysamplewebsite.com” as mentioned above. Follow the path below to complete the Subdomain creation step in the Squarespace WordPress Integration process:
- Step 1: Log in to your Web host’s Dashboard and navigate to the cPanel. Click on the Subdomain option.
- Step 2: Type in the name for your Subdomain such as shop, store, blog, support, etc., that resonates with the site’s purpose.
- Step 3: Choose your “Parent” domain from the drop-down menu and finally, click on the Create button. This completes the subdomain creation step in your Squarespace WordPress Integration process.

Step 3: Installing WordPress on your Subdomain
Most web hosts offer a one-click Install WordPress button for seamlessly installing it on your subdomain. After you click on this button available on the cPanel Admin area of your host, you will be asked to fill in details such as site name, username, and email address. Ensure that you correctly enter the Subdomain name and complete the WordPress installing step of the Squarespace WordPress Integration process
You can also follow the Installing WordPress article to manually add it to your subdomain.


Step 4: Design your WordPress Website
Now that you completed the technical parts of the Squarespace WordPress Integration, you can start customizing your WordPress website. To make the transition from Squarespace to your WordPress Subdomain page smooth, choose a WordPress Theme similar to the one used in Squarespace. To add a theme follow these simple steps:
- Step 1: Log in to your subdomain “blog.mysamplewebsite.com/admin”.
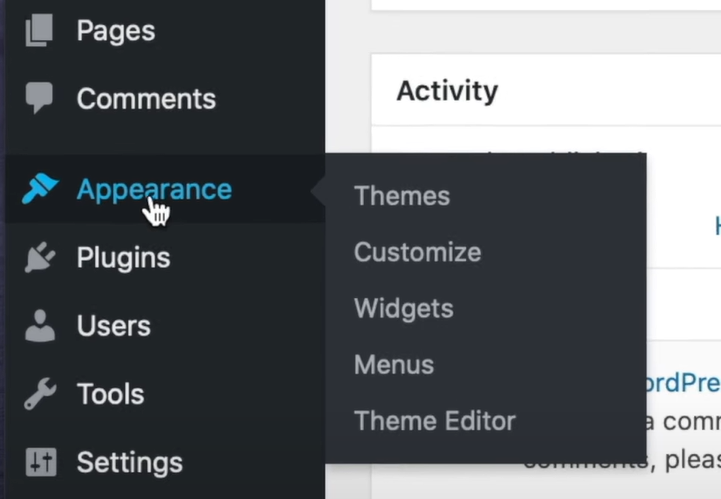
- Step 2: Navigate to Appearances > Themes. Click on the Add New Theme button and you will see a list of themes from the WordPress Theme library.
- Step 3: Hover over themes and click on the Install button and then the Activate button. You can also upload a theme from your computer by clicking on the Upload Theme button.
After you have customised your WordPress Website, you can now move towards setting up the seamless Squarespace WordPress Connection.
Step 5: Complete the Squarespace WordPress Websites Connection
Making your Navigation Menus for both sites identical can make both the pages seem the same. You also have to link your navigation menus to the desired pages so that visitors can smoothly move back and forth between these two sites. To Link pages to the Squarespace Navigation Menu follow these steps:
- Step 1: Log in to your Squarespace admin area and navigate to the Pages section of your Dashboard.
- Step 2: Click on the Top Navigation option and then click on the Link option.
- Step 3: Type in a suitable title and link to the WordPress page of your choosing. Click on the Save button. Repeat the process for all the other WordPress Pages as well.

- Step 4: You also have to add the Squarespace links on the WordPress Navigation Menu. Navigate to Appearances > Menus to get started. Refer to Add Navigation Menu to WordPress article if you have not yet created it. After the Menu is set up, navigate to the Pages meta box on the left side of your screen. Using the default option, you can add all the WordPress pages to the Menu. Select all your pages and click on the Add to Menu button.

- Step 5: To add Squarespace links to the WordPress Navigation menu, ensure that the Custom Links box is checked by clicking on the Screen Options tab available on the top right of your screen.

- Step 6: Now, click on the Custom Links option available on the left of your screen under the Add Menu Items heading. Type in the suitable Squarespace page titles and enter the URL. Click on the Add to Menu button and repeat the process for all the Squarespace pages. This completes the Squarespace WordPress Integration process.

Conclusion
In this article, you have learned how to effectively set up the Squarespace WordPress Integration. Squarespace provides an easy-to-use platform for designing and managing a professional website. WordPress’s plethora of Themes and Plugins allow you to enhance the functionality of your website effortlessly. Squarespace WordPress Integration allows you to run two different websites on the same domain name with smooth navigation among them.
To efficiently process this astronomical amount of data, you need to invest a portion of your engineering bandwidth to Integrate, Cleanse, Transform, and Load your data into your data warehouse or a destination of your choice. All of these challenges can be effectively solved with a Cloud-Based ETL tool like Hevo Data.
Hevo Data, a No-code Data Pipeline, can help you transfer and integrate your data from a vast sea of Data Sources, such as WordPress, into a Data Warehouse or a Destination of your choice. It is a fully automated and secure platform that doesn’t require you to write any code!
Want to take Hevo for a ride? Sign Up for a free 14-day Trial! And simplify your Data Integration process. You can check out the pricing details to select a plan that fits your business needs.
FAQs
1. How do I convert my Squarespace website to WordPress?
To convert from Squarespace to WordPress, you’ll need to export your content, such as posts and pages, from Squarespace and import it into WordPress. Some manual adjustments may be necessary, as the export may not cover all elements like design and some media files.
2. Do I own my Squarespace website?
With Squarespace, you own your content, but the platform owns the underlying infrastructure, so you’re limited to its templates, hosting, and features. Moving to another platform, like WordPress, gives you more ownership over hosting and customization.
3. Can I use a domain from Squarespace on WordPress?
Yes, you can transfer a Squarespace domain to WordPress. You’ll need to unlock the domain in Squarespace and get the transfer code, then follow the domain transfer steps in your WordPress hosting provider’s settings.
Share it with your connections.
-
 Share To LinkedIn
-
 Share To Facebook
-
 Share To X
-
 Copy Link


