


Stripe has become the go-to payment processing platform for businesses and online platforms. Storing and analyzing all that data becomes vital as transactions flow through Stripe. MySQL is a popular open-source database solution well-suited for this purpose.
Integrating Stripe transaction activity into a MySQL database enables consolidated reporting and billing reconciliation. This article outlines two straightforward approaches for connecting Stripe to MySQL. By establishing a linkage, critical payment information can flow from your Stripe account into MySQL for simplified business intelligence and accounting.
Table of Contents
What is Stripe?

Stripe is a fully integrated suite of payment products. In simple terms, Stripe’s software and APIs provide payment infrastructure for millions of businesses on the Internet. It powers payments for subscription businesses, software platforms, and marketplaces. Stripe services also aid in avoiding payment frauds, sending invoices, issuing virtual and physical cards, getting finance, and managing business spending.
With Stripe’s technology-first approach to finance and payments, users can directly integrate the platform with several banks and card networks. Stripe’s systems operate with 99.99% uptime. They are conveniently scalable as their machine learning models are trained on billions of customer records to track payment patterns and detect possible fraud or cart abandonment scenarios. Additionally, Stripe is optimizable at every level of the financial stack, making it the backbone of the internet business.
What is MySQL?

MySQL is considered to be one of the most popular Open-Source Relational Database Management Systems (RDBMS). MySQL implements a simple Client-Server Model that helps its users manage Relational Databases i.e. data stored in the form of rows and columns across tables. It uses the well-known query language, Structured Query Language (SQL) that allows users to perform all required CRUD (Create, Read, Update, Delete) operations.
Method 1: Using Hevo to Set Up Stripe to MySQL
With Hevo, you can seamlessly integrate 150+ sources like Stripe to any destination database or datawarehouse of your choice. It automates the data migration process without the need to write a single line of code. Hevo’s fault-tolerant architecture ensures that the data is handled securely and consistently with zero data loss.
Method 2: Using Custom Code to Move Data from Stripe to MySQL
Using custom code to transfer data from Stripe to MySQL allows the ETL process to be tailored to specific needs, but it requires significant development effort and ongoing maintenance.
Method 1: Using Hevo Data, a No-code Data Pipeline
Step 1: Configure Stripe as a Source
- Connect Hevo Data with Stripe by providing the API key and a unique pipeline name for your Stripe account.

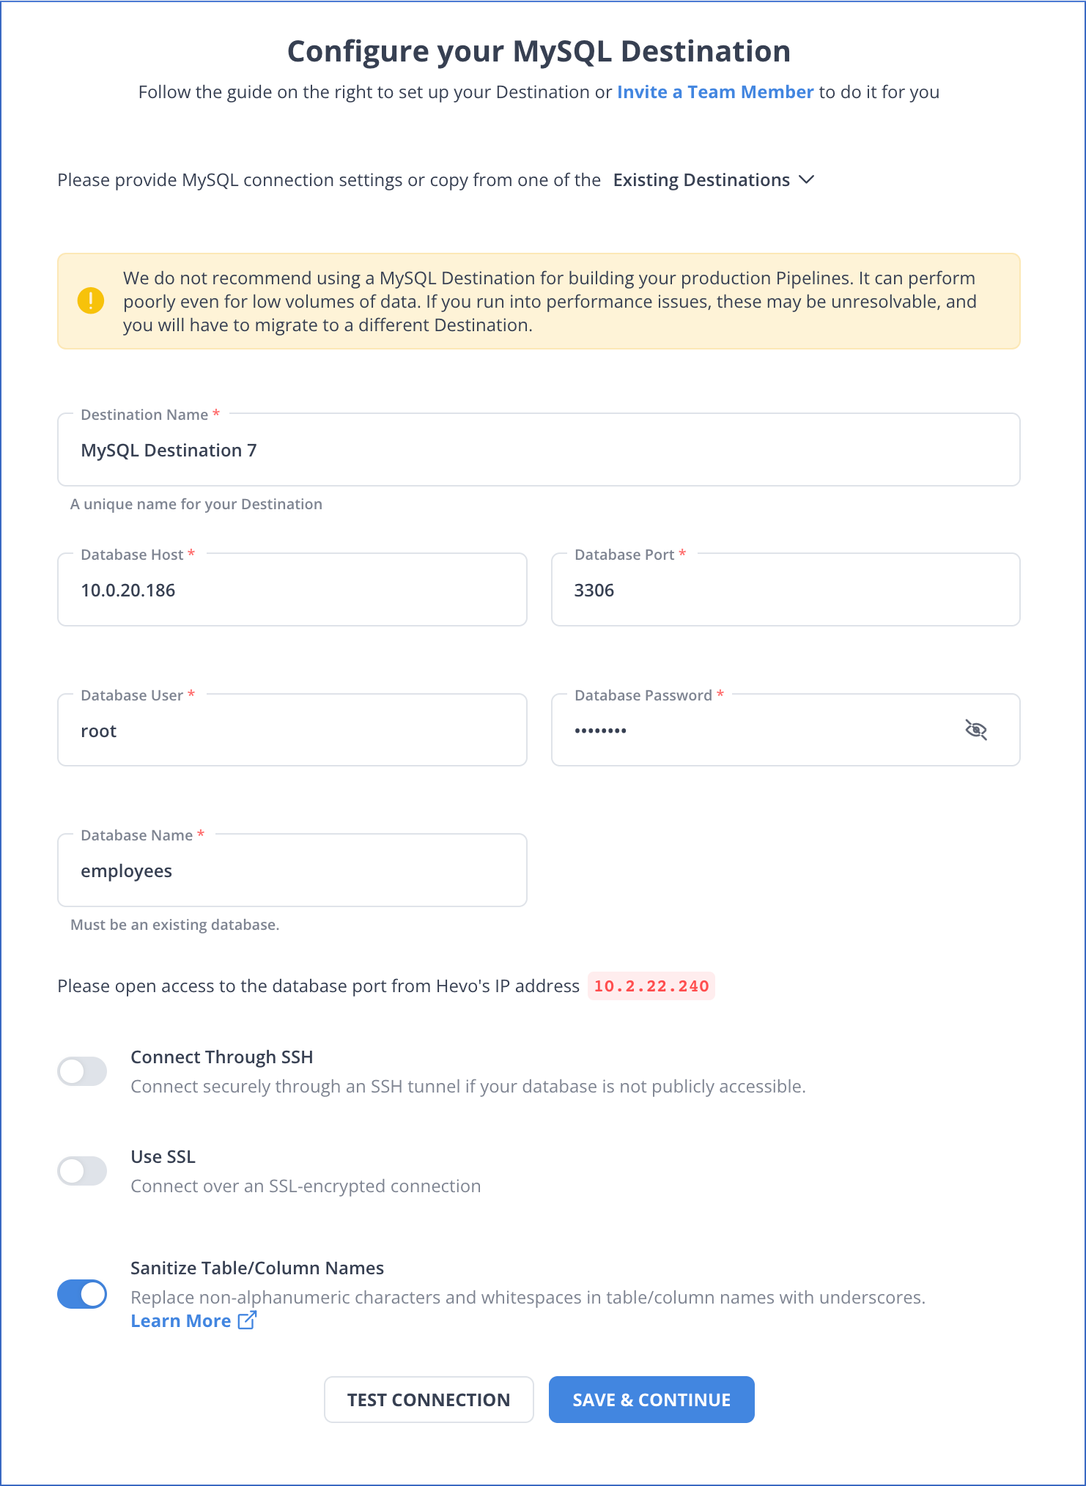
Step 2: Configure MySQL as a Destination
- Configure PostgreSQL connection settings as mentioned below in the screenshot
Check out what makes Hevo amazing:
- Schema Management: Hevo takes away the tedious task of schema management & automatically detects the schema of incoming data and maps it to the destination schema.
- Minimal Learning: Hevo, with its simple and interactive UI, is extremely simple for new customers to work on and perform operations.
- Hevo Is Built To Scale: As the number of sources and the volume of your data grows, Hevo scales horizontally, handling millions of records per minute with very little latency.
- Incremental Data Load: Hevo allows the transfer of data that has been modified in real-time. This ensures efficient utilization of bandwidth on both ends.
Method 2: Using Stripe APIs & PowerShell to Load Data from Stripe to MySQL
Stripe allows its users to make use of its RESTful APIs and endpoints to fetch customer and payment data from their accounts and further provides support for many programming languages such as Python, Node.js, Perl, .NET, etc. to access its APIs.
Using Windows Powershell and its CMDlets, you make web-based API requests and fetch your data in the JSON format and then transform it into CSV to load it into your MySQL database.
This method can be implemented using the following steps:
- Step 1: Retrieve your API keys from Stripe
- Step 2: Retrieve Stripe Records using the Stripe API
- Step 3: Transform JSON Responses to a Flat Structure for CSV Files
- Step 4: Export Data from Stripe as CSV
- Step 5: Ingest CSV-Based Data from Stripe to MySQL
Step 1: Retrieve your API keys from Stripe
- To load data using Stripe APIs, you will first need to obtain your API keys, from the Stripe dashboard. To do this, go to the official website of Stripe and log in using your credentials such as username and password.

- Once you’ve logged in, your Stripe dashboard will now open up on your screen. Click on the developer’s option, found in the panel on the left, and select the API keys option.

- You now need to ensure that you’re using an account that has developer or administrator access, only then you will be able to see your API keys.
- You further need to ensure that you’re not viewing the test data. If you are, you can toggle off the test mode and go to live data mode.

- You can now see the publishable and secret keys option on your screen. You must click on both options to access the full API key values.
- The “Publishable” and “Secret” APIs keys use the following syntax respectively:
- Publishable Key: pk_live_somelongrandomvaluelike0Rx3jvetc
- Secret Key: sk_live_somelongrandomvaluelike0Rx3jvetc
- Copy the “Publishable” and “Secret” API keys and keep them safe as you’ll not be able to see the “Secret” key again.

This is how you can retrieve your Stripe API Keys to start fetching data from Stripe using its REST APIs.
Step 2: Retrieve Stripe Records using the Stripe API
- Once you’ve retrieved your Stripe API key, you can now use Windows Powershell and make a web request using the Invoke-WebRequest cmdlet, available as a part of Microsoft.PowerShell.Utility module.

- With Windows PowerShell now up and running on your system, you can use the following lines of code to fetch your customer data from Stripe with ease, by providing the correct URI for your account along with your Stripe private API key:
$uri = 'https://api.stripe.com/' #Base URI
$key = '<stripe API private key>'
 $headers = @{
    'Authorization' = "Bearer $key"
}
  $response = Invoke-RestMethod -Uri $uri -Headers $headers
- Stripe API will now start sending you JSON-based responses containing the customer data. To check the data, you can use the following line of code and print out the JSON response:
echo $response.Content- You can also make use of .NET objects such as System.NET.WebRequest to make an API-based web request to pull your data as follows:
$webRequest = [System.Net.WebRequest]::Create($uri)
$webRequest.ContentType = 'application/json'
$webRequest.Headers.Add('AUTHORIZATION', $authVal)
$webRequest.Method = 'GET'
$responseStream = ($webRequest.GetResponse()).GetResponseStream()
$streamReader = New-Object System.IO.StreamReader -ArgumentList $responseStream
This is how you can start pulling data from Stripe using its REST APIs.
Step 3: Transform JSON Responses to a Flat Structure for CSV Files
With the Stripe API now fetching data from your Stripe account as JSON documents, you will have to transform your hierarchical JSON data into a flat-file format to export the data as a CSV file successfully.
- To do this, you will have to create a function that will accept your Stripe APIs JSON object as a parameter and map it into a flat data structure and then return a collection of data objects in the correct format.
- You can code your transformation function as follows:
function flattenObject ($jsonCustomers) {
	$customers = @()
       foreach ($jsonCustomer in $jsonCustomers.data) {$customerProperties = @{}
$customerProperties.id = $jsonCustomer.id
$customerProperties.Description = $jsonCustomer.description
$customerProperties.Email = $jsonCustomer.email
$customerProperties.Created = $jsonCustomer.created
$customerProperties.Delinquent = $jsonCustomer.delinquent
$customerProperties["Account Balance"] = $jsonCustomer.account_balance

         foreach($paymentSource in $jsonCustomer.sources.data) {
			if ($jsonCustomer.default_source -eq $paymentSource.id) {
$customerProperties['Card ID'] = $paymentSource.id
$customerProperties['Card Last4'] = $paymentSource.last4
$customerProperties['Card Brand'] = $paymentSource.brand
$customerProperties['Card Funding'] = $paymentSource.funding
$customerProperties['Card Exp Month'] = $paymentSource.exp_month
$customerProperties['Card Exp Year'] = $paymentSource.exp_year
$customerProperties['Card Name'] = $paymentSource.name
$customerProperties['Card Name'] = $paymentSource.name
$customerProperties['Card Address Line1'] = $paymentSource.address_line1
$customerProperties['Card Address Line2'] = $paymentSource.address_line2
$customerProperties['Card Address City'] = `$paymentSource.address_city
$customerProperties['Card Address Country'] = $paymentSource.address_country
$customerProperties['Card Address State'] = `$paymentSource.address_state
$customerProperties['Card Address Zip'] = $paymentSource.address_zip
$customerProperties['Card Issue Country'] = $paymentSource.country
$customerProperties['Card Fingerprint'] = $paymentSource.fingerprint
$customerProperties['Card CVC Status'] = $paymentSource.cvc_check }
		}

	foreach($subscription in $jsonCustomer.subscriptions.data) {
			if ($subscription.plan.id -eq 1) {
$customerProperties.Plan = $subscription.plan.id
$customerProperties.Status = $subscription.status
$customerProperties['Cancel At Period End'] = $subscription.cancel_at_period_end}		}
$customers += New-Object PSObject -Prop $customerProperties
	}
	return $customers
}- Ensure that you use the correct column names while creating your function that will help you map your JSON objects into the flat file structure.
- Similarly, every time your code generates a new customer object, ensure you are adding it to the customer properties list, that your function will return.
This is how you can transform your Stripe APIs JSON responses to a flat-file structure.
Step 4: Export Data from Stripe as CSV
With your transformation function now ready, you can start exporting your data from Stripe to MySQL as CSV files. To export your Stripe data as CSV files on your local system, you can make use of PowerShell’s Export-CSV cmdlet that will take an object as the input parameter and map the properties into a CSV file and store it in the file location of your choice on your system.
- You can use the following lines of code, that will fetch data from your Stripe APIs using the
"System.NET.WebRequest".NET-based object and export the retrieved data as a CSV file by specifying a file path of your choice with the “Export-CSV” parameter:
$baseUri = 'https://api.stripe.com/v1/customers?limit=100'
$uri = $baseUri
$key = '<stripe API private key>'
$authVal = 'Basic ' + `
    [System.Convert]::ToBase64String([System.Text.Encoding]::UTF8.GetBytes($key))
do {
	$webRequest = [System.Net.WebRequest]::Create($uri)
	$webRequest.ContentType = 'application/json'
	$webRequest.Headers.Add('AUTHORIZATION', $authVal)
	$webRequest.Method = 'GET'
	$responseStream = ($webRequest.GetResponse()).GetResponseStream()
	$streamReader = New-Object System.IO.StreamReader -ArgumentList $responseStream

	$jsonCustomers = $streamReader.ReadToEnd() | ConvertFrom-Json
	$customersObject += flattenObject($jsonCustomers.data)
	$lastId = $jsonCustomers.data[-1].id
	$uri = $baseUri + '&starting_after=' + $lastId
} while ($jsonCustomers.has_more)

$customersObject | Export-Csv -Path 'C:TestStripe-Customers.csv' -NoTypeinformation
rv customersObject- Here the has_more parameter helps to check whether any more customer records are there in Stripe. Since Stripe APIs allow pulling up to 100 records at max, you can use the limit parameter in your base URI, to specify the number of customer records you want to pull.
- Similarly, the -NoTypeInformation parameter helps ensure that your CSV exports don’t have the object type information in the first record/row.
- You can now combine your code snippets from all the steps above together as follows and use the combined script together:
function flattenObject ($jsonCustomers) {
	$customers = @()
	foreach($jsonCustomer in $jsonCustomers) {
		$customerProperties = @{}
		$customerProperties.id = $jsonCustomer.id
		$customerProperties.Description = $jsonCustomer.description
		$customerProperties.Email = $jsonCustomer.email
		$customerProperties.Created = $jsonCustomer.created
		$customerProperties.Delinquent = $jsonCustomer.delinquent
		$customerProperties["Account Balance"] = $jsonCustomer.account_balance
		foreach($paymentSource in $jsonCustomer.sources.data) {
			if ($jsonCustomer.default_source -eq $paymentSource.id) {
	$customerProperties['Card ID'] = $paymentSource.id
	$customerProperties['Card Last4'] = $paymentSource.last4
	$customerProperties['Card Brand'] = $paymentSource.brand
	$customerProperties['Card Funding'] = $paymentSource.funding
	$customerProperties['Card Exp Month'] = $paymentSource.exp_month
	$customerProperties['Card Exp Year'] = $paymentSource.exp_year
	$customerProperties['Card Name'] = $paymentSource.name
	$customerProperties['Card Name'] = $paymentSource.name
	$customerProperties['Card Address Line1'] = `
                    $paymentSource.address_line1
	$customerProperties['Card Address Line2'] = `
                    $paymentSource.address_line2
	$customerProperties['Card Address City'] = `
                    $paymentSource.address_city
	$customerProperties['Card Address Country'] = `
                    $paymentSource.address_country
	$customerProperties['Card Address State'] = `
                    $paymentSource.address_state
	$customerProperties['Card Address Zip'] = $paymentSource.address_zip
	$customerProperties['Card Issue Country'] = $paymentSource.country
	$customerProperties['Card Fingerprint'] = $paymentSource.fingerprint
	$customerProperties['Card CVC Status'] = $paymentSource.cvc_check}		}
		foreach($subscription in $jsonCustomer.subscriptions.data) {
			if ($subscription.plan.id -eq 1) {
	$customerProperties.Plan = $subscription.plan.id
	$customerProperties.Status = $subscription.status
	$customerProperties['Cancel At Period End'] = `
                    $subscription.cancel_at_period_end}	}
		$customers += New-Object PSObject -Prop $customerProperties} return $customers }

$baseUri = 'https://api.stripe.com/v1/customers?limit=100'
$uri = $baseUri
$key = '<stripe API private key>'
$authVal = 'Basic ' + ` [System.Convert]::ToBase64String([System.Text.Encoding]::UTF8.GetBytes($key))
do {
	$webRequest = [System.Net.WebRequest]::Create($uri)
	$webRequest.ContentType = 'application/json'
	$webRequest.Headers.Add('AUTHORIZATION', $authVal)
	$webRequest.Method = 'GET'
	$responseStream = ($webRequest.GetResponse()).GetResponseStream()
	$streamReader = New-Object System.IO.StreamReader -ArgumentList $responseStream
	$jsonCustomers = $streamReader.ReadToEnd() | ConvertFrom-Json
	$customersObject += flattenObject($jsonCustomers.data)
	$lastId = $jsonCustomers.data[-1].id
	$uri = $baseUri + '&starting_after=' + $lastId
} while ($jsonCustomers.has_more)
$customersObject | Export-Csv -Path 'C:TestStripeCustomers.csv' -NoTypeinformation
rv customersObject
This is how you can export data from Stripe as CSV using Stripe APIs.
Step 5: Ingest CSV-Based Data from Stripe to MySQL
With your Stripe data now available in the CSV format on your system, you can use the MySQL Workbench to import data to a MySQL database of your choice using the table import/export wizard.
- To start the data import process, launch MySQL Workbench on your system and log in with your credentials, such as username and password.
- Once you’ve logged in, the MySQL Workbench dashboard will now open up on your screen as follows:

- Now, from the navigator panel on the left, select the table in your database in which you want to import your Stripe data, right-click on it and select the “Table Data Import Wizard”.

- The data import window will now open up on your screen, where you will need to choose the CSV file from your system. To do this, click on the folder option and select the file path.

- You can now either choose to import the data to an existing table or create a new one for the import process. Click on the Create a New Table option and provide a new name for your table.
- Configure your CSV import by selecting the encoding as per your CSV file, here you can choose UTF-8, along with the column names and their data types.
- You will be able to see a preview as well for your table in the wizard. Click on next to start the import process.

- MySQL Workbench’s import wizard will now start importing your data into your MySQL database. You can also monitor the import process from the logs on the import wizard.
This is how you can transfer your data from Stripe to MySQL as a CSV file using the Stripe API and MySQL Workbench.
Limitations of using Powershell & Stripe APIs to transfer records from Stripe to MySQL
- This method requires you to write multiple custom codes to work with Stripe APIs, and hence, you must have a strong technical knowledge of APIs, which can be challenging, especially for beginners.
- The Stripe API has an upper limit of retrieving up to 100 records.
- There are security concerns while using Powershell, which may expose your database to potential threats.
- Text-based commands are used to get the work done while writing scripts in most cases. If a user switches to Windows PowerShell from some other type of shell, he will have to get used to a different way of thinking. Thus, some users need more time to understand the PowerShell, and the process can become time-consuming.
- Writing long codes using this method can become time-consuming, reducing productivity and scalability and increasing the chances of errors.

You can also learn more about:
Use Cases to transfer your Stripe data to MySQL
You can connect MySQL to Stripe integration to get several benefits. Here are a few use cases:
- Advanced Analytics: You can perform complex queries and data analysis on your Stripe data, extracting insights that wouldn’t be possible within Stripe alone by Stripe MySQl connect.
- Data Consolidation: Syncing to MySQL allows you to centralize your data for a holistic view of your operations, and to set up a change data capture process. This is helpful when you are using multiple other sources with Stripe and you will never have any discrepancies in your data again.
- Historical Data Analysis: Stripe has limits on historical data. Syncing data to MySQL allows for long-term data retention and analysis of historical trends over time.
- Data Security and Compliance: Robust data security features are provided by MySQL. Syncing Stripe data to MySQL makes sure that your data is secured. It enables advanced data governance and compliance management.
- Scalability: MySQL can handle large volumes of data without affecting performance. This is an ideal solution for growing businesses with expanding Stripe data.
- Data Science and Machine Learning: Having Stripe data in MySQL can enable you to apply machine learning models to your data for predictive analytics, customer segmentation, and more.
- Reporting and Visualization: While Stripe provides reporting tools, data visualization tools like Tableau, PowerBI, Looker (Google Data Studio) can connect to MySQL, providing more advanced business intelligence options.
Conclusion
This article teaches you how to connect Stripe to MySQL with ease. It provides in-depth knowledge about the concepts behind every step to help you understand and implement them efficiently. These methods, however, can be challenging, especially for a beginner & this is where Hevo saves the day.
Hevo Data, a No-code Data Pipeline, helps you transfer data from a source of your choice in a fully automated and secure manner without having to write the code repeatedly. Hevo, with its strong integration with 150+ sources, allows you to not only export & load data but also transform & enrich your data & make it analysis-ready in a jiffy.
SIGN UP for a 14-day free trial and see the difference!
You can also look at the unbeatable pricing that will help you choose the right plan for your business needs! You can now transfer data from sources like Stripe to your target destination for Free using Hevo!
Tell us about your experience of connecting Stripe to MySQL! Share your thoughts in the comments section below!
FAQs
1. Which data does Stripe share?
Stripe shares data with you, your customers, and service providers for legal compliance and fraud prevention while protecting user privacy through its policies.
2. How do I get data from Stripe?
-Using Stripe API
-Using Webhooks
-Using Stripe Dashboard
3. How to communicate with MySQL?
To communicate with MySQL, use a MySQL client or command-line tool to connect to the database. You can also use programming languages like Python, Java, or PHP with appropriate libraries (e.g., MySQL Connector) to interact with the database.

Share it with your connections.
-
 Share To X
-
 Share To LinkedIn
-
 Share To Facebook
-
 Copy Link


