

Snowflake is a cloud-based platform that manages large data workloads in virtual warehouses. It is known for its unique architecture and pricing model. Snowflake charges you for the compute resources, storage, and data transfer services you utilize. However, most of the costs on your Snowflake bill are based on the compute resources you use rather than storage and data transfer.
If compute resource usage is not monitored carefully, costs can escalate. Understanding how Snowflake compute costs are charged for resource consumption is essential to avoid such complications. You must also know cost optimization techniques to reduce spending without affecting Snowflake’s performance.
This article helps you better understand the Snowflake compute costs and how to optimize them.
Table of Contents
Overview of Snowflake
Snowflake is one of the most popular data platforms which operates as a cloud data warehouse to support multi-cloud infrastructure environments. Developed in 2012, the Snowflake platform is a fully managed SaaS (software-as-a-service) that allows you to store and compute while scaling independently.
The cloud platform offers many unique features like on-the-fly scalable compute, separation of storage and compute (like in BIgQuery), data cloning, data sharing, and third-part tools support.
Hevo is a No-Code Data Pipeline. It can efficiently load data in Snowflake in a few simple steps. It is a fully automated platform and it completely automates the process of data migration.
Let’s see some unbeatable features of Hevo Data:
- Fully Managed: Hevo Data is a fully managed service and is straightforward to set up.
- Schema Management: Hevo Data automatically maps the source schema to perform analysis without worrying about the changing schema.
- Real-Time: Hevo Data works on the batch as well as real-time data transfer so that your data is analysis-ready always.
- Live Support: With 24/5 support, Hevo provides customer-centric solutions to the business use case.
Key Features of Snowflake
Snowflake has the edge over other cloud data platforms due to a few distinctive and noteworthy features. These include:
- Cloud Agnostic Solution: Snowflake is a cloud-agnostic solution. It is available on Google Cloud Platform, Amazon Web Services, and Microsoft Azure. It enables you to have similar deployment options and the same end-user experience while leveraging Snowflake into your current cloud architecture.
- Workload Separation: Traditional warehouses have a few concurrency issues, wherein users and processes compete for resources. With Snowflake’s multi-cluster architecture, this issue is completely solved. It separates workloads to be executed via its compute clusters (virtual warehouse).
- Near-Zero Administration: Snowflake does not require any prior software or hardware installation. It is generally delivered as a warehouse service to manage data without much involvement from IT teams or database administrators (DBA).
Fivetran cost monitoring, built into Snowflake.

Understanding Snowflake Compute Cost
Snowflake compute costs are determined by the amount of Snowflake compute resources you utilize and the duration of your usage. The more compute resources you allocate, the higher your compute costs will be. You can use Snowflake credits to pay for the compute resources you consume within the Snowflake platform. Let’s look into the Snowflake credits and types of compute resources that consume credits:
What Are Snowflake Credits?
- Snowflake credit is a unit used to determine the billing cost for the computing resources you utilize within the Snowflake platform. It is consumed when your compute resources are active. Your bill is calculated by multiplying the number of used credits with the current price of each Snowflake credit.
- Each compute resource utilizes Snowflake credits differently, and the credit pricing rate is based on the Snowflake edition you use.
- To learn more about Snowflake credit pricing, check out the Snowflake credit pricing guide.
- The three types of compute resources that incur Snowflake credits are virtual warehouse, serverless features, and cloud services. The following section provides insights into how each compute resource consumes Snowflake credits and provides cost optimization tips.
Virtual Warehouse Compute
A virtual warehouse in Snowflake is one or more clusters of user-managed compute resources that consume credits to perform query execution, data loading, and other DML operations.
Snowflake offers the following types of virtual warehouses:
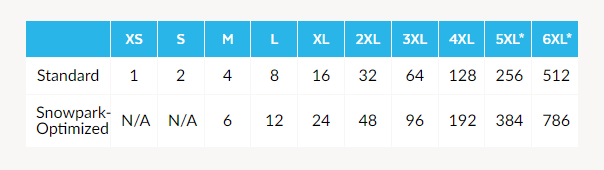
- Standard Virtual Warehouse: These warehouses are suitable for data analytical applications. They can start and stop at any time as per your requirements. While they are actively running, you can resize them to allocate more or less compute resources to your warehouses dynamically.
- Snowpark-optimized Virtual Warehouse: It provides 16x more memory per node than a standard virtual warehouse. It is well-suited for tasks demanding high memory, like using machine learning to train datasets on a single virtual warehouse node.
How Virtual Warehouses Consume Snowflake Credits?
The virtual warehouse consumes Snowflake credits to pay for the processing time utilized during its operation. Snowflake credits are billed per second during the operation of your virtual warehouse, with a minimum charge of 60 seconds. Snowflake credits for virtual warehouses are charged based on the following factors:
Size
The virtual warehouses are available in ten different sizes. Each size determines the number of compute resources per cluster, which a virtual warehouse can access to run the queries quickly. Snowflake doubles the computing power and number of credits charged for every full operational hour when a warehouse is expanded to the next larger size.
Uptime
Snowflake warehouse cost is incurred only for the time it is running. If you suspend it, no credits are consumed.
Duration
The total time in which the virtual warehouse is actively performing Snowflake tasks. Longer durations of activity result in higher credit usage.
Let’s look into Snowflake’s Standard and Snowpark-Optimized virtual warehouse sizes and credit usage billed per hour:
Things to Know about Virtual Warehouse Billing
Here are some key points to keep in mind regarding how virtual warehouses are billed:
- Whenever a virtual warehouse is started, resized, or resumed, your warehouse is charged for one minute of use. After the first minute, all subsequent billing is calculated per second as long as the warehouse continues to run.
- When a warehouse is resized to a larger size, the number of credits is charged for additional compute resources allocated to it. The above table shows that resizing from Small to Medium sizes results in billing for one minute of the additional two credits.
- If you suspend and restart a warehouse within the first minute, you will incur multiple charges due to the minimum charge policy.
- When resizing a warehouse from larger to smaller, charges are incurred for new and old compute resources for a short time until the old resources become inactive.
Cost Optimization Tips for Virtual Warehouse Compute
Let’s explore some of the practical tips for optimizing the compute cost of Virtual Warehouses:
- Choose Virtual Warehouse Size: One best practice for optimizing your billing cost is to use an appropriate virtual warehouse size according to your workload. If you cannot choose the best size, begin with a smaller size and gradually expand it based on the performance of your workload.
- Adjust Statement Timeout: You can set the
STATEMENT_TIMEOUT_IN_SECONDSparameter at the user, account, session, or individual warehouse level to optimize the long-running queries. The default parameter value is two days or 172,800 seconds. Use the following query to set the time out for two hours:
ALTER WAREHOUSE My_Virtual_Warehouse SET STATEMENT_TIMEOUT_IN_SECONDS = 7200;- Adjust Auto-suspension: To reduce the costs when the virtual warehouses are suspended, Snowflake sets the
AUTO_SUSPENDparameter by default with a value of 600 seconds. If your query size is small, you can adjust it to lower seconds to avoid running the warehouses at the idle period. Run the following query to adjust theAUTO_SUSPENDparameter to suspend your warehouse after two minutes:
ALTER WAREHOUSE My_Virtual_Warehouse SET AUTO_SUSPEND = 120; - Utilize Query Caching: Snowflake allows you to utilize the query cache feature to persist the responses from queries executed in the past 24 hours. It helps you execute the same query again within the same virtual warehouse. Instead of recalculating the same query, Snowflake will provide the results of the query that has already been generated.
Serverless Compute
These are the Snowflake-managed compute resources used by serverless features like Automatic Clustering, Snowpipe, or Search Optimization. To learn more about each serverless feature, read the Snowflake documentation.
To reduce costs, you can use serverless compute resources instead of virtual warehouses, which can automatically adjust their scale as per each workload. As a result, it allows you to execute queries without interruptions.
How Serverless Compute Consumes Snowflake Credits?
The serverless compute model is more efficient than virtual warehouses. It consumes credits only for the time you utilize serverless features that rely on Snowflake-managed compute resources. The serverless feature charges are determined by the total usage of Snowflake-managed compute resources measured in compute-hours. Depending on the serverless feature, the credit usage per compute hour may differ.
For more information about the credit usage by a serverless feature, refer to the Serverless feature table.
Cost Optimization Tips for Serverless Compute
Here are a few practical tips for reducing serverless compute costs:
- Inspect Materialized View: Whenever rows are inserted into the source table, background maintenance happens automatically, and these rows are also added to the materialized view.
- Employ Search Optimization Service: To improve the performance of query types that include substring and regular expression searches, you can configure the search optimization service. It also avoids unwanted micro-partitions during table scans, which results in faster query execution. To reduce your serverless compute costs, you must choose the resources that utilize this service carefully.
Cloud Services Compute
The cloud services layer of Snowflake consists of stateless compute resources that incur credits for back-end services like authentication, access control, and metadata management. This layer executes on compute resources that Snowflake provisions from the cloud service providers, such as AWS, Azure, or GCP.
How Cloud Service Consumes Snowflake Credit?
Cloud services utilize Snowflake credits just like the virtual warehouses. Let’s look into the following two cases to understand the billing for cloud service usage:
Case 1: You are billed only if the daily cloud services credit usage exceeds 10% of your daily virtual warehouse credit consumption.
The 10% adjustment is computed daily in UTC timestamp by multiplying the credits for the daily virtual warehouse consumption by 10%. Then, your billable credits are calculated by subtracting the adjustment from the cloud services credits for that day.
For example, if you use 100 credits for virtual warehouse compute and 20 credits for cloud services on a particular day.
Then, 10% adjustment for that day = 100 * 10% = 10
Your daily cloud usage exceeds 10% of your virtual warehouse compute.
Therefore, your billable credits = Cloud services credits for the day – 10% adjustment
= 20 – 10
= 10 credits
Case 2: If cloud services credit usage is less than 10% of virtual warehouse compute credit on a given day, Snowflake bills you based on the cloud services credits you utilized on that day.
For example, if you use 120 credits for virtual warehouse compute and 10 credits for cloud services in a day.
Then, 10% adjustment for that day = 120 * 10% = 12
Your daily cloud service credit usage is less than 10% of your virtual warehouse compute.
Therefore, your billable credits = Cloud services credits for the day
= 10 credits
Things to Remember about Cloud Services Billing
Here are a few points to keep in mind about how cloud service usage is billed:
- Serverless compute is not included in the 10% adjustment for cloud services.
- If cloud service credit usage exceeds 10% of virtual warehouse credit usage, the 10% adjustment on the monthly consumption statement is equivalent to the total sum of these adjustments.
- If cloud service credit consumption is less than 10% of virtual warehouse credit usage, the total monthly adjustment can also be less than 10%.
Cost Optimization Tips for Cloud Service Compute
The following practical tips can help reduce the cloud service costs:
- Prevent Full Clones: When you create a full database clone for backups, it can result in additional cloud service costs. To reduce costs, clone only the necessary tables or columns.
- Examine Complex Queries: When you use joins in complex queries, you must use more cloud service credits depending on the time required for the query compilation. Review your queries or check the cost per query to determine where the highest expenses occur.
- Execute COPY Commands Selectively: When using the
COPYcommand to reference files in external files, you should be specific about which files should be copied. ExecutingCOPYcommands with poor selectivity may result in high credit usage for cloud services. Snowflake recommends changing your source structure to include a date prefix so you can list only the files you actually need.
How Can You View Credit Usage of Compute Resources in Snowflake?
You can use Snowsight to view the total cost of the compute resources used for a given day, week, or month. The cost information will be available in Snowsight within 72 hours.
Follow the steps below to check the compute costs:
- Log into your Snowsight interface.
- Switch to the ACCOUNTADMIN role. If you do not have an account administrator privilege, switch to a role with access to cost and usage information.
- Go to Admin > Cost Management option.
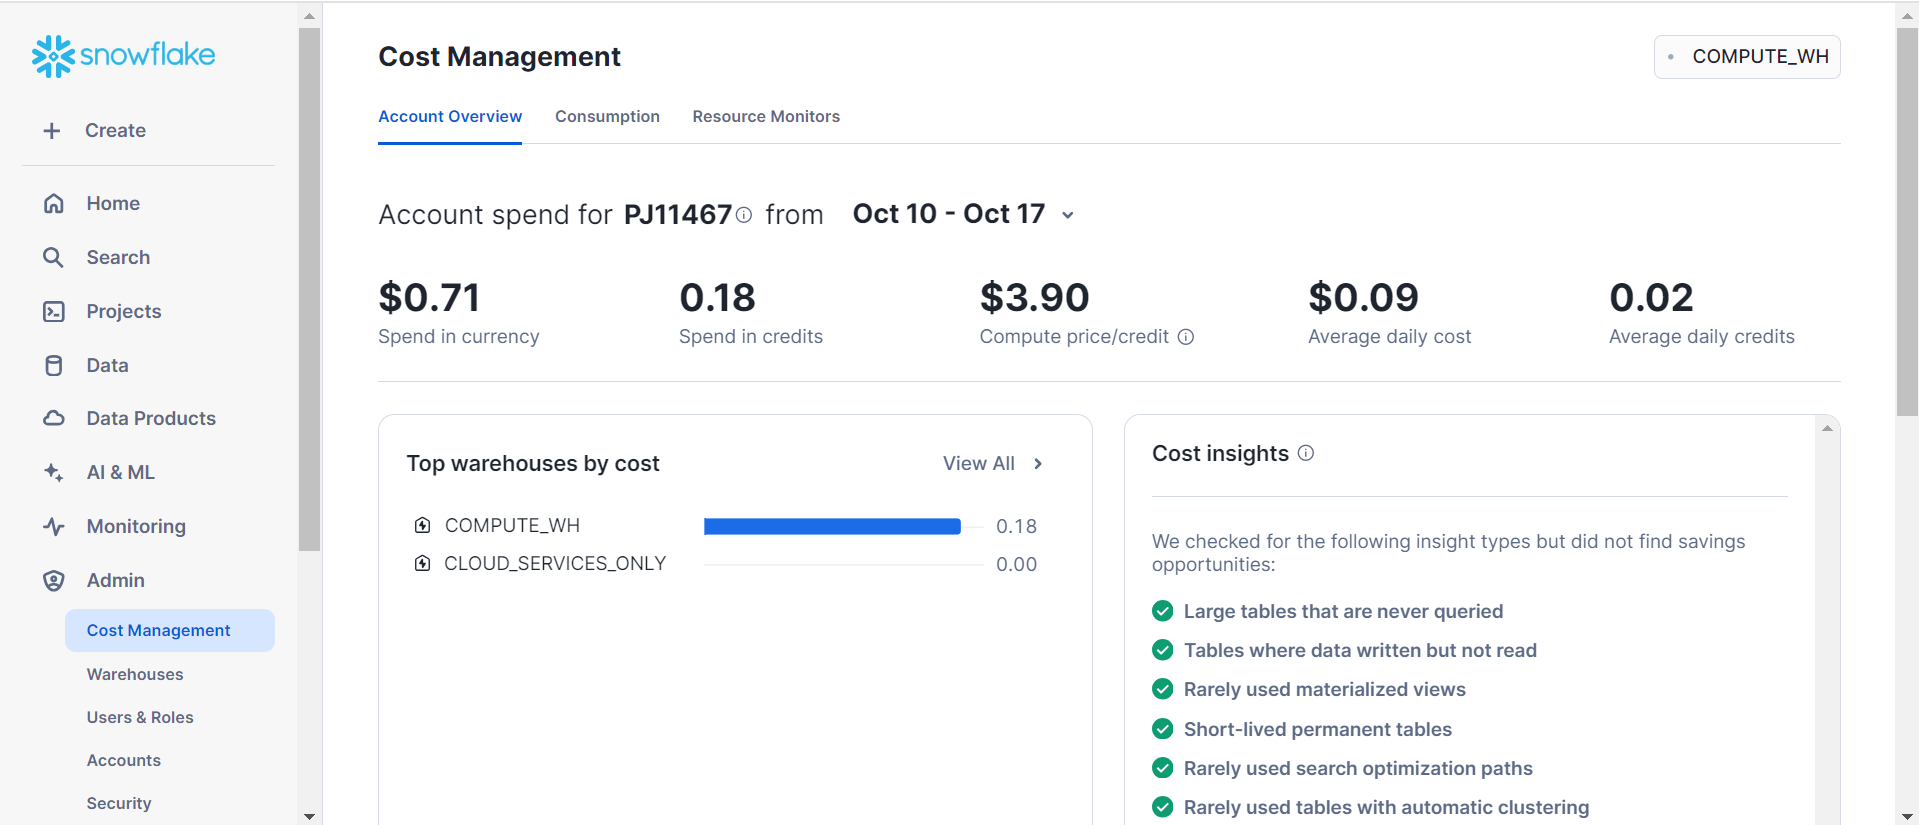
- Choose a warehouse to view the credit usage. Snowflake recommends using the XS (extra small) warehouse for this purpose.
- Click on Consumption and select Compute as your Usage Type.
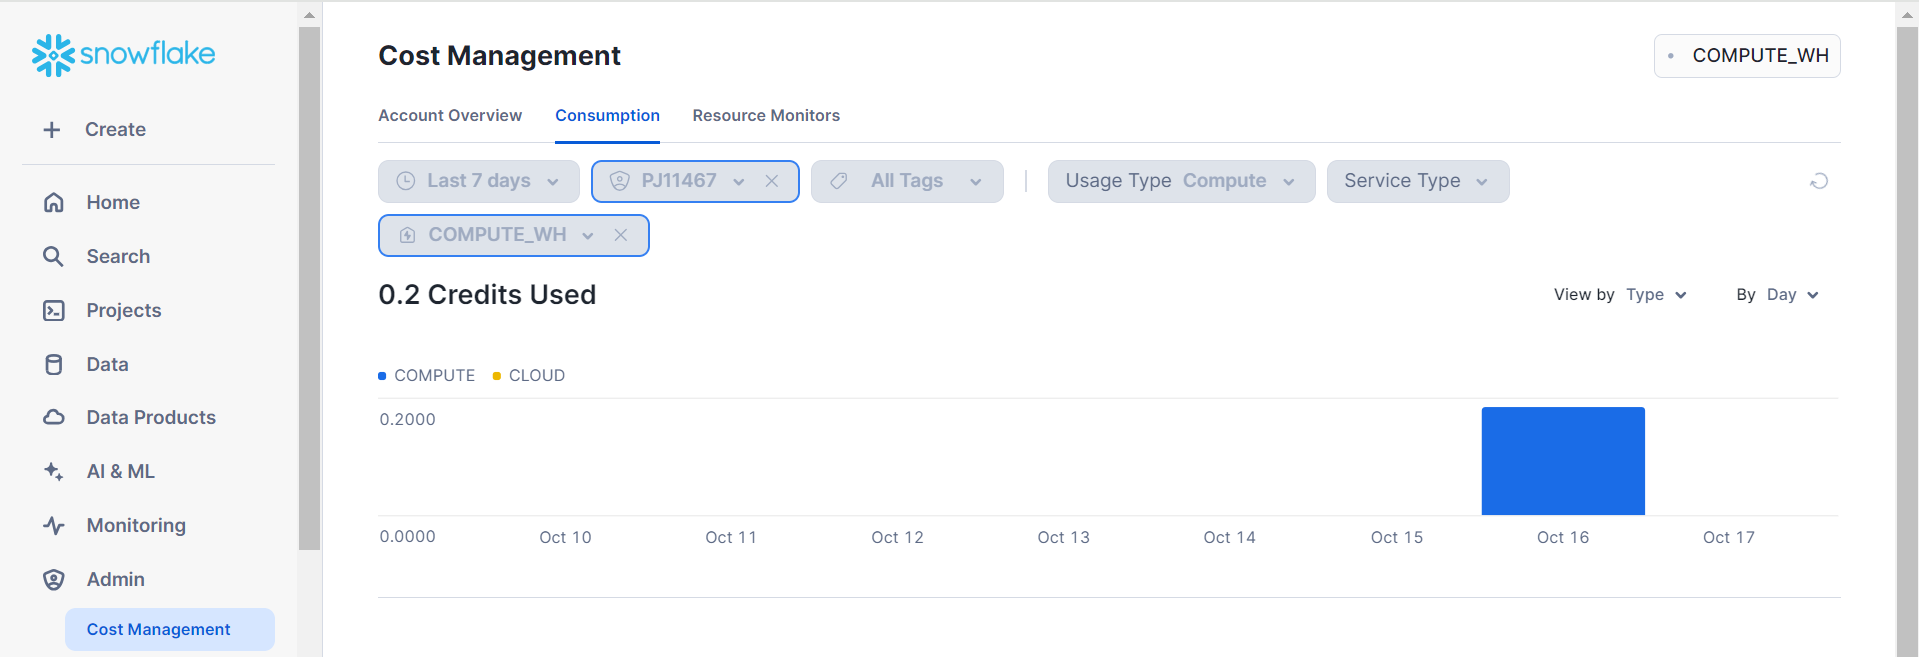
You can also filter your Consumption dashboard to display the costs related to a particular tag using the steps in the filter by tag. Additionally, you can learn how to filter the data in a bar graph that shows compute history read view consumption by type, resource, or service.
How to Query Data for Monitoring Snowflake Compute Cost?
ORGANIZATION_USAGEandACCOUNT_USAGEare the Snowflake schemas that store data associated with cost and usage. Views within these schemas allow you to create customized reports or dashboards. Most views contain compute resource cost in terms of consumed credits.- To analyze compute costs in currency instead of credits, you must write queries against the
USAGE_IN_CURRENCY_DAILYview. This view allows you to convert consumed credits into currency using the credit price on that day. - To explore different views within the Snowflake schema, refer to the view table of cost and usage information related to compute resource cost.
- Let’s see a few examples of queries executed against different views within the Snowflake schemas to gain insights into compute costs:
Compute Cost for Virtual Warehouses
Query 1: Average hour-by-hour Snowflake credit consumption across all warehouses over the past N days.
SELECT start_time,
warehouse_name,
credits_used_compute
FROM snowflake. account_usage.warehouse_metering_history WHERE start_time >= DATEADD (day, -m, CURRENT_TIMESTAMP()) AND warehouse_id > 0
ORDER BY 1 DESC, 2;
-- by hour
--
Skip pseudo-VWs such as "CLOUD_SERVICES_ONLY"
SELECT DATE_PART('HOUR', start_time) AS start_hour,
warehouse_name,
AVG(credits_used_compute) AS credits_used_compute_avg FROM snowflake.account_usage.warehouse_metering_history WHERE start_time >= DATEADD (day, -m, CURRENT_TIMESTAMP()) AND warehouse_id > 0
GROUP BY 1, 2
- Skip pseudo-VWs such as "CLOUD_SERVICES_ONLY"
--
ORDER BY 1, 2;
Query 2: Total credit usage by each warehouse over a particular period.
--
- Credits used (all time
SELECT warehouse_name,
=
past year)
SUM (credits_used_compute) AS credits_used_compute_sum FROM snowflake.account_usage.warehouse_metering_history GROUP BY 1
ORDER BY 2 DESC;
-- Credits used (past N days/weeks/months)
SELECT warehouse_name,
SUM(credits_used_compute) AS credits_used_compute_sum FROM snowflake.account_usage.warehouse_metering_history WHERE start_time >= DATEADD (day, -m, CURRENT_TIMESTAMP()) GROUP BY 1
ORDER BY 2 DESC;
Compute Cost for Cloud Services
Query 1: Total credits used for cloud services by a query type
SELECT query_type,
SUM(credits_used_cloud_services) AS cs_credits,
COUNT (1) num_queries
FROM snowflake.account_usage.query_history
WHERE true
AND start_time >= TIMESTAMPADD (day, -1, CURRENT_TIMESTAMP)
GROUP BY 1
ORDER BY 2 DESC
LIMIT 10;
Query 2: For all the queries you have executed within a minute. The order for this query is determined by the total query execution time.
SELECT *
FROM snowflake. account_usage.query_history
WHERE true
AND start_time >= TIMESTAMPADD (minute, -60, CURRENT_TIMESTAMP)
ORDER BY compilation_time DESC,
execution_time DESC,
list_external_files_time DESC,
queued_overload_time DESC,
credits_used_cloud_services DESC
LIMIT 10;
Compute Cost for Serverless Features
Query for Automatic Clustering Compute Cost: List of the tables within the Automatic Clustering and the number of credits consumed over the last 30 days.
SELECT TO DATE (start_time) AS date,
database_name,
schema_name, table_name,
SUM(credits_used) AS credits_used
FROM snowflake.account_usage.automatic_clustering_history WHERE start_time >= DATEADD (month, -1, CURRENT_TIMESTAMP()) GROUP BY 1,2,3,4
ORDER BY 5 DESC;
Query for Snowpipe Compute Cost: The average number of credits used daily by Snowpipe and grouping it by week over the past year.
WITH credits_by_day AS (
)
SELECT TO_DATE(start_time) AS date,
SUM (credits_used) AS credits_used
FROM snowflake.account_usage.pipe_usage_history
WHERE start_time >= DATEADD ( year, -1, CURRENT_TIMESTAMP())
GROUP BY 1
ORDER BY 2 DESC
SELECT DATE TRUNC ('week', date),
AVG(credits_used) AS avg_daily_credits
FROM credits_by_day
GROUP BY 1
ORDER BY 1;
Query for Compute Costs for Tasks: Finding out the current credit consumption for all the serverless tasks.
SELECT start_time,
end_time, task_id,
task_name,
credits_used,
schema_id,
schema_name,
database_id,
database_name
FROM snowflake.account_usage.serverless_task_history
ORDER BY start_time, task_id;
For more information about how each compute resource queries data to determine the cost, refer to the sample SQL queries for viewing Snowflake compute costs.
How Can You Optimize Your Snowflake Credits Usage with Cloud Cost Intelligence?
To understand your Snowflake spending, you can utilize CloudZero, a Snowflake cost intelligence platform. Using this platform, you will gain the following benefits:
- You can analyze Snowflake’s overall cost across cloud providers like AWS.
- You can determine the features and products that drive your Snowflake spending and control the cost overruns.
- You can identify your Snowflake costs at the customer, team, project, or environment level. This allows you to cut unnecessary costs without affecting Snowflake’s performance.
- You will be alerted about the overspending on Snowflake through Slack or email.
- You can conduct a cost-effective and quick monitoring of your Snowflake resources according to your needs.
How Does Hevo Data Help Optimize Snowflake Compute Cost?
If your organization’s data is spread across multiple databases and requires ad hoc analysis, you must collate and integrate all the data into Snowflake. Once the data is transferred, you can fully focus on the datasets for analysis and reporting, reducing Snowflake’s compute resources for querying multiple datasets at different times. For smooth integration, you can leverage Hevo Data, a near-real-time ELT, no-code pipeline platform.
Hevo Data helps you cost-effectively extract, load, and transform all your data into Snowflake. Take a look at some of Hevo’s key features that help in optimizing Snowflake compute cost:
- Data Transformation: Hevo Data provides analyst-friendly transformation approaches, such as Python-based scripts or drag-and-drop blocks, to clean and transform your data. Thus, you can reduce the Snowflake compute costs to enrich your data.
- Incremental Data Load: Instead of reloading the entire dataset each time, Hevo Data enables near-real-time transfer of modified data, ensuring efficient bandwidth utilization on both ends of the pipeline. This efficiency in data transfer optimizes the Snowflake compute cost, as fewer resources are required to handle the incremental updates.
- Auto-Schema Mapping: Hevo Data’s auto-mapping feature automatically recognizes the incoming data structure and copies it to the destination schema, eliminating manual schema management. Depending on your data replication requirements, you can choose either Full or Incremental mappings. This minimizes the compute resources required for schema alterations in Snowflake, saving costs.


Conclusion
In this article, you have explored everything about Snowflake compute costs. Optimizing these compute costs is the key to fully utilizing the benefits of Snowflake warehouses, cloud services, and serverless features. Following the cost optimization tips for each compute resource can help you save money without sacrificing business performance.
Additionally, Hevo Data, a no-code data pipeline platform, allows you to move data from multiple sources into Snowflake. By efficiently optimizing the usage of Snowflake compute resources required for data preparation, Hevo Data helps reduce compute costs.
Sign up for a 14-day free trial and simplify your data integration process. Check out the pricing details to understand which plan fulfills all your business needs.
Frequently Asked Questions
1. What is the cost of a Snowflake credit?
The credit costs depend on the selected Snowflake editions. The Standard edition costs $0.00056, and the Enterprise edition costs $0.00111 per second per credit utilized.
2. What are the benefits of Snowflake pricing?
You can avail the following benefits from the Snowflake pricing model:
– You can start or stop the resource usage to reduce the costs.
– It offers flexibility in payment because you can pay on demand or in advance.
– To optimize Snowflake compute costs, you can integrate with advanced Snowflake cost monitoring platforms.
– You only have to pay for your actual resource usage.
3. How does monthly billing work in Snowflake?
Monthly billing is calculated based on your daily consumption of data storage and compute resources.
4. Is there any charge for idle resources in Snowflake?
No, you are billed if the resources you utilize are active. Snowflake allows you to set the AUTO_SUSPEND parameter to stop running the resource after the given time of inactivity.
Share it with your connections.
-
 Share To LinkedIn
-
 Share To Facebook
-
 Share To X
-
 Copy Link


