


Are you trying to derive deeper insights from your Amazon RDS by moving the data into a Data Warehouse like Amazon Redshift? Well, you have landed on the right article. Now, it has become easier to replicate data from Amazon RDS to Redshift.
This article will give you a brief overview of Amazon RDS and Redshift. You will also get to know how you can set up your Amazon RDS to Redshift Integration using 3 popular methods. Moreover, the limitations in the case of the manual method will also be discussed in further sections. Read along to decide which method of connecting Amazon RDS to Redshift is best for you.
Table of Contents
Prerequisites
You will have a much easier time understanding the ways to set up the Amazon RDS to Redshift Integration if you have gone through the following aspects:
- An active AWS account.
- Working knowledge of Databases and Data Warehouses.
- Working knowledge of Structured Query Language (SQL).
- Clear idea regarding the type of data to be transferred.
Introduction to Amazon RDS

Amazon RDS provides a very easy-to-use transactional database that frees the developer from all the headaches related to database service management and keeping the database up. It allows the developer to select the desired backend and focus only on the coding part.
To know more about Amazon RDS, visit this link.
Introduction to Amazon Redshift

Amazon Redshift is a Cloud-based Data Warehouse with a very clean interface and all the required APIs to query and analyze petabytes of data. It allows the developer to focus only on the analysis jobs and forget all the complexities related to managing such a reliable warehouse service.
To know more about Amazon Redshift, visit this link.
A Brief About the Migration Process of AWS RDS to Redshift

The above image represents the Data Migration Process from the Amazon RDS to Redshift using AWS DMS service.
AWS DMS is a cloud-based service designed to migrate data from relational databases to a data warehouse. In this process, DMS creates replication servers within a Multi-AZ high availability cluster, where the migration task is executed. The DMS system consists of two endpoints: a source that establishes a connection to the database that extracts structured data and a destination that connects to AWS redshift for loading data into the data warehouse.
DMS is also capable of detecting changes in the source schema and loads only newly generated tables into the destination as source data keeps growing.
Pre-Migration Considerations from RDS to Redshift
- Data Assessment: Both RDS and Redshift support different data types. Check data type compatibility before migrating data.
- Schema Compatibility: Redshift doesn’t support all schema and indexing features provided by RDS.
- ETL Process Planning: Decide which tool suits your migration and data needs the best before migrating your data.
Method 1: Using Hevo Data to Set up Amazon RDS to Redshift Integration
Using Hevo Data, you can seamlessly integrate Amazon RDS to Redshift in just two easy steps. All you need to do is Configure the source and destination and provide us with the credentials to access your data. Hevo takes care of all your Data Processing needs and lets you focus on key business activities.
Method 2: Manual ETL Process to Set up Amazon RDS to Redshift Integration
For this section, we assume that Amazon RDS uses MySQL as its backend. In this method, we have dumped all the contents of MySQL and recreated all the tables related to this database at the Redshift end.
Method 3: Using AWS Pipeline to Set up Amazon RDS to Redshift Integration
In this method, we have created an AWS Data Pipeline to integrate RDS with Redshift and to facilitate the flow of data.
Get Started with Hevo for FreeMethods to Set up Amazon RDS to Redshift Integration
This article delves into both the manual and using Hevo methods to set up Amazon RDS to Redshift Integration. You will also see some of the pros and cons of these approaches and would be able to pick the best method based on your use case. Below are the three methods for RDS to Amazon Redshift ETL:
Method 1: Using Hevo Data to Set up Amazon RDS to Redshift Integration
The steps to load data from Amazon RDS to Redshift using Hevo Data are as follows:
Step 1: Configure Amazon RDS as the Source
- Connect your Amazon RDS account to Hevo’s platform. Hevo has an in-built Amazon RDS MySQL Integration that connects to your account within minutes.
- After logging in to your Hevo account, click PIPELINES in the Navigation Bar.
- Next, in the Pipelines List View, click the + CREATE button.
- On the Select Source Type page, select Amazon RDS MySQl.
- Specify the required information in the Configure your Amazon RDS MySQL Source page to complete the source setup.
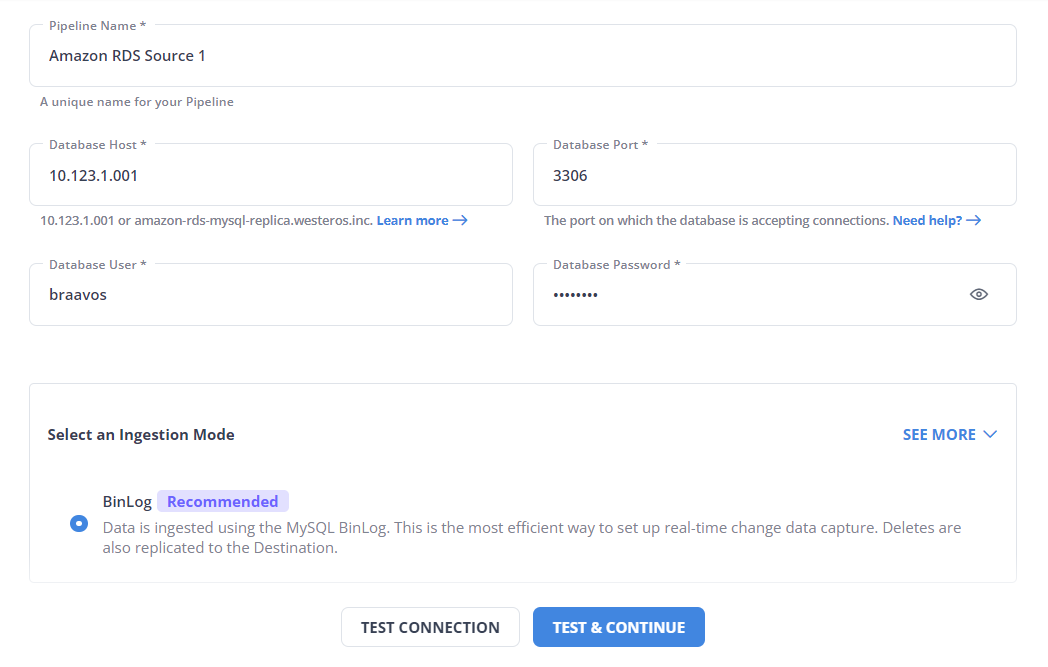
Learn more about configuring Amazon RDS MySQL source here.
Step 2: Configure RedShift as the Destination
- Select Amazon Redshift as your destination and start moving your data.
- To Configure Amazon Redshift as a Destination
- Click DESTINATIONS in the Navigation Bar.
- Within the Destinations List View, click + CREATE.
- In the Add Destination page, select Amazon Redshift and configure your settings
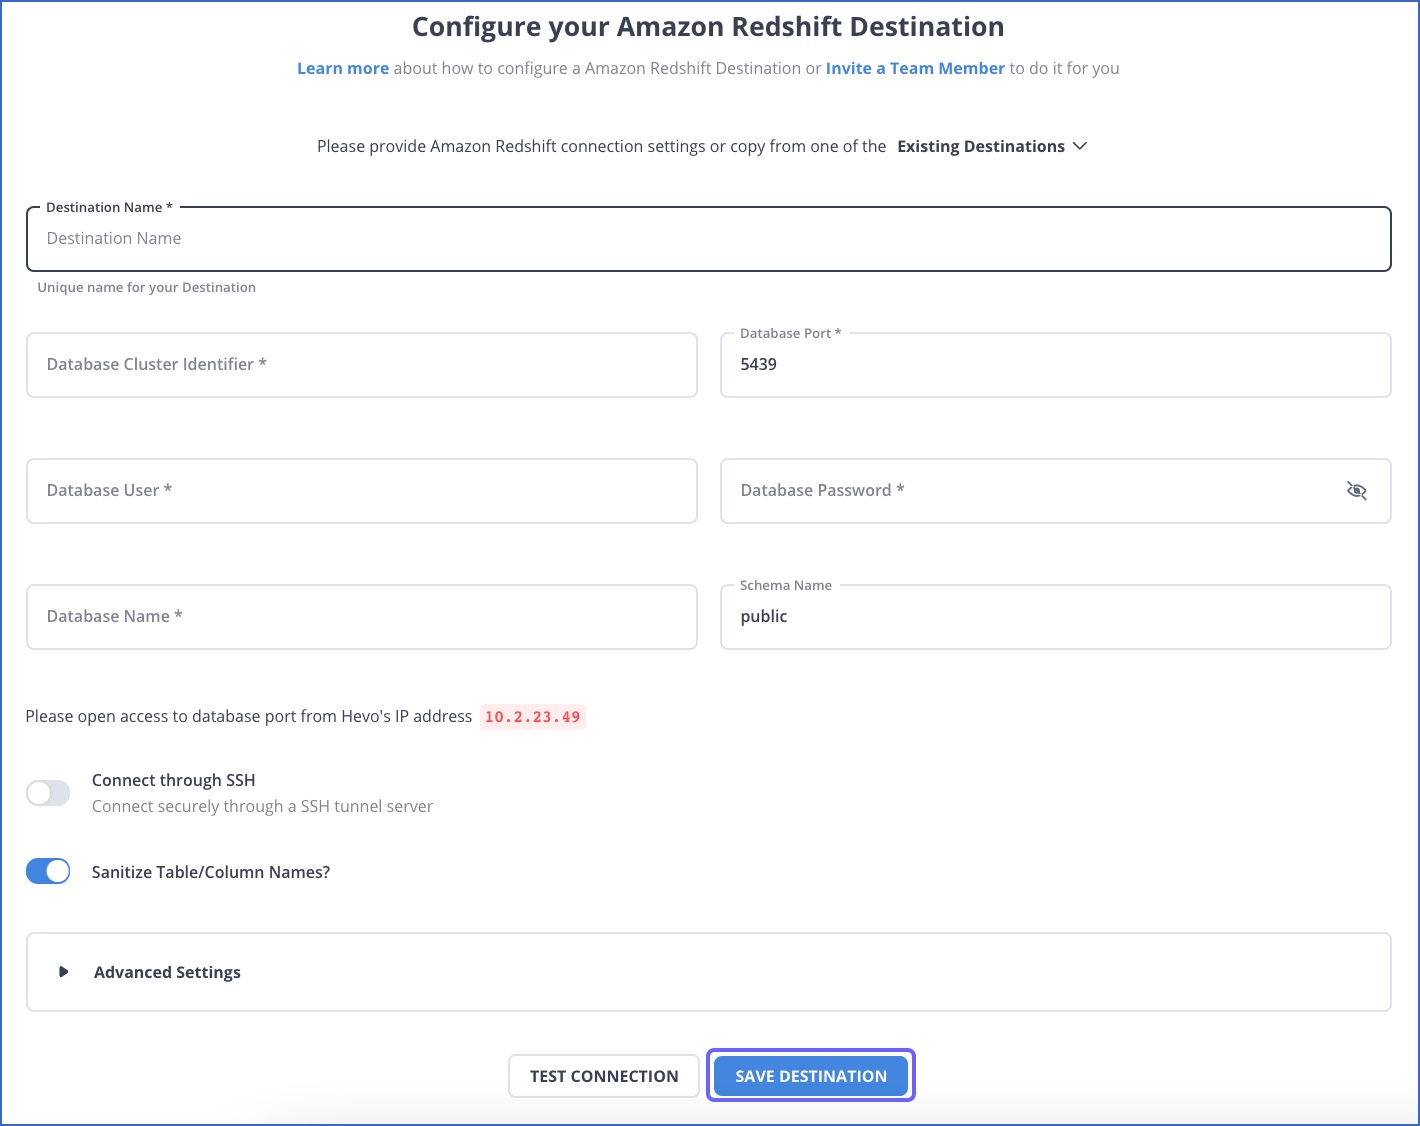
Learn more about configuring Redshift as a destination.
- Click TEST CONNECTION and Click SAVE & CONTINUE. These buttons are enabled once all the mandatory fields are specified.
Here are more reasons to try Hevo:
- Secure: Hevo has a fault-tolerant architecture that ensures that the data is handled in a secure, consistent manner with zero data loss.
- Schema Management: Hevo takes away the tedious task of schema management & automatically detects the schema of incoming data and maps it to the destination schema.
- Incremental Data Load: Hevo allows the transfer of data that has been modified in real-time. This ensures efficient utilization of bandwidth on both ends.
Method 2: How to Sync Amazon RDS to Redshift Integration using MySQL
For the scope of this post, let us assume RDS is using MySQL as the backend.
The easiest way to do this data copy is to dump all the contents of MySQL and recreate all the tables related to this database at the Redshift end. Let us look deeply into the steps that are involved in RDS to Redshift replication.
- Step 1: Export RDS Table to CSV File
- Step 2: Copying the Source Data Files to S3
- Step 3: Loading Data to Redshift in Case of Complete Overwrite
- Step 4: Creating a Temporary Table for Incremental Load
- Step 5: Delete the Rows which are Already Present in the Target Table
- Step 6: Insert the Rows from the Staging Table
Step 1: Export RDS Table to CSV file
The first step here is to use mysqldump to export the table into a CSV file. The problem with the mysqldump command is that you can use it to export to CSV, only if you are executing the command from the MySQL server machine itself. Since RDS is a managed database service, these instances usually do not have enough disk space to hold large amounts of data. To avoid this problem, we need to export the data first to a different local machine or an EC2 instance.
Mysql -B -u username -p password sourcedb -h dbhost -e "select * from source_table" -B | sed "s/'/'/;s/t/","/g;s/^/"/;s/$/"/;s/n//g" > source_table.csvThe above command selects the data from the desired table and exports it into a CSV file.
Step 2: Copying the Source Data Files to S3
Once the CSV is generated, we need to copy this data into an S3 bucket from where Redshift can access this data. Assuming you have AWS CLI installed on our local computer this can be accomplished using the below command.
aws s3 cp source_table.csv s3://my_bucket/source_table/Step 3: Loading Data to Redshift in Case of Complete Overwrite
This step involves copying the source files into a redshift table using the native copy command of redshift. For doing this, log in to the AWS management console and navigate to Query Editor from the redshift console. Once in Query editor type the following command and execute.
copy target_table_name from ‘s3://my_bucket/source_table’ credentials access_key_id secret_access_key
Where access_key_id and secret_access_key represents the IAM credentials
Step 4: Creating a Temporary Table for Incremental Load
The above steps to load data into Redshift are advisable only in case of a complete overwrite of a Redshift table. In most cases, there is already data existing in the Redshift table and there is a need to update the already existing primary keys and insert the new rows. In such cases, we first need to load the data from S3 into a temporary table and then insert it to the final destination table.
create temp table stage (like target_table_name)
Note that creating the table using the ‘like’ keyword is important here since the staging table structure should be similar to the target table structure including the distribution keys.
Step 5: Delete the Rows which are Already Present in the Target Table:
begin transaction; delete from target_table_name using stage where targettable_name.primarykey = stage.primarykey;Step 6: Insert the Rows from the Staging Table
insert into target_table_name select * from stage; end transaction;The above approach works with copying data to Redshift from any type of MySQL instance and not only the RDS instance. The issue with using the above approach is that it requires the developer to have access to a local machine with sufficient disk memory. The whole point of using a managed database service is to avoid the problems associated with maintaining such machines. That leads us to another service that Amazon provides to accomplish the same task – AWS Data Pipeline.

Limitations of Manually Setting up Amazon RDS to Redshift Integration
The above methods’ biggest limitation is that while the copying process is in progress, the original database may get slower because of all the load. A workaround is to first create a copy of this database and then attempt the steps on that copy database.
Another limitation is that this activity is not the most efficient one if this is going to be executed as a periodic job repeatedly. And in most cases in a large ETL pipeline, it has to be executed periodically. In those cases, it is better to use a syncing mechanism that continuously replicates to Redshift by monitoring the row-level changes to RDS data.
In normal situations, there will be problems related to data type conversions while moving from RDS to Redshift in the first approach depending on the backend used by RDS. AWS data pipeline solves this problem to an extent using automatic type conversion. More on that in the next point.
While copying data automatically to Redshift, MYSQL or RDS data types will be automatically mapped to Redshift data types. If there are columns that need to be mapped to specific data types in Redshift, they should be provided in pipeline configuration against the ‘RDS to Redshift conversion overrides’ parameter. The mapping rule for the commonly used data types is as follows:
| MySQL Data Type | Redshift Data Type |
| TINYINT, SMALLINT, TINYINT UNSIGNED, SMALLINT UNSIGNED | SMALLINT |
| MEDIUMINT | INTEGER |
| INT, INT(size) | INTEGER |
| INT UNSIGNED, INT UNSIGNED(size) | BIGINT |
| BIGINT, BIGINT(size) | BIGINT |
| BIGINT UNSIGNED BIGINT(size) UNSIGNED | VARCHAR(20*4) |
| FLOAT FLOAT(size,d) FLOAT(size,d) UNSIGNED | REAL |
| DOUBLE(size,d) | DOUBLE PRECISION |
| DECIMAL(size,d) | DECIMAL(size,d) |
| CHAR(size) | VARCHAR(size*4) |
| CHAR(size) | VARCHAR(size*4) |
| TINYTEXT | VARCHAR(255*4) |
| TEXT,MEDIUMTEXT,LONGTEXT | VARCHAR(max) |
| BOOLEAN, BOOL, TINYINT | BOOLEAN |
You now understand the basic way of copying data from RDS to Redshift. Even though this is not the most efficient way of accomplishing this, this method is good enough for the initial setup of the warehouse application. In the longer run, you will need a more efficient way of periodically executing these copying operations.
Method 3: Using AWS Pipeline to Set up Amazon RDS to Redshift Integration
AWS Data Pipeline is an easy-to-use Data Migration Service with built-in support for almost all of the source and target database combinations. We will now look into how we can utilize the AWS Data Pipeline to accomplish the same task.
As the name suggests AWS Data pipeline represents all the operations in terms of pipelines. A pipeline is a collection of tasks that can be scheduled to run at different times or periodically. A pipeline can be a set of custom tasks or built from a template that AWS provides. For this task, you will use such a template to copy the data. Below are the steps to set up Amazon RDS to Redshift Integration using AWS Pipeline:
- Step 1: Creating a Pipeline
- Step 2: Choosing a Built-in Template for Complete Overwrite of Redshift Data
- Step 3: Providing RDS Source Data
- Step 4: Choosing a Template for an Incremental Update
- Step 5: Selecting the Run Frequency
- Step 6: Activating the Pipeline and Monitoring the Status
Step 1: Creating a Pipeline
The first step is to log in to https://console.aws.amazon.com/datapipeline/ and click on Create Pipeline. Enter the pipeline name and optional description.

Step 2: Choosing a Built-in Template for Complete Overwrite of Redshift Data
After entering the pipeline name and the optional description, select ‘Build using a template.’ From the templates available choose ‘Full Copy of Amazon RDS MySQL Table to Amazon Redshift’

Step 3: Providing RDS Source Data
While choosing the template, information regarding the source RDS instance, staging S3 location, Redshift cluster instance, and EC2 keypair names are to be provided.

Step 4: Choosing a Template for an Incremental Update
In case there is an already existing Redshift table and the intention is to update the table with only the changes, choose ‘Incremental Copy of an Amazon RDS MySQL Table to Amazon Redshift‘ as the template.

Step 5: Selecting the Run Frequency
After filling in all the required information, you need to select whether to run the pipeline once or schedule it periodically. For our purpose, we should select to run the pipeline on activation.

Step 6: Activating the Pipeline and Monitoring the Status
The next step is to activate the pipeline by clicking ‘Activate’ and wait until the pipeline runs. AWS pipeline console lists all the pipelines and their status. Once the pipeline is in FINISHED status, you will be able to view the newly created table in Redshift.

The biggest advantage of this method is that there is no need for a local machine or a separate EC2 instance for the copying operation. That said, there are some limitations for both these approaches and those are detailed in the below section.

Before wrapping up, let’s cover some basics.
Common Challenges and How to Overcome Them
You can face various challenges while migrating your data from Amazon RDS to Redshift. A few challenges are as follows:
- Data Type Incompatibilities: Amazon RDS and Redshift support different data types, so you must change your data before migrating it to Redshift. You can do this using AWS’s Schema Conversion Tool(SCT).
- Data Consistency and Integrity: Ensuring data consistency during the migration can be challenging, but it can be done using AWS’s Change Data Capture(CDC) feature.
- Security and Compliance: You can ensure security and compliance by using IAM permissions for access control, encryption at transit and rest, and AWS compliance policies.
- Schema and Index Changes: Redshift doesn’t support all schema and indexing features provided by RDS. So, you will need to transform your schema to Redshift’s requirements.
Best Practices for Data Migration
- Planning and Documentation – You can define the scope of data migration, the source from where data will be extracted, and the destination to which it will be loaded. You can also define how frequently you want the migration jobs to take place.
- Assessment and Cleansing – You can assess the quality of your existing data to identify issues such as duplicates, inconsistencies, or incomplete records.
- Backup and Roll-back Planning – You can always backup your data before migrating it, which you can refer to in case of failure during the process. You can have a rollback strategy to revert to the previous system or data state in case of unforeseen issues or errors.
Benefits of Replicating Data from Amazon RDS to Redshift
Many organizations will have a separate database (Eg: Amazon RDS) for all the online transaction needs and another warehouse (Eg: Amazon Redshift) application for all the offline analysis and large aggregation requirements. Here are some of the reasons to move data from RDS to Redshift:
- The online database is usually optimized for quick responses and fast writes. Running large analysis or aggregation jobs over this database will slow down the database and can affect your customer experience.
- The warehouse application can have data from multiple sources and not only transactional data. There may be third-party sources or data sources from other parts of the pipeline that needs to be used for analysis or aggregation.
What the above reasons point to, is a need to move data from the transactional database to the warehouse application on a periodic basis. In this post, we will deal with moving the data between two of the most popular cloud-based transactional and warehouse applications – Amazon RDS and Amazon Redshift.
Learn More About:
Conclusion
This article gave you a comprehensive guide to Amazon RDS and Amazon Redshift and how you can easily set up Amazon RDS to Redshift Integration. It can be concluded that Hevo seamlessly integrates with RDS and Redshift ensuring that you see no delay in terms of setup and implementation. Hevo will ensure that the data is available in your warehouse in real-time. Hevo’s real-time streaming architecture ensures that you have accurate, latest data in your warehouse.
See how connecting AWS RDS MSSQL to Redshift can optimize your data operations. Explore our guide for easy-to-follow instructions on setting up the integration.
Businesses can use automated platforms like Hevo Data to set this integration and handle the ETL process. It helps you directly transfer data from a source of your choice to a Data Warehouse, Business Intelligence tools, or any other desired destination in a fully automated and secure manner without having to write any code and will provide you a hassle-free experience.
FAQs to load data from RDS to RedShift
1. How to migrate from RDS to Redshift?
To migrate data from RDS (Amazon Relational Database Service) to Redshift:
1. Extract data from RDS using AWS DMS (Database Migration Service) or a data extraction tool.
2. Load the extracted data into Redshift using COPY commands or AWS Glue for ETL (Extract, Transform, Load) processes.
2. Why use Redshift instead of RDS?
You can choose Redshift over RDS for data warehousing and analytics due to its optimized architecture for handling large-scale analytical queries, columnar storage for efficient data retrieval, and scalability to manage petabyte-scale data volumes.
3. How Do I Migrate My AWS RDS Database?
To migrate, create a snapshot of your RDS instance, restore it in a new region or account if needed, or use AWS DMS for a live migration with minimal downtime. You can also use automated platforms like Hevo.
4. When not to use Redshift?
You can not use Redshift If real-time data access and low-latency queries are critical, as Redshift’s batch-oriented processing may not meet these requirements compared to in-memory databases or traditional RDBMS optimized for OLTP.
