
There are many use cases when you must migrate MySQL database between two servers, like cloning a database for testing, a separate database for running reports, or completely migrating a database system to a new server. Migrating a MySQL database doesn’t have to be a headache! Be it scaling up your app or switching servers, a smooth and secure migration is the key to keeping your operations running like clockwork.
In this blog, discover the classic methods like mysqldump and game-changing no-code solutions like Hevo to make your migration process fast, efficient, and error-free. Let’s dive in!
Table of Contents
What Is MySQL?

MySQL is a widely used open-source Relational Database Management System (RDBMS) developed by Oracle. It employs structured query language (SQL) and stores data in tables with defined rows and columns, making it a robust choice for applications requiring data integrity, consistency, and reliability. Read about database migration and strategy formulation to ensure a smooth transition in detail. Connect other databases, such as MariaDB, to MySQL and manage databases of websites and applications with high traffic. MySQL allows you to consolidate all your customer data in one place, making it available for overall analysis and reporting, which is useful while connecting Salesforce to MySQL.
Benefits of Migrating a MySQL Database Between Two Servers
- Improved Performance: Distribute the database load across servers to enhance speed and efficiency.
- Better Reliability: Minimize downtime and reduce the risk of data loss with backups on another server.
- Scalability: Easily expand your database infrastructure as your business grows.
- Enhanced Security: Store data in a more secure environment or upgrade to a better-protected server.
- Disaster Recovery: Maintain a backup server to restore data in case of failure quickly.
You can also consider replicating your MySQL data to BigQuery for advanced analytics.
Switching MySQL databases to a new server can be simple and secure. Hevo’s automated pipeline ensures seamless data transfer with minimal downtime and complete accuracy.
- No-code automation: Move data effortlessly, no complex scripts required.
- Incremental load options: Transfer only the new changes, saving time and resources.
- Comprehensive monitoring: Track data migration in real time for a secure process.
Thousands of customers trust Hevo with their ETL process. Join them today and experience seamless data integration.
Get Started with Hevo for FreeHow to Migrate MySQL Database Between Two Servers?
Let’s understand the steps to migrate the MySQL database between 2 servers. Understanding the process of transferring MySQL databases from one server to another is crucial for maintaining data integrity and continuity of services. To migrate the MySQL database seamlessly, ensure both source and target servers are compatible.
For scalable data warehousing, explore how to move your data from MySQL to Redshift.
Method 1: Using Hevo’s No-Code Solution
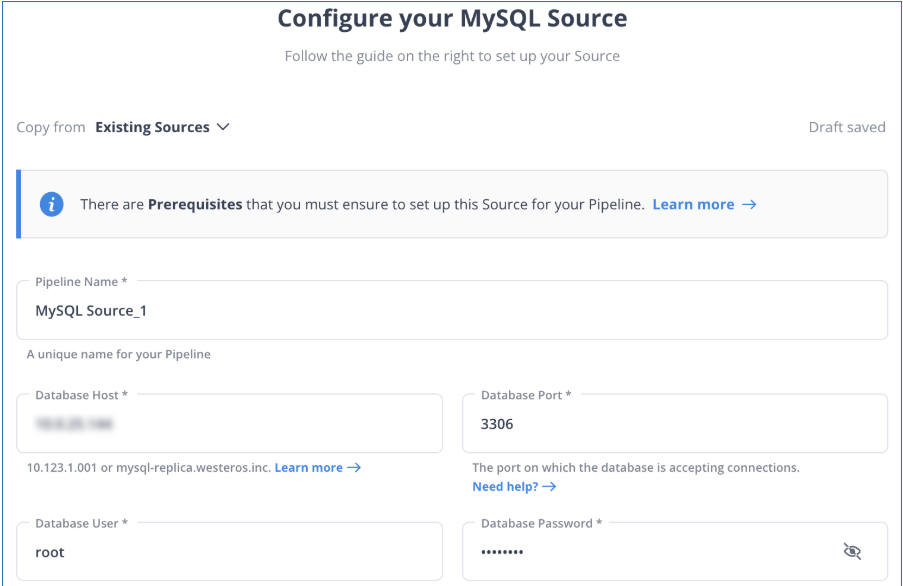
Step 1: Configure MySQL As a Source
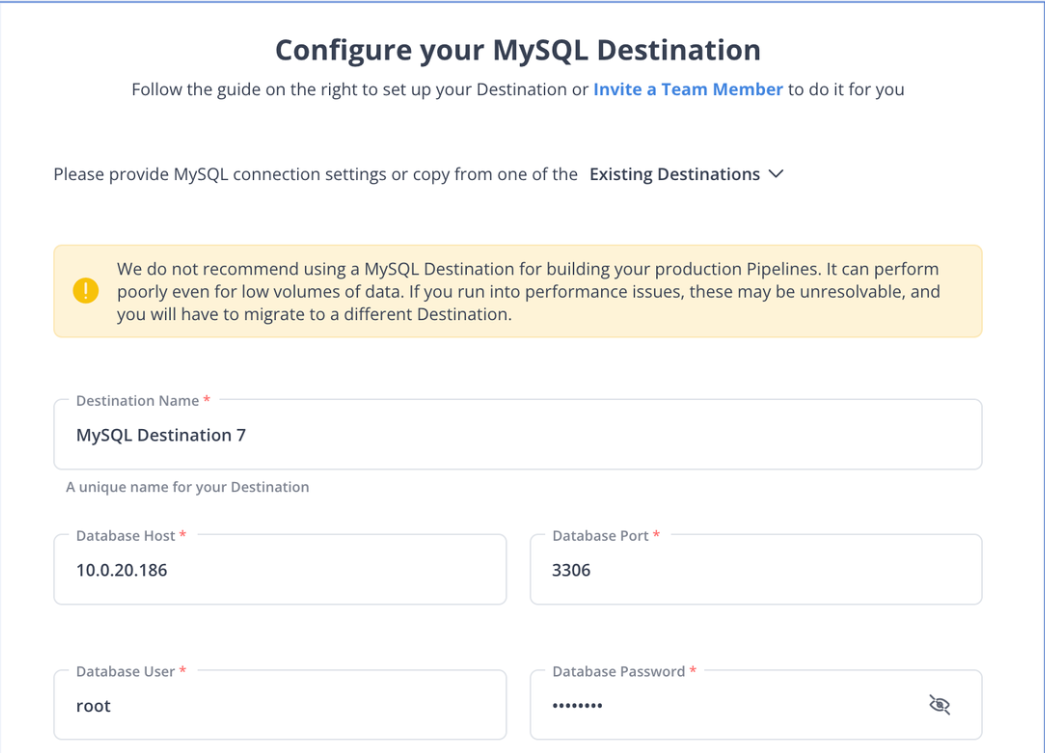
Step 2: Configure MySQL As Destination
Now, your source is connected to the destination, and the pipeline will start ingesting the data. Hevo automatically maps the schema, and you will receive alerts in case of any error.
Discover how Hevo’s automated pipeline facilitates Airtable to MySQL integration.

Method 2: Using MySQL Dump
Below are the steps you can follow to understand how to migrate MySQL database between 2 servers:
Step 1: Backup the Data
- The first step to migrate MySQL database is to take a dump of the data that you want to transfer. This operation will help you move the MySQL database to another server.
- To do that, you will have to use
mysqldumpcommand. The basic syntax of the command is:
mysqldump -u [username] -p [database] > dump.sql- If the database is on a remote server, either log in to that system using SSH or use the -h and -P options to provide the host and port, respectively.
mysqldump -P [port] -h [host] -u [username] -p [database] > dump.sqlThere are various options available for this command; let’s go through the major ones as per the use case.
Use Case 1: Backing Up Specific Databases
mysqldump -u [username] -p [database] > dump.sql- This command dumps specified databases to a file.
Use Case 2: Backing Up Specific Tables
- The above commands dump all the tables in the specified database. If you need to take a backup of some specific tables, you can use the following command:
mysqldump -u [username] -p [database] [table1] [table2] > dump.sqlUse Case 3: Custom Query
- If you want to backup data using some custom query, you will need to use the where option provided by mysqldump.
mysqldump -u [username] -p [database] [table1] --where="WHERE CLAUSE" > dump.sql

Example: mysqldump -u root -p testdb table1 --where="mycolumn = myvalue" > dump.sqlNote:
- By default,
mysqldumpcommand includesDROP TABLEandCREATE TABLEstatements in the created dump.
Other use cases
Here’s a list of uses for the mysqldump command based on use cases:
- To backup a single database:
mysqldump -u [username] -p [database] > dump.sql- To backup multiple databases:
mysqldump -u [username] -p --databases [database1] [database2] > dump.sql- To backup all databases on the instance:
mysqldump -u [username] -p --all-databases > dump.sql- To backup specific tables:
mysqldump -u [username] -p [database] [table1] [table2] > dump.sql- To backup data using a custom query:
mysqldump -u [username] -p [database] [table1] --where="WHERE CLAUSE" > dump.sqlExample:
mysqldump -u root -p testdb table1 --where="mycolumn = myvalue" > dump.sql- To copy only the schema but not the data:
mysqldump -u [username] -p [database] --no-data > dump.sq- To restore data without deleting previous data (incremental backups):
mysqldump -u [username] -p [database] --no-create-info > dump.sqlStep 2: Copy the Database Dump to the Destination Server
- Once you have created the dump as per your specification, the next step to migrate MySQL database is to use the data dump file to move the MySQL database to another server (destination).
Scp -P [port] [dump_file].sql [username]@[servername]:[path on destination]- Examples:
scp dump.sql root@130.243.18.62:/var/data/mysql
scp -P 3306 dump.sql root@130.243.18.62:/var/data/mysql- To copy to a single database, use this syntax:
scp all_databases.sql user@example.com:~/- For a single database:
scp database_name.sql user@example.com:~/- Here’s an example:
scp dump.sql root@130.243.18.62:/var/data/mysql scp -P 3306 dump.sql root@130.243.18Step 3: Restore the Dump
- The last step in MySQL migration is restoring the data on the destination server.
- MySQL command directly provides a way to restore and dump data to MySQL.
mysql -u [username] -p [database] < [dump_file].sql- Example:
mysql -u root -p testdb < dump.sql- Note: Don’t specify the database in the above command if your dump includes multiple databases.
mysql -u root -p < dump.sql- For all databases:
mysql -u [user] -p --all-databases < all_databases.sql- For a single database:
mysql -u [user] -p newdatabase < database_name.sql- For multiple databases:
mysql -u root -p < dump.sqlLimitations with Dumping and Importing MySQL Data
Dumping and importing MySQL data can present several challenges:
- Time Consumption: The process can be time-consuming, particularly for large databases, due to creating, transferring, and importing dump files, which may slow down with network speed and database size.
- Potential for Errors: Human error is a significant risk, including overlooking steps, misconfiguring settings, or using incorrect parameters with the mysqldump command.
- Data Integrity Issues: Activities on the source database during the dump process can lead to data inconsistencies in the exported SQL dump. Measures like putting the database in read-only mode or locking tables can mitigate this but may impact application availability.
- Memory Limitations: Importing massive SQL dump files may encounter memory constraints, necessitating adjustments to MySQL server configurations on the destination machine.
Conclusion
Following the above-mentioned steps, you can migrate a MySQL database between two servers easily, but migrating a MySQL database to another server can be quite a cumbersome activity, especially if it’s repetitive. An all-in-one solution like Hevo takes care of this effortlessly and helps manage all your data pipelines in an elegant and fault-tolerant manner.
Read about connecting MongoDB to MySQL to store data in a structured manner when dealing with large volumes of data.
Hevo will automatically catalog all your table schemas and do all the necessary transformations to copy MySQL database from one server to another. Sign up for a 14-day free trial and make your data transfer easy! Also, check out our unbeatable pricing for the best plan that fits your needs.
FAQs
1. How do you migrate a MySQL database?
Migrate a MySQL database by exporting the database using the mysqldump command, transferring the dump file to the new server, and importing it using the mysql command to restore the database.
2. How to transfer all MySQL databases from old to new server?
Transfer all MySQL databases by using mysqldump --all-databases > all_databases.sql to create a dump file, then transfer this file to the new server and import it with mysql < all_databases.sql.
3. How to transfer data from one database to another in MySQL?
Transfer data between databases by using INSERT INTO target_db.table_name SELECT * FROM source_db.table_name; to copy data, ensuring both databases are accessible and properly configured.
Share it with your connections.
-
 Share To LinkedIn
-
 Share To Facebook
-
 Share To X
-
 Copy Link


