

Airflow is a platform that
In this article, you will gain information about Airflow Webserver. You will also gain a holistic understanding of Apache Airflow, its key features, components of Airflow Architecture, Airflow Webserver, and different ways of configuring Airflow Webserver UI. Read along to find out in-depth information about Airflow Webserver.
Table of Contents
What is Airflow?

Airflow is a platform that enables its users to automate scripts for performing tasks. It comes with a scheduler that executes tasks on an array of workers while following a set of defined dependencies. Airflow also comes with rich command-line utilities that make it easy for its users to work with directed acyclic graphs (DAGs). The DAGs simplify the process of ordering and managing tasks for companies.
Airflow also has a rich user interface that makes it easy to monitor progress, visualize pipelines running in production, and troubleshoot issues when necessary.
Key Features of Airflow
- Dynamic Integration: Airflow uses Python as the backend programming language to generate dynamic pipelines. Several operators, hooks, and connectors are available that create DAG and tie them to create workflows.
- Extensible: Airflow is an open-source platform, and so it allows users to define their custom operators, executors, and hooks. You can also extend the libraries so that it fits the level of abstraction that suits your environment.
- Elegant User Interface: Airflow uses Jinja templates to create pipelines, and hence the pipelines are lean and explicit. Parameterizing your scripts is a straightforward process in Airflow.
- Scalable: Airflow is designed to scale up to infinity. You can define as many dependent workflows as you want. Airflow creates a message queue to orchestrate an arbitrary number of workers.
Airflow can easily integrate with all the modern systems for orchestration. Some of these modern systems are as follows:
- Google Cloud Platform
- Amazon Web Services
- Microsoft Azure
- Apache Druid
- Snowflake
- Hadoop ecosystem
- Apache Spark
- PostgreSQL, SQL Server
- Google Drive
- JIRA
- Slack
- Databricks
You can find the complete list here.
Hevo enables seamless integration with Apache Airflow, allowing you to extract and synchronize metadata, task logs, and DAG (Directed Acyclic Graph) execution data from Airflow to your desired data warehouse or BI tool for real-time monitoring and analysis.
What Hevo Offers?
- Automated Schema Mapping: Hevo auto-detects Airflow schema changes and adjusts the target data structure in real-time.
- No-code Integration: Easily connect Airflow with Hevo without any complex configurations or code, simplifying data extraction.
- Real-time Sync: Continuously stream Airflow metadata and task data to destinations like Snowflake, BigQuery, or Redshift for instant analysis.
What are the Components of Airflow Architecture?
The different components of Airflow Modular Architecture are as follows:
1) Airflow Webserver
Airflow Webserver is the User Interface (UI) of Airflow, which can be used to get an overview of the overall health of various Directed Acyclic Graphs (DAG) as well as assist in visualizing different components and states of each DAG. The Airflow Webserver responds to HTTP requests and allows users to interact with it. The Airflow WebServer also allows you to manage users, roles, and various configurations for the Airflow setup.
2) Airflow Scheduler
The Airflow Scheduler keeps track of different DAGs and their tasks. It triggers the task instances whose dependencies have been met. It monitors and maintains synchronization with a folder for all DAG objects, and it inspects tasks on a regular basis to see if they can be triggered. It restricts the number of runs of each DAG so that a single DAG does not overwhelm the entire system, while also making it simple for users to schedule and run DAGs on Airflow.
3) Airflow Executor
The Scheduler orchestrates the tasks, but the Executors are the components that actually carry them out. Airflow includes a number of Executors, including SequentialExecutor, LocalExecutor, CeleryExecutor, and KubernetesExecutor. People usually choose the executor that best fits their needs.
4) Airflow Metadata Database
For its Metadata store, Airflow supports a number of databases. This database contains information about DAGs, their runs, and other Airflow configurations such as users, roles, and connections. The Airflow WebServer displays the states of the DAGs as well as their database runs. This information is also updated in this Metadata Database by the Scheduler.
What is Apache Airflow WebServer?
Airflow WebServer includes a well-equipped built-in user interface that allows control over each pipeline, as well as the ability to visualize various aspects of them. The following are the most important features of an Airflow WebServer:
- Monitoring DAGs: The Airflow WebServer homepage provides a quick overview of the DAG statuses and their most recent runs.
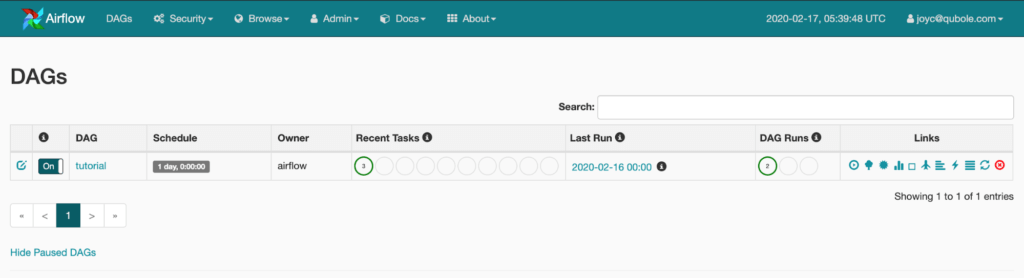
The above image showcases Airflow Webserver HomePage showing a list of DAGs and statuses of their most recent runs.
- Visualizing DAGs: The UI also includes a section for visualizing the DAG flow, a tree view of all recent runs, and the status of each task for these runs. Other things that can be viewed to help debug DAG runs include the DAG code, the amount of time each task takes for each run, logs, and more.
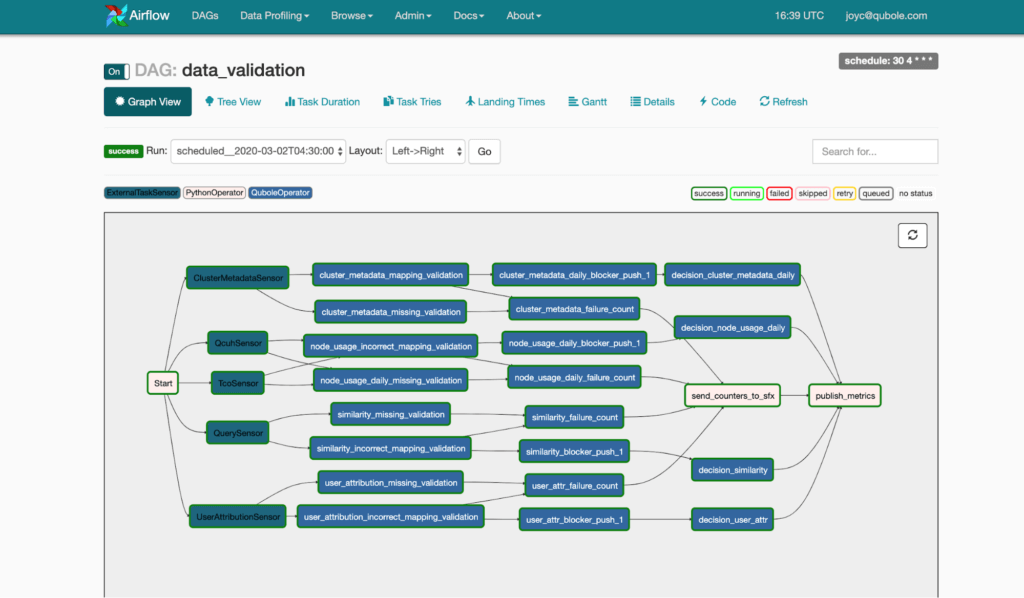
The above image showcases Airflow UI showing a graphical representation of a DAG.
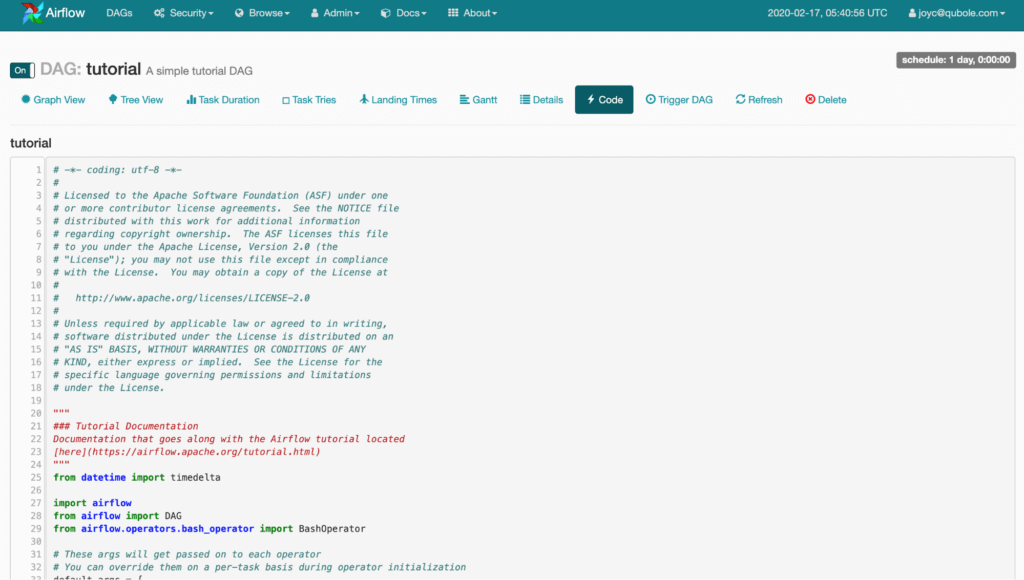
The above image views DAG Code from Airflow UI.
- API Endpoints: Airflow WebServer also includes a set of REST APIs that can be used to perform tasks such as triggering DAGs, tasks, and obtaining the status of each task instance.
- Configuration Management: The Airflow WebServer UI also allows you to manage various configurations such as variables and connections, as well as view the Airflow default configuration.
- User Management: The Airflow WebServer includes the ability to enable Role-Based Access Controls (RBAC). To enable this interface, simply set the value of ‘webserver.rbac‘ to True. It allows you to manage user permissions at a very granular level. We can even limit who can trigger/view a DAG.
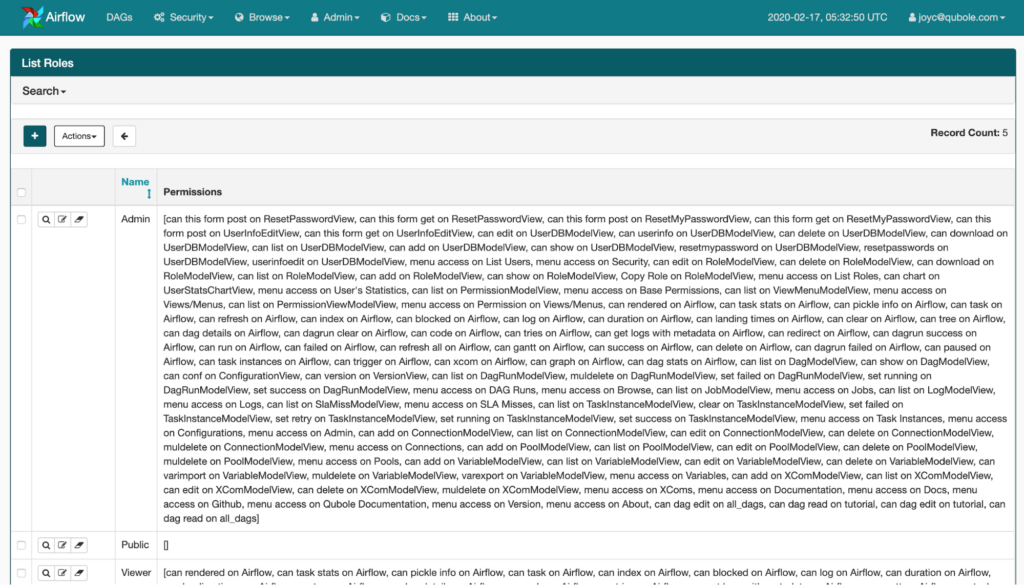
- The above image shows the management of Roles on the Airflow WebServer UI.

Configuring Airflow for securing Airflow Webserver
The different ways of securing Airflow Webserver are as follows:
- Securing Airflow Webserver: Rendering Airflow UI in a Web Frame from another site
- Securing Airflow Webserver: Sensitive Variable fields
- Securing Airflow Webserver: Web Authentication
- Securing Airflow Webserver: SSL
1) Rendering Airflow UI in a Web Frame from another site
Using Airflow UI i.e, Airflow Webserver in a web frame is enabled by default. To disable this, thus preventing clickjacking attacks, you can set the following.
[webserver]
x_frame_enabled = False
2) Sensitive Variable fields
By default, the Airflow Value of a variable is hidden if the key contains any of the following words: (‘password’, ‘secret’, ‘passwd’, ‘authorization’, ‘api key’, ‘apikey’, ‘access token’), but this list can be extended by using the following configuration options:
[admin]
hide_sensitive_variable_fields = comma_separated_sensitive_variable_fields_list
Variable values that are deemed “sensitive” based on the variable name will be automatically masked in the UI, i.e., Airflow Webserver.
For further information on masking sensitive data in Airflow UI i.e, Airflow Webserver, you can visit here.
3) Web Authentication
By default, Airflow requires users to enter a password before logging in. To create an account, you can use the following CLI commands:
# create an admin user
airflow users create
    --username admin
    --firstname Peter
    --lastname Parker
    --role Admin
    --email spiderman@superhero.org
However, authentication can be enabled by using one of the supplied backends or by creating your own.
To disable authentication and allow users to be identified as Anonymous, the following entry in $AIRFLOW_HOME/webserver config.py must be set with the desired default role for the Anonymous user:
AUTH_ROLE_PUBLIC = 'Admin'A) Password
One of the most basic authentication mechanisms is requiring users to enter a password before logging in.
To create accounts, please use the command-line interface, airflow users create or do so in the UI ie, Airflow Webserver.
B) Other Methods
The Flask App Builder RBAC has been the default UI since Airflow 2.0. A webserver_config.py configuration file is generated automatically and can be used to configure the Airflow to support authentication methods such as OAuth, OpenID, LDAP, and REMOTE_USER.
To enable the Flask App Builder RBAC UI in previous Airflow versions, set the following entry in $AIRFLOW_HOME/airflow.cfg.
rbac = TrueThe default authentication option described in the Web Authentication section is linked to the following line in $AIRFLOW_HOME/webserver config.py.
AUTH_TYPE = AUTH_DBAnother way to create users is through the UI login page, which allows user self-registration via a “Register” button. To enable this, edit the following entries in $AIRFLOW_HOME/webserver config.py:
AUTH_USER_REGISTRATION = True
AUTH_USER_REGISTRATION_ROLE = "Desired Role For The Self Registered User"
RECAPTCHA_PRIVATE_KEY = 'private_key'
RECAPTCHA_PUBLIC_KEY = 'public_key'

MAIL_SERVER = 'smtp.gmail.com'
MAIL_USE_TLS = True
MAIL_USERNAME = 'yourappemail@gmail.com'
MAIL_PASSWORD = 'passwordformail'
MAIL_DEFAULT_SENDER = 'sender@gmail.com'
Because user self-registration is a feature provided by the framework Flask-AppBuilder, the package Flask-Mail must be installed via pip.
To support authentication via a third-party provider, update the AUTH_TYPE entry with the desired option such as OAuth, OpenID, or LDAP, and remove the comments from the lines with references to the chosen option in the $AIRFLOW_HOME/webserver config.py.
C) Example using team-based Authorization with Github OAuth
To use team-based authorization with Github OAuth, you must first complete a few steps.
- Configure OAuth in webserver_config.py using the FAB config.
- Make your own security manager class and pass it to FAB in webserver_config.py.
- Map the roles returned by your security manager class to FAB-compliant roles.
Here’s an example of what you could put in your webserver_config.py file:
from flask_appbuilder.security.manager import AUTH_OAUTH
import os

AUTH_TYPE = AUTH_OAUTH
AUTH_ROLES_SYNC_AT_LOGIN = True  # Checks roles on every login
AUTH_USER_REGISTRATION = (
    True  # allow users who are not already in the FAB DB to register
)
# Make sure to replace this with the path to your security manager class
FAB_SECURITY_MANAGER_CLASS = "your_module.your_security_manager_class"
AUTH_ROLES_MAPPING = {
    "Viewer": ["Viewer"],
    "Admin": ["Admin"],
}
# If you wish, you can add multiple OAuth providers.
OAUTH_PROVIDERS = [
    {
        "name": "github",
        "icon": "fa-github",
        "token_key": "access_token",
        "remote_app": {
            "client_id": os.getenv("OAUTH_APP_ID"),
            "client_secret": os.getenv("OAUTH_APP_SECRET"),
            "api_base_url": "https://api.github.com",
            "client_kwargs": {"scope": "read:user, read:org"},
            "access_token_url": "https://github.com/login/oauth/access_token",
            "authorize_url": "https://github.com/login/oauth/authorize",
            "request_token_url": None,
        },
    },
]
The following is an example of how to define a custom security manager. This class must be in Python’s path and, if desired, can be defined in webserver_config.py itself.
from airflow.www.security import AirflowSecurityManager
import logging
from typing import Dict, Any, List, Union
import os

log = logging.getLogger(__name__)
log.setLevel(os.getenv("AIRFLOW__LOGGING__FAB_LOGGING_LEVEL", "INFO"))

FAB_ADMIN_ROLE = "Admin"
FAB_VIEWER_ROLE = "Viewer"
FAB_PUBLIC_ROLE = "Public"  # The "Public" role is given no permissions
TEAM_ID_A_FROM_GITHUB = 123  # Replace these with real team IDs for your org
TEAM_ID_B_FROM_GITHUB = 456  # Replace these with real team IDs for your org


def team_parser(team_payload: Dict[str, Any]) -> List[int]:
    # Parse the team payload from Github however you want here.
    return [team["id"] for team in team_payload]


def map_roles(team_list: List[int]) -> List[str]:
    # Associate the team IDs with Roles here.
    # The expected output is a list of roles that FAB will use to Authorize the user.

    team_role_map = {
        TEAM_ID_A_FROM_GITHUB: FAB_ADMIN_ROLE,
        TEAM_ID_B_FROM_GITHUB: FAB_VIEWER_ROLE,
    }
    return list(set(team_role_map.get(team, FAB_PUBLIC_ROLE) for team in team_list))


class GithubTeamAuthorizer(AirflowSecurityManager):

    # In this example, the oauth provider == 'github'.
    # If you ever want to support other providers, see how it is done here:
    # https://github.com/dpgaspar/Flask-AppBuilder/blob/master/flask_appbuilder/security/manager.py#L550
    def get_oauth_user_info(
        self, provider: str, resp: Any
    ) -> Dict[str, Union[str, List[str]]]:

        # Creates the user info payload from Github.
        # The user previously allowed your app to act on thier behalf,
        #   so now we can query the user and teams endpoints for their data.
        # Username and team membership are added to the payload and returned to FAB.

        remote_app = self.appbuilder.sm.oauth_remotes[provider]
        me = remote_app.get("user")
        user_data = me.json()
        team_data = remote_app.get("user/teams")
        teams = team_parser(team_data.json())
        roles = map_roles(teams)
        log.debug(
            f"User info from Github: {user_data}n" f"Team info from Github: {teams}"
        )
        return {"username": "github_" + user_data.get("login"), "role_keys": roles}
4) SSL
SSL can be activated by supplying a certificate and key. After you’ve enabled it, make sure to use “https://” in your browser.
[webserver]
web_server_ssl_cert = <path to cert>
web_server_ssl_key = <path to key>
Enabling SSL will not automatically change the Airflow Webserver port. If you want to use the standard port 443, you’ll need to configure that too. Be aware that super user privileges (or cap_net_bind_service on Linux) are required to listen on port 443.
# Optionally, set the server to listen on the standard SSL port.
web_server_port = 443
base_url = http://<hostname or IP>:443
You can also enable CeleryExecutor with SSL. It will assist you in ensuring that client and server certs and keys are properly generated.
[celery]
ssl_active = True
ssl_key = <path to key>
ssl_cert = <path to cert>
ssl_cacert = <path to cacert>Conclusion
In this article, you have learned about Airflow Webserver. This article also provided information on Apache Airflow, its key features, components of Airflow Architecture, Airflow Webserver, and different ways of configuring Airflow Webserver UI in detail. For further information on Airflow ETL, Airflow Databricks Integration, Airflow REST API, you can visit the following links.
Hevo Data, a No-code Data Pipeline provides you with a consistent and reliable solution to manage data transfer between a variety of sources and a wide variety of Desired Destinations with a few clicks.
FAQ Airflow Webserver
What does Airflow webserver do?
The Apache Airflow webserver is a critical component of the Airflow ecosystem, providing a user interface (UI) that allows users to interact with and manage their workflows.
What is the difference between scheduler and webserver in Airflow?
The scheduler is responsible for scheduling the execution of tasks within workflows (DAGs). It determines when tasks should run and sends them to the appropriate executor.
The webserver provides a graphical user interface (UI) for users to interact with and manage Airflow workflows.
How to access Airflow webserver?
Here is a guide on how to access Airflow webserver:
1. Starting the webserver
2. Accessing the webserver
3. Logging In
4. Use the user interface
Share it with your connections.
-
 Share To LinkedIn
-
 Share To Facebook
-
 Share To X
-
 Copy Link


