Key Takeaways
The Postgres Operator is an Airflow component that lets you execute SQL operations against PostgreSQL databases within your data workflows. It’s part of the airflow.providers.postgres.operators.postgres package and internally uses PostgresHook for database interactions.
Key purpose: Enables you to perform common database operations like creating tables, inserting data, and querying PostgreSQL databases directly from your Airflow DAGs without writing custom database connection code.
Main use cases: Creating database schemas, populating tables with data, running queries for data extraction, and managing database operations as part of larger data pipelines.
Best practices: Store SQL queries in separate .sql files within a sql/ directory rather than embedding them directly in your DAG code for better maintainability and organization.
Airflow is a Task Automation tool. It helps organizations to schedule their tasks so that they are executed when the right time comes. This relieves the employees from doing tasks repetitively. When using Airflow, you will want to access it and perform some tasks from other tools. This means that you will need a way to connect to Airflow from other tools. PostgreSQL is an Object-Relational Database Management System that focuses on SQL compliance and extensibility. This Open-Source Relational Database supports both JSON & SQL querying and serves as the primary data source for numerous mobile, web, geospatial, and analytics applications.
This blog talks about the different steps you can take to establish Airflow Postgres Operator seamlessly. It also gives a brief introduction to the key features of Apache Airflow and Airflow Operators before diving into the nitty-gritty of the article.
Table of Contents
What is Apache Airflow?

Apache Airflow is an open-source workflow automation and scheduling platform that programmatically authors, schedules, and monitors workflows. Organizations use Airflow to orchestrate complex computational workflows, create data processing pipelines, and perform ETL processes. Apache Airflow uses DAG (Directed Acyclic Graph) to construct the workflow, and each DAG contains nodes and connectors. Nodes connect to other nodes via connectors to generate a dependency tree.
Key Features of Apache Airflow
- Dynamic Integration: Airflow uses Python as the backend programming language to generate dynamic pipelines. Several operators, hooks, and connectors are available that create DAG and tie them to create workflows.
- Extensible: Airflow is an open-source platform, and so it allows users to define their custom operators, executors, and hooks. You can also extend the libraries so that it fits the level of abstraction that suits your environment.
- Elegant User Interface: Airflow uses Jinja templates to create pipelines, and hence the pipelines are lean and explicit. Parameterizing your scripts is a straightforward process in Airflow.
- Scalable: Airflow is designed to scale up to infinity. You can define as many dependent workflows as you want. Airflow creates a message queue to orchestrate an arbitrary number of workers.
Some of the uses of Airflow include:
- Scheduling and running data pipelines and jobs.
- Ordering jobs correctly based on dependencies.
- Managing the allocation of scarce resources.
- Tracking the state of jobs and recovering from failures.
What are Apache Airflow Operators?
Before delving into Apache Airflow Operators, you need to understand DAGs. DAGs are defined as a collation of tasks where all the tasks (if linked) are linked through direct lines. Within Airflow, DAGs are defined using Python code. Here’s a code snippet to describe the process of creating a DAG in Airflow:
from airflow import DAG
dag = DAG(
dag_id='example_bash_operator',
schedule_interval='0 0 * * *',
dagrun_timeout=timedelta(minutes=60),
tags=['example']
)
A DAG comprises multiple tasks that need to be executed in a specific order. These tasks can be SubDags, Sensors, or Operators in Airflow. Once you’ve instantiated an Operator, it can provide integration to a service like PostgresOperator, MySQLOperator, SlackOperator, to name a few.
What is Apache Airflow Postgres Operator?
The primary purpose of leveraging the Apache Airflow Postgres Operator is to describe the tasks involving interactions with the PostgreSQL database. In Airflow-2.0, the Apache Airflow Postgres Operator class can be found at airflow.providers.postgres.operators.postgres. Internally, Airflow Postgres Operator passes on the cumbersome tasks to PostgresHook.
If you want to leverage the Airflow Postgres Operator, you need two parameters: postgres_conn_id and sql. These two parameters are finally sent to the PostgresHook object that directly makes contact with the PostgreSQL database.
How Do You Use the Airflow Postgres Operator for Database Operations?
Here are a few handy operations that can be carried out by a user while leveraging Airflow Postgres Operator:
- Creating a Postgres Database Table
- Inserting Data into said Postgres Database Table
- Querying/Fetching Data from Postgres Database Tables
Automate Your PostgreSQL Data Pipelines:
The following sections will cover the aforementioned operations with helpful examples to drill the point home.
How to Create a Postgres Database Table?
- Step 1: Execute the following code snippet:
import datetime

from airflow import DAG
from airflow.providers.postgres.operators.postgres import PostgresOperator

# create_pet_table, populate_pet_table, get_all_pets, and get_birth_date are examples of tasks created by
# instantiating the Postgres Operator

with DAG(
    dag_id="postgres_operator_dag",
    start_date=datetime.datetime(2020, 2, 2),
    schedule_interval="@once",
    catchup=False,
) as dag:
    create_pet_table = PostgresOperator(
        task_id="create_pet_table",
        sql="""
            CREATE TABLE IF NOT EXISTS pet (
            pet_id SERIAL PRIMARY KEY,
            name VARCHAR NOT NULL,
            pet_type VARCHAR NOT NULL,
            birth_date DATE NOT NULL,
            OWNER VARCHAR NOT NULL);
          """,
)- DAG Definition:
dag_id="postgres_operator_dag": Identifies the DAG.start_date: Sets the start date to February 2, 2020.schedule_interval="@once": Runs the DAG only once.catchup=False: Disables backfilling of missed runs.
- Task:
create_pet_table: UsesPostgresOperatorto execute SQL that creates apettable if it doesn’t already exist.- The table has columns for
pet_id(primary key),name,pet_type,birth_date, andowner.
- Step 2: Unloading SQL statements within your Airflow Postgres Operator isn’t the most effective solution and might cause maintainability pains in the future. Airflow comes to the rescue with an elegant solution. All you need to do is create a directory within the DAG folder known as sql and then place all the SQL files that contain your SQL queries inside it. This is what your dags/sql/pet_schema.sql should look like:
-- create pet table
CREATE TABLE IF NOT EXISTS pet (
    pet_id SERIAL PRIMARY KEY,
    name VARCHAR NOT NULL,
    pet_type VARCHAR NOT NULL,
    birth_date DATE NOT NULL,
OWNER VARCHAR NOT NULL);- Step 3: Finally, you need to refactor create_pet_table within your DAG as follows:
create_pet_table = PostgresOperator(
    task_id="create_pet_table",
    postgres_conn_id="postgres_default",
    sql="sql/pet_schema.sql",
)
How to Insert Data into Postgres Tables?
- Step 1: If you assume that you already have the SQL Insert statement in your dags/sql/pet_schema.sql file as follows:
-- populate pet table
INSERT INTO pet VALUES ( 'Max', 'Dog', '2018-07-05', 'Jane');
INSERT INTO pet VALUES ( 'Susie', 'Cat', '2019-05-01', 'Phil');
INSERT INTO pet VALUES ( 'Lester', 'Hamster', '2020-06-23', 'Lily');
INSERT INTO pet VALUES ( 'Quincy', 'Parrot', '2013-08-11', 'Anne');- Step 2: You can then create an Airflow Postgres Operator task that fills up the pet table with the following code snippet:
populate_pet_table = PostgresOperator(
    task_id="populate_pet_table",
    postgres_conn_id="postgres_default",
    sql="sql/pet_schema.sql",
)
How to Fetch/Query Data from Postgres Tables?
Querying or Fetching data from your Postgres Tables while leveraging Airflow Postgres Operators can be as simple as executing the following code snippet:
get_all_pets = PostgresOperator(
    task_id="get_all_pets",
    postgres_conn_id="postgres_default",
    sql="SELECT * FROM pet;",
)task_id="populate_pet_table": Uniquely identifies this task within the DAG.postgres_conn_id="postgres_default": Specifies the PostgreSQL connection to use, configured in Airflow.sql="sql/pet_schema.sql": Executes the SQL script located atsql/pet_schema.sqlto populate thepettable with data.
How to Connect to Apache Airflow using Postgres Operator Airflow?
Here are the steps involved in setting up Airflow Postgres Operator:
- Step 1: Import Airflow Modules
- Step 2: Configure Default Airflow Postgres Operator Arguments
- Step 3: Instantiate your Airflow DAG
- Step 4: Set up Airflow Task using the Postgres Operator
- Step 5: Configure Dependencies for Airflow Operators
- Step 6: Establishing Airflow PostgreSQL Connection
- Step 7: Verify your Connection
Before you start setting up Airflow Postgres Operator, you need to make sure that your system fulfills the following requirements:
- Installed Apache Airflow
- Installed Ubuntu in the Virtual Machine
- Installed Postgres in your Local
- Installed Packages if you are using the latest version of Airflow (pip3 install apache-airflow-providers-postgres)
First, generate a DAG file within the /airflow/dags folder by using the following command:
sudo gedit postgresoperator_demo.pyAfter you’ve executed the aforementioned command, you can carry out the following steps.
Step 1: Import Airflow Modules
- First, you need to import key Python dependencies that are needed for the workflow to function effectively:
import airflow
    from datetime import timedelta
    from airflow import DAG
    from airflow.operators.postgres_operator import PostgresOperator
    from airflow.utils.dates import days_ago
Step 2: Configure Default Airflow Postgres Operator Arguments
- Next, you need to describe the DAG-specific and default arguments for your Airflow Postgres Operator as follows:
args={'owner': 'airflow'}

default_args = {
    'owner': 'airflow',
    #'start_date': airflow.utils.dates.days_ago(2),
    # 'end_date': datetime(),
    # 'depends_on_past': False,
    #'email': ['airflow@example.com'],
    #'email_on_failure': False,
    # 'email_on_retry': False,
    # If a task fails, retry it once after waiting
    # at least 5 minutes
    'retries': 1,
    'retry_delay': timedelta(minutes=5),
}
Step 3: Instantiate your Airflow DAG
- After you’ve configured the arguments for your Airflow Postgres Operator, you can assign a name for your DAG, configure the schedule along with the DAG settings as mentioned in the code snippet given below:
dag_psql = DAG(
    dag_id = "postgresoperator_demo",
    default_args=args,
    # schedule_interval='0 0 * * *',
    schedule_interval='@once',
    dagrun_timeout=timedelta(minutes=60),
    description='use case of psql operator in airflow',
    start_date = airflow.utils.dates.days_ago(1)
)dag_id="postgresoperator_demo"and a brief description explain its purpose.- Uses
default_argsfromargsfor common settings. schedule_interval='@once': Executes only once.dagrun_timeout=timedelta(minutes=60): Limits each run to 60 minutes.- Starts one day before the current date.
- If you don’t want to schedule your DAG, you can simply use schedule_interval=None as opposed to schedule_interval=’None’.
Step 4: Set up Airflow Task using the Postgres Operator
- Next, you need to set up the tasks that require all the tasks in the workflow to function efficiently. Within the code snippet create_table, insert_data are tasks generated by instantiating the codes. To execute the SQL query, insert_data_sql_query and create_table_sql_query are created as well. Here’s the complete code snippet for the same:
create_table_sql_query = """
CREATE TABLE employee (id INT NOT NULL, name VARCHAR(250) NOT NULL, dept VARCHAR(250) NOT NULL);
"""
insert_data_sql_query = """
insert into employee (id, name, dept) values(1, 'vamshi','bigdata'),(2, 'divya','bigdata'),(3, 'binny','projectmanager'),
(4, 'omair','projectmanager') ;"""

    create_table = PostgresOperator(
    sql = create_table_sql_query,
    task_id = "create_table_task",
    postgres_conn_id = "postgres_local",
    dag = dag_psql
    )

    insert_data = PostgresOperator(
    sql = insert_data_sql_query,
    task_id = "insert_data_task",
    postgres_conn_id = "postgres_local",
    dag = dag_psql
    )
Step 5: Configure Dependencies for Airflow Operators
- In this step, you will have to set up the order in which the tasks need to be executed or dependencies. In the following code snippet, a handy way of defining dependencies has been provided:
create_table >> insert_data

    if __name__ == "__main__":
dag_psql.cli()- The aforementioned snippet explains that the create table task will be run first followed by the Insert Data Execute task. As is evident, a DAG is simply a Python file that can be used to organize tasks and establish their execution context. DAGs aren’t meant to be used for carrying out any form of actual computation. Opposed to this, Tasks are the elements of Airflow that execute the “work” that needs to be performed. Hence, it becomes your job to pen down the configuration and manage the tasks in specific orders to develop a complete and effective Data Pipeline.
Step 6: Establishing Airflow PostgreSQL Connection
- First, you need to create the Connection Airflow to connect the Postgres Database as depicted below:
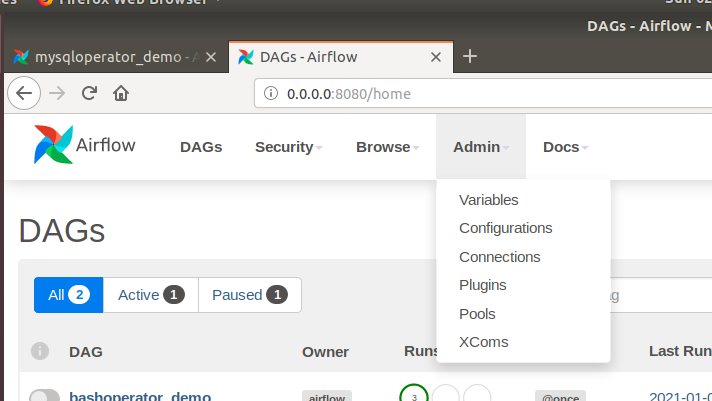
- Next, hover over to the admin tab to choose the connections. You will be prompted with a new window to generate and pass the details of the Postgres connection as mentioned below:

- Next, click on the plus button next to the action tab to generate an Airflow connection to Postgres as follows:
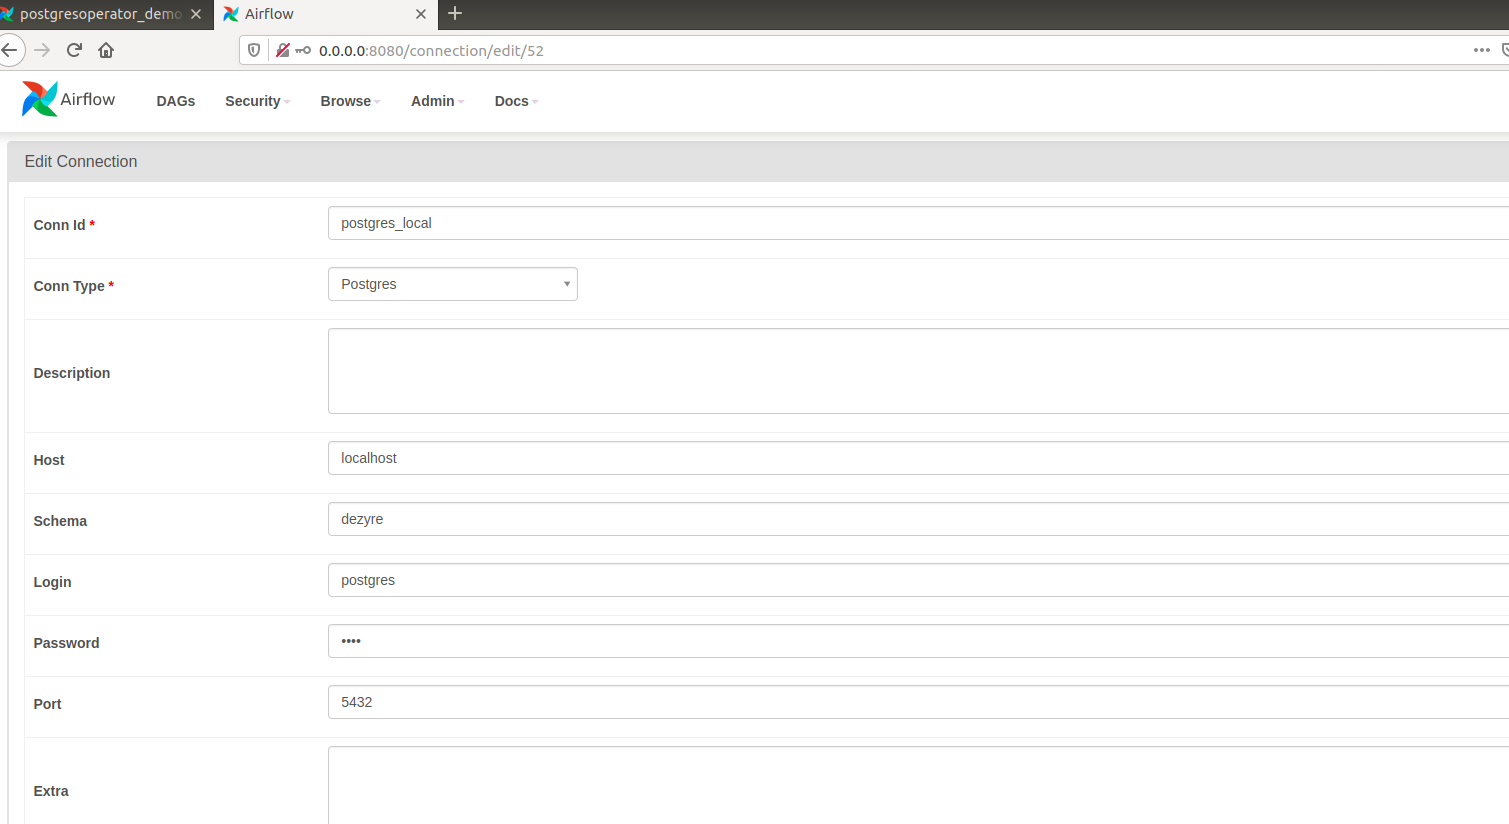
- Now, you need to supply the conn id with the value of your choice followed by selecting Postgres for the connType. You also need to use localhost as the host when prompted followed by specifying the schema name and pass credentials of Postgres. The default port you can leverage is 5432 along with the password received previously to finish this step.
Step 7: Verify your Connection
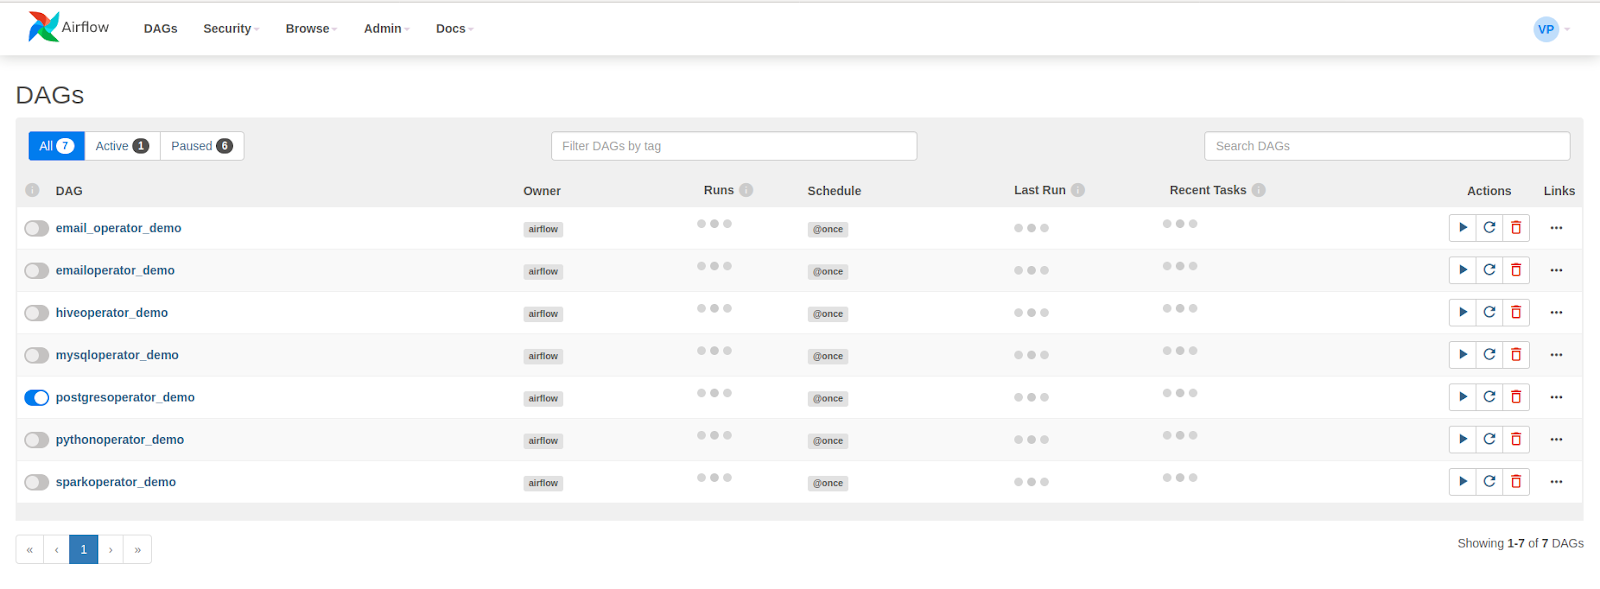
- After you’ve successfully established a functional Airflow Postgres Operator connection, you’ll have to verify the same. First, you need to unpause the postgresoperator_demo dag file as follows:
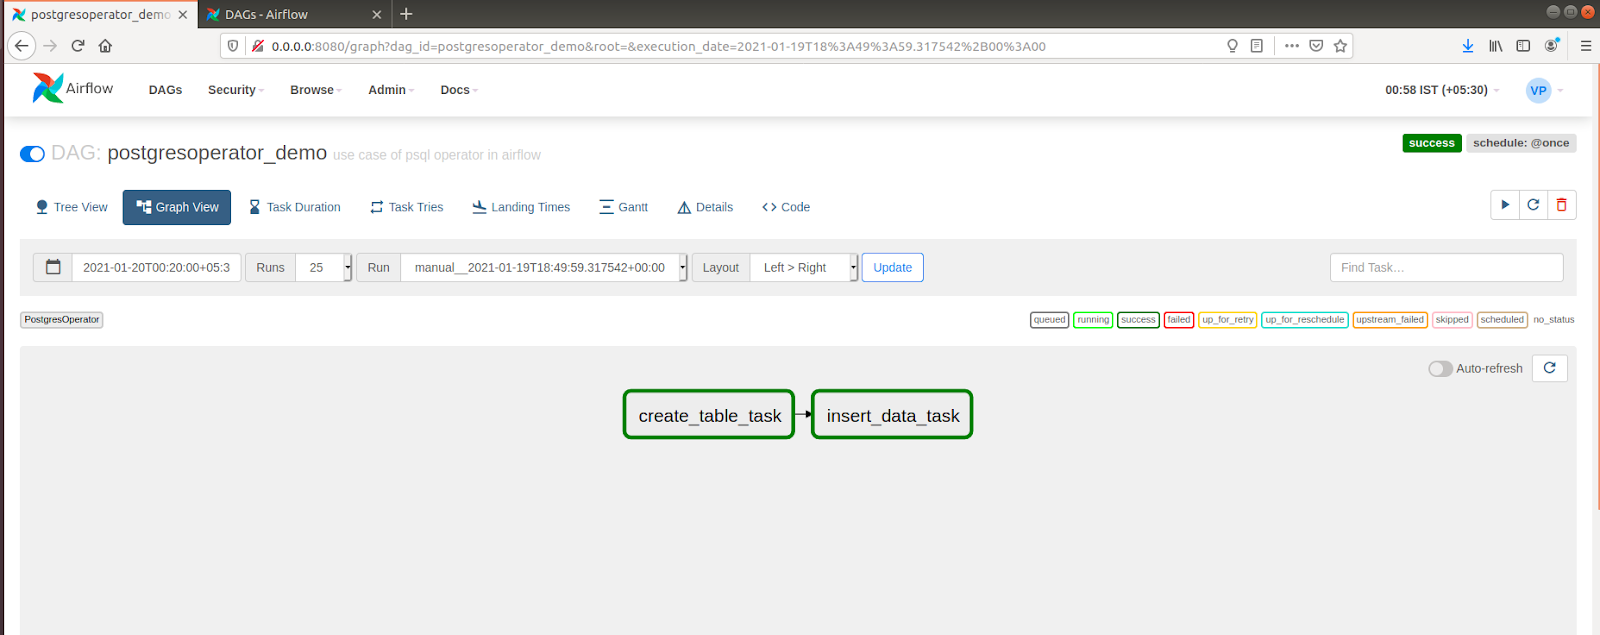
- Next, click on the “postgresoperator_demo” name and check the DAG logfile followed by selecting Graph View. You have two tasks to insert data tasks and create a table as follows:
- If you want to check the log file to ascertain the query status, you need to click on the Make Table task present in the Graph View. This prompts you with the following window:

- Hover to the log tab and click it to check the log file. Here’s what the log file would look like:
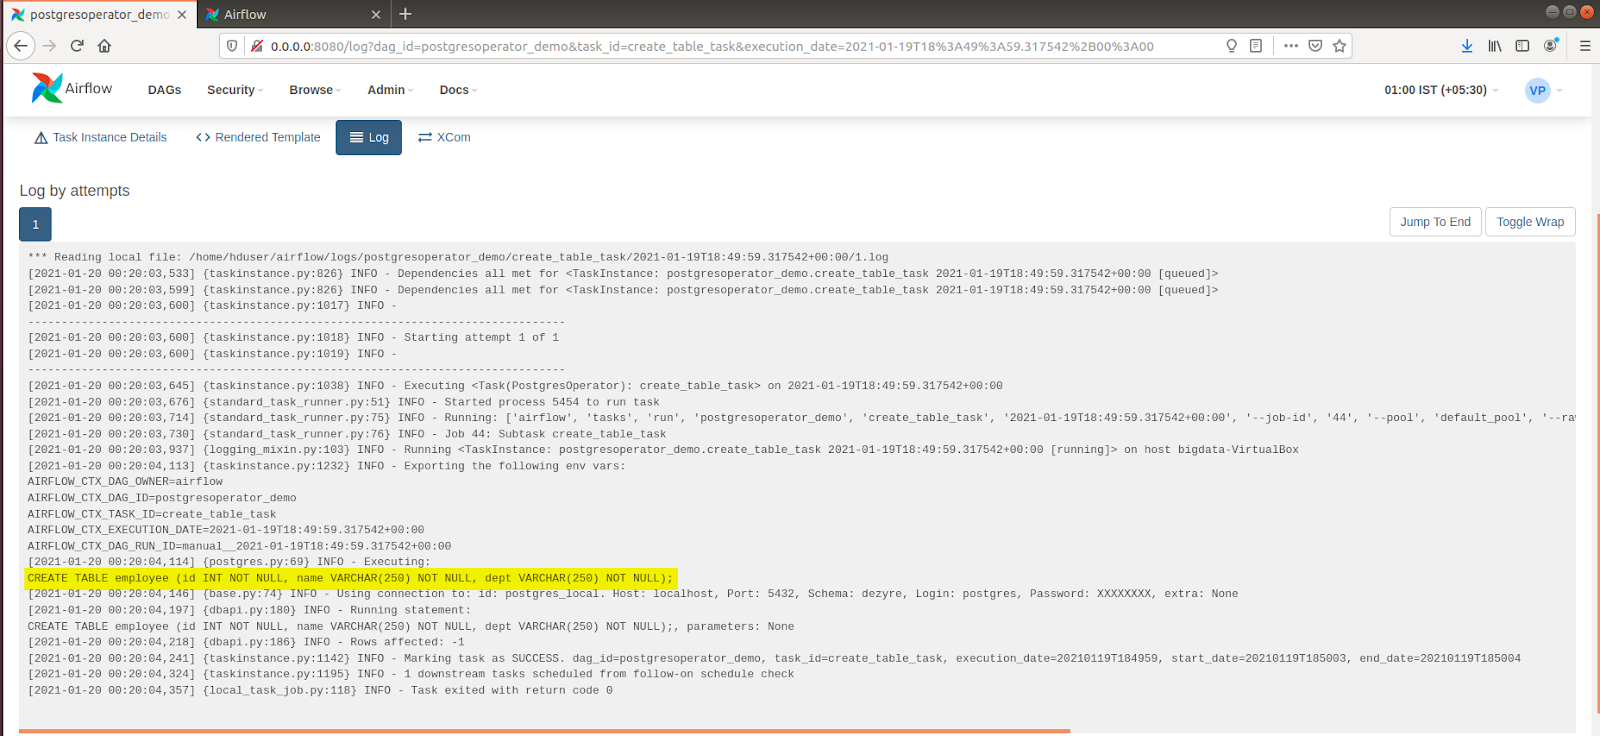
- It is evident from the aforementioned log file that the command led to the creation of table tasks. To check the functioning of the Insert Data Task, follow the steps mentioned below:
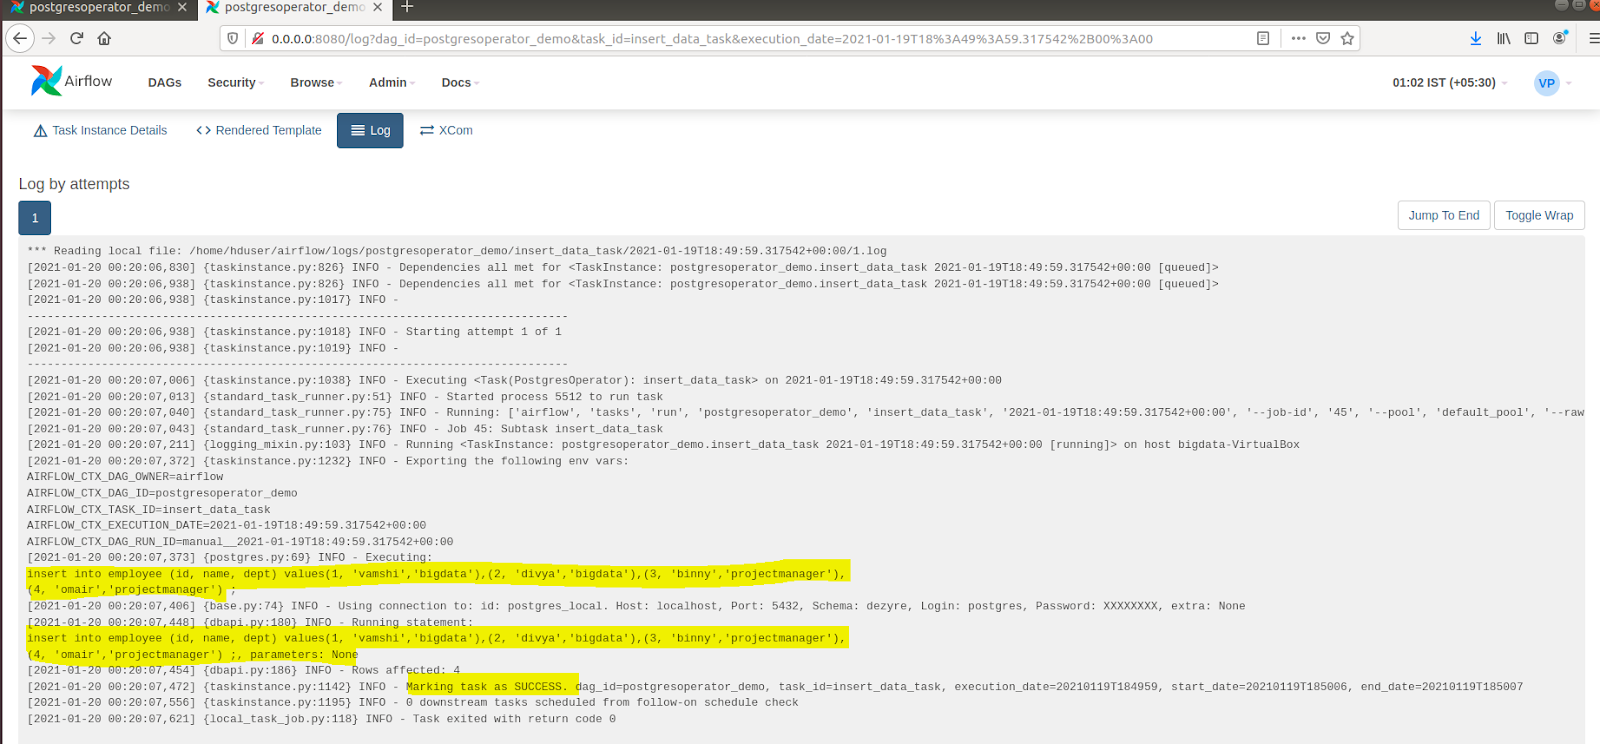
- The output of the aforementioned DAG file is depicted in the command line as follows:

What Are Parameters and Params in Airflow Postgres Operators?
The Airflow Postgres Operator allows you to pass values/parameters to your SQL requests. This can come in handy for the following reasons:
- You can easily inject these values/parameters at runtime allowing you to avoid hardcoding data within your SQL requests.
- The values/parameters are grouped at the same place improving the clarity of your DAG.
Parameters
- Step 1: If you want to pass an age to your SQL request, you can use the argument “parameters” present in the Airflow Postgres operator. Parameters either take a dictionary or a list/tuple. Here’s an example to drive the point home:
check_age = PostgresOperator(
task_id='check_age',
postgres_conn_id='postgres_default',
sql="SELECT CASE WHEN %s > 21 THEN 'adult' ELSE 'young' END",
parameters=[30]
)- Step 2: This is what the output of the aforementioned code snippet looks like:
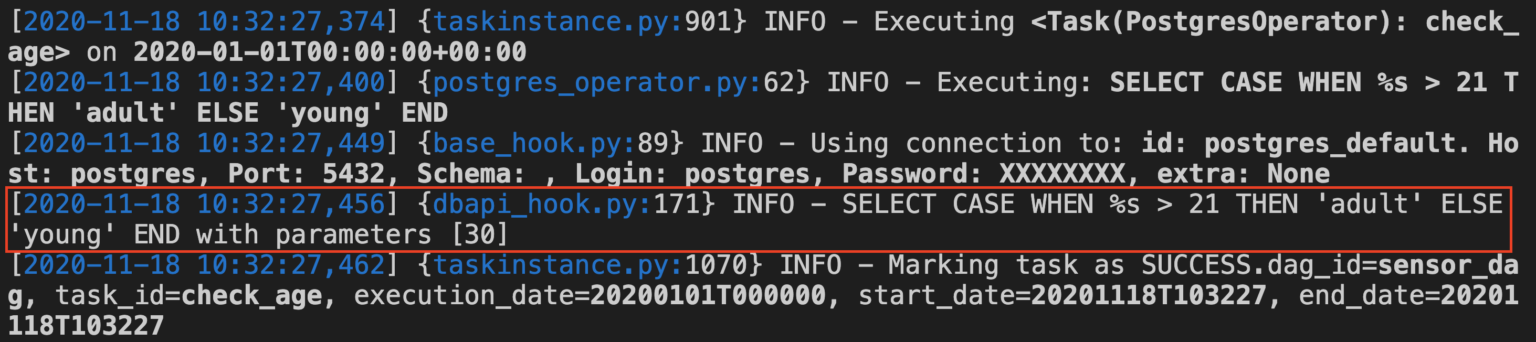
- Step 3: In this instance, the placeholder %s gets replaced by the value 30 within the parameters. Apart from this, you can see that the value is depicted in the output as “with parameters [30]. If you want to leverage a dictionary instead of a list, start with the following snippet:
check_age = PostgresOperator(
task_id='check_age',
postgres_conn_id='postgres_default',
sql="SELECT CASE WHEN %(age)s > 21 THEN 'adult' ELSE 'young' END",
parameters={ 'age': 30 }
)- Step 4: Pay close attention to the special syntax %(theKeys)s. To adhere to the best practices, place the SQL request in a file named SELECT_AGE.sql. This is what this file will contain:
/*  dags/SELECT_AGE.sql */
SELECT CASE WHEN %(age)s > 21 THEN 'adult' ELSE 'young' END- Step 5: It will also contain the related task as mentioned below:
  check_age = PostgresOperator(
task_id='check_age',
postgres_conn_id='postgres_default',
sql="sql/SELECT_AGE.sql",
parameters={ 'age': 30 }
)- Step 6: It is pretty evident that it’s almost the same code, except in this instance, the SQL request is in a dedicated file to clean up your DAG and make it more organized.
Params
Similar to any other Airflow Operator, the Airflow Postgres Operator inherits from the BaseOperator. This means that all arguments defined in the BaseOperator can be accessed from the Airflow Postgres Operator. One such argument that you can access is “params”. You can leverage Params to pass additional values to your operators.
Here’s an example demonstrating how you can leverage Params:
- Step 1: Say, you use the same SQL request:
/*  dags/SELECT_AGE.sql */
SELECT CASE WHEN %(age)s > 21 THEN 'adult' ELSE 'young' END- Step 2: Now, if instead of using parameters, you use Params as follows:
check_age = PostgresOperator(
task_id='check_age',
postgres_conn_id='postgres_default',
sql="sql/SELECT_AGE.sql",
params={ 'age': 30 }
)- Step 3: This will throw the following error:

- Step 4: The error is thrown because params don’t work like the argument parameters. The primary difference between parameters and params is that parameters are specific to the Airflow Postgres Operator as opposed to params that can be leveraged by all operators. If you want to access Params with the Postgres Operator, you have to use the Jinja template syntax. This is how using this syntax on the previous statement would look like:
/*  SELECT_AGE.sql */
SELECT CASE WHEN {{ params.age }} > 21 THEN 'adult' ELSE 'young' END- Step 5: Now, if you try to run this command, this is the output you get:

Learn More About:
- Understanding Airflow BigQuery Operators
- Sending Emails using Airflow EmailOperator
- Airflow Redshift Operator
Conclusion
This blog talks in detail about the different steps you can follow to set up an Airflow Postgres Connection for your Data Pipeline.
It also gives a brief introduction to Postgres and Airflow Operators before diving into the steps involved in setting up Airflow Postgres Operator.
Extracting complex data from a diverse set of data sources to carry out an insightful analysis can be challenging, and this is where Hevo saves the day!
FAQ on Airflow Postgres Operator
How to import Postgres operator in Airflow?
To import and use the Postgres operator in Apache Airflow, you need to ensure that you have the apache-airflow-providers-postgres package installed. This package contains the PostgresOperator.
How do I connect Airflow to Postgres?
To connect Airflow to Postgres follow the given steps:
1. Open Airflow UI
2. Go to Admin > Connections
3. Create a new Connection
4. Configure the Postgres Connection
How do I use email operator in Airflow?
To use the email operator follow the given steps:
Install the required Packages
Configure Airflow to use an SMTP Server
Create a DAG with EmailOperator
What is the Postgres operator?
The PostgresOperator is provided by the apache-airflow-providers-postgres package. This operator allows you to execute SQL commands against a PostgreSQL database as part of your Airflow DAGs.
What are Airflow operators?
In Apache Airflow, operators are units of work that perform a specific task in a workflow. They encapsulate an action or a set of actions that can be executed as part of a Directed Acyclic Graph (DAG), which is a collection of tasks and their dependencies.
Share it with your connections.
-
 Share To X
-
 Share To LinkedIn
-
 Share To Facebook
-
 Copy Link