


Tableau is a powerful Data Visualization tool that data analysts, scientists, statisticians, and others may use to visualize data and draw clear conclusions from data analysis. Tableau is well-known for its ability to process large amounts of data quickly and produce the necessary Data Visualization results.
In this article, you will learn about Tableau and how to DateParse Tableau and convert fields to Date type.
Table of Contents
What is Tableau?

Tableau is a powerful and rapidly evolving Data Visualization program. It aids in the conversion of raw data into an easily understandable format. Tableau assists in the generation of data that specialists at all levels of an organization can understand. Custom dashboards are simple to create even for those with little technical skills.
Tableau allows for quick Data Analysis and the creation of graphics in the form of dashboards and workbooks.
Key Features of Tableau
- Usability: It’s easy to use and doesn’t require any technical or programming knowledge. When it comes to constructing a dashboard, it responds quickly. Tableau may be downloaded to mobile devices and desktop computers, making it easy to access and analyze data. Multilingual data representation and real-time data exploration are supported.
- Connection and Sharing: It comes with many advanced features, such as cooperation and data distribution.
- Security: Multiple data sources are linked together in a highly secure manner. Importing and exporting massive amounts of data is simple.
- Advanced Visualization: Tableau allows you to create a wide range of visualizations, from simple Pie Charts and Bar Graphs to more complicated Histograms and Gantt Charts.
Tableau is a powerful BI tool that simplifies data visualization, enabling businesses to extract insights and make data-driven decisions. While Tableau handles visualizations, tools like Hevo can streamline data integration into compatible databases, ensuring your data is always ready for analysis. Try Hevo and equip your team to:
- Instantly load and sync your transformed data into your desired destination.
- Integrate data from 150+ sources(60+ free sources).
- Simplify data mapping with an intuitive, user-friendly interface.
Understanding the Process of Verifying Date Fields
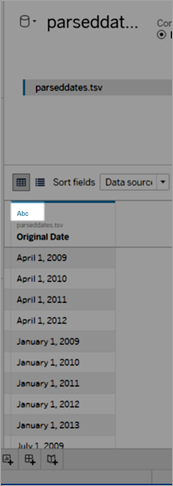
A Date Field might appear as a string in either the Data Source page or the Data Pane.
All of the advantages and conveniences of dealing with date fields, such as drilling down, using date computations, and toggling between Continuous and Discrete measurements, are lost when dates are treated as strings.
If the dates are not parsed correctly then perform the following steps in order:
- DateParse Tableau Process: Change the Data Type of the Field
- DateParse Tableau Process: Create a Calculation using the DATEPARSE Function
- DateParse Tableau Process: Create a Calculation using the DATE Function
1. Change the Data Type of the Field
Ensuring the data type is set to Date or Date & Time is the first step in fixing a date field interpretation in DateParse Tableau.
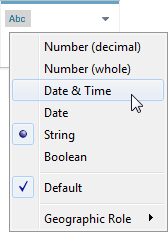
- Step 1: In the Data Source or Data pane, click the data type icon and change the data type to Date or Date & Time.
- Step 2: Examine the data in the Data Source or View pane. If there are a lot of null values, change the data type to String and continue. To fix the problem, use the DATEPARSE function to make a calculation.

2. Create a Calculation Using the DATEPARSE Function
Dates can be saved in an almost limitless number of forms. Years come before months in some date fields, periods divide sections of the date in others, and still, others employ a mix of styles. It’s possible that Tableau can’t comprehend a date field because the format can’t be translated.
You may explicitly identify which portions of your field are which parts of a date using the DATEPARSE Tableau function. In other words, you’re making a map that Tableau can utilize to convert the string to a date field. This map is called The Format.
2.1: Creating the DATEPARSE function
To create a DATEPARSE Tableau Function, follow the given steps:
- Step 1: Examine your date field’s current format. In your field, take note of where the months, years, hours, and days are shown. This information is required for the DATEPARSE Tableau function.
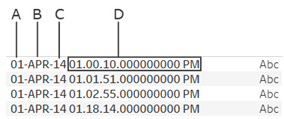
A- Day of month
B- Month
C- Year
D- Hour, minute, second, millisecond, period
- Step 2: In the Dimensions pane, right-click the date field and then choose Create > Calculated Field.
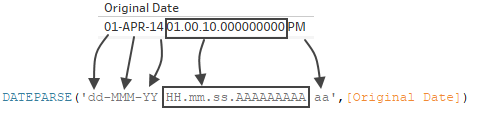
- Step 3: Write the DATEPARSE function in the dialogue box. The format and the string are the two pieces of the DATEPARSE Tableau function. The string represents the field you want to convert, and it must be of the string data type.
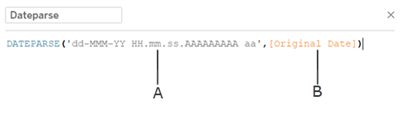
Tableau will use the format as a reference to interpret the string as a date. As shown in the table below, each portion of a date or time string has a corresponding symbol. The format should be identical to the way the date is shown. The calculation may yield null values if a single year code (“Y”) is used when the text has a two-digit year code (“97”).
To accurately read the string, the format must include all spaces, hyphens, and other non-alphanumeric symbols.
2.2: Date Field Symbols
| Date Part | Symbol | Example String | Example Format |
| Year | y | 97, 2017 | yy, y or yyyy |
| Year of “Week of the year” | Y | 1997 | Y |
| Time Zone | Z, z | -0800, PST-08:00, PST | Z, ZZZZ, zzz |
| Month | M | 9, 09, Sep, September | M, MM, MMM, MMMM |
| Week of the year (1-52) | w | 8, 27 | w, ww |
| Quarter of year | Q | Q2, 2nd quarter | QQQ, QQQQ |
| Day of week | E | Mon, Monday | EEE, EEEE |
| Day of month | d | 1, 15 | d, dd |
| Day of the year (1-365) | D | 23, 143 | D, DD, DDD |
| Period (am/pm marker) | a | AM, am, PM | aa, aaaa |
| Hour (1-12), Hour (0-23) | h, H | 1, 10, 16 | h, hh, HH |
| Minute | m | 8, 59 | m, mm |
| Second in a minute | s | 5, 05 | s, ss |
| Fractional second | S | 2, 23, 235, 2350 | S, SS, SSS, SSSS |
| Milliseconds in the day | A | 34532 | AAAAA |
- Step 4: Compare your format to the string shown in Tableau. Select OK to create the new calculated field if the symbols and formatting are right. In your view, the calculated field will be used as a date field.
2.3: Hyper Extracts
The Unicode Consortium defines the symbols for .hyper extract data sources. Go to Format syntax in the DATEPARSE function to extract data sources for more information on the field types and symbols that can be used with the DATEPARSE Tableau function in .hyper extracts.


2.4: Locale Considerations
To interpret and display the strings you want to convert, the DATEPARSE function uses the locale supplied by your computer settings. The location, in particular, has an impact on whether or not a particular format may be identified. This means that if the locale doesn’t support a format, you can get a null value or nothing at all. For example, you’ve got the following string in your data:
12Sep2016:9:8:8.6546
The DATEPARSE function returns different values for this string depending on the locale. You will receive a particular value in the English locale, but none in the Japanese locale. Because the Japanese locale does not recognize “Sep,” no value is returned in this example.
Datetime value
| English locale | Japanese locale |
| #9/12/2016 9:08:09 AM# | – |
When you use the DATEPARSE function to convert a string to a DateTime type, Tableau will show the DateTime value in the default format of your locale, just like it does with all dates. The result of the DATEPARSE function may display your new DateTime value in a different format if the locale changes.
3. Create a Calculation Using the DATE Function
You can use the DATE function instead of the DATEPARSE function if the data you’re working with doesn’t have the DATEPARSE function or if the field you’re trying to convert has a numeric data type.
- Step 1: The DATE function converts a date type from an integer, string, or date expression. Tableau inserts a new field in your Tableau data source when you use the DATE function in a calculation. This field allows you to interact with your date data as a date. Tableau must be able to interpret the components of the string into date parts in order to effectively output date values from an integer, string, or date expression using the DATE function. Tableau uses the computer locale to determine the date’s default format after identifying the date’s components.
For example, the table you’re dealing with has a column called “Original Date” that contains date data. The column “Original Date” is of the string type.
| Original Date |
| 03Jan2017 |
| 05Jan2017 |
| 07Mar2017 |
| 19Mar2017 |
| 30Apr2017 |
- Step 2: In this situation, you may build a calculated field named “New Date” that converts the string values in the “Original Date” field to date values using an expression in a DATE function.
- Step 3: The LEFT function isolates the day component, the MID function isolates the month component, and the RIGHT function isolates the year component in this example’s date expression.
DATE (LEFT([Original Date], 2) + "/" + MID([Original Date],3,3) + "/" + RIGHT([Original Date],4))The “New Date” calculation gives the following column:
| New Date |
| 1/3/2017 |
| 1/5/2017 |
| 3/7/2017 |
| 3/19/2017 |
| 4/30/2017 |
The updated date values in this example are based on an English locale and default formatting.

Conclusion
Mastering DateParse in Tableau simplifies the process of converting fields into date formats, enabling accurate analysis and seamless visualizations. With just three straightforward steps, you can transform string data into meaningful dates, ensuring consistency and reliability in your reports. This function is particularly useful when working with diverse datasets that may not follow standard date formats.
Effortless data preparation is key to effective analytics, and while Tableau handles visualization, tools like Hevo automate data integration, ensuring your data is always accurate and analysis-ready.
Streamline your data workflows and unlock the full potential of Tableau—Sign up for a free trial and explore Hevo today!
Frequently Asked Questions
1. What is the use of Dateparse in Tableau?
The DATEPARSE function in Tableau is used to convert a string into a date format based on a specified date format string.
2. What does Datepart do in Tableau?
The DATEPART function extracts a specific part of a date (e.g., year, month, day) from a given date field.
3. How do I show a date as a string in Tableau?
STR(DATEPART(‘month’, [Order Date])) + ‘/’ + STR(DATEPART(‘day’, [Order Date])) + ‘/’ + STR(DATEPART(‘year’, [Order Date]))
Share it with your connections.
-
 Share To LinkedIn
-
 Share To Facebook
-
 Share To X
-
 Copy Link


