

In today’s data-driven world, efficient workflow management and secure storage are essential for the success of any project or organization. If you have large datasets in a cloud-based project management platform like Hive, you can smoothly migrate them to a relational database management system (RDBMS), like MySQL.
Now, you must be wondering why you should connect the two applications. The Hive MySQL replication ensures real-time backup of critical data within the Hive platform onto the secure MySQL infrastructure. You can efficiently manage your projects in Hive and safeguard the data related to the project workflows in MySQL.
This section will guide you in replicating Hive data to MySQL using two easy methods. Let’s start exploring the process for Hive MySQL replication!
Looking for the perfect ETL solution for your Hive to MySQL? Hevo stands out among the top tools with its seamless integration and powerful features.
Why Choose Hevo?
- Versatile Integration: Supports Hive and MySQL and other 150+ connectors.
- No-Code Platform: Easily set up and manage data pipelines without any coding.
- Real-Time Data Sync: Ensure your data warehouse is always up-to-date with real-time data flows.
Join industry leaders, including Freight Tiger, who rely on Hevo for efficient and reliable data integration from PostgreSQL.
Table of Contents
What is Hive?
Hive is a cloud-based project management, planning, and collaboration platform that enables businesses to organize their projects and tasks to suit their preferences and workflows.
In the Hive platform, you can easily create and assign tasks, connect remotely with your team, and automatically track the time spent on Hive activities. You can also quickly start any project by utilizing hundreds of pre-built templates on the platform.
Hive offers key features, such as Analytics, Automations, and Integrations. These features allow you to derive insights into your projects, save time by automating your daily tasks, and integrate Hive with your frequently used applications.
What is MySQL?
MySQL is one of the most popular open database management systems. It allows you to efficiently store, manage, and retrieve data using SQL syntax. Many organizations use MySQL to manage high-traffic websites, critical business applications, and packaged software solutions.
MySQL offers a default stored engine called InnoDB to provide robustness and reliability for database transactions. Other stored engines include CSV, Memory, and MyISAM. MySQL’s ACID (Atomicity, Consistency, Isolation, Durability) properties are essential for reliable database operations. It provides various techniques for optimizing database performance, such as indexing, query optimization, and caching mechanisms. MySQL integrates with multiple programming languages, frameworks, and tools through standard MySQL connectors and APIs.
In addition, MySQL provides frameworks to ensure high availability. Learn more about MySQL high availability frameworks.

Data Migration Methods to Load Hive to MySQL
You can utilize Hevo Data or the Manual CSV Export/Import method to connect Hive to MySQL.
Method 1: Load Data from Hive to MySQL Using Hevo Data
Hevo Data is the real-time ELT and no-code data pipeline platform that automates data pipelines to meet your needs cost-effectively. It integrates over 150+ data sources, allowing you to effortlessly export data from sources, load it into destinations, and transform it for in-depth analysis.
Hevo is the only real-time ELT No-code Data Pipeline platform that cost-effectively automates data pipelines that are flexible to your needs. With integration with 150+ Data Sources (40+ free sources), we help you not only export data from sources & load data to the destinations but also transform & enrich your data, & make it analysis-ready.
Let’s dive into the step-by-step process for Hive to MySQL Replication.
Step 1: Configure Hive as Your Source
Ensure you meet the following prerequisites before configuring Hive as your pipeline’s source.
- An active Hive account containing the data you want to import
- API credentials to allow Hevo to connect to your Hive account.
- Administrative access to your Hive account to obtain the API credentials.
- Hold the Team Administrator, Team Collaborator, or Pipeline Administrator role in Hevo to establish the data pipeline.
Perform the following steps to configure Hive as the source end in your Hevo pipeline:
- Obtain API Credentials
To connect Hevo with your Hive account, you must have the API credentials, including the Hive user ID, the API key, and the workspace ID. The following steps will help you to get these credentials from your Hive account:
- Sign in to your Hive account.
- Navigate to the top right corner of your account dashboard and click the username icon to choose Edit Profile from the drop-down menu.

- Click on the API info from the left navigation pane.

- When redirecting to the API info page, you must copy the API Key, User ID, and Workspace ID and save them securely while configuring your Hevo data pipeline.

- Configure Hive Connection Settings
Here are the steps for configuring the Hive as a source connector:
- Log into your Hevo account and click on PIPELINES in the Navigation Bar.
- Navigate to the Pipelines List View and click on + CREATE.
- Choose Hive from the Select Source Type page.
- Upon redirecting to the Configure your Hive Source page, you must fill in the following:
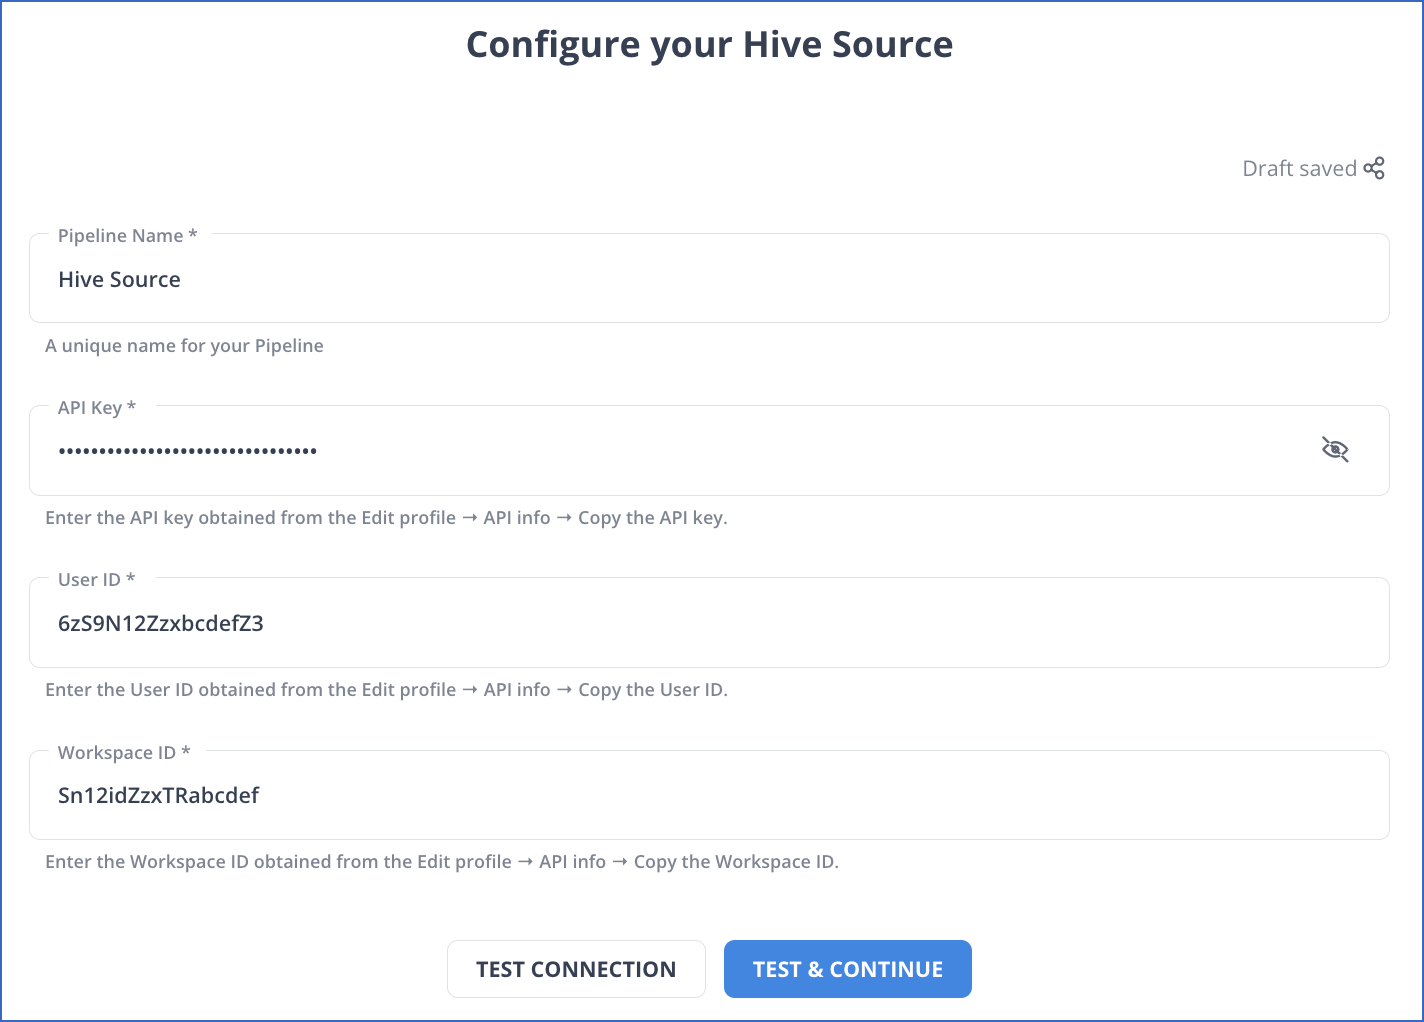
- Pipeline Name: A name for your pipeline source that is no longer than 255 characters.
- API Key: It is the unique API key you obtained during the creation process of your Hive account.
- User ID: This is the user ID obtained from your Hive account.
- Workspace ID: The unique ID of the Hive workspace you wish to ingest data.
- Click on the TEST & CONTINUE button.
For more details about the configuration, read Hevo’s Hive Source Connector Documentation.
Step 2: Configure MySQL as Your Destination
Before getting started, here is a list of prerequisites:
- A MySQL server in running status. Check the status of your MySQL instance with the following command:
service mysql status
Make sure MySQL instance status shows as Active: active (running).
- MySQL version 5.5 or higher. You can check the MySQL version using the following command:
mysql -V
- Grant the database user with the required privileges.
- Team Collaborator or Administrator role except for Billing Administrator role in Hevo to create the destination.
1. Whitelist Hevo’s IP Addresses
To enable Hevo to connect to your MySQL database, you should whitelist Hevo IP addresses for your Hevo region in the MySQL configuration file. Perform the following to do this:
- Go to the MySQL configuration directory /etc/mysql/mysql.conf.d
- Open the MySQL server configuration file in edit mode using the sample command:
sudo nano /etc/mysql/mysql.conf.d/mysqld.cnf
- Navigate to the [mysqld] section and modify the bind-address variable by specifying in one of the following ways:
- Specify the following bind-address to allow any IPv4 address to connect to your MySQL destination:
bind-address = 0.0.0.0
- Specify the following bind-address to allow particular Hevo IP addresses for your Hevo region:
bind-address = 10.2.7.152
- To apply the modifications to the MySQL server configuration file, you must save the file and restart the MySQL server.
2. Create a Database User and Grant Privileges
- Open an SQL Client Tool.
- Log in to your MySQL instance as a root user using the following command:
Mysql -u root -p
- Create a database user by entering the following command:
CREATE USER ‘<user_name>’@’%’ IDENTIFIED BY ‘<strong password>’;
You can replace user_name and strong password with your credentials.
- Grant privileges to the newly created database user using the following command:
GRANT ALTER, CREATE, CREATE TEMPORARY TABLES, DELETE, DROP, INSERT, SELECT, UPDATE ON <database_name>.* to <user_name>@<IP address> IDENTIFIED BY <user_password>;
3. Configure MySQL Connection Settings
Here are the steps to configure MySQL as the destination in Hevo.
- From the Navigation Bar, click on DESTINATIONS.
- Go to the Destinations List View and click on + CREATE
- Choose MySQL on the Add Destination page.
- Fill in the following fields in the Configure your MySQL Destination page.
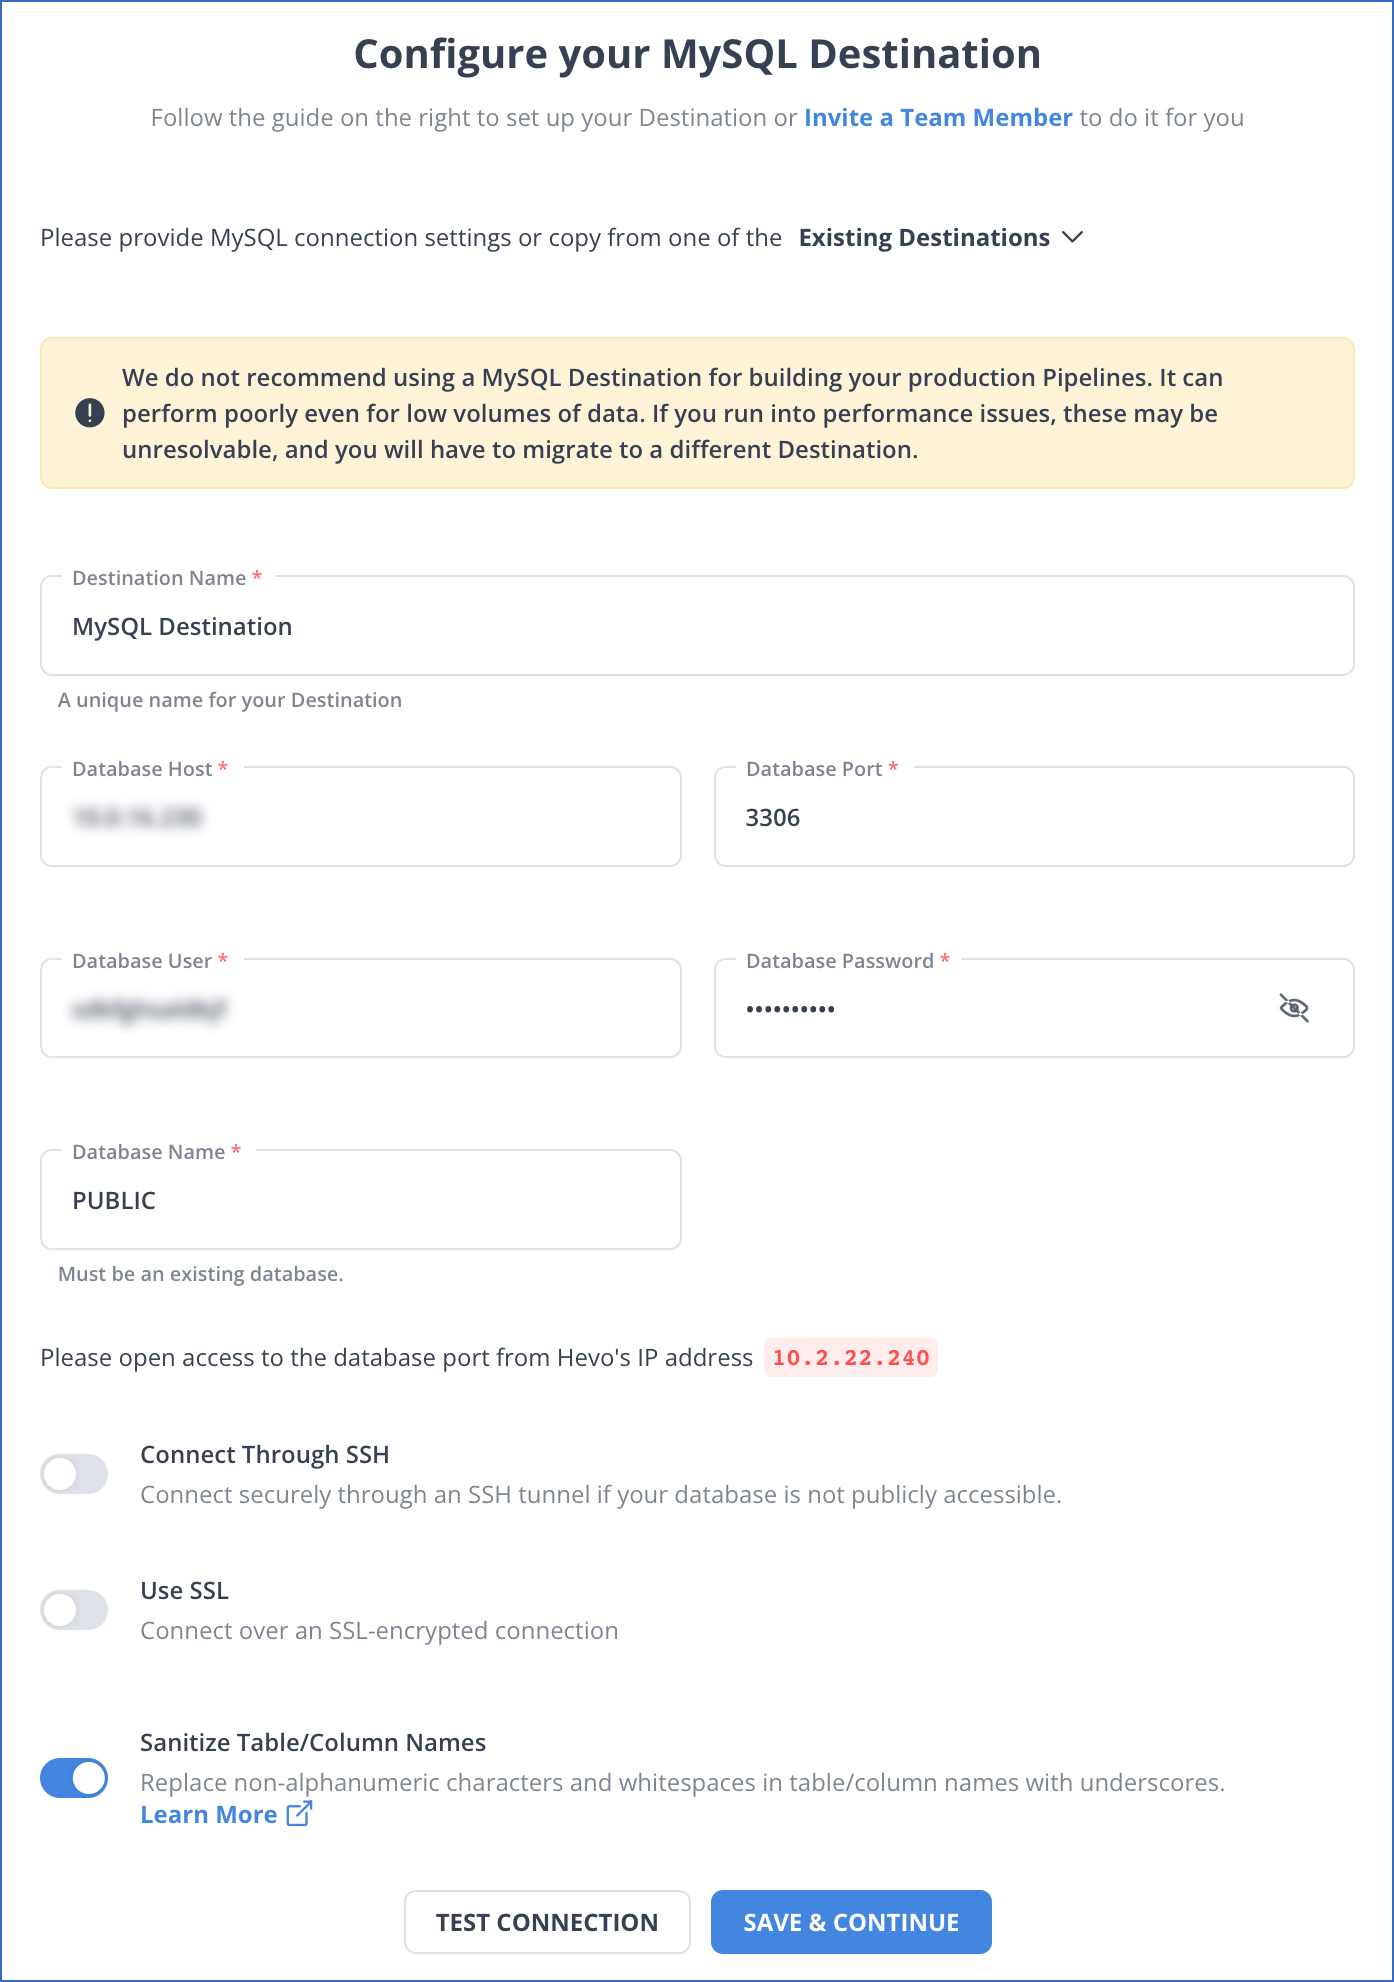
- Destination Name: Give a unique name for your destination that is longer than 255 characters.
- Database Host: It is the MySQL host’s DNS or IP address, or you can connect to a local database. To learn about how to connect with a local database, refer to Connecting to a Local Database.
- Database Port: The Default value of a database port is 3306.
- Database User: A user created in your MySQL database without administrative access.
- Database Password: Add your password for the database user.
- Database Name: Add the name of the destination database to load your data.
- Additional Settings:
- Connect through SSH: When enabled, your MySQL database host will connect to Hevo through an SSH tunnel rather than a direct connection.
If you disable this option, you must whitelist Hevo’s IP addresses to enable the connection between Hevo and MySQL database host.
- Use SSL: For secure SSL-encrypted connections, enable this option by specifying the following:
- CA File: A file that includes SSL server certificate authority.
- Client Certificate: It is the public key certificate file for the client.
- Client Key: It is the private key file for the client.
- Sanitize Table/Column Names: Once this option is enabled, Hevo can replace all spaces and non-alphanumeric symbols present in a table or column name with an underscore (_).
- Click on the TEST CONNECTION button.
- Click on the SAVE & CONTINUE button.
To read more about the configuration process, read Hevo’s MySQL destination connector configuration.
If you want to connect to a MySQL database using Hevo, refer to the Connecting to a MySQL database with Hevo.
Method 2: Transfer Hive Data to MySQL Using CSV Export/Import
To copy data from Hive to MySQL using CSV Export/Import, perform the following steps:
Step 1: Export Hive Data to CSV Files
To export the Hive data to a CSV file, do the following in the Hive Query Environment “HiveServer2”:
- Start with the following command:
INSERT OVERWRITE DIRECTORY
- Specify the directory in which the CSV file needs to be saved and identify the fields that you want to include in the CSV file. A sample directory and fields are given below:
/home/hirw/sales
/home/hirw is the directory and sales is the field to be included in the CSV file.
- Export the Hive data to a local file system using the LOCAL keyword.
INSERT OVERWRITE LOCAL DIRECTORY
- Specify a custom field terminator by using the following clause:
ROW FORMAT DELIMITED FIELDS TERMINATED BY ’,’
The overall query to export the Hive data from sales_table into a CSV file is given below:
INSERT OVERWRITE LOCAL DIRECTORY ‘/home/hirw/sales ROW FORMAT DELIMITED FIELDS TERMINATED BY ’,’ select * from sales_table
Step 2: Import the Exported CSV Files into MySQL
You can use MySQL’s LOAD DATA INFILE command to import the CSV files containing the exported Hive data into MySQL.
Let’s look into a sample code for importing CSV files into MySQL utilizing LOAD DATA INFILE
LOAD DATA INFILE ‘path/to/your-file-name.csv’
INTO TABLE your_mysql_table
FIELDS TERMINATED BY ‘,’
ENCLOSED BY ‘”‘
LINES TERMINATED BY ‘\\n’;
Replace the following placeholders with the required information:
- path/to/your-file-name.csv: This is the path to your CSV file, which contains the extracted Hive tables to load into the MySQL table.
- Your_mysql_table: It is the name of your MySQL table where you need to load the data.
With these steps, you can complete Hive to MySQL Replication using the CSV export/import method.
Limitations of CSV Export/Import for Hive to MySQL Migration
- Expertise in Command Line Tools: Using command line tools for Hive MySQL replication requires expertise. You must have adequate training and experience to conduct the data migration effectively.
- Effort-Intensive: The CSV Export/Import method for Hive MySQL integration becomes time-consuming and labor-intensive. You must make a significant effort to ensure the data is moved accurately and without errors.
- Lack of Real-time Integration: When data replication lacks real-time integration, it cannot be used for critical and time-sensitive projects, as you cannot obtain the required insights swiftly.
Use Cases of Hive MySQL Replication
- Increase Productivity: By conducting the Hive MySQL integration, you can automatically generate tasks in MySQL whenever you receive new notifications in the Hive platform. This data replication will streamline your project workflow and automate iterative tasks.
- Improved Data Visibility: You can track the progress of your project in Hive and view the same in MySQL in real-time.
- Real-time Integration: Any changes made in Hive data will be immediately reflected in the MySQL database. If data in your projects or tasks is damaged or lost, you can get an updated copy of your project data from MySQL.
- Extensibility: MySQL’s open-source nature helps you extend its functionality to build custom stored engines, user-defined functions, or procedures. This extension offers high scalability when integrating MySQL with the Hive platform, which helps efficiently accommodate and manage vast amounts of data.
You can learn more about:
Conclusion
You can efficiently achieve the Hive MySQL replication by utilizing Hevo Data or employing Manual CSV Export/Import.
Hevo Data provides a streamlined, user-friendly integration platform and readily available source and destination connectors. Using this platform, you can minimize human involvement and reduce the risk of errors. The CSV Export/Import method is more suitable for applications that do not need real-time data replication.
Refer to the Hive to PostgreSQL Replication to learn the process of Hive PostgreSQL replication.
Want to take Hevo for a spin? Sign Up for a 14-day free trial and experience the feature-rich Hevo suite firsthand.
Learn more about: Hive to Snowflake Data Replication
Frequently Asked Questions (FAQs)
1. For a Hive MySQL Replication, I’ve obtained an API key to allow Hevo to access the data on my Hive account. What is the pagination limit for API calls fetching data from various Hive objects in my Hive account?
Every time you make an API request for a Hive object, you will receive one page with a maximum of 200 records for objects, including Actions, Labels, Project Statuses, and Project Assignments. You will receive one page with 100 records for other types of Hive objects.
2. Before replicating data from Hive objects to MySQL, why must I disable the foreign key in the target tables?
Disabling foreign keys in the target tables is necessary because these keys prevent data from being loaded until the referenced table has a corresponding key. If you temporarily disable the foreign keys, you allow a smooth data-loading process without violating referential constraints. Once the data is loaded, you can re-enable the foreign keys to maintain consistency and enforce integrity within your MySQL database.
Share it with your connections.
-
 Share To LinkedIn
-
 Share To Facebook
-
 Share To X
-
 Copy Link


