


In today’s digital environment, everything is accessible and managed online. Due to the volume of data produced by digitalization, it is difficult to perform real-time analysis, develop insights, identify fraud and anomalies, alert users, and perform other duties.
The infrastructure that Google provides for Google Play and Android developers to publish on is known as Google Play Console, and ASO teams value it a lot. This platform enables developers to monitor the performance of their apps in Google Play store.
Superior Data Analytics are made possible by the Cloud-based, fully managed Snowflake data warehousing solution. AWS, Azure, and GCP are used by Snowflake to handle its cloud infrastructure and data. The data is subjected to SQL queries by Snowflake in order to convert data and offer insights.
In this article, you will learn how to transfer data from Google Play Console to Snowflake using CSV files format.
Table of Contents
What is Google Play Console?

Google Play Console is the platform that allows developers to keep track of how well their apps are doing in the Google Play Store. The platform allows you to: “Publish your apps and games with the Google Play Console and expand your business on Google Play,” according to Google. You can use tools offered by the platform that will help you raise the caliber of your app, engage your audience, generate income, and more.
The Google Play Console enables App developers and marketers to gain a better understanding of the growth, technical performance, such as crashes or display difficulties, and financial performance of their apps. The console provides thorough analysis and acquisition reports that can be used by app developers and marketers to determine how well an app is actually functioning. With data-driven research, the Google Play Console enables app developers and marketers to track their CVR and organic success with the greatest accuracy.
Key Features of Google Play Console
- Dashboards: With summaries of installs and uninstalls, top installing nations, current installs, ratings volume and value, crashes, Android vitals, and pre-launch information, the dashboard provides answers to the most important questions you may have about your app. Click explore or view for additional details on each summary. The view can be changed between seven days, thirty days, a year, or the app’s lifespan.
- Statistics: You can create a view of the app data that matters to you using statistics. You can plot two metrics simultaneously and contrast them to data from a prior time period in addition to viewing data over any date range. For more in-depth analysis, some metrics provide hourly graphs. You can observe how events (such app launches or sales) affected your numbers because they are depicted on the graph and in the events timeline below it.
- Android Vitals: The quality of your app, as determined by its stability and performance, is the focus of Android Vitals. By fixing these problems, you’ll increase user satisfaction, which will encourage more users to give your app great reviews. Android Vitals can provide data on five areas of your app’s performance when there is enough collected data: battery life, rendering (commonly known as jank), stability, startup time, and permission denials.
- Release Management: You have control over how consumers download your new or updated app using the release management area. As part of this, your app must be tested before going live, the appropriate devices must be targeted, and real-time management and monitoring of updates in the testing and production tracks must be maintained.
- Device Catalog: The device catalog offers the opportunity to search and browse device specifications for thousands of Android and Chrome OS devices that have been approved by Google. Devices can be individually excluded, and criteria can be established based on performance metrics like RAM and System on Chip. Additionally, the catalog displays the installs, reviews, and income generated by each kind of device.
What is Snowflake?

Snowflake is a fully manged SaaS platform that supports Data Warehousing, Data Lakes, Data Engineering, Data Science, Data Application Development, and Secure Sharing and Consumption of Real-time / Shared Data. Snowflake offers pre-built capabilities including Storage and Compute Separation, On-the-Fly Scalable Compute, Data Sharing, Data Cloning, and Third-Party Tool Support to satisfy the demanding needs of growing businesses.
No existing database or “Big Data” software platform, like Hadoop, is the foundation of Snowflake. Snowflake, in comparison, combines a state-of-the-art Cloud Architecture with a fresh SQL query engine. Users may get all the functions and features a corporate analytic database offers via Snowflake, plus a lot more.
Key Features of Snowflake
The following are some of the features of Snowflake as a Software as a Service (SaaS) solution:
- You may build your own Data Exchange using Snowflake, allowing you to securely exchange real-time, controlled data.
- Making better data-driven decisions is made possible with the aid of Snowflake, which helps you eliminate information silos and guarantee that everyone in your company has access to pertinent data. This is an essential first step in, among other things, enhancing partner relationships, optimizing pricing, reducing operational costs, and boosting sales effectiveness.
- You might increase the accuracy and efficiency of your analysis by switching from nightly Batch Loads to Real-time Data Streams in Snowflake.
- Snowflake delivers cache results quickly by using the Caching Paradigm.
- Snowflake can help you discover more about the routines and usage patterns of your consumers.


Methods to Connect Google Play Console to Snowflake
Method 1: Connect Google Play Console to Snowflake using Hevo
Hevo helps you directly transfer data from various sources such as Google Play Console to Snowflake, Database, Data Warehouses, or a destination of your choice in a completely hassle-free & automated manner. Hevo is fully managed and completely automates the process of not only loading data from your desired source but also enriching the data and transforming it into an analysis-ready form without having to write a single line of code. Its fault-tolerant architecture ensures that the data is handled in a secure, consistent manner with zero data loss.
The following steps can be implemented to connect Google Play Console to Snowflake using Hevo:
Step 1: Configure Google Play Console as your Source
Perform the following steps to configure Google Play as the Source in your Hevo Pipeline:
- Step 1.1: Click PIPELINES in the Asset Palette.
- Step 1.2: Click + CREATE in the Pipelines List View.
- Step 1.3: In the Select Source Type page, select Google Play.
- Step 1.4: In the Configure your Google Play Account page, click + ADD GOOGLE PLAY ACCOUNT.
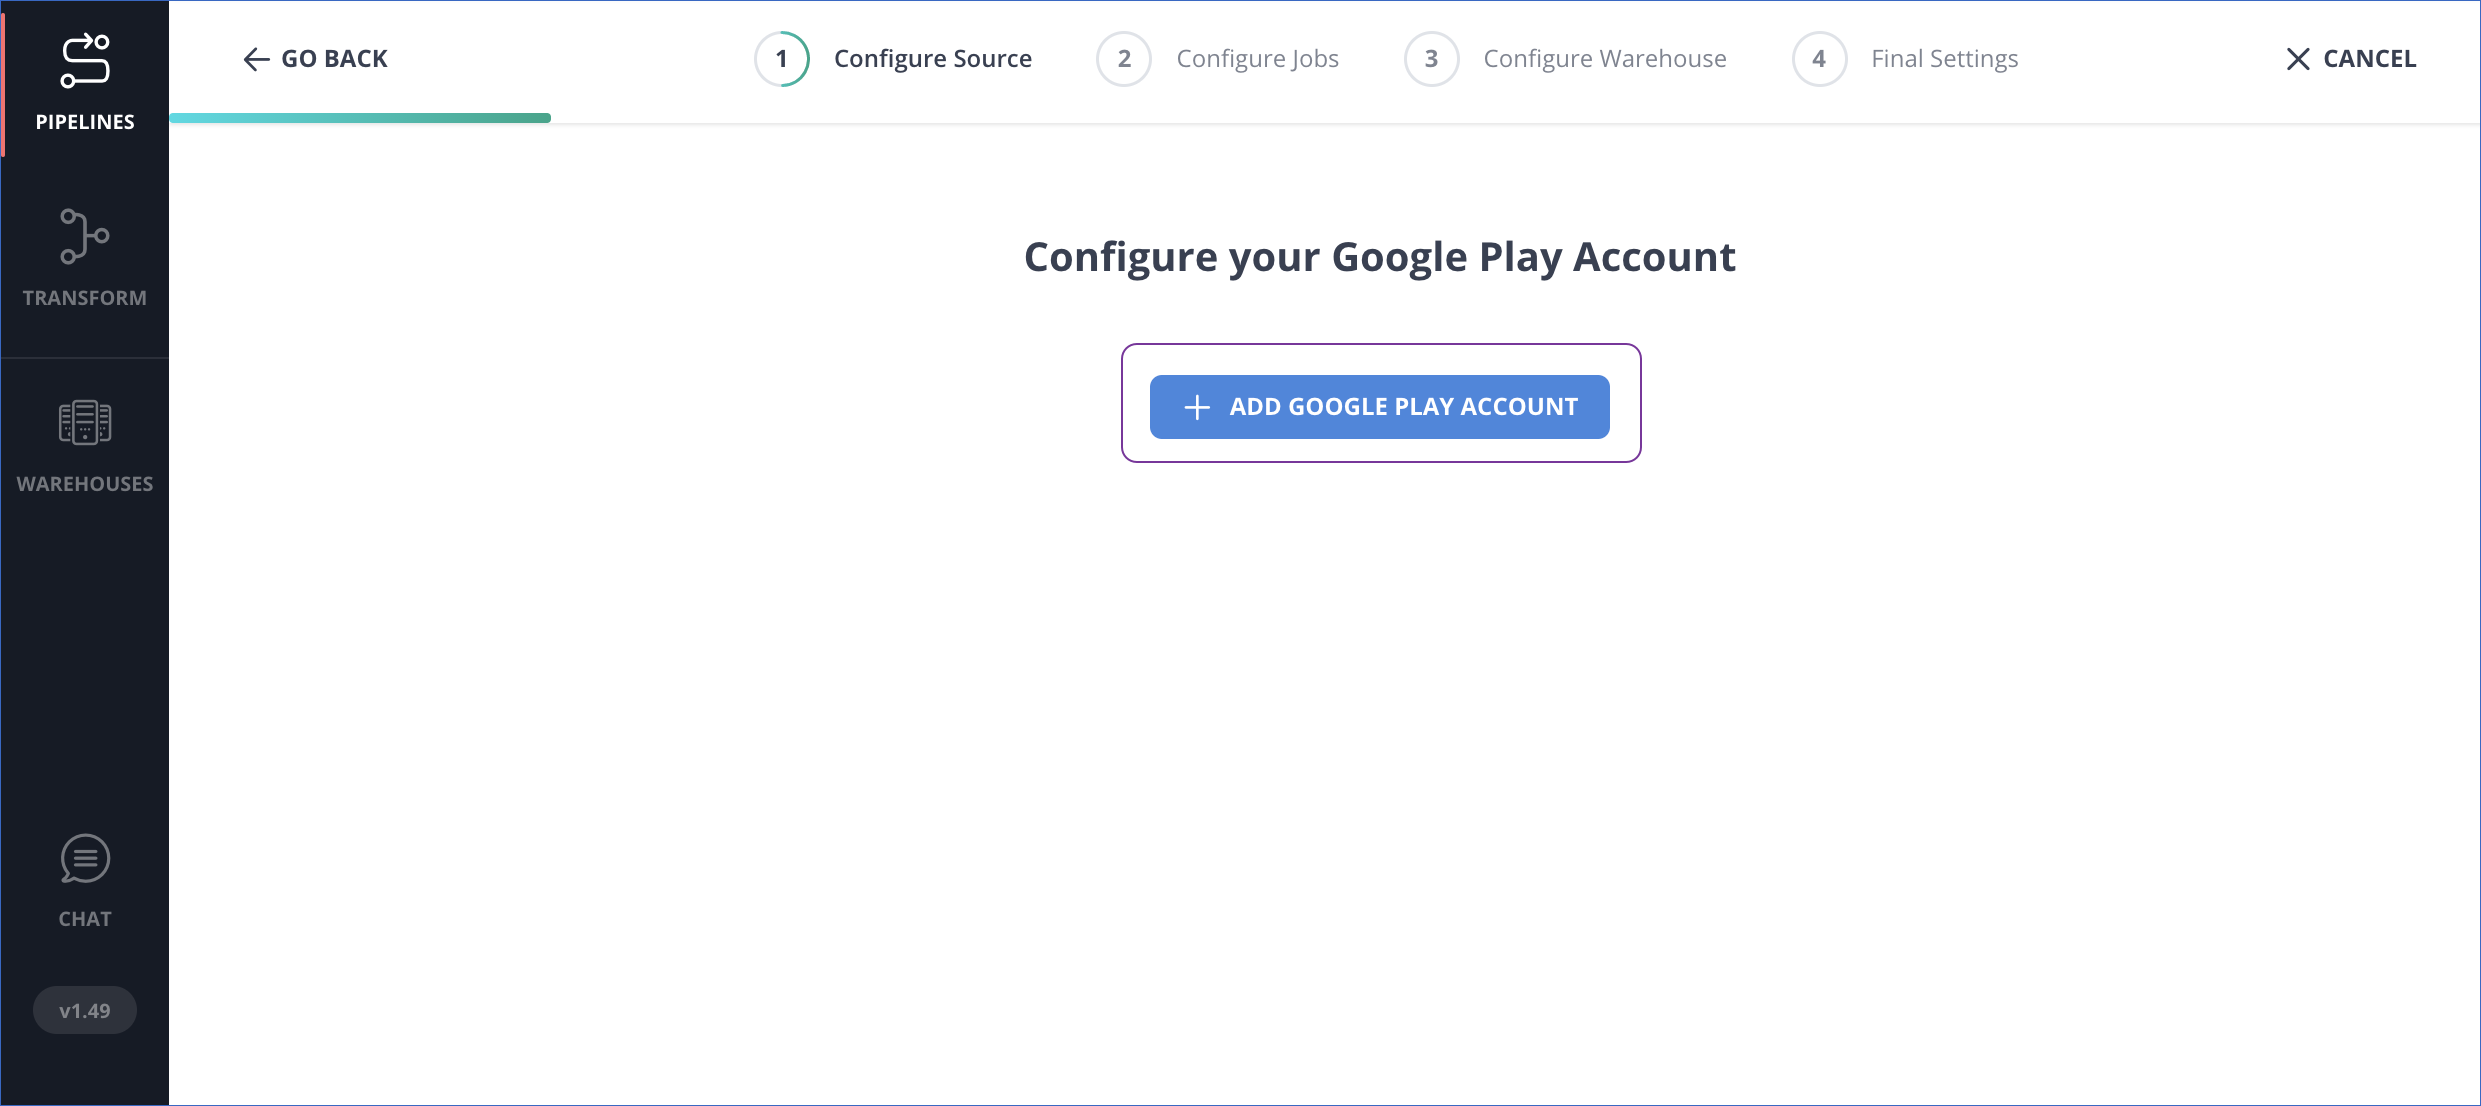
- Step 1.5: In the Sign in with Google dialog, select the Google Play account to log in to.
- Step 1.6: Click Allow to enable Hevo to access your Google account to read the reports data for the applications within this account.
- Step 1.7: In the Configure your Google Play Source page, specify the following:
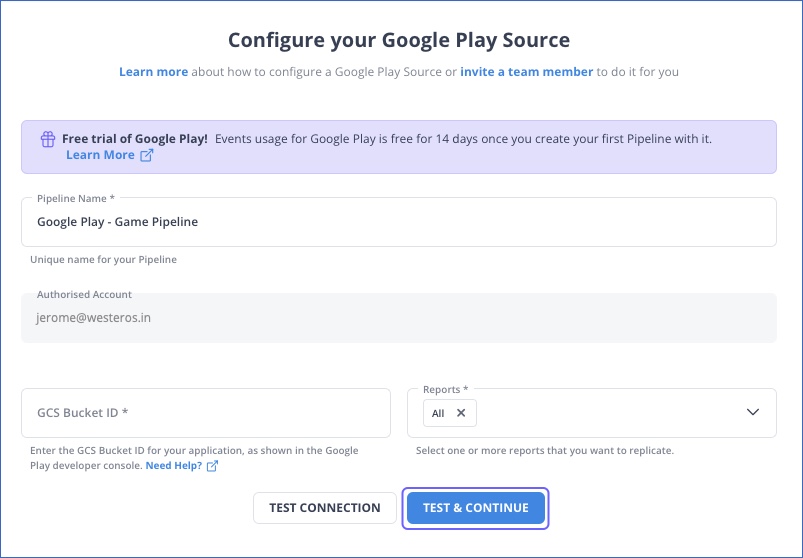
- Pipeline Name: A unique name for the Pipeline.
- Bucket ID: ID of the bucket that holds the reports, which you retrieved from Google Play.All the reports available in the selected bucket are listed under different heads in the adjacent Reports drop-down.
- Reports: Modify the selection, if needed. By default, all reports are selected.
- Step 1.8: Click TEST & CONTINUE.
- Step 1.9: Proceed to configuring the data ingestion and setting up the Destination.
Step 2: Configure Snowflake as your Destination
To set up Snowflake as a destination in Hevo, follow these steps:
- Step 2.1: In the Asset Palette, select DESTINATIONS.
- Step 2.2: In the Destinations List View, click + CREATE.
- Step 2.3: Select Snowflake from the Add Destination page.
- Step 2.4: Set the following parameters on the Configure your Snowflake Destination page:
- Destination Name: A unique name for your Destination.
- Snowflake Account URL: This is the account URL that you retrieved.
- Database User: The Hevo user that you created in the database. In the Snowflake database, this user has a non-administrative role.
- Database Password: The password of the user.
- Database Name: The name of the Destination database where data will be loaded.
- Database Schema: The name of the Destination database schema. Default value: public.
- Warehouse: SQL queries and DML operations are performed in the Snowflake warehouse associated with your database.
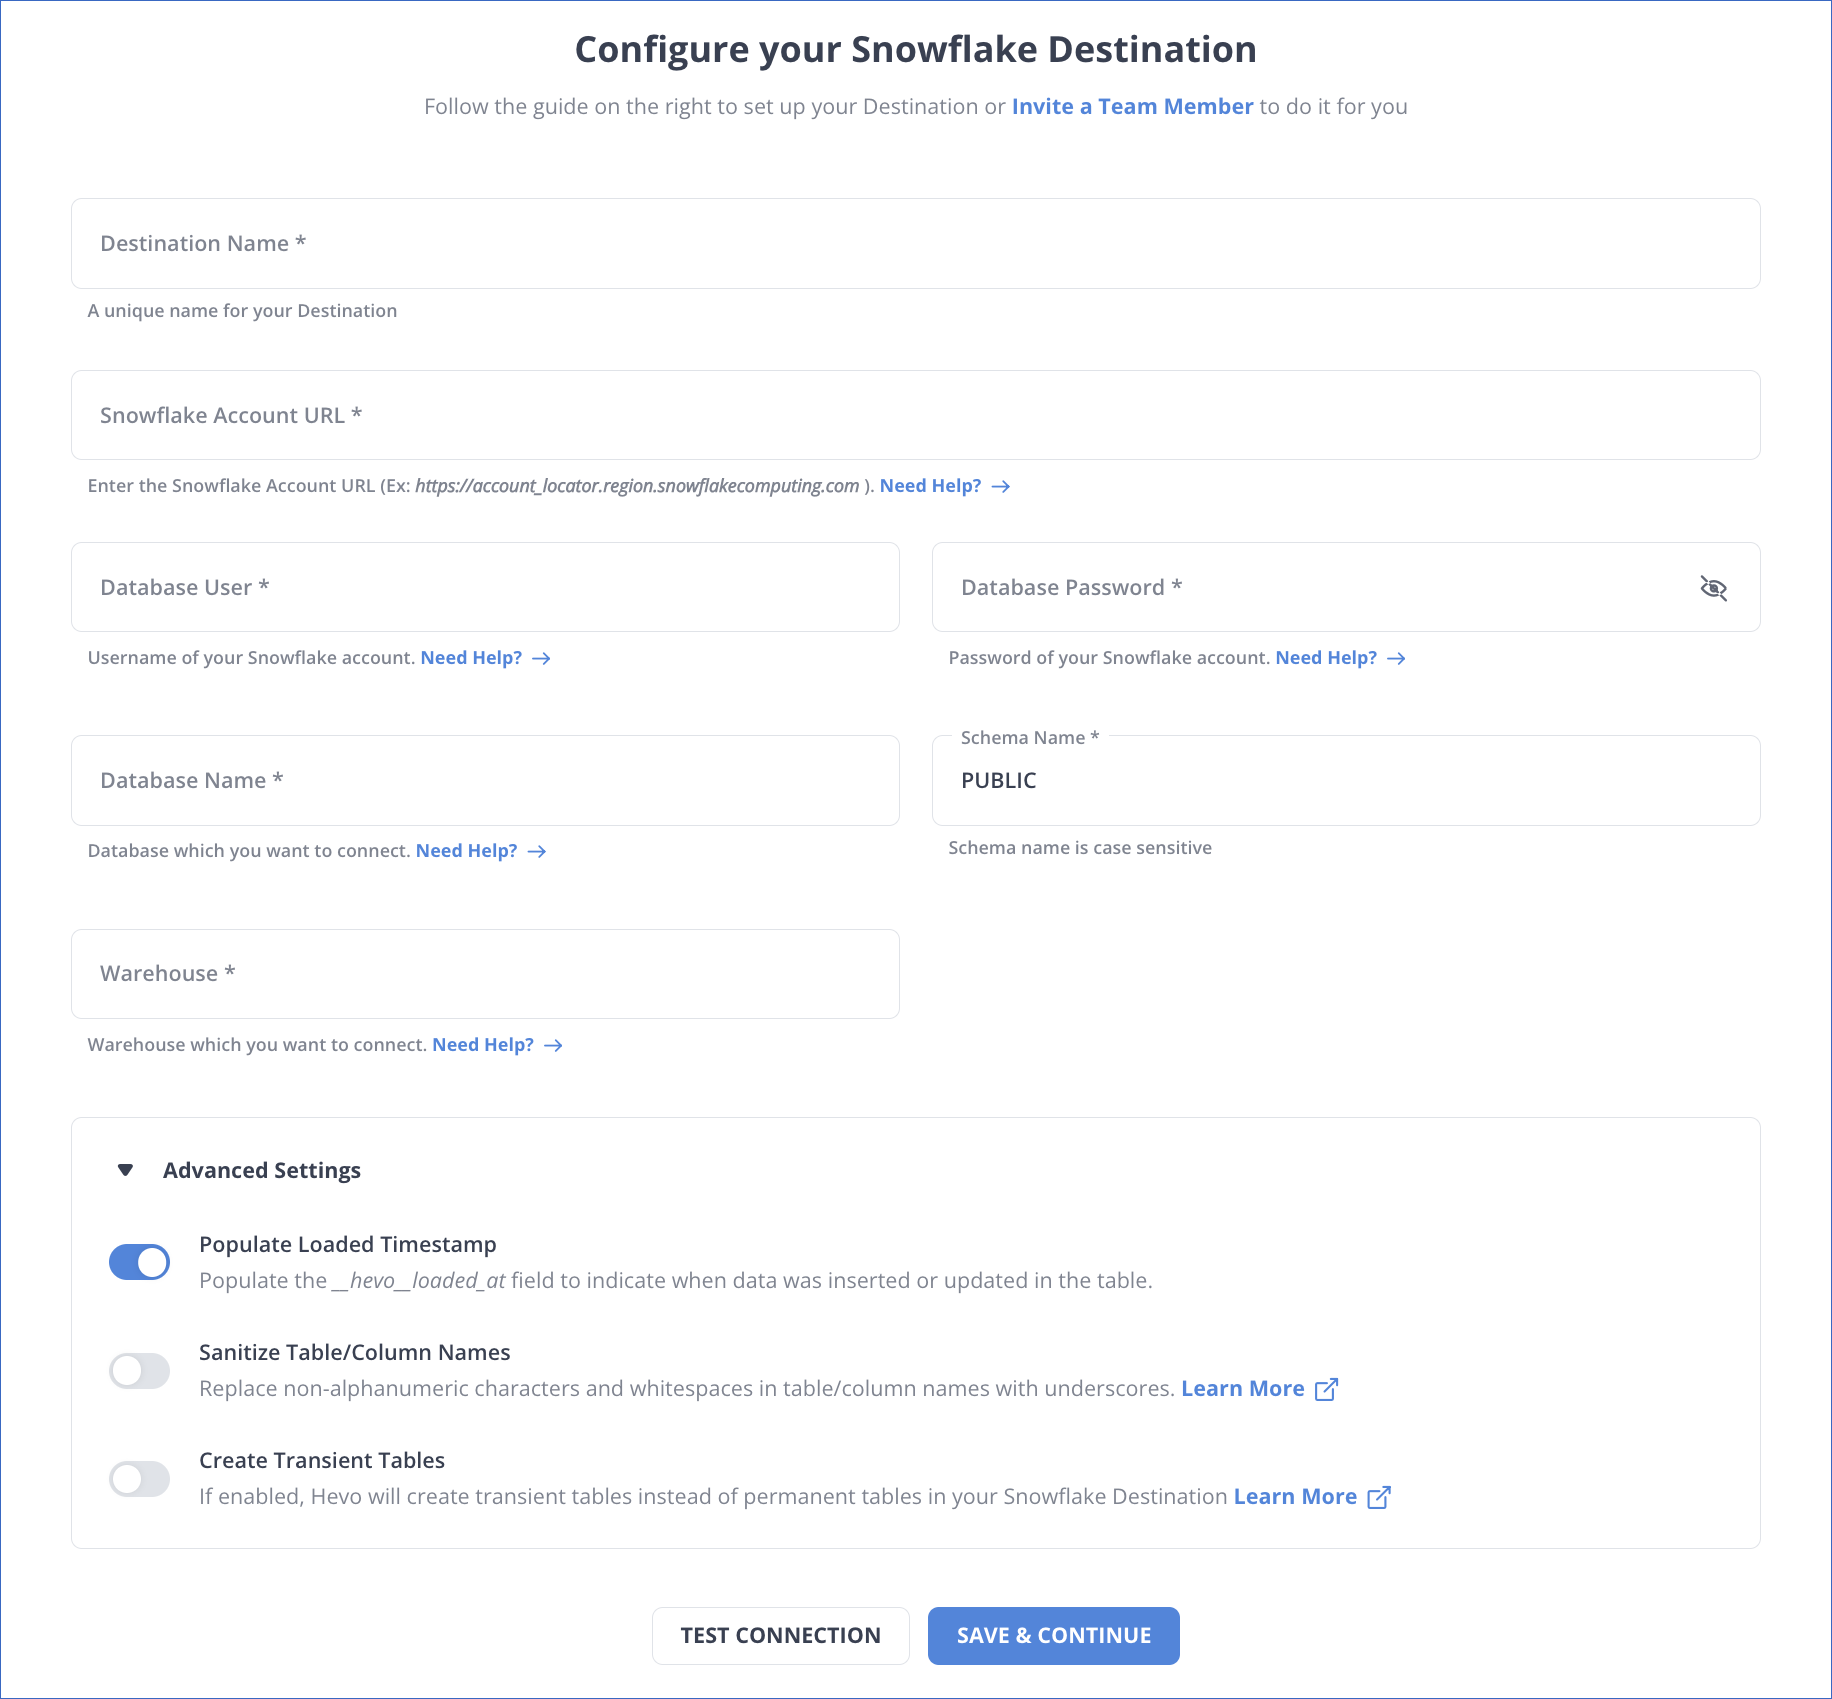
- Step 2.5: Click Test Connection to test connectivity with the Snowflake warehouse.
- Step 2.6: Once the test is successful, click SAVE DESTINATION.
Hevo’s no-code platform makes integrating Google Play Console with Snowflake simple. Key benefits include:
- Real-time data transfer from Google Play Console to Snowflake.
- 150+ pre-built integrations and automated pipelines.
Try Hevo and discover why 2000+ customers have chosen Hevo over tools like AWS DMS to upgrade to a modern data stack.
Try Hevo today and streamline your data integration!
Get started for Free with Hevo!Method 2: Connect Google Play Console to Snowflake Manually using CSV Files
You cannot directly export the data from Google Play Console to Snowflake. To export data from Google Play Console to Snowflake, first you will have to export data from Google Play Console as CSV files and then load the CSV files into Snowflake.
Step 1: Export Data from Google Play Console as CSV
The first step in exporting data from Google Play Console to Snowflake is exporting data from Google Play Console as CSV files.
You can export a list of all users with access and their given permissions as a CSV file to help you keep track of the users that have access to your developer account. This can be useful, for instance, if you want to audit which team members have which permissions.
Here’s how to export a complete list of all users having access to your developer account:
- Launch Play Console and go to the Users and Permissions screen.

- In order to obtain your CSV, click the Export user list.
Configuring the Users List
The search box and filter at the top of the page can be used to select which users are shown in the table and are included in the CSV you want to export. This makes it simple to export user lists for many criteria, including specific permissions, the apps they can access, invitation status, and other search parameters like email domain or name.
The CSV will include details on each App in your account if you are the account owner or administrator. Only the information pertaining to the applications for which you are an admin will be visible if you are an admin but not an account owner or administrator. This maintains the confidentiality and security of the account.
CSV Format
The following fields and columns are included in your downloaded CSV:
| Column/ Field | Description |
| The user’s email address | |
| Status | The status of the user’s invitation. This can be: |
| – INVITATION_EXPIRED: The user was invited but did not accept the invitation to join your developer account within 30 days. | |
| – ACCESS_GRANTED: The user has access to your developer account as a team member. | |
| – ACCESS_EXPIRED: The user had access until a specified date, which has since elapsed. | |
| – INVITED: The user has been invited to join your developer account but has not yet accepted. | |
| Expiration time | The date when access will expire for users who only have access for a limited time. |
| Invitation Time | The date that the user was last invited to join your developer account. This field is not populated after an invitation is accepted. |
| App permissions | A list of each app that the user has access to, and which app-specific permissions they have. This is in the format: |
| {com.exampleApp1:PERMISSION_1,PERMISSION2}; {com.exampleApp2:PERMISSION_1,PERMISSION3} | |
| Account permissions | A list of every account-level permission that the user has. These apply to your whole developer account, account-level features such as Play Games Services, or every app within your account. |
Now you have your CSV Data with you. The first step in exporting data from Google Play Console to Snowflake is complete now.
Step 2: Load CSV Data into Snowflake
The second step in exporting data from Google Play Console to Snowflake is importing CSV data into Snowflake. This section describes how to use the SnowSQL client to bulk load data into Snowflake. Any delimited plain-text file, such as Comma-delimited CSV files, can be used to bulk load data using SQL. Additionally, semi-structured data from JSON, AVRO, Parquet, or ORC files can be bulk loaded. However, the emphasis of this article is loading from CSV files. You can stage files in Snowflake on what are known as stages on the inside. Every user and table has a stage. Additionally, Snowflake allows for the creation of named stages, such as demo stages.
- Step A: To get started, upload your data files somewhere Snowflake can access them. This refers to Staging the files.
- Internal stages make it possible to store data files conveniently and securely without using any external resources. However, if your data files are already staged in a supported Cloud storage site like GCS or S3, you can avoid staging and load directly from these external locations.
- You can also upload CSV files directly from your local computer.
- Step B: Now you need to load your data into your tables from these staged files. You will employ the “use” statement to choose the database that you previously constructed.
Syntax:
Use database [database-name]; Example:
use database dezyre_test;Output:

- Step C: Establishing a named file format for a set of staged data that can be accessed or loaded into Snowflake tables.
Syntax:
CREATE [ OR REPLACE ] FILE FORMAT [ IF NOT EXISTS ]
                      TYPE = { CSV | JSON | AVRO | ORC | PARQUET | XML } [ formatTypeOptions ]
                      [ COMMENT = '' ]
Example:
create or replace file format my_csv_format
  type = csv
  field_delimiter = '|'
  skip_header = 1
  null_if = ('NULL', 'null')
  empty_field_as_null = true
  compression = gzip;
Output:

- Step D: Now, the Create statement is used to create a table, as displayed below. In the current or given schema, it either replaces an existing table or creates a new one.
Syntax:
CREATE [ OR REPLACE ] TABLE [ ( [ ] , [ ] , ... ) ] ;Example:
CREATE OR REPLACE TABLE dezyre_employees (
EMPLOYEE_ID number,
FIRST_NAME varchar(25),
LAST_NAME varchar(25),
EMAIL varchar(25),
PHONE_NUMBER varchar(15),
HIRE_DATE DATE,
JOB_ID varchar(15),
SALARY  number(12,2),
COMMISSION_PCT  real,
MANAGER_ID number,
DEPARTMENT_ID number
);Output:

- Step E: Here, you’ll upload the CSV data file from your local computer to Snowflake’s staging area, as displayed below. You can also provide the URLs for the locations of staged CSV files and, if the location is protected, the access credentials. Additionally, you can establish named stages that refer to a different place.
Syntax:
put file://D:\dezyre_emp.csv @DEMO_DB.PUBLIC.%dezyre_employees;Output:

- Step F: Now its time to load the CSV data into the target Snowflake table made earlier.
Example:
copy into dezyre_employees
  from @%dezyre_employees
  file_format = (format_name = 'my_csv_format' , error_on_column_count_mismatch=false)
  pattern = '.*dezyre_emp.csv.gz'
  on_error = 'skip_file';
Output:

- Step G: By running the select query displayed below, you can confirm that the data entered into the target database is accurate.
Example:
select * from dezyre_employees;Output:

You have successfully transferred data from Google Play Console to Snowflake.

Limitations of Connecting Google Play Console to Snowflake Manually
- Data can only be transferred in one direction from Google Play Console to Snowflake. Two-way sync is necessary to keep both tools current.
- Because the records need to be updated frequently, the manual procedure requires time. Time and resources that could be spent for more important business tasks are being wasted on this.
- The amount of engineering bandwidth required to maintain workflows across many platforms and update current data can be annoying for some consumers.
- Data transfer does not allow for any transformation. Businesses that want to modify their data before transferring it from Google Play Console to Snowflake may find this to be a significant drawback.
Learn More About:
How to Connect Google Search Console to Snowflake
Conclusion
In this article, you got a glimpse of how to connect Google Play Console to Snowflake after a brief introduction to the salient features, and use cases. The methods talked about in this article are using automated solutions such as Hevo and CSV files. The second process can be a bit difficult for beginners. Moreover, you will have to update the data each and every time it is updated and this is where Hevo saves the day!
FAQ
Can I connect a Google sheet to Snowflake?
Yes, you can connect a Google Sheet to Snowflake using ETL tools like Hevo or Fivetran. These tools allow you to extract data from Google Sheets and load it directly into Snowflake for analysis.
How to integrate Snowflake with GCP?
To integrate Snowflake with Google Cloud Platform (GCP), you can use Snowflake’s native connectors or third-party ETL tools. Set up a cloud storage integration with Google Cloud Storage (GCS) for data loading and unloading, and configure the necessary permissions for secure access.
How do I transfer my Google Play Console account?
To transfer your Google Play Console account, you need to add a new user with the appropriate permissions in your current account. Then, the new user can create a developer account and request the transfer of apps through the Google Play Console Help Center. Follow the provided steps to complete the transfer process.

Share it with your connections.
-
 Share To X
-
 Share To LinkedIn
-
 Share To Facebook
-
 Copy Link


