


Integrating Google Sheets with MySQL offers a powerful way to combine the simplicity of spreadsheet data entry with a relational database’s advanced data handling capabilities. Whether you’re aiming to automate workflows, streamline data storage, or enable robust querying, this guide will walk you through efficient methods to connect Google Sheets to MySQL.
This guide outlines two primary methods for establishing this connection: using Hevo Data’s no-code platform and performing a manual integration via command-line tools.
Table of Contents
What is Google Sheets?

Google Sheets is a free web-based spreadsheet program that Google provides. It allows users to create and edit spreadsheets, but more importantly, it allows multiple users to collaborate on a single document, seeing your collaborators ’ contributions in real-time simultaneously.
Key Features of Google Sheets
- Real-time Collaboration: Multiple users can work on the same spreadsheet simultaneously, with changes reflected instantly for everyone.
- Version History: Track changes made to your spreadsheet over time and easily revert to previous versions if needed.
- Formulas and Functions: Utilize a wide range of built-in formulas (like SUM, AVERAGE, IF, etc.) and functions for calculations, data analysis, and automation.
- Charts and Graphs: Create various types of charts (bar, line, pie, etc.) and graphs to visualize data effectively and gain insights.
What is MySQL?

MySQL is an open-source relational database management system or RDMS, that uses Structured Query Language (SQL) for managing and manipulating databases. It is widely used for web applications and as a component of the popular LAMP (Linux, Apache, MySQL, PHP/Python/Perl) stack.
Key Features of MySQL:
- Open-source: Freely available and modifiable under the GNU General Public License.
- High Performance: Designed for high-speed, scalable applications with fast query processing.
- Cross-platform Support: Available for operating systems like Linux, Windows, and macOS.
- Scalability: Supports large databases, up to terabytes of data.
Ditch the manual process of writing long commands to connect your Google Sheets and MySQL and choose Hevo’s no-code platform to streamline your data migration.
With Hevo:
- Easily migrate different data types like CSV, JSON etc.
- 150+ connectors like MySQL and Google Sheets(including 60+ free sources).
- Eliminate the need of manual schema mapping with the auto-mapping feature.
Experience Hevo and see why 2000+ data professionals including customers, such as Thoughtspot, Postman, and many more, have rated us 4.3/5 on G2.
Get Started with Hevo for FreeWhy Connect Google Sheets and MySQL?
Google Sheets is a versatile spreadsheet application that struggles with managing extensive datasets and conducting intricate queries. In contrast, MySQL is proficient in handling large-scale structured data, offering excellent scalability, reliability, and robust querying capabilities.
Connecting Google Sheets and MySQL enables:
- Advanced Data Analysis: Leverage MySQL’s querying capabilities for in-depth insights.
- Instant Data Sync: Syncing Google Sheets with MySQL allows for automatic updates, eliminating the need for manual changes.
- Centralized Storage: Consolidate data for better management and security.
- Enhanced Scalability: Manage larger datasets efficiently.
- Automation: Enable seamless, real-time data updates.
Method 1: Using Automated Platforms like Hevo [Recommended]
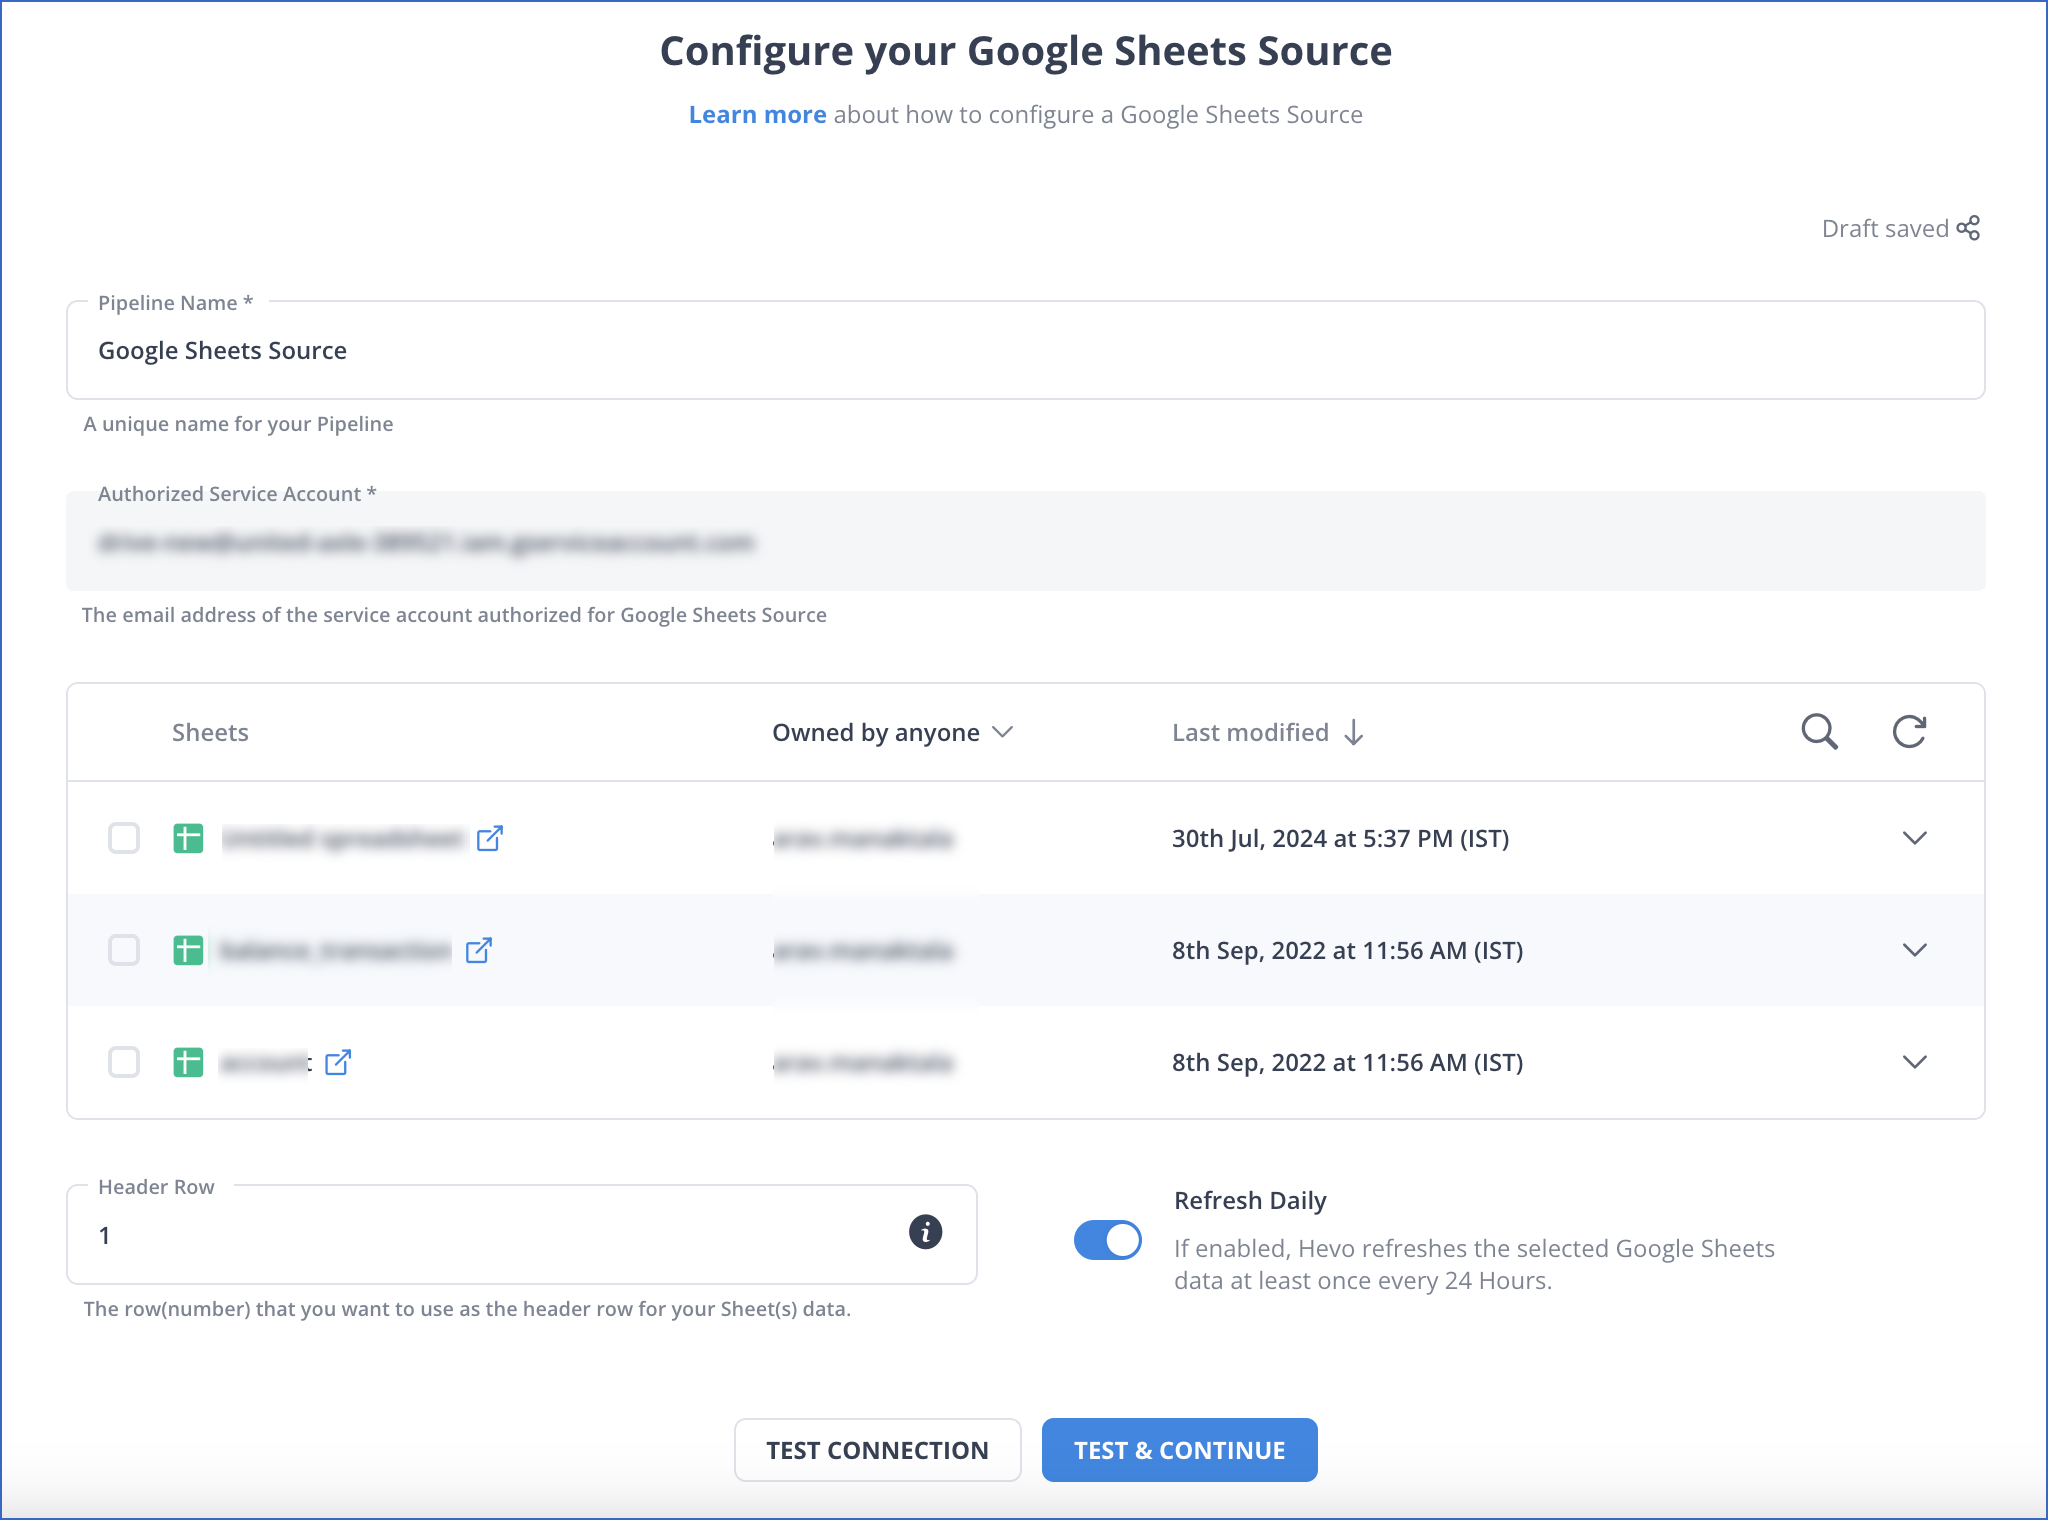
Step 1: Configure the Google Sheets Source
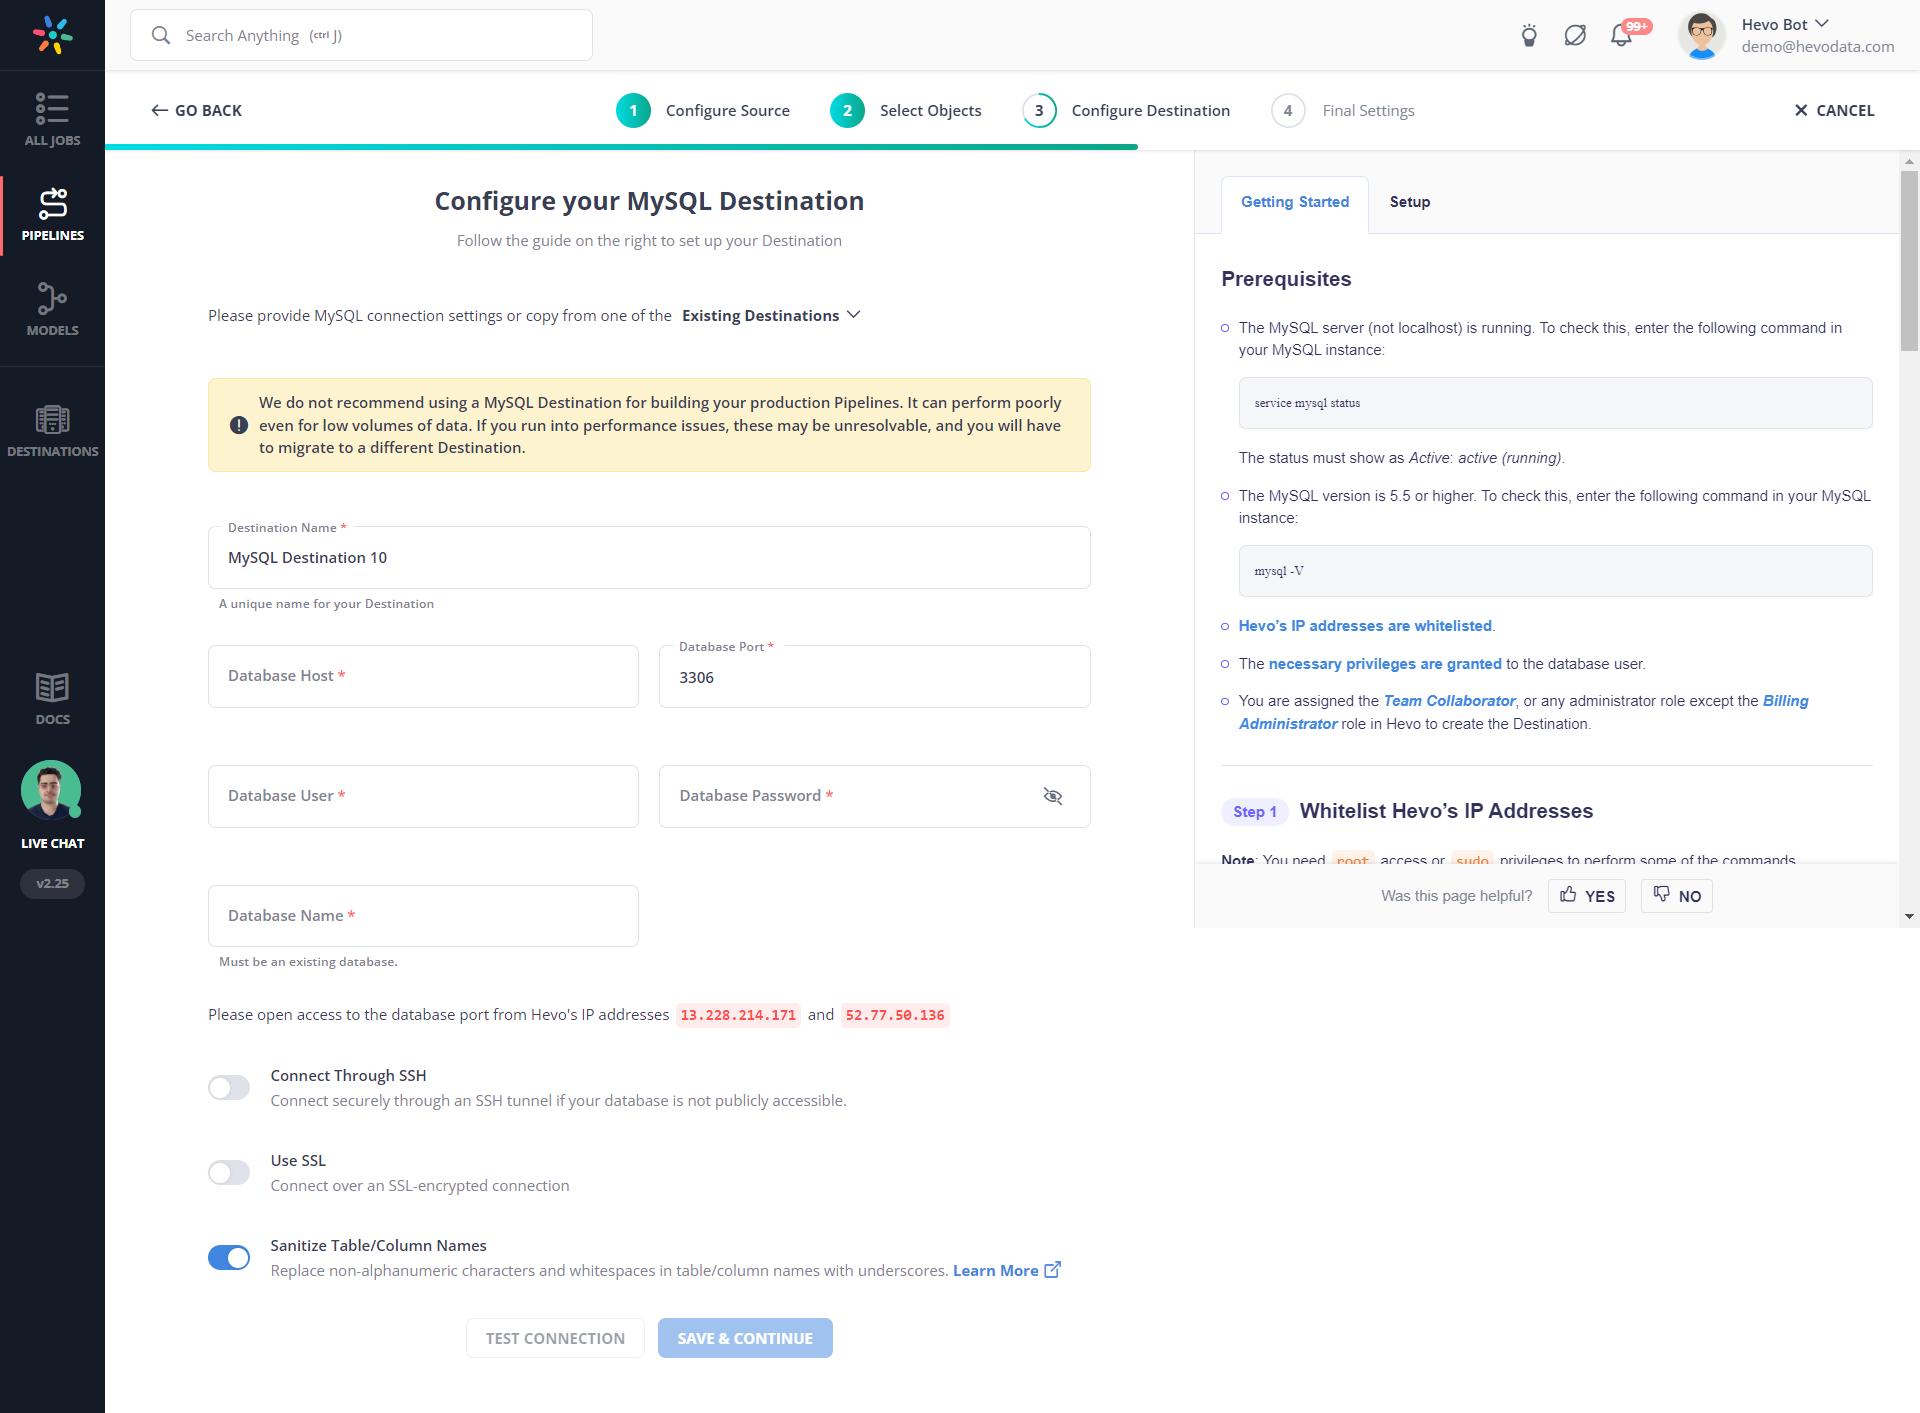
Step 2: Configure the Destination
- Select MySQL as your destination.
- Fill out the required fields and click on Save & Continue.
With these simple steps, you have created a data pipeline to seamlessly migrate your data from Google Sheets to MySQL.
Method 2: Using the Command Line
This example demonstrates how to create a table for product listing data stored in Google Sheets, assuming the data is organized into two columns:
- Id
- Name
To complete this migration, follow these steps:
Step 1: Prepare your Google Sheets Data
- Firstly, you must ensure that the data in your Google Sheets is clean and formatted correctly.
- Then, to export your Google Sheets data, click on File > Download and choose a suitable format for MySQL import. CSV (Comma-separated values) is a common choice for this purpose.
- After this, your CSV file will get downloaded to your local machine.
Step 2: Create a MySQL database and Table
- Login to your MySQL server using the command prompt.
- Create a database using the following command:
CREATE DATABASE your_database_name; - Use that Database by running the command:
Use your_database_name;- Now, create a table in your database using the following command:
CREATE TABLE your_table_name (

column1_name column1_datatype,

column2_name column2_datatype,

……

);
Step 3: Upload your CSV data to MySQL
Use the LOAD DATA INFILE command to import the CSV file. The command will look something like this:
LOAD DATA INFILE '/path/to/your/file.csv'

INTO TABLE your_table_name

FIELDS TERMINATED BY ','

LINES TERMINATED BY '\n'

IGNORE 1 ROWS;
Note: The file path should be the absolute path to where the CSV file is stored on the server. If you’re importing the file from your local machine to a remote server, you might need to use tools like PuTTY to download the pscp.exe file. Then, you can use that command to load your CSV file from your local machine to Ubuntu and then import that data to your MySQL database.
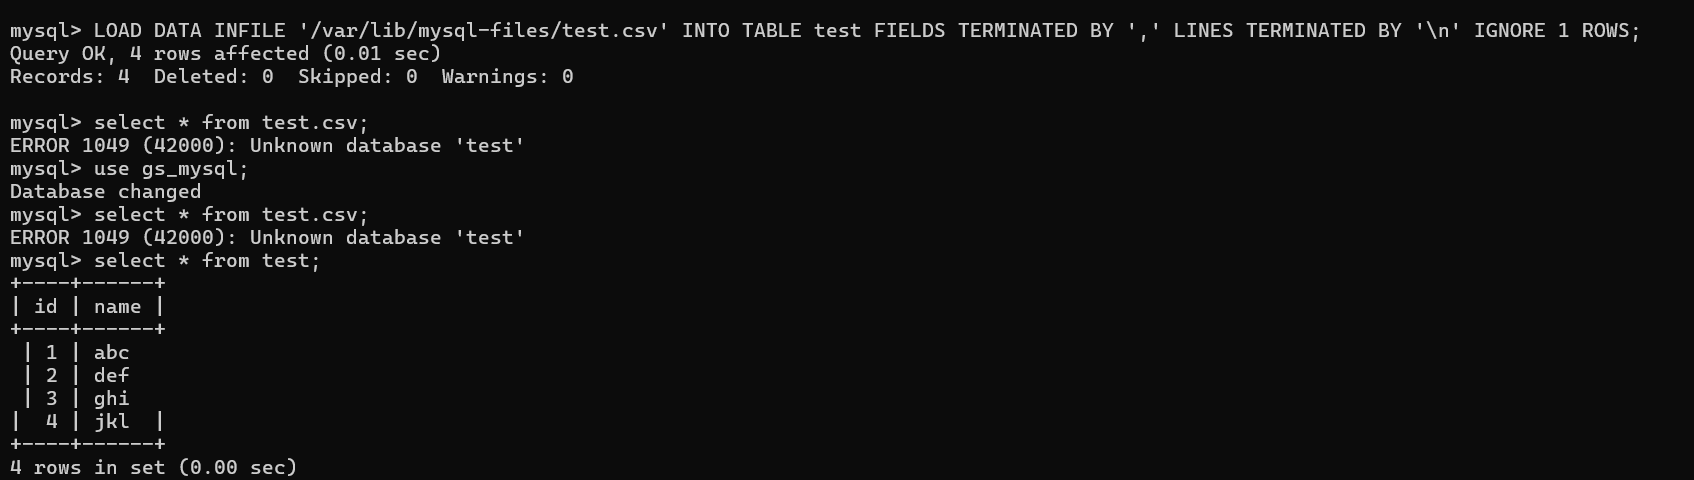
After running the above command, your data will be migrated from Sheets to MySQL. To understand this better, have a look at an example:
Step 6: Clean Up and Validate
- Review the data. Check for any anomalies or issues with the imported data.
- Run some queries to validate the imported data.
Limitations and Challenges of Using the Command Line Method
- Complex: It requires technical knowledge of SQL and command lines, so it could be difficult for people with no/less technical knowledge to implement.
- Error-prone: It provides limited feedback or error messages, making debugging challenging.
- Difficult to scale: Scaling command-line solutions for larger datasets or more frequent updates gets trickier and error-prone.
Method 3: Using App Scripts
You can connect Google Sheets to a MySQL database using Google Apps Script and its built-in JDBC service. Here’s a quick guide:
Step 1: Write the Connection Script:
Use the JDBC service to connect to your MySQL database. Replace the placeholders with your database credentials and host details.
Step 2: Open Script Editor:
In your Google Sheet, go to Extensions > Apps Script.
function connectToMySQL() {
  // Replace with your MySQL connection details
  var host = "your-database-host";
  var port = "3306"; // default MySQL port
  var dbName = "your-database-name";
  var user = "your-username";
  var password = "your-password";

  var url = "jdbc:mysql://" + host + ":" + port + "/" + dbName;

  // Establish a connection
  var conn = Jdbc.getConnection(url, user, password);

  // Example query: Fetch all rows from a table called 'my_table'
  var stmt = conn.createStatement();
  var results = stmt.executeQuery("SELECT * FROM my_table");

  // Get active sheet to output data
  var sheet = SpreadsheetApp.getActiveSpreadsheet().getActiveSheet();
  var row = 1;

  // Loop through the results and write to the sheet
  while (results.next()) {
    // Example: Assuming the table has two columns: id and name
    sheet.getRange(row, 1).setValue(results.getString("id"));
    sheet.getRange(row, 2).setValue(results.getString("name"));
    row++;
  }

  // Clean up
  results.close();
  stmt.close();
  conn.close();
}
Step 3: Run the Script:
Save your script and click the Run button. The script will ask for necessary permissions, so follow the prompts. Once executed, your Google Sheet will be populated with data from your MySQL table.
Step 4: Error Handling & Best Practices:
- Connection Limits: Google Apps Script has quotas on JDBC connections, so make sure your usage is within allowed limits.
- Error Handling: Add try-catch blocks to handle errors gracefully.
- Security: Avoid hardcoding credentials in your script; consider using Google Cloud Secret Manager or script properties for sensitive data.
Best Practices for a Seamless Integration
- Validate Data: Ensure data accuracy before and after transferring to MySQL.
- Secure Connections: Use encrypted connections and limit access to sensitive data.
- Automate Processes: Opt for tools like Hevo for real-time syncing.
- Monitor Performance: Regularly audit data pipelines for bottlenecks or errors.
- Implement Error Handling: Use try-catch blocks to capture and log errors. This helps in debugging and ensuring the script doesn’t fail silently.
Additional Resources
- More on Google Script Connect To MYSQL
- MySQL to BigQuery
- MySQL to Snowflake
- MySQL to Databricks
- MySQL to PostgreSQL
What’s Next?
Now that you’ve explored multiple methods to integrate Google Sheets with MySQL—from using no-code platforms like Hevo Data to manual command-line and Apps Script solutions—it’s time to put these strategies into practice. Here are some next steps to consider:
- Experiment with Methods:
Try out the no-code integration with Hevo for a quick setup, and then dive into manual methods if you need more control over your data pipeline. - Secure and Optimize:
Apply the best practices discussed to secure your connection, validate your data, and optimize query performance. Experiment with automated error handling to ensure a smooth workflow. - Scale Your Integration:
Once your initial setup is stable, explore options to automate regular data syncs, monitor performance, and scale your integration to handle larger datasets or more frequent updates. - Expand Your Knowledge: Read about similar migrations to expand your knowledge. Check out the following blogs:
- Connect Google Sheets to SQL Server.
- How to Connect Postgres to Google Sheets.
- Google Sheets to BigQuery: 3 Ways to Connect & Migrate Data.
FAQ
Can I connect Google Sheets to SQL?
Yes, you can connect Google Sheets to SQL databases.
How do I turn a Google Sheet into a database?
1. Use Google Apps script
2. Third-party add-ons
3. Use Formulas and Functions
How do I sync MySQL to Google Sheets?
1. Use Google Apps script
2. Third-party add-ons
3. Google Cloud Functions and Google Cloud SQL
Can Google Sheets pull data from a database?
Yes, Google Sheets can pull data from a database.
How do I import Google Sheets to MySQL?
1. Use Google Apps script
2. Third-party add-ons
2. CSV Export and Import
Share it with your connections.
-
 Share To X
-
 Share To LinkedIn
-
 Share To Facebook
-
 Copy Link


