


Imagine your HR and accounting departments suddenly requested a connection between Harvest and Snowflake. And you have to sacrifice your engineering bandwidth to handle this task head-on. This can be challenging when you’re already busy monitoring and configuring your current data pipeline.
We know you’re looking for a fast and accurate solution, and we’ve got you covered. We have prepared a simple, step-by-step guide to help you replicate data from Harvest to Snowflake. That’s enough chit-chat, let’s get started.
Table of Contents
What Is Harvest?
Harvest is a cloud-based time-tracking and invoicing platform that helps businesses monitor time spent on various tasks and projects, create invoices, manage expenses, etc.
Key Features Of Harvest
- Time Tracking: Easily track work hours with timers or manual entries.
- Invoicing: Convert tracked time into professional invoices and send them to clients.
- Expense Tracking: Track and categorize project expenses, adding them to invoices.
- Reporting: Generate detailed reports on time, expenses, and project performance.
Looking for the best ETL tools to connect your Snowflake account? Rest assured, Hevo’s no-code platform seamlessly integrates with Snowflake to streamline your ETL process. Try Hevo and equip your team to:
- Integrate data from 150+ sources(60+ free sources).
- Simplify data mapping with an intuitive, user-friendly interface.
- Instantly load and sync your transformed data into Snowflake.
Choose Hevo and see why Deliverr says- “The combination of Hevo and Snowflake has worked best for us. ”
Get Started with Hevo for FreeWhat is Snowflake?
Snowflake is a cloud-based data warehousing platform that enables businesses to store, process, and analyze large amounts of data efficiently. It’s known for its scalability, flexibility, and ability to handle diverse workloads across multiple cloud environments without requiring extensive infrastructure management.
Key Features Of Snowflake
- Scalability: Instantly scale compute and storage independently, based on workload demands.
- Multi-Cloud Support: Operates across major cloud providers (AWS, Azure, Google Cloud).
- Data Sharing: Allows secure, real-time data sharing across organizations without moving data.
- Concurrency Handling: Handles multiple queries at the same time without performance degradation.
Why Connect Harvest and Snowflake?
Connecting Harvest (a time-tracking tool) with Snowflake (a cloud data platform) enables businesses to streamline data analytics and reporting. Here’s why:
- Data Consolidation: Combine Harvest data with other business datasets (e.g., payroll, project management) to get a holistic view of operations.
- Centralized Data Storage: Store Harvest time-tracking data in Snowflake for better accessibility and analysis.
- Advanced Analytics: Leverage Snowflake’s powerful querying capabilities to gain deeper insights into project time, team performance, and productivity.
- Automated Reporting: Generate real-time dashboards by integrating Harvest data with BI tools like Tableau or Power BI.
How Can You Integrate Data from Harvest to Snowflake?
Method 1: Using Automated Tools like Hevo
Step 1: Configure Harvest as a Source

Step 2: Configure Snowflake as a Destination

Method 2: How Can You Migrate Data from Harvest to Snowflake Using CSV files?
Let’s discuss the stepwise process to integrate data from Harvest to Snowflake in CSV Format:
Step 1: Export Data from Harvest as CSV Files
You can export the following type of data from your Harvest account:
- Time Entries
- Clients and Contact
- Invoices
- Projects and Tasks
- Expenses
- Reports
Then with the above data, you can build the following type of report on your Harvest account:
- Time Report
- Detailed Time Report
- Detailed Expense Report
- Uninvoiced Report
- Invoiced Report
- Payments Received Report
- Contractor Report
Let’s jump into the stepwise process to export data from Harvest in CSV Format.
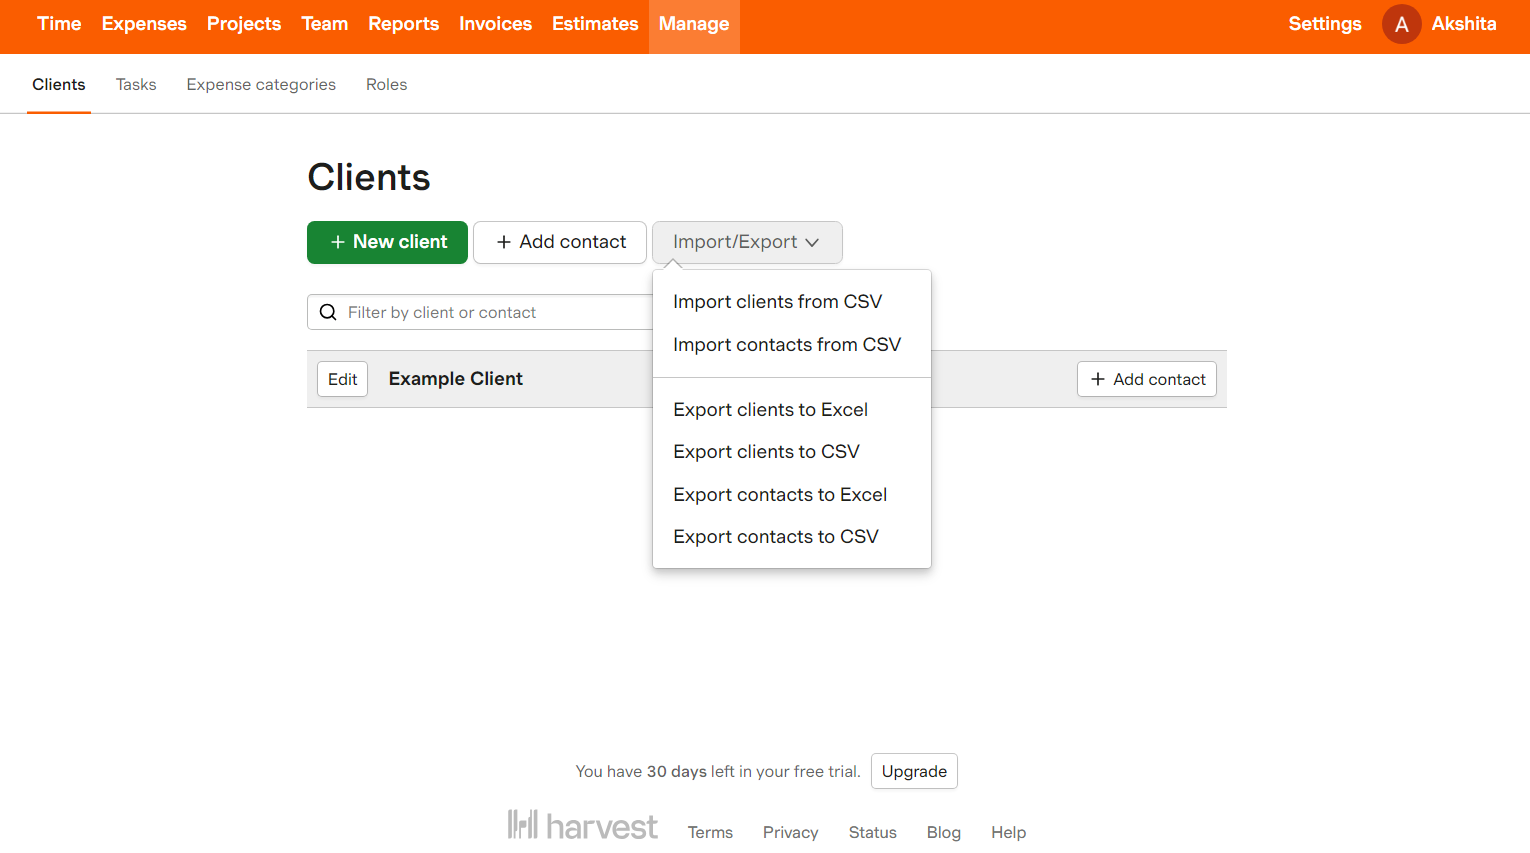
A: To export data about contacts, people, clients, and tasks:
- Go to the Manage tab.
- Go to the top right corner of the page and click Export.
- A list of your required data will be downloaded in a comma-separated values (CSV) file format.
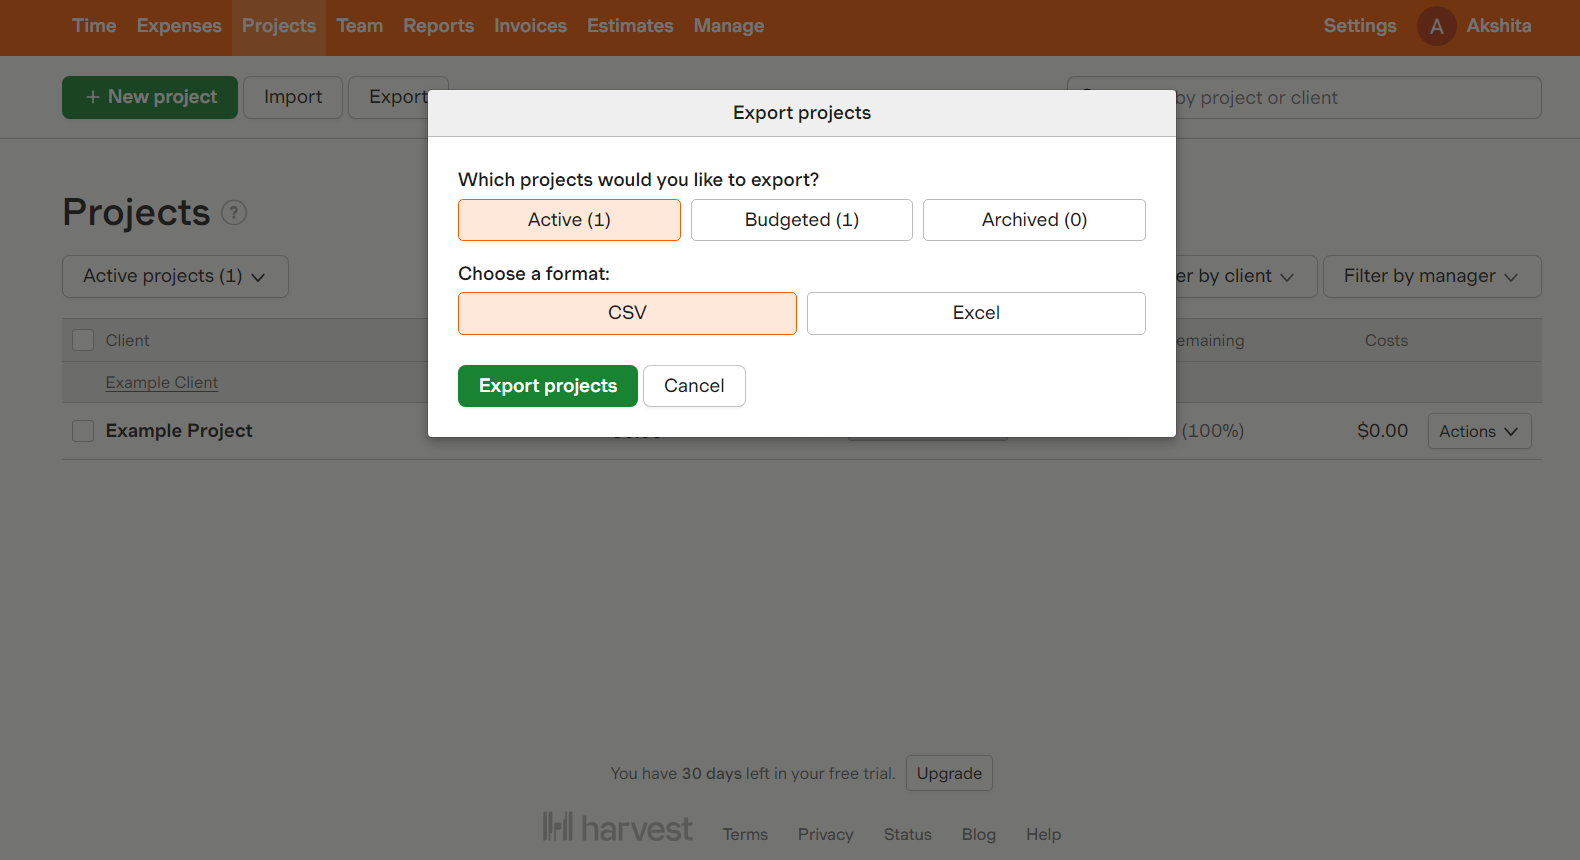
B: To export project data:
- Go to the Projects tab.
- Go to the top right corner of the page and click Export.
- Export projects from Harvest with the desired status: active, budgeted, or archived.
- A list of your required project data will be downloaded in a CSV file format.
C: To export reports data:
- Go to the Reports tab.
- Select the name of the report you want to export.
- Export a report from Harvest with the desired timeframe, projects, filters, etc.
- Click the Run Report button.
- Go to the top right corner of the page and click Export. Then, choose the format as CSV.
- A list of your required report data will be downloaded in a CSV file format.
D: To export estimates data:
- Go to the Estimates tab.
- To export a list of open estimates, click the Open option and select the Export button.
- To export all of your estimates, click on the All Estimates option. Now, you can filter the data by estimating status, client, or timeframe. Then select the Export button.
- Choose your format as CSV. A list of your estimated data will be downloaded in a CSV file format.
Step 2: Import CSV Files into Snowflake
Login to your Snowflake account and select the database where you want to upload the files.
USE DATABASE test_db;

CREATE OR REPLACE FILE FORMAT harvest_csv_format
  TYPE = csv
  FIELD_DELIMITER = ','
  SKIP_HEADER = 1
  NULL_IF = ('null', 'NULL')
  EMPTY_FIELD_AS_NULL = true
COMPRESSION = gzip;;USE DATABASE test_db;: Switches to the database namedtest_dbfor subsequent operations.CREATE OR REPLACE FILE FORMAT harvest_csv_format: Defines or replaces a file format namedharvest_csv_format.TYPE = csv: Specifies that the file format is CSV.FIELD_DELIMITER = ',': Sets the field delimiter to a comma.SKIP_HEADER = 1: Instructs the system to skip the first row of the CSV file, which usually contains headers.NULL_IF = ('null', 'NULL'): Defines values that should be interpreted as NULL in the data.EMPTY_FIELD_AS_NULL = true: Treats empty fields as NULL values.COMPRESSION = gzip: Indicates that the files are compressed using gzip.
1) Create the New Table in Snowflake
Considering no destination table exists, employ the CREATE OR REPLACE TABLE command to create the new table.
CREATE OR REPLACE TABLE harvest_data (
  id INT,
  project_name VARCHAR(255),
  task_name VARCHAR(255),
  start_date DATE,
  end_date DATE,
  hours INT
);
CREATE OR REPLACE TABLE harvest_data: Creates a new table namedharvest_dataor replaces it if it already exists.id INT: Defines a columnidof integer type to store unique identifiers.project_name VARCHAR(255): Creates a column for the project name, allowing up to 255 characters.task_name VARCHAR(255): Creates a column for the task name, allowing up to 255 characters.start_date DATE: Defines a column to store the start date of the task.end_date DATE: Defines a column to store the end date of the task.hours INT: Creates a column to store the number of hours spent on the task, as an integer.
2) Load Data to Target
Upload the CSV file to the Snowflake staging area using the PUT command and load the data into your target table using the COPY INTO command.
PUT file://D:\harvest_data.csv @test_db.PUBLIC.%harvest_data/harvest_data.csv.gz;

COPY INTO harvest_data
FROM (
  SELECT $1 AS column1, $2 AS column2, ...
-- Specify the column names based on your CSV file
  FROM @test_db.PUBLIC.%harvest_data/file://D:\harvest_data.csv
  (file_format = (format_name = 'harvest_csv_format',
                  error_on_column_count_mismatch = false),
   pattern = '.*harvest_data.csv.gz',
   on_error = 'skip_file')
);
PUT file://D:\harvest_data.csv @test_db.PUBLIC.%harvest_data/harvest_data.csv.gz;uploads the local CSV file to the specified stage intest_dbas a gzipped file.COPY INTO harvest_dataimports data into theharvest_datatable from the uploaded CSV file.SELECT $1 AS column1, $2 AS column2, ...specifies which columns to select from the CSV.- Uses the
harvest_csv_formatfor reading the CSV, allowing flexibility with column counts and error handling.
This method is particularly valuable in the following scenarios:
- One-Time Replication: If your Finance team needs data from Harvest yearly, quarterly, or occasionally, then this manual effort and time are justified.
- Dedicated Team: If your organization has dedicated staff who manually select categories, customize templates, and download and upload CSV files, then replicating data from Harvest using CSV files is the way to go
- Less number of Reports: Managing multiple CSV files can be time-consuming and tedious, especially when you need to generate a 360-degree view of your business and merge data from various departments.
However, downloading CSV files and transforming Harvest data is not a scalable solution for businesses that need to integrate data from multiple sources.
This approach is time-consuming, error-prone, and requires specialized skills.

Limitations of Manual Method
- Requires frequent manual exports from Harvest and uploads to Snowflake.
- Increases the risk of human errors and delays in data updates.
- Data updates are not instantaneous; reports may rely on outdated information.
- Not suitable for businesses requiring real-time analytics.
- Large CSV files can be challenging to process and may slow down ingestion in Snowflake.
- Handling millions of rows manually can lead to performance bottlenecks.
What Can You Achieve by Migrating Your Data From Harvest to Snowflake?
Replication of data from Harvest to Snowflake can provide critical business insights. Here are five questions that you can answer by replicating your data:
- What are the total expenses incurred for each project or client?
- What are the billable hours for each client during a particular period?
- Is there any specific trend or pattern in client purchase behavior?
- What is the average revenue per client or project?
- Who are the Important contributors to a project?
Final Thoughts
Connecting Harvest with Snowflake enables businesses to unlock valuable insights, streamline reporting, and optimize resource management. While CSV-based transfers provide a basic solution, they come with limitations such as manual effort, lack of real-time updates, and data integrity risks. Leveraging an ETL tool like Hevo Data is the best approach to ensure seamless, automated, and real-time data synchronization.
Ready to automate your Harvest to Snowflake integration? Try Hevo Data for a no-code, real-time data pipeline and transform your analytics effortlessly. Sign up for a free trial today!
Check out the pricing details to understand which plan fulfills all your business needs.
FAQs
1. Why migrate to snowflake?
Migrating to Snowflake offers several benefits, such as scalability, cost-efficiency, and fast query performance. Its cloud-native architecture enables seamless handling of large data volumes, with separate compute and storage scaling.
2. What is Snowflake famous for?
Snowflake is famous for its cloud-based data warehousing capabilities, offering scalability, flexibility, and high performance.
3. What is Snowflake warehouse vs database?
A Snowflake warehouse is a virtual compute engine used to execute queries and perform data processing tasks. A Snowflake database is a logical container that stores structured data, including tables, views, and schemas.
4. Does Snowflake require a running warehouse?
No, Snowflake doesn’t require a running warehouse to store or query metadata. However, a running warehouse is needed to execute queries and perform data processing tasks.

Share it with your connections.
-
 Share To X
-
 Share To LinkedIn
-
 Share To Facebook
-
 Copy Link


