Data management and analysis are major operations for every organization. As the scale of data has increased over time, so have the methods to manage and analyze it. Companies spend thousands of dollars to generate useful insights from their in-house data, and managing data has become an essential part of the business process.

One way to manage large amounts of data is to migrate it from a company’s resource planning portal, like NetSuite, to a more suitable environment, such as a cloud data warehouse service provider like Amazon Redshift, where the data can be modeled properly.

This article will guide you on how to migrate your data from NetSuite to Redshift using different methods in a very easy-to-follow way.

A General Overview of NetSuite

Offered by Oracle Corporation, NetSuite is a cloud-based Enterprise Resource Planning (ERP) platform that provides multiple features to businesses of different scales. Some of the features include financial management, customer relationship management, inventory management, and many more.

NetSuite ERP allows you to plan your resources efficiently so that you can manage and monitor all the components of your business with regularly updated data on a single platform.

A General Overview of Amazon Redshift

Amazon Redshift Logo

Amazon Redshift is a cloud-based solution offered by Amazon Web Services (AWS) that provides data warehousing services. It can manage large volumes of data and perform high-performance analytics.

Redshift stores data in a columnar format so that it can be queried better by reading only the specific columns required for the analysis process. With its distributed architecture, Redshift allows parallel data processing, hence providing low latency.

One of the best benefits of using Redshift is that it is easy to integrate with other AWS services like Amazon S3 and Amazon QuickSight. This allows easy retrieval of data and analytics, helping generate useful insights from the data.

Methods to Move Data from NetSuite to Redshift

Let’s look at the different ways to load data from NetSuite to Redshift.

Method 1: Using Hevo Data to Load Data from NetSuite to Redshift

Hevo Data is the only real-time ELT, no-code data pipeline platform that provides a cost-effective way to automate data pipelines that are flexible to your needs. Some of the features provided by Hevo Data are instant data integration through different sources, loading data into warehouses in real time, and transforming data for analytics purposes, which can help your business flourish.

With only a few clicks, you can directly jump into analytics with your transformed data by establishing the data source and the destination on the Hevo platform. NetSuite API to Amazon Redshift integration with Hevo can ease the process of transferring your Netsuite ERP data to Redshift.

Get Started with Hevo for Free

Here are some of the key features of Hevo:

  • Data Transformation: Hevo provides Python-based drag-and-drop data transformation techniques that enable you to clean and prepare your data in a simple, non-technical way for the destination.
  • Incremental Data Load: Hevo allows real-time transfer of modified data. This ensures efficient utilization of bandwidth on the source and destination.
  • Automated Schema Mapping: Hevo replicates destination schema in such a way that it can automatically detect the format of incoming data. It allows you to choose whether you want Full & Incremental Mappings to suit your requirements of data replication.
  • No-Code Integrations: Hevo provides no-code solutions in building data pipelines with multiple sources and destinations with more than 150+ data source involved.
  • Support Over Multiple Regions: With a maximum of five workspaces, Hevo provides support for maintaining a single account across all the Hevo regions.
  • Syncing Historical Data: Your data that was available during the creation of the pipeline is synced with Hevo, and fetching your historical data is not complicated anymore due to Hevo’s Recent Data First approach.
Get Started with Hevo for Free

Steps to Configure Data Pipeline in Hevo for Transferring Data from NetSuite to Redshift

You can go through the steps below to connect NetSuite to Redshift with the help of Hevo Data.

1. Obtaining API Credentials from NetSuite

Before configuring NetSuite ERP as your pipeline source, you need to ensure some prerequisites.

Prerequisites

  • For your data to be extracted, you need to have an active NetSuite ERP account.
  • Ensure you’re logged in as an Administrator,for the purpose of creating a role and user for Hevo and obtain the API credentials.
  • Hevo has been given permission to access the NetSuite ERP data.
  • You must have access to Team Administrator, Team Collaborator, or Pipeline Administrator role on the Hevo platform to create data pipelines.

You can go through the steps from Hevo Data’s official NetSuite ERP documentation for detailed information.

To obtain the API credentials, including the Account ID, Token ID and Secret, and Consumer Key and Secret, log in as an Administrator. Then, perform the following steps.

Step 1: Enable Web Services and Token-Based Authentication for NetSuite Account

Enabling web services and token-based authentication is necessary to use the SuiteTalk API and to authenticate Hevo with access tokens. Follow the steps below:

  • Login to your NetSuite account as Administrator, and on the Home page, search for page: enable. Then, select the Page: Enable Features option.
NetSuite to Redshift: Enable Features
  • Select SuiteCloud on the Enable Features main page, and check the SOAP WEB SERVICES and REST WEB SERVICES options in the SuiteCloud tab.
NetSuite to RedShift: Enabling Soap Web Services and Rest Web Services
  • Under Manage Authentication, select the TOKEN-BASED AUTHENTICATION check box.
NetSuite to Redshift: Enabling Token-Based Authentication
  • Finally, click Save.

Step 2: Create an Integration Record to Uniquely Identify Hevo

To properly identify Hevo in the NetSuite account, you must create an integration record. Here are the steps to create an integration record:

  • Search for page: integrations in the NetSuite global search bar, and select the Page: Manage Integrations option.
NetSuite to Redshift: Managing Integrations
  • Click New on the Integrations page, select a unique Name for integration, and check the Token-based Authentication box to allow Hevo access to your data for transfer.
NetSuite to RedShift: Creating Unique Name and Allowing Token-Based Authentication
  • Click on Save, copy the Consumer key/secret that is displayed on the confirmation page, and securely save them. These credentials are going to be useful in creating a Hevo pipeline.

Step 3: Creating a Hevo-Specific Role and User

Creating a Hevo-specific role and user can make it easier for you to assign and manage the permissions required for Hevo to replicate data.

  • Search for page: new role under the global search bar of NetSuite, and select the Page: New Role option.
  • A Role page will pop up; on that page, enter the name for the role under the Name field, and under the authentication section of the page, select the WEB SERVICES ONLY ROLE checkbox.
NetSuite to Redshift: Selecting Role for Authentication
  • On the same page, there is a Permissions section at the bottom. Click on all the tabs, add permissions for the role under each tab, and click Add. You can also read the permissions required for Hevo to access data from the Hevo Role Permissions page. After adding permissions, click on Save.
NetSuite to Redshift: Adding Permissions for the Role.

Step 4: Creating a New Hevo User

Follow the steps given below to create a new Hevo user.

  • Search for page: new employee in the NetSuite search bar, and select Page: New Employees.
NetSuite to Redshift: Creating New User.
  • Fill out the NAME, EMAIL, SUBSIDIARY, and the other required fields under the Employee page.
  • Scroll down, select the Access tab, and perform the following tasks.
  • Select the GIVE ACCESS check box and the MANUALLY ASSIGN OR CHANGE PASSWORD to create a new password for the user.
  • Under the Roles section, select the Role drop-down, select the created role, and click Add.
NetSuite to Redshift: Assigning Password and Roles
  • Then, click Save.

After following these steps, you will create a new Hevo user.

Step 5: Create an Access Token

Creating an access token is essential to use NetSuite as a source. The credentials obtained from this step will be used to create your Hevo Pipeline. Follow the steps given below to create an access token.

  • Search for page: tokens in the NetSuite search bar, select Page: Access Tokens, and select New Access Token on the Access Tokens page.
NetSuite to Redshift: Creating New Access Token
  • In the Access Token page, specify APPLICATION NAME, USER, ROLE, and TOKEN NAME that were created in the previous steps.
NetSuite to Redshift: Access Token
  • Next, click Save. A confirmation page will be displayed, from which you must copy the Token ID and Secret and save them securely.

Step 6: Identifying the NetSuite Account ID and Subdomain

NetSuite Account ID and subdomain are essential for Hevo to access your data from NetSuite. Follow these easy steps to obtain them.

  • Search page: web services in the NetSuite search bar, and select the Page: Web Services Preferences.
  • Copy the Account ID from the Primary Information section of the SOAP Web Services Preferences and save it securely.
NetSuite to Redshift: Account ID information
  • Access the NetSuite ERP subdomain from the dashboard URL. For example, if your dashboard URL is https://abc.app.netsuite.com/, the subdomain is “abc”.
2. Setting up NetSuite ERP as a Source

After obtaining the API credentials from NetSuite, you can follow these steps to set NetSuite ERP as your source in the data pipeline.

  • Select PIPELINES from the Navigation Bar, and select + CREATE in the Pipelines List View.
  • Under the Select Source Type Page, select the NetSuite ERP Option.
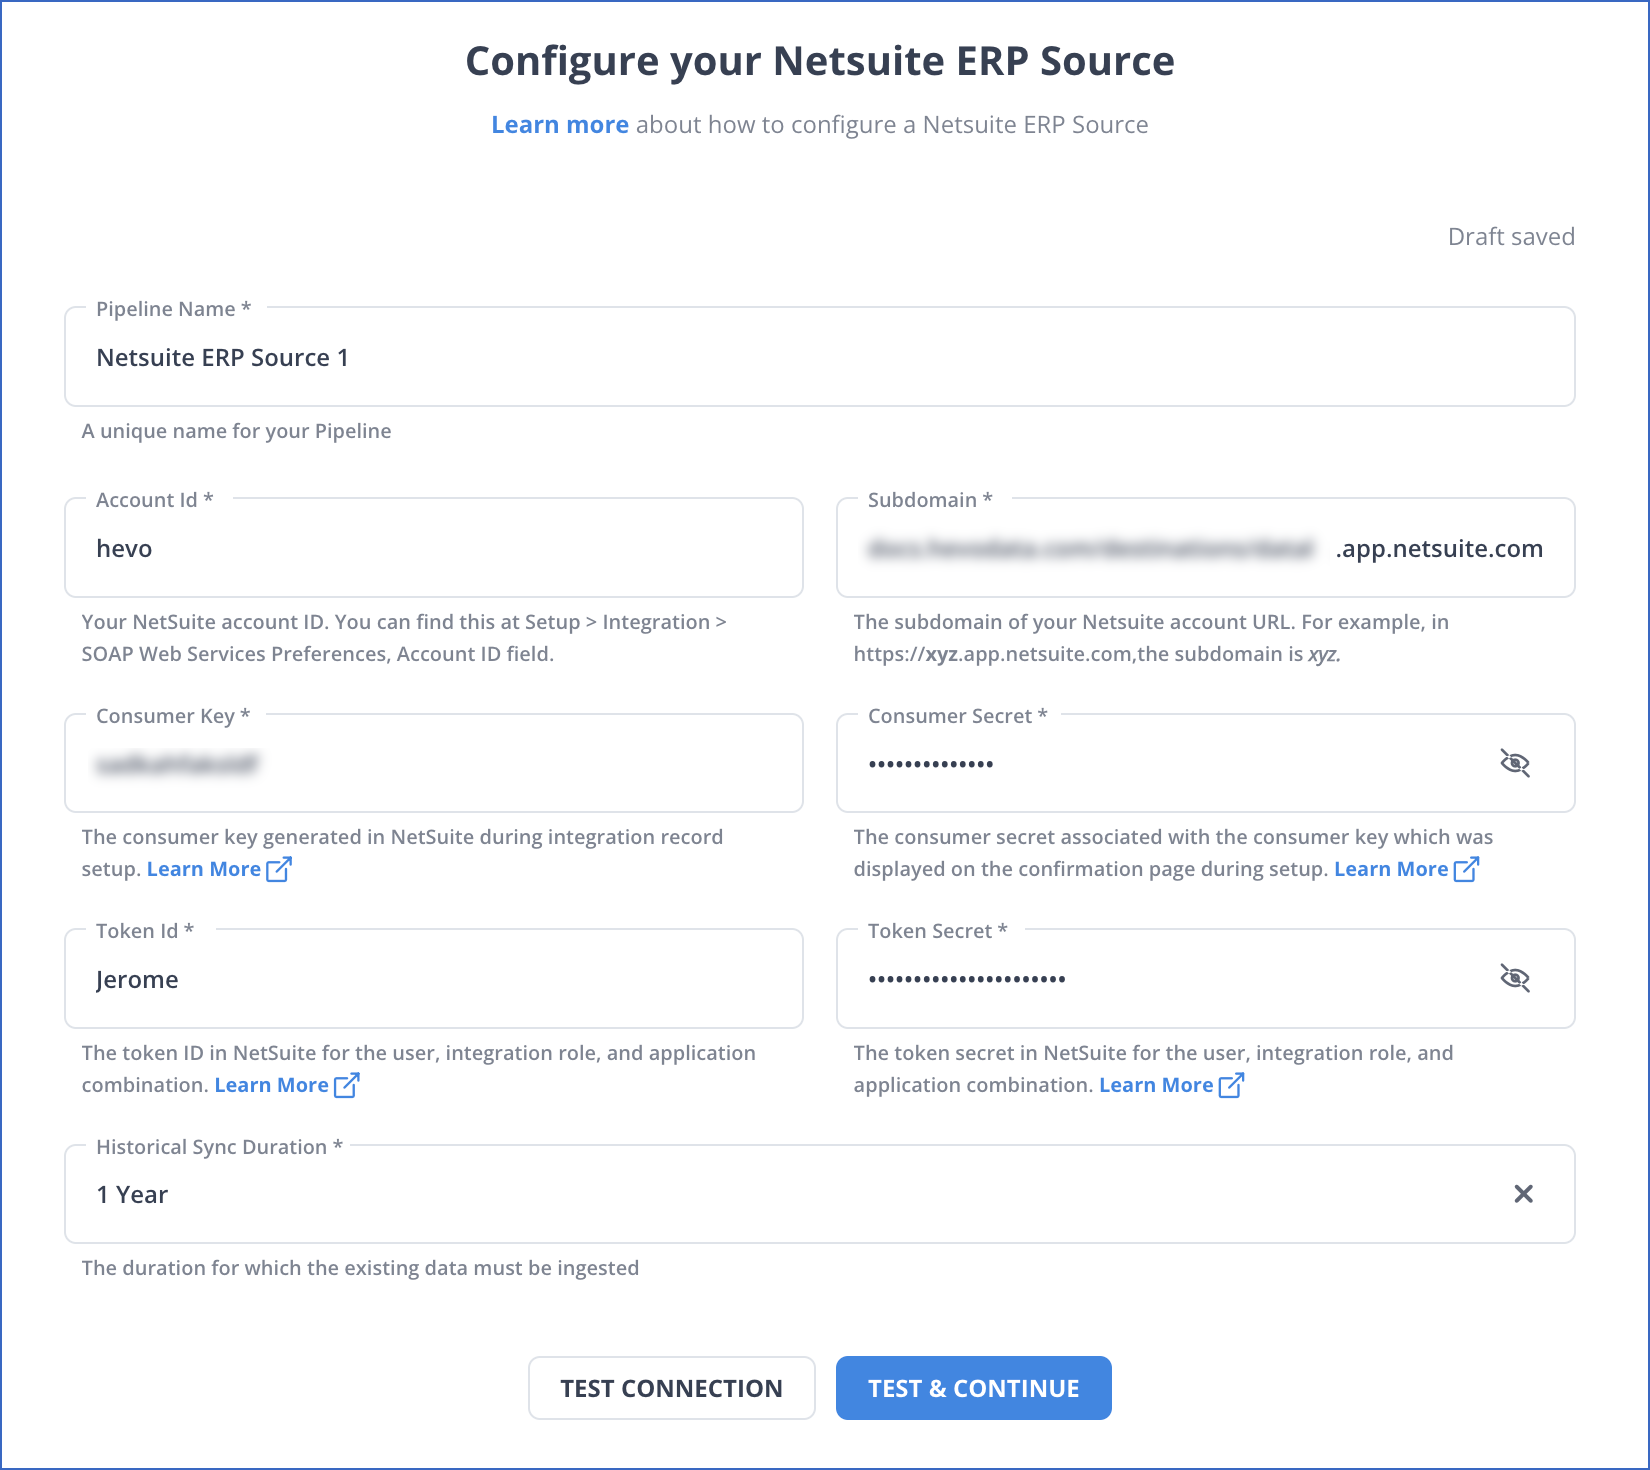
  • In the Configure your NetSuite ERP Source Page, you must specify the Pipeline NameAccount ID, Subdomain, Consumer Key, Consumer Secret, Token ID, Token Secret, and Historical Sync Duration. Ensure the Pipeline Name has less than 255 characters, and the Historical Sync Duration is the time duration for which you want to ingest the data from the source.
Netsuite to Redshift: Source Configuration
  • Select the option TEST & CONTINUE and proceed to setting up the destination.
3. Setting up Amazon Redshift as the Destination

Follow these steps to configure Redshift as your destination in the Hevo Data pipeline.

Prerequisites

Before setting up Redshift as your destination, you must make sure that all the prerequisites are satisfied.

  • The Amazon Redshift instance must be set up and running.
  • A Redshift database must be available.
  • The hostname and port number must be available for the Redshift database instance.
  • To set up Redshift as a destination, you must be assigned as the Team Collaborator or any other administrator role except the Billing Administrator role in Hevo.

Step 1: Whitelist the Hevo IP Address for Your Region

First, you have to enable Hevo to connect to your Amazon Redshift database, and for that, you need to whitelist Hevo’s IP address for your region. Follow these steps to do so:

  • You need to log in to the Amazon Redshift dashboard and select Clusters in the left navigation pane.
  • Select the Cluster to connect to Hevo.
NetSuite to Redshift: Selecting the Cluster
  • Click on the link under Cluster Properties, VPC security groups under the Configuration tab to open the Security Groups panel.
NetSuite to Redshift: Security Groups
  • Under the Security Groups panel, select Inbound and click Edit.
NetSuite to Redshift: Editing Inbounds
  • Follow the given steps in the Edit inbound rules:
    • Select Add Rule, and under the Type column, select Redshift from the dropdown.
    • Enter your Amazon Redshift cluster port in the Port Range column.
    • Under the Source column, select Custom and enter Hevo’s IP address for your region. To whitelist all the IP addresses, repeat this step and click Save.
NetSuite to Redshift: Editing Inbound Rules

Step 2: Grant Privileges to the User

  • You need to log in to your Amazon Redshift database as a superuser and fill out the given commands to grant privileges to the user. Hevo contains code scripts that you can directly copy and paste to make your journey easier:
  • For an existing database granting CREATE privileges to the user.

GRANT CREATE ON DATABASE <database_name> TO hevo;

GRANT CREATE ON SCHEMA <SCHEMA_NAME> TO <USER>;

GRANT USAGE ON SCHEMA <SCHEMA_NAME> TO <USER>;

  • Granting SELECT privileges to all the tables or certain tables in the database.

GRANT SELECT ON ALL TABLES IN SCHEMA <schema_name> TO hevo; #all tables

GRANT SELECT ON TABLE <schema_name>.<table_name> TO hevo; #specific table

Step 3: Configuring Amazon Redshift as Your Data Pipeline’s Destination

You can follow these steps to configure Redshift as your destination location.

  • Select DESTINATIONS in the Navigation Bar.
  • Click + CREATE from the Destinations List View.
  • Select Amazon Redshift on the Add Destination page.
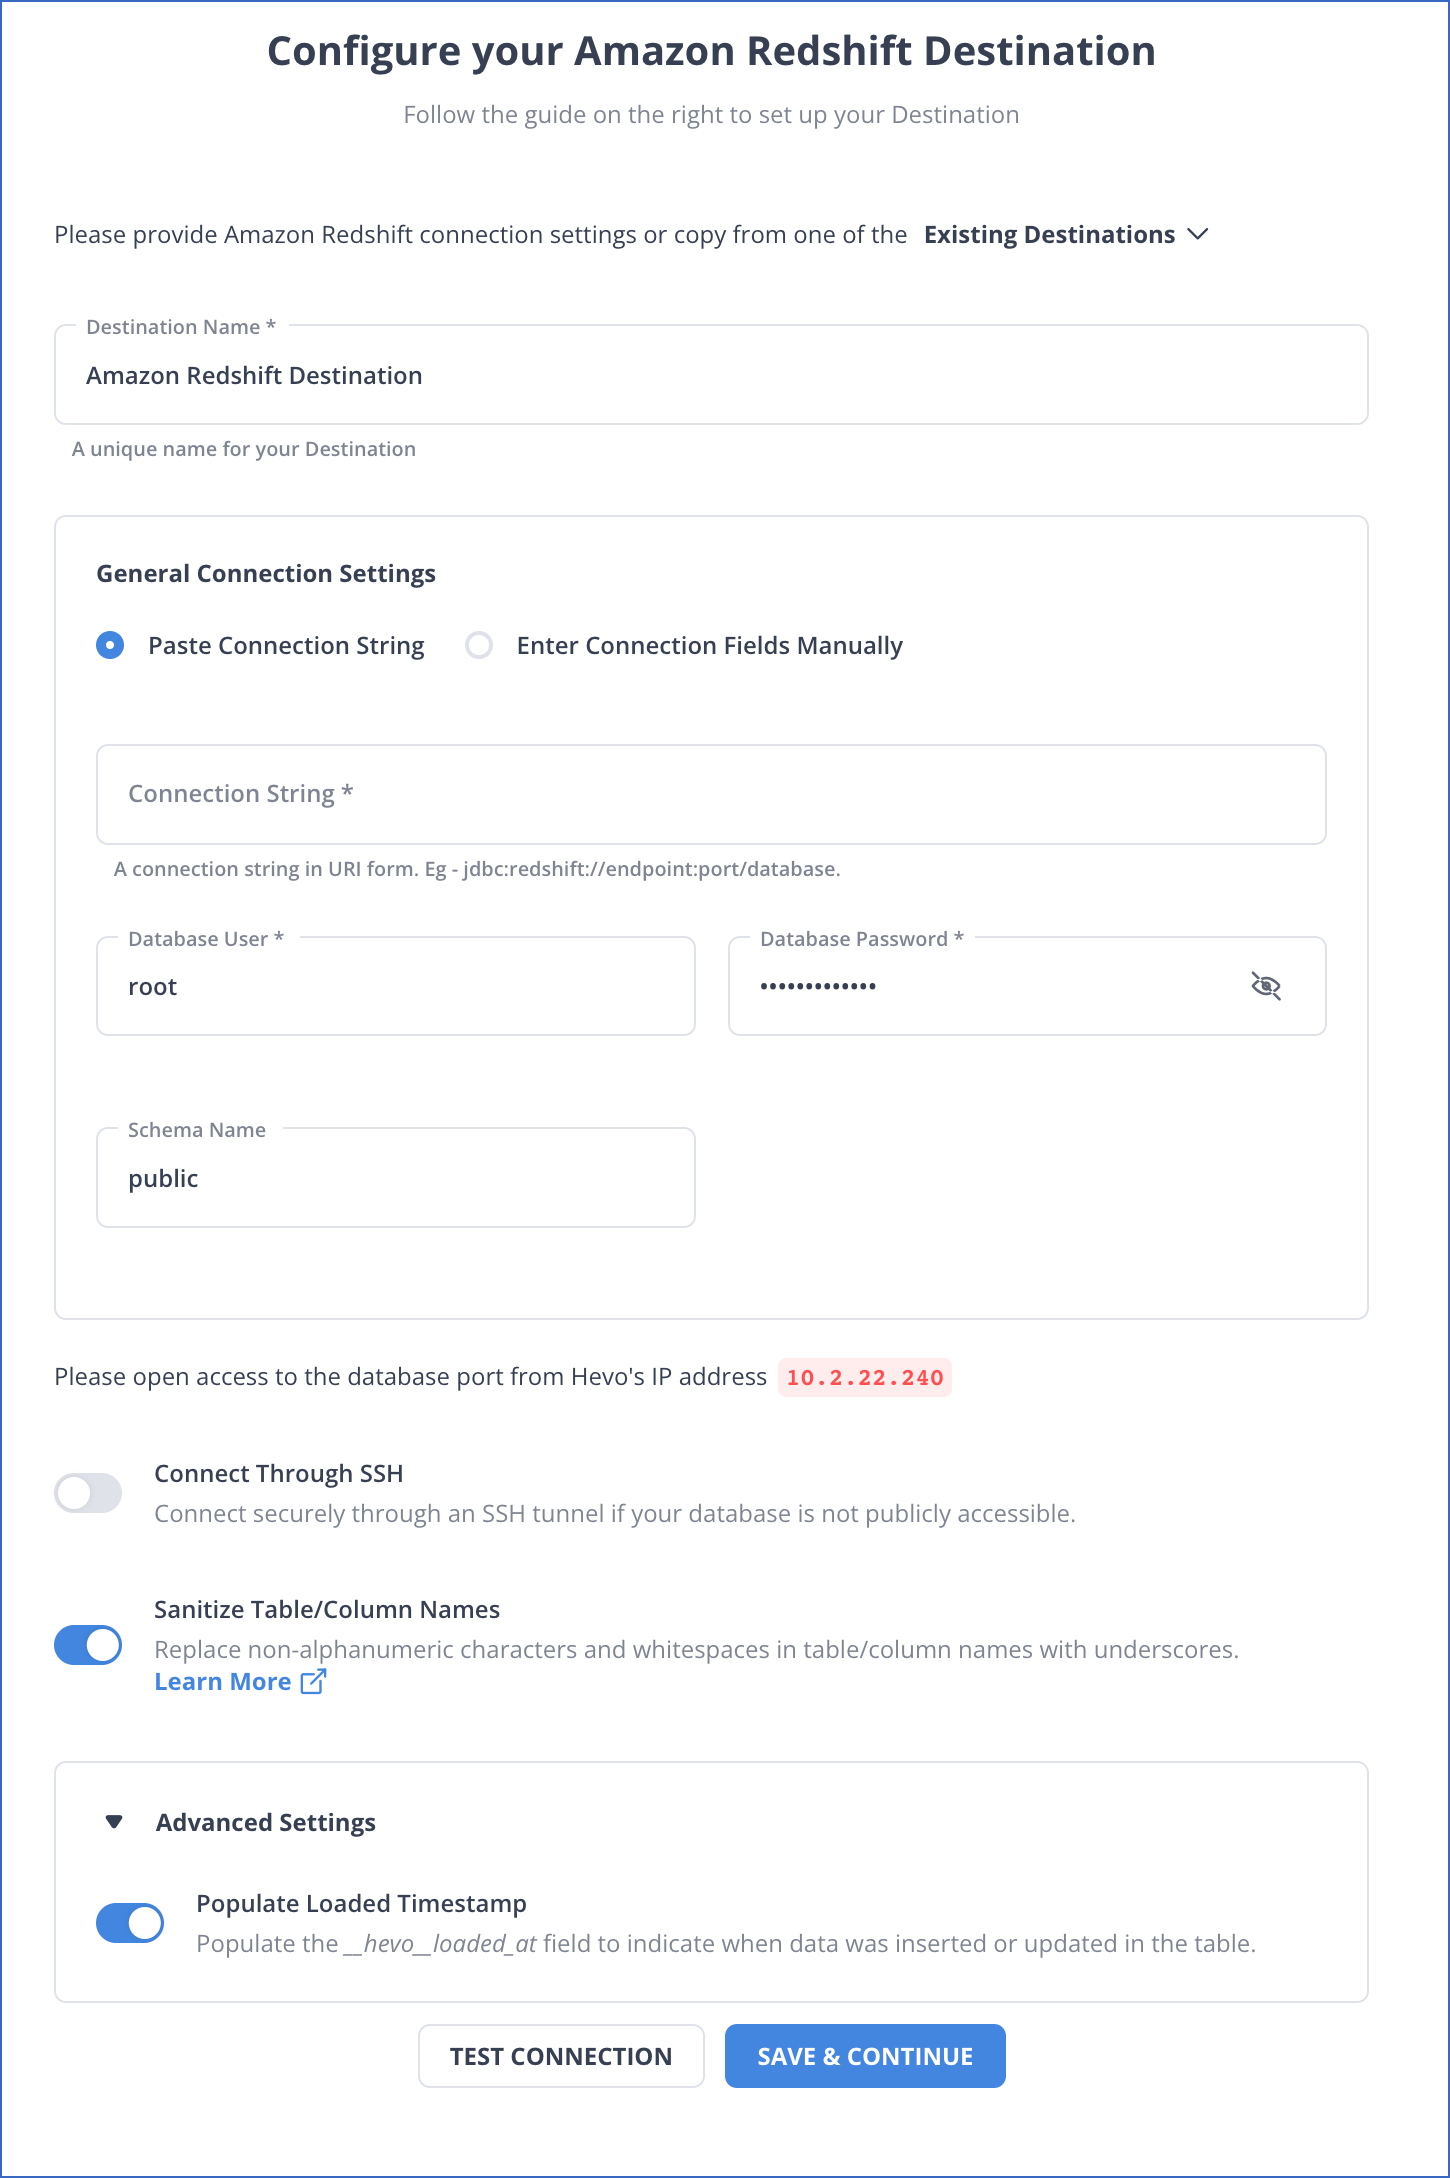
  • Under the Configure your Amazon Redshift Destination page, make sure you fill out the mandatory options correctly.
NetSuite to Redshift: Configuring Amazon Redshift as Destination

You must enable Populate Loaded Timestamp so that the hevo_loaded_loaded_at_ column can be appended to the destination table. This option will indicate the time when the event was loaded to the destination.

Finally, click TEST CONNECTION > SAVE & CONTINUE; by following these simple steps, you can create a Hevo Data pipeline and integrate NetSuite with Redshift.

For more detailed information on the connector, read Hevo’s Amazon Redshift connector documentation.

SIGN UP HERE FOR A 14-DAY FREE TRIAL

Method 2: Manually Transferring Data from NetSuite to Redshift Using CSV Export/Import

Migrating data from NetSuite to Redshift can also be done by manually transferring the CSV data file from NetSuite to the Amazon S3 bucket. After moving the CSV data to the Amazon S3 bucket, you can easily import the data into Amazon Redshift. Follow the steps below to move data from NetSuite to Redshift.

1. Exporting Data from NetSuite

You can easily download the data from your NetSuite profile by following these steps.

  • Log in to your Netsuite account using your credentials.
  • Navigate to Export Tasks from Setup and Import/Export.
  • Select Full CSV Export under the Export Tasks option.
  • Make sure that your user account holds the Administrator Role position to execute the export task.
  • Select the Submit option to start the export process and monitor the progress.
  • After the completion of the export process, a File Download window will appear, select Save This File to Disk. Rename the file and save it in .zip format.

This process creates a zip file of your NetSuite data, which can now be stored in Amazon S3.

2. Uploading the Data on Amazon S3

After exporting the data, you must move it from your local machine to Amazon S3 to migrate it to Redshift.

  • Open the Amazon S3 console by logging in to the AWS Management Console.
  • Choose Buckets from the left navigation page, choose the bucket where you want to upload your files, and click on Upload.
  • An Upload window will pop up, select Add File, and choose your NetSuite data file.
  • Click on Enable Bucket Versioning under Destination to enable the versioning process.
  • Click on Upload to store the files on the S3 platform. When this process is complete, you will see a success message on the Upload: status page.

3. Creating an IAM Role for Redshift

  • On the Amazon Redshift Serverless Console, click on default-namespace under the Namespace option.
  • A default-namespace page will open up; on that page, there is a Security and encryption option.
  • Click on Manage IAM Roles, and a new page will open. On that page, select Create IAM role from the dropdown in the Associated IAM roles region.
  • On the Create IAM role page, select Any S3 bucket and click on Create IAM role as default.
  • Click on Save Changes.

4. Loading the Data from Amazon S3 to Amazon Redshift

Here’s a step-by-step guide for loading data from Amazon S3 to Redshift; you can also follow the official AWS Documentation.

Step 1: Create a Cluster
  • Open the Amazon Redshift console by signing into the AWS Management Console.
  • Choose the Region at the top right corner to create a cluster.
  • Select Clusters on the navigation menu, and then select Create Cluster. The Create Cluster page will appear. On that page, select the parameters for your cluster.
  • You can choose the parameters on your own but change the following values:
    • Choose node type as dc2.large.
    • Number of nodes is 4.
    • Under the Cluster permissions, choose the IAM role from the available ones; this role must be previously created. Finally, choose the Associated IAM Role, add it to the Associated IAM Roles for the cluster, and choose Create cluster.
Step 2: Run COPY Command to Load Tables

Here’s a command you can use to copy your data into Redshift. You can run this command in the Redshift query editor and fill out the options in the code with your information.

COPY required_table_name [ list_of_columns ] FROM data_source authorization CREDENTIALS access_credentials [options] 

Step 3: Vacuum and Analyze the Database

When rows are added, deleted, or modified in the database, the vacuum command restores the sort order and recovers space. On the other hand, the analyze command updates the statistics metadata. Run the following commands to vacuum and analyze the database.

vacuum;
analyze;

This completes the integration of data from NetSuite to Redshift.

Limitations of Using CSV Export/Import Method for NetSuite to Redshift Migration

Multiple limitations must be considered before using the CSV export/import method to transfer data from NetSuite to Redshift. While this method is efficient for small datasets, it might cause issues when working with large datasets.

  • Time Consumption: As the amount of data increases, the process becomes increasingly time-consuming. This method involves considerable delays in data extraction from NetSuite, uploading to Amazon S3, and command execution to move the data to Redshift.
  • Lack of Automation: Each step in this method involves manual efforts, making data transfer from one location to another difficult. This method increases the likelihood of data transfer delays.
  • Risk of Error Production: With each step requiring manual efforts, the risk of error increases. Errors such as incorrect data mapping and inconsistencies in data may occur and deteriorate your data analysis process.
  • Lack of Real-time Integration: The method lacks real-time integration capabilities due to the delays between extracting NetSuite data and loading it into Redshift. This can produce a delay in your abilities to make informed decisions in real time based on the most recent data.

Method 3: Loading Data from NetSuite to Redshift Using AWS Rest API

Here’s another way to move your data from your NetSuite account to Redshift. This time, you will use AWS Rest API to move your data around and load it to Redshift. Follow these steps to transfer your data from NetSuite to Redshift.

  • You will be uploading data to Amazon S3 using AWS API, that can be achieved using tools like Postman, or some other Amazon Library. You can read more about bucket operation from AWS Documentation.
  • Once the bucket has been set up, you can send your data to Amazon S3 using AWS API endpoints. Depending on your preference, you can use the HTTP endpoint or existing libraries.
  • There are two methods that you can follow from here to load data into Amazon Redshift:
    • The first method uses the INSERT command by connecting your Redshift instance with a JDBC or ODBC connection. You can follow these Redshift INSERT Examples to learn more about this process.
  • The second method uses the COPY command that helps in uploading data to Redshift. We already used this command in the previous method; you can also look into the Redshift COPY command page to learn more about this method.

Limitations of Moving Data Using AWS REST API

While using AWS REST API to transfer data from NetSuite to Redshift is an effective method, there are certain shortcomings that must be kept in mind. Here are some of the limitations involved with this method.

  • Complexity: You need to have prior programming knowledge before using this method. The need for technical expertise can make this method complex for some users.
  • Increased Errors: As the development and maintenance of a custom integration process increases, the risk of errors also increases. This might result in data inconsistencies and inaccuracies.
  • Maintenance Issues: Any update in data schemas can lead to challenges in maintaining the integration, and it might cause disturbance in the flow of data.

Use Cases of Migrating NetSuite to Redshift

  • By migrating your data from NetSuite to Amazon Redshift, you can improve your analytics and reporting environment, generating insights for multiple business streams.
  • Amazon Redshift can leverage your data to forecast essential decision-making processes in your business and produce better marketing strategies.
  • Transferring your data from NetSuite to Redshift can enable you to perform real-time data analysis on continuously streaming data and identify trends that can increase your business performance.
  • Moving your data from NetSuite to Redshift can provide better inventory management opportunities. It will give you better access to inventory levels, turnover planning, and many other features.

Conclusion

Migrating data from your NetSuite ERP to Amazon Redshift presents multiple positives in terms of business prospects and data management. Shifting the data from a resource planning environment to an analysis and reporting environment can help you make more data-driven decisions.

You’ve seen two different methods that can help move your data from your NetSuite account to your Redshift account. Using CSV export/import is the custom method that involves extracting NetSuite data into CSV files and loading CSV into Redshift through S3. However, this method is associated with limitations such as being time-consuming, effort-intensive, and lacking real-time integration capabilities. You can overcome such limitations by leveraging the key features of Hevo Data to build a data pipeline quickly and transfer data smoothly without any interruptions.

Want to migrate your NetSuite data elsewhere? Here are a few interesting reads:

Visit our Website to Explore Hevo

Hevo can help you integrate your data from numerous sources and load them into a destination to analyze real-time data with a BI tool such as Tableau. It helps transfer data from source to a destination of your choice for free. It will make your life easier and data migration hassle-free. It is user-friendly, reliable, and secure. Check out the Hevo Pricing details here.  

Sign Up for a 14-day free trial with Hevo to start moving data from NetSuite to Redshift right now!

Suraj Kumar Joshi
Freelance Technical Content Writer, Hevo Data

Suraj is a technical content writer specializing in AI and ML technologies, who enjoys creating machine learning models and writing about them.

All your customer data in one place.