


Managing databases is an essential part of business. It helps you store and retrieve data on the go. With the latest technologies in the market, deciding which database management system is the best has become tough. One such necessary factor is the cost considerations of choosing a database.
MySQL is a free database management system that can help you manage your business at a low cost. You can conduct various analyses of your data to determine factors that can improve your overall business performance. If you have large datasets stored in Amazon Aurora, integrating Aurora MySQL datasets can be a good decision. You will get more control over your database environment and explore cost-optimized insights.
Take a look at two methods that help you carry out Aurora MySQL data migration.
Table of Contents
An Overview of Amazon Aurora
Amazon Aurora is a serverless relational database service compatible with MySQL and PostgreSQL. It provides you with multiple benefits, including high performance to manage critical workflows, high availability, and cost-effectiveness.
With its serverless nature, Aurora can scale up thousands of transactions in just a matter of seconds. It provides real-time analytics and transactional facilities by integrating with Amazon Redshift. You can check out the difference between Amazon Aurora and RDS to know more about AWS ecosystem databases.


An Overview of MySQL
MySQL is a well-known relational database management system (RDBMS). Using Structured Query Language (SQL), you can maintain and manipulate the data present in MySQL.
There are many benefits associated with using MySQL as a database management system. Some of the major benefits include its being an open-source RDBMS, which allows you to use its abilities for free, and its potential to handle data from different-scale applications.
With MySQL’s data replication properties, you can move data from one database to another without worrying about inconsistencies in the data.
Methods to Transfer Aurora Data to MySQL
Migrating data from Aurora to MySQL can streamline your database management and improve performance. Here are two effective methods to achieve this:
Method 1: Use Hevo Data for Aurora MySQL Migration
Leverage Hevo’s no-code data pipeline to effortlessly transfer data from Aurora to MySQL with real-time updates and transformations.
Method 2: Using Amazon S3 for Aurora MySQL Data Migration
Export your Aurora data to Amazon S3 as CSV files and then import it into MySQL, a manual yet effective method for data migration.
Method 1: Use Hevo Data for Aurora MySQL Migration
Hevo Data is a real-time, no-code, automated ELT data pipeline platform that is cost-effective and adaptable to your requirements. With this platform, you get instant data transfer through 150+ data sources.
Here are some of the main features provided by Hevo Data:
- Data Transformation: Hevo provides you with Python-based drag-and-drop data transformation techniques that enable you to clean and prepare your data.
- Incremental Data Load: Hevo enables you to transfer modified data in real-time, and this feature maintains bandwidth utilization at both the source and destination.
- Automated Schema Mapping: Hevo automatically detects the format of incoming data and replicates it in the destination schema. Per your requirements, you can choose between full or incremental mappings.
1. Configuring Amazon Aurora MySQL as a Source
Before proceeding with the steps to configure Amazon Aurora MySQL as your source, you must meet the given prerequisite conditions.
Prerequisites
- An instance of Amazon Aurora MySQL must run in any role other than localhost.
- MySQL 5.5 or any other higher version is available.
- If BinLog is your chosen ingestion mode:
- The database you are connecting to will be a master instance. Amazon Aurora MySQL doesn’t support replicating BinLog on Read Replicas.
- Aurora MySQL hostname and port number must be available.
- To create pipelines, you must be assigned a Team Administrator, Team Collaborator, or Pipeline Administrator role in Hevo.
Step 1: Set up MySQL Binary Logs for Replication
A binary log collects information about data object modifications and data modifications made on MySQL server instances. This feature enables data recovery features, but you must enable binary logging on your MySQL instance for this to happen.
To enable binary logging on Aurora DB, you can follow these steps:
- Open your Amazon RDS Console and select the Parameter groups from the left navigation pane.
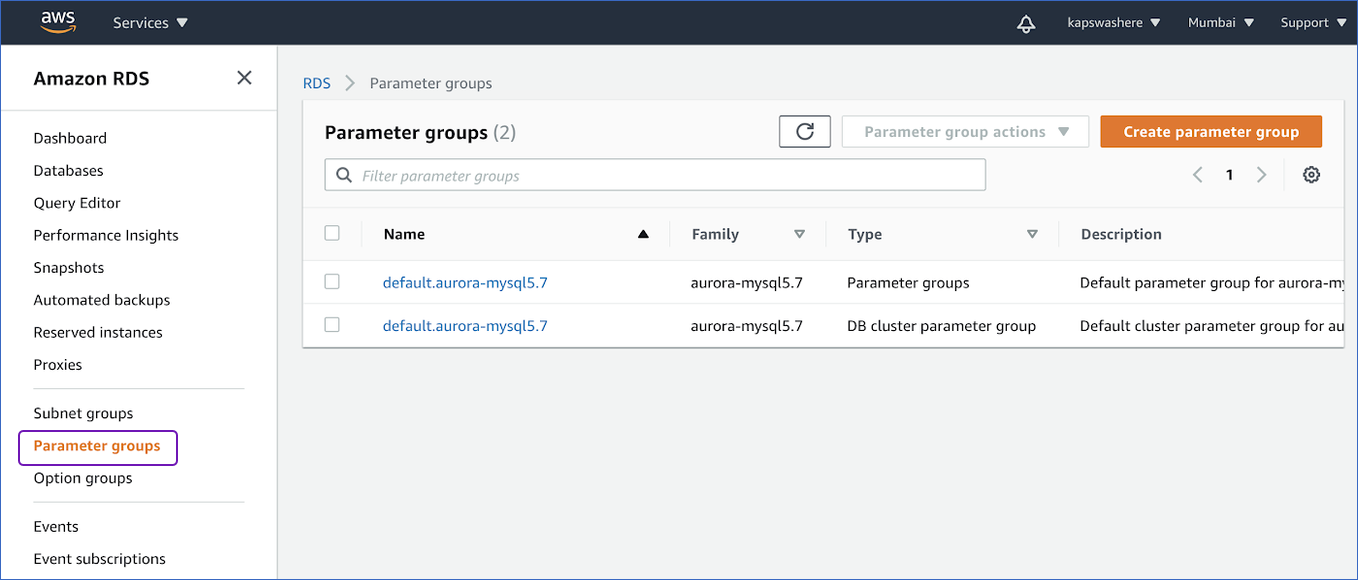
- If you are using the standard Aurora DB cluster parameter group, you must create a new one with Type as the DB cluster parameter group. Otherwise, you can select an instance with Type as the DB cluster parameter group.
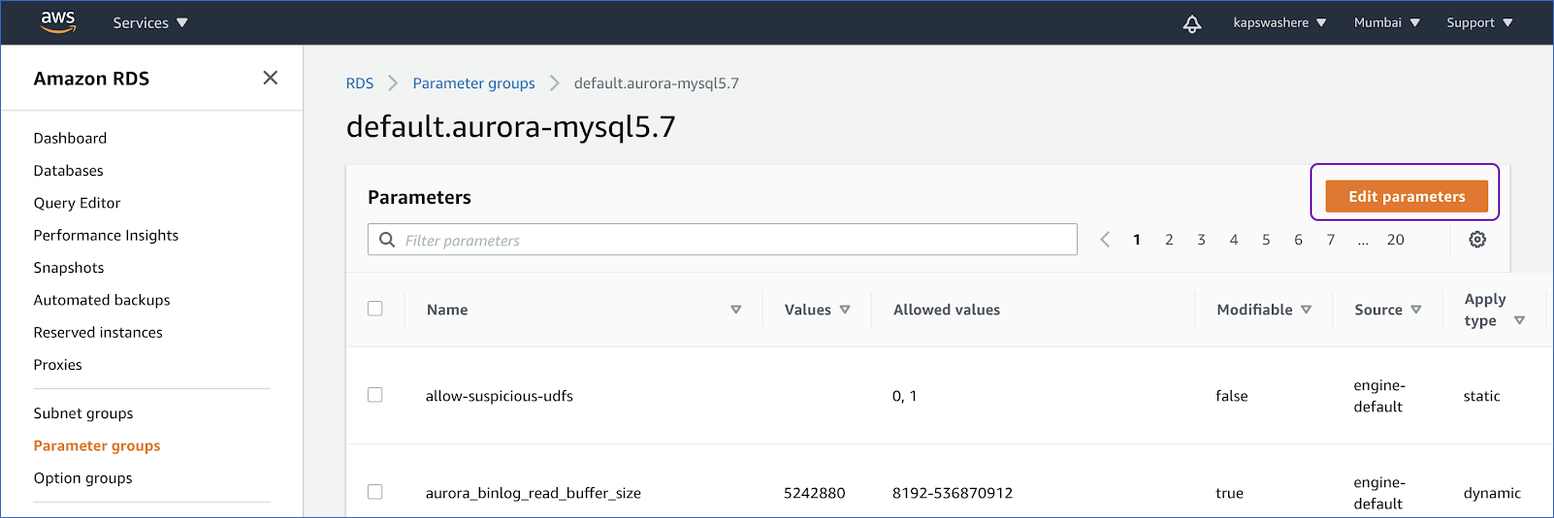
- Click on Edit Parameter.
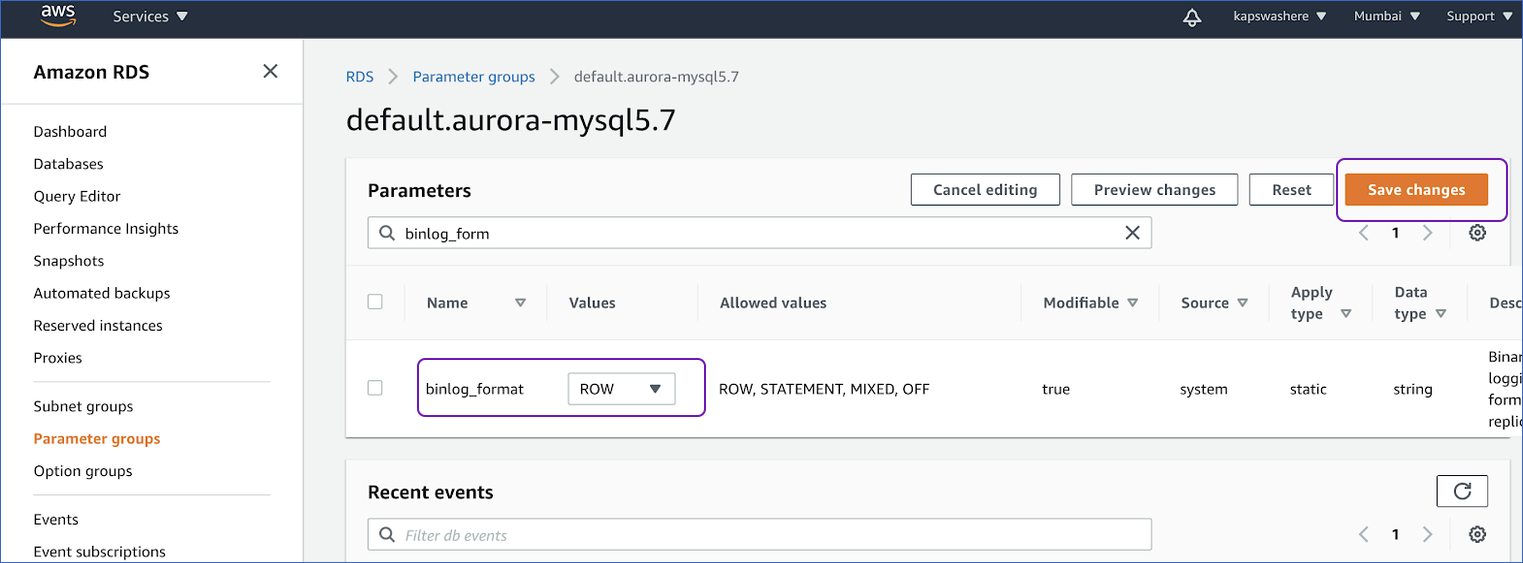
- Search for the parameter Name binlog_format. Activate the binary log replication option by selecting the Values to ROW and clicking Save Changes.
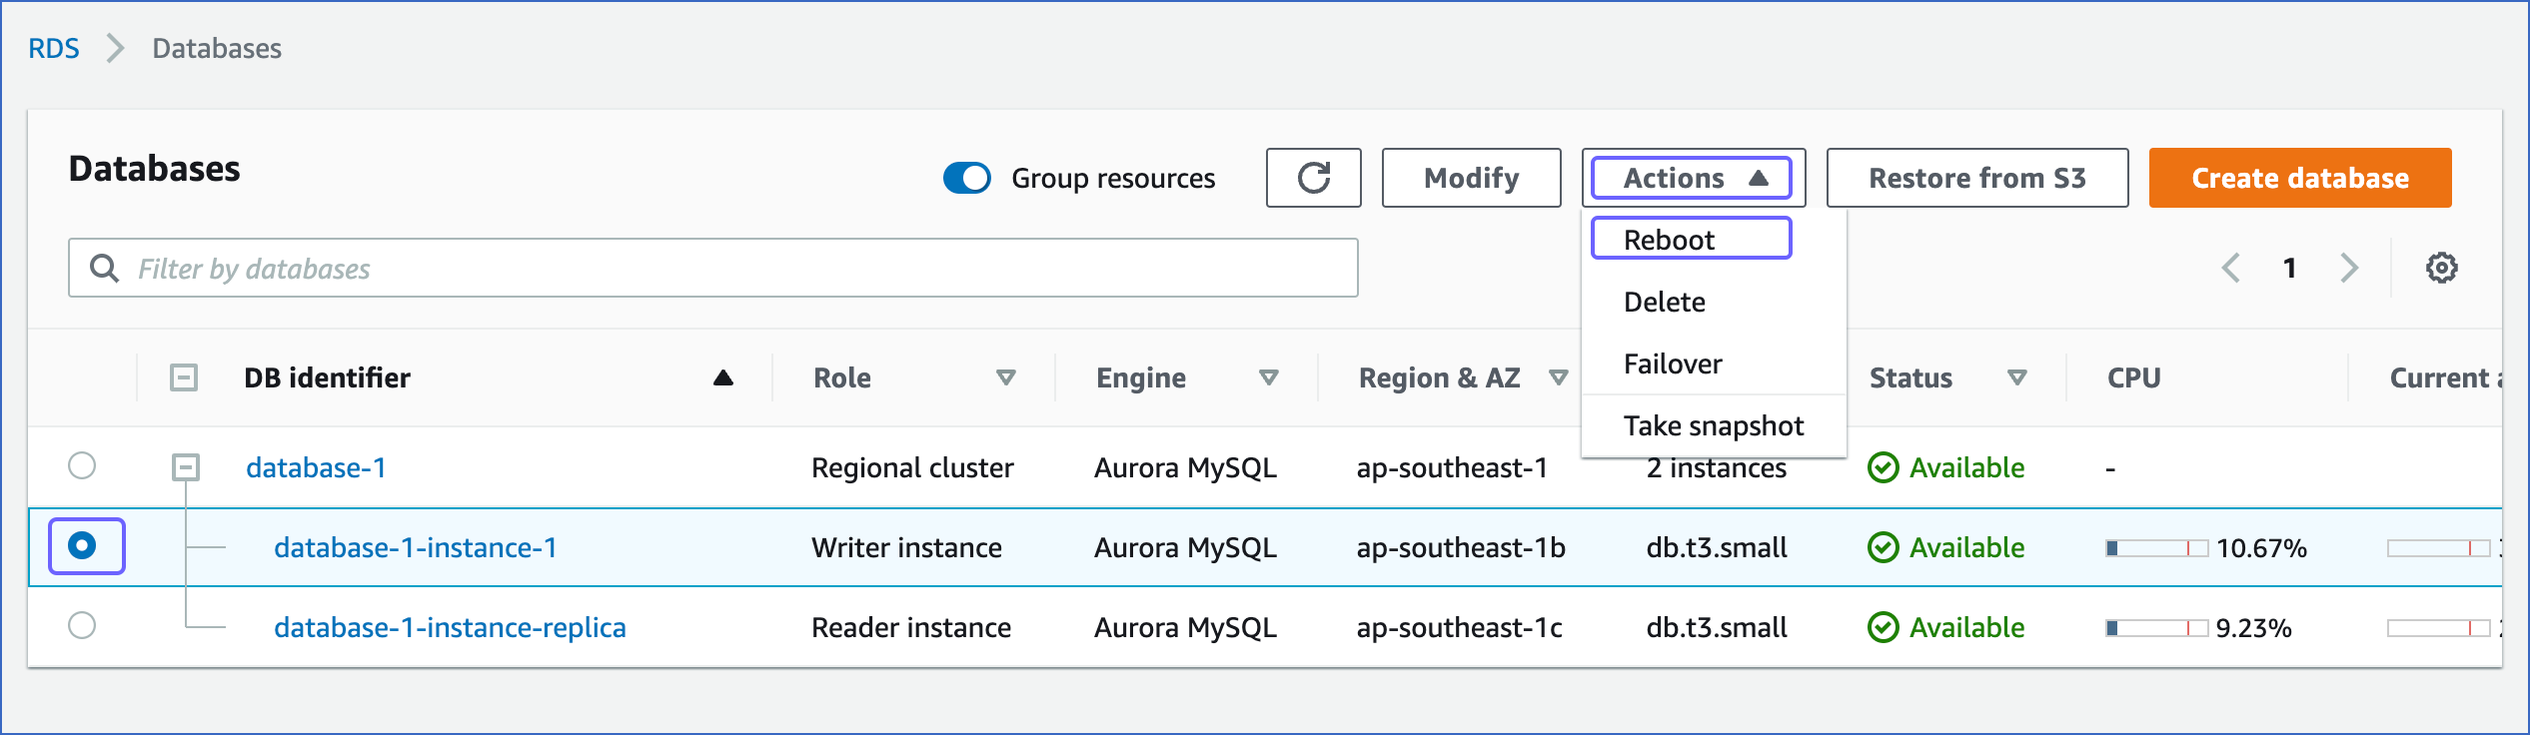
- Reboot the database instance to apply the above changes. Follow these steps to do so:
- Under the Dashboard option in the left navigation pane, click Databases.
- On the right side, in the Databases section, select the DB identifier of the Aurora MySQL instance that you want to replicate.
- Click Reboot in the Actions drop-down. If you are rebooting as a Writer role in the DB cluster, all the other reader instances in the database will be rebooted, too.
- Click Confirm on the Reboot DB Instance page. The read replica takes some time to create. Aurora will show the status as Creating, which will eventually change to Available.
For more information on database replication in MySQL, you can follow the BinLog guide.
Step 2: Whitelist Hevo’s IP Address for Your Region
- Open your Amazon RDS console.
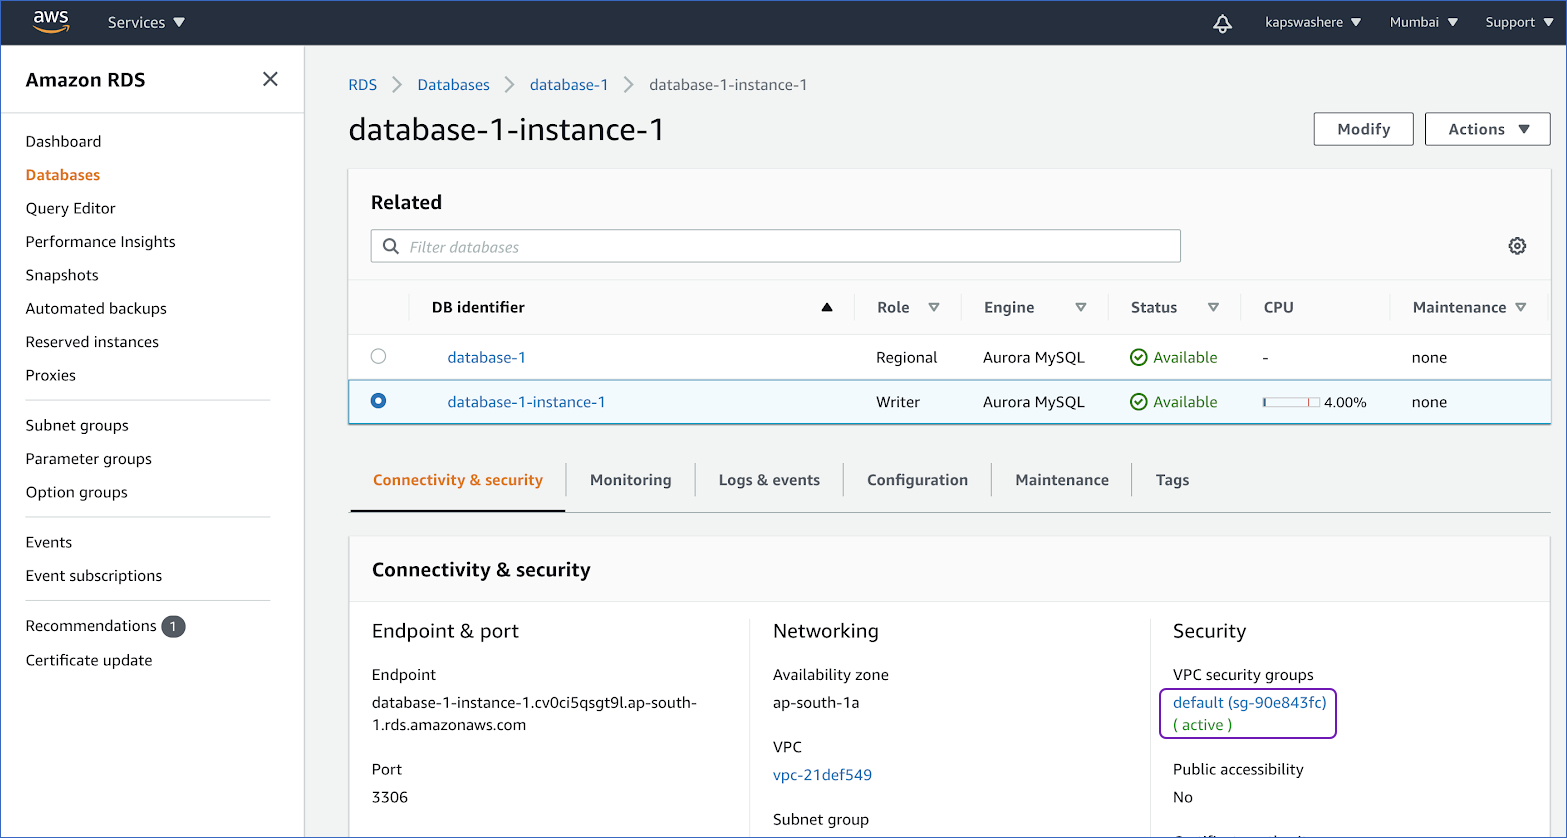
- Click Databases on the left navigation pane. Under the Databases section on the right side of the new page, select the Aurora instance’s DB identifier to configure a security group.

- Under the Connectivity & security tab, click the link that is present under the Security, VPC security groups.
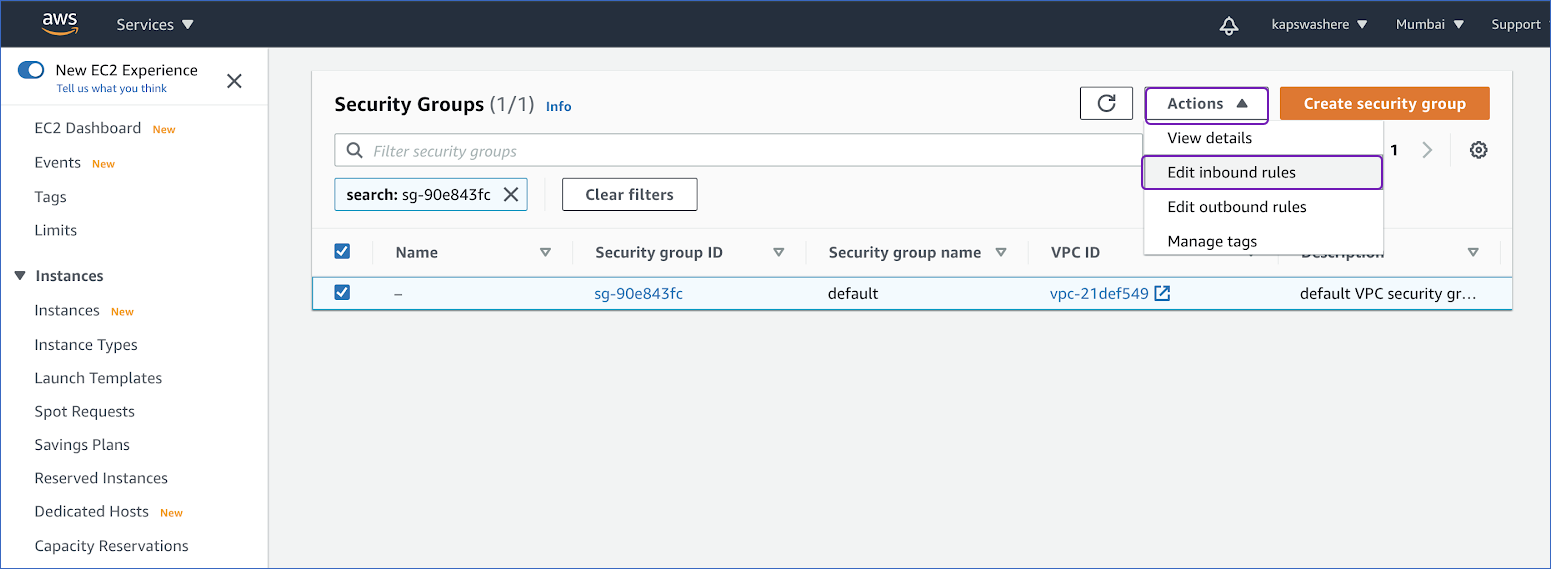
- Select Edit inbound rules from the Actions drop-down in the top right corner.
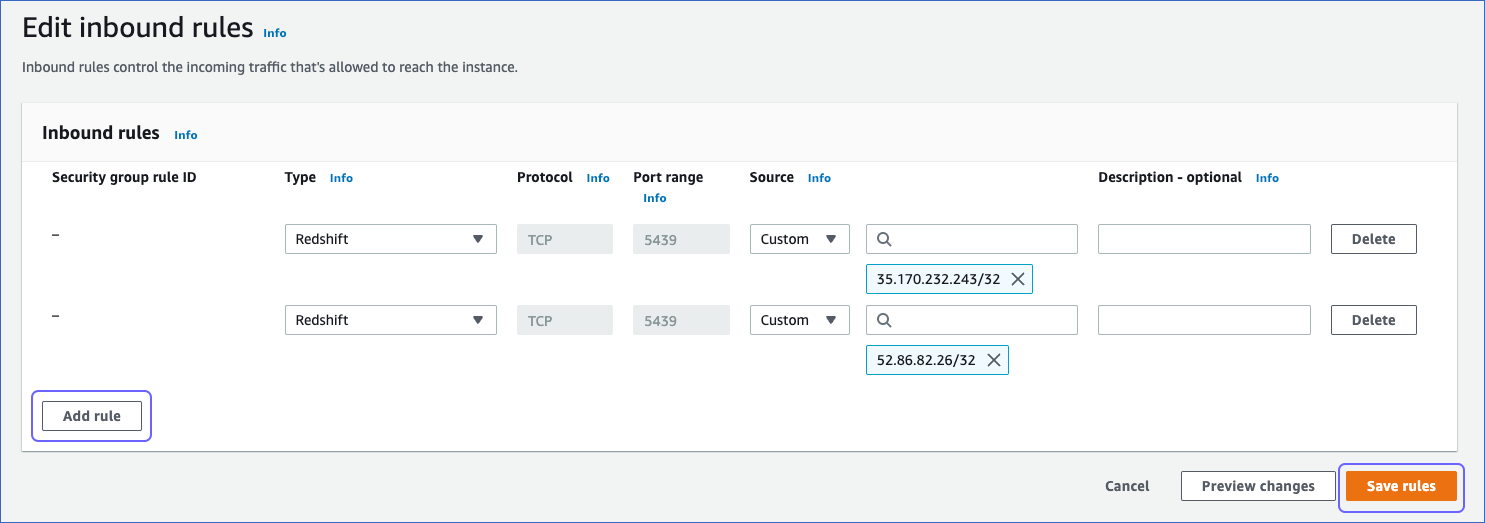
- On the Edit inbound rules page, click Add rule.
- To grant access to the Amazon Aurora MySQL instance, add a new rule with the specified Hevo IP address for your region and click Save rules.
Step 3: Create a Database User and Grant Privileges
To create a new database user, you must connect to your Aurora MySQL database as a root user using the SQL client tool, such as MySQL workbench. Replace the <username> placeholder from the given code with your own credential:
CREATE USER <username>@'%' IDENTIFIED BY '<password>';You can perform the steps given below in order to grant privileges to the user:
- Using an SQL Client tool, you must connect to your Aurora MySQL database as a root user.
- Grant the SELECT and REPLICATION privileges to the user by following the command given below by replacing the <username> placeholder:
GRANT SELECT, REPLICATION CLIENT, REPLICATION SLAVE ON *.* TO <username>@'%';- Allow Hevo to access your database using this command:
GRANT SELECT ON <database-name>.* TO <username>;- If ingestion mode is set to Binlog to grant access to the database user to read BinLog settings:
GRANT EXECUTE ON PROCEDURE mysql.rds_show_configuration TO '<username>'@'<hostname>';Step 4: Settings to Establish Amazon Aurora MySQL Connection:
Learn more about configuring Amazon Aurora as a source in Hevo’s documentation.
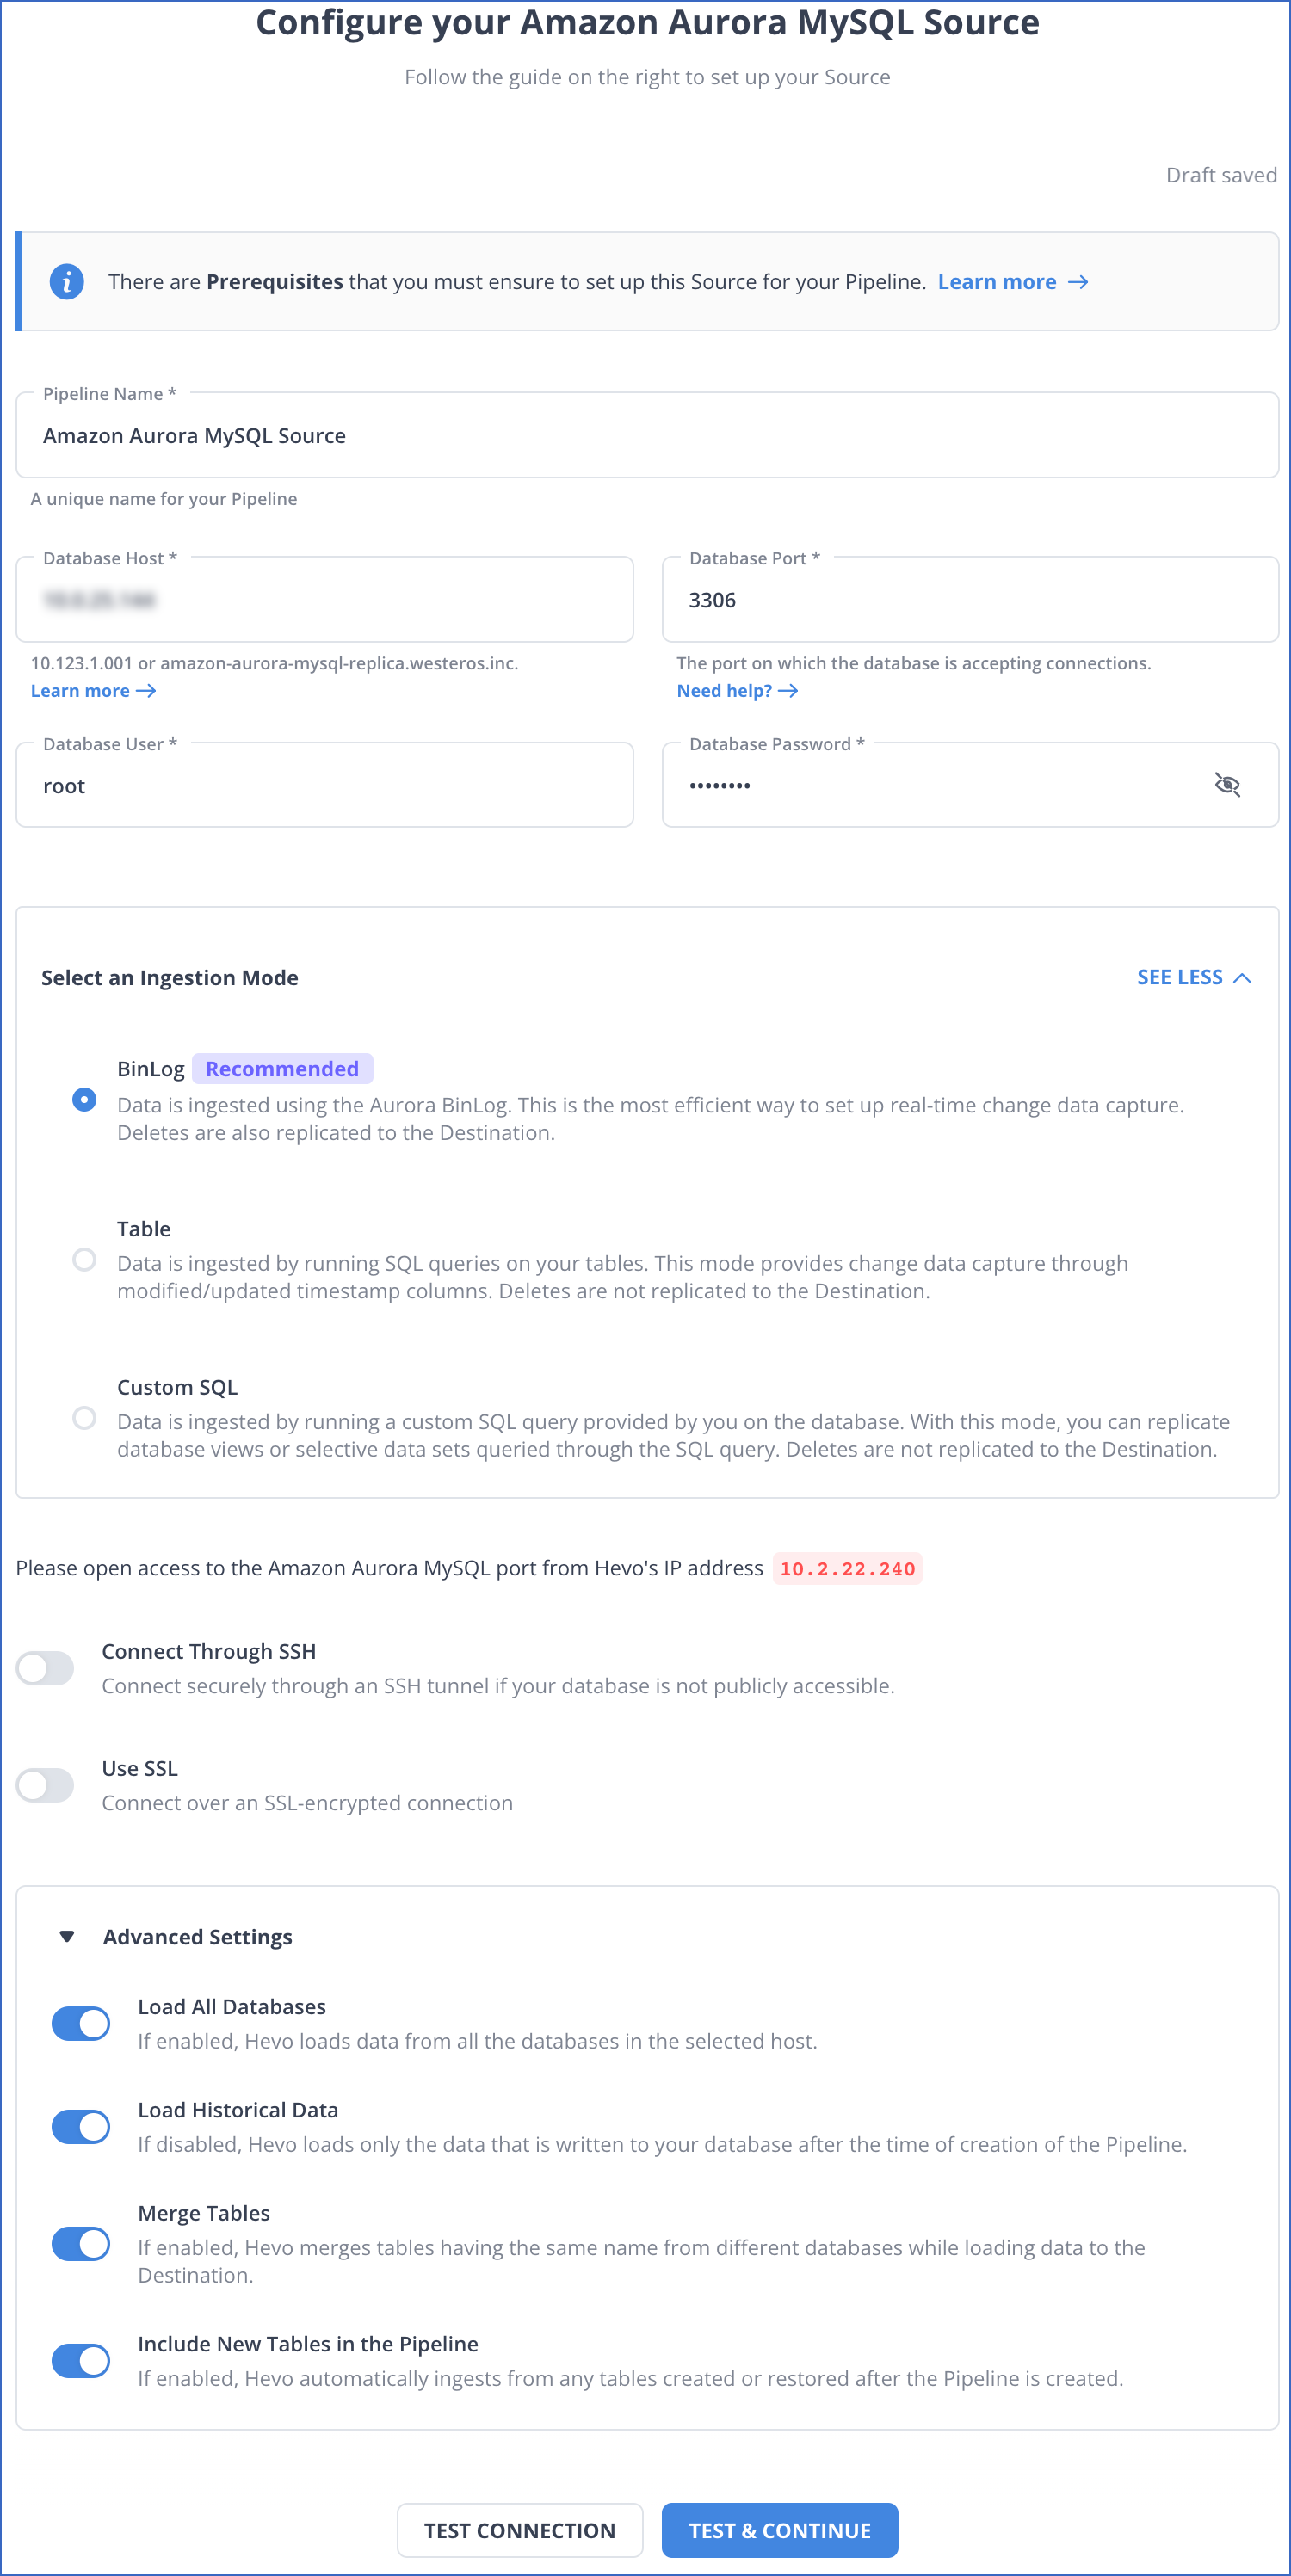
On the Configure your Amazon Aurora MySQL Source page, specify the necessary fields:
- Pipeline Name: A unique name that is less than 255 characters.
- Database Host
- Database Port: The port on which your Aurora MySQL server listens for a connection.
- Database User
- Database Password
- Select an Ingestion Mode: It is set to BinLog by default.
For the Connection Settings, enable the Connect through SSH option. This helps you connect to Hevo using an SSH tunnel. To use an SSL encrypted connection, enable Use SSL and specify the CA File, Client Certificate, and Client Key.
Additionally, you have the option to enable Load All Databases, which is applicable for BinLog mode. Choosing this option allows Hevo to load the data from all the databases onto the specified host.
You also have the option to enable Load Historical Data, Merge Tables, and Include New Tables in the Pipeline according to your requirements.
Finally, click on TEST CONNECTION and select TEST & CONTINUE.
Specify Object and Query Mode Settings
After specifying the source connection settings, select an ingestion mode:
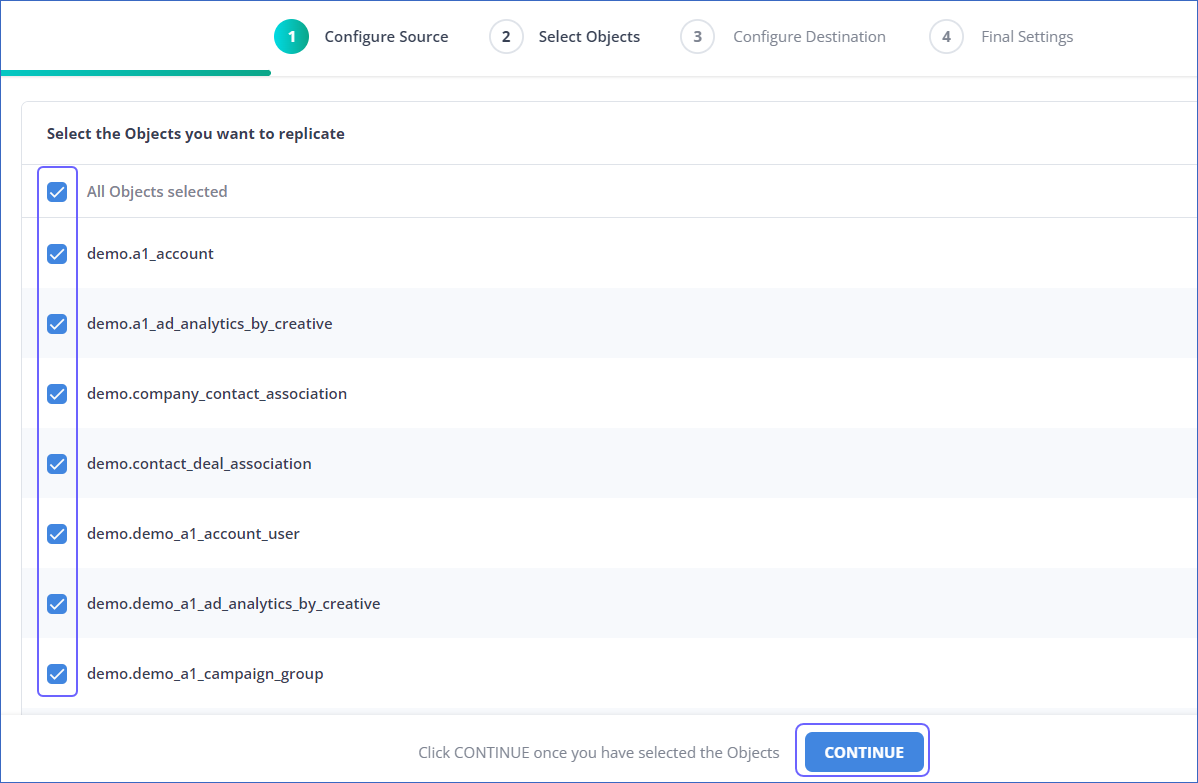
- If your pipeline is in Table or BinLog mode:
- On the Select Objects page, choose the object you want to replicate and click CONTINUE. Remember that each object represents a table in your database.
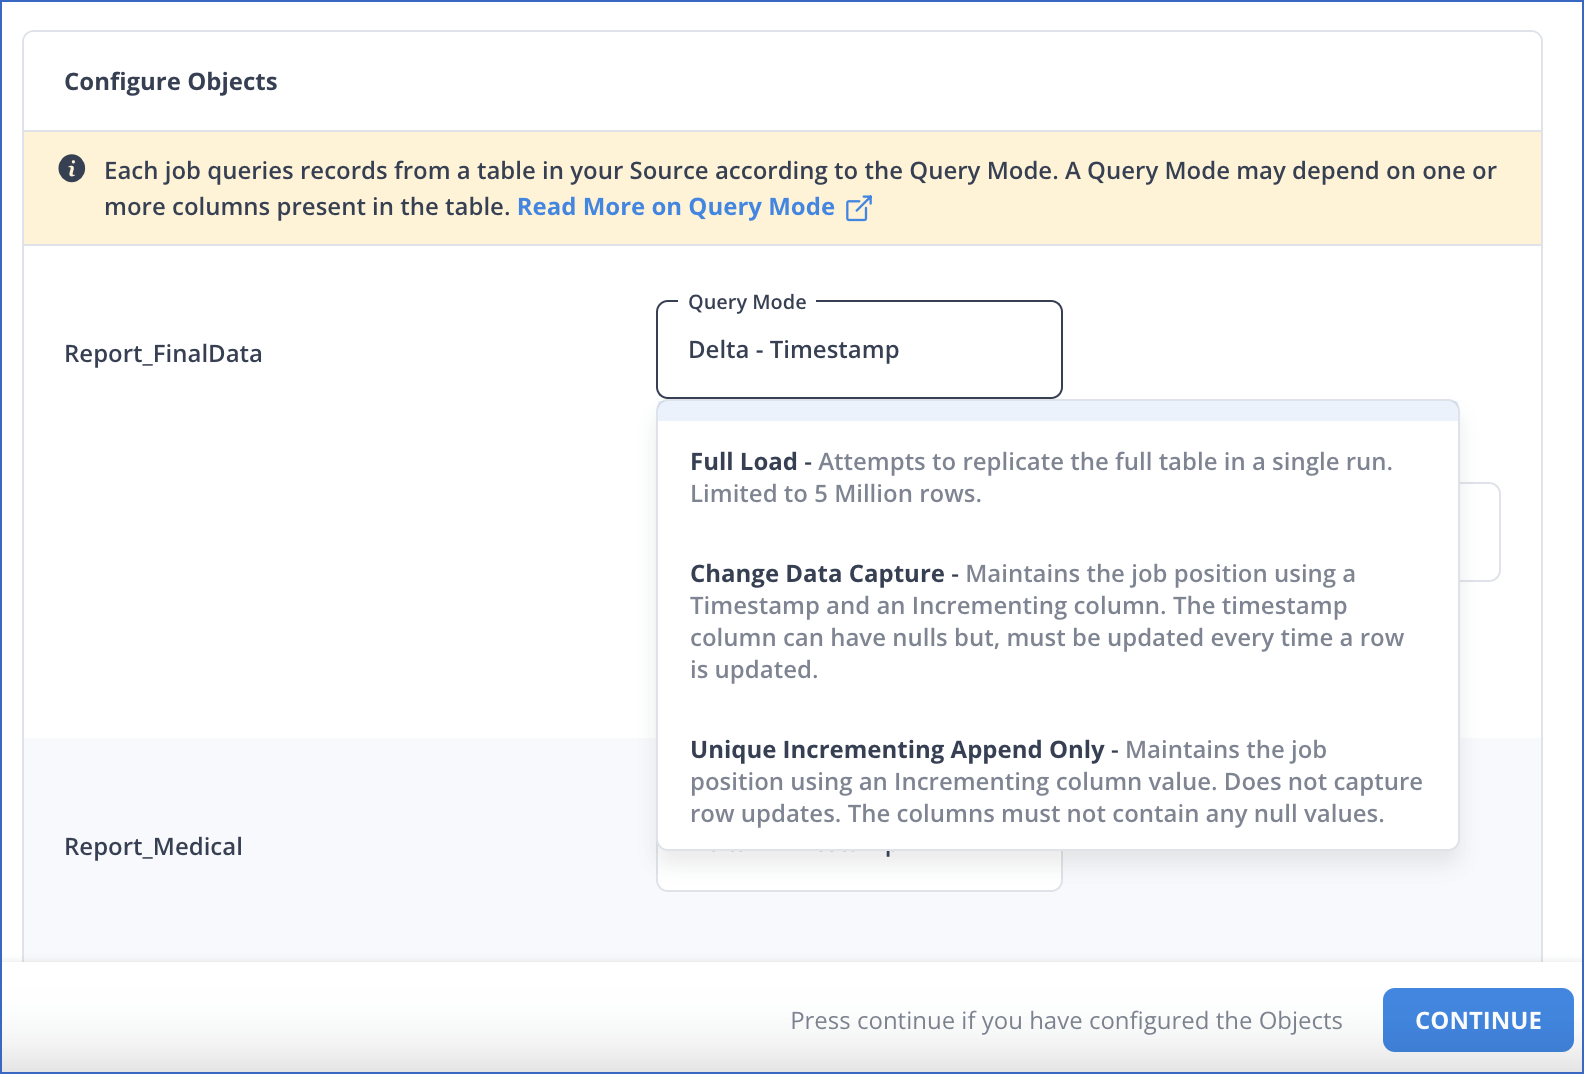
- For each selected object, specify the query mode you want to use on the Configure Objects page.
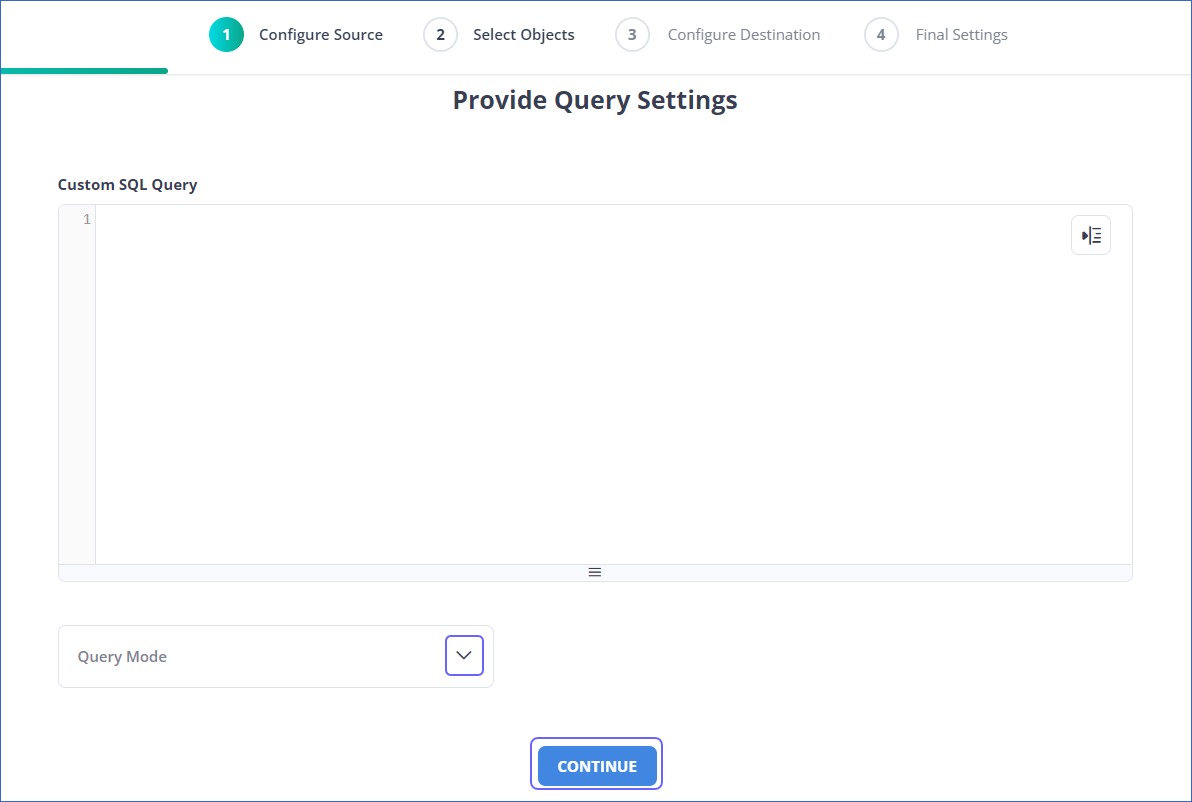
- If the pipeline is in Custom SQL mode:
- Enter the SQL query and fetch data from the source on the Provide Query Settings page. Select the query mode from the Query Mode drop-down, and click CONTINUE.
By following the given steps, you can configure Amazon Aurora MySQL as a source in your data pipeline. To learn more about the steps, you can refer to the Amazon Aurora MySQL Hevo Documentation page.
2. Setting up MySQL as a Destination
To set MySQL as a destination of your data pipeline through Hevo Data, you must ensure you meet all the prerequisite conditions.
Prerequisites
- The MySQL server must be running (not in a local host environment). To check this, copy and paste the given command into your MySQL instance:
service mysql statusThis command will show you a result as Active: active (running) if the condition is satisfied.
- Run the following command to check the MySQL version; it must be 5.5 or higher:
mysql -V- You must be assigned as a Team Collaborator or any other administrator role apart from Billing Administrator in Hevo.
Step 1: Whitelist Hevo IP Address for Your Region
Here, you will require root access or sudo privileges to perform some commands. Follow the steps to whitelist the Hevo IP address for your region:
- Navigate to the MySQL configuration directory and open the MySQL server configuration file in edit mode.
sudo nano /etc/mysql/mysql.conf.d/mysqld.cnfThe filename mentioned in the above example will depend on the location of your server configuration file.
- Update the bind-address variable by scrolling to the [mysqld] section in any one of the following ways:
- To allow any IPv4 address to connect to your MySQL destination, you need to specify:
bind-address = 0.0.0.0To allow any specific Hevo IP address for your region:
bind-address = 10.2.7.152- To make changes, restart the MySQL server after saving the file.
For any version of MySQL above 8.0, you must add the bind-address variable if it is not present in the [mysqld] section. You also need to delete the skip-networking variable, as it will allow the MySQL server to listen to remote connections.
Step 2: Create and Grant Privileges to a Database User
To create a database user, you need to be logged in to your MySQL database instance using the SQL client tool as a root user. Use the command by replacing the placeholder values:
CREATE USER '<user_name>'@'%' IDENTIFIED BY '<strong password>';Grant necessary privileges to the user by following the steps below:
- Log in to your MySQL server as a root user.
- Enter the following commands by replacing the placeholder values to grant the required privileges to the database user:
GRANT ALTER, CREATE, CREATE TEMPORARY TABLES, DELETE, DROP, INSERT, SELECT, UPDATE ON <database_name>.* to <user_name>@<IP address> IDENTIFIED BY <user_password>;Step 3. Configure MySQL Connection Settings
- In the Navigation Bar, click DESTINATIONS.
- Select + CREATE in the Destinations List View.
- Select MySQL on the Add Destination page.
- Specify the mandatory details in the Configure your MySQL Destination page. This includes Destination Name, Database Host, Database Port, Database User, Database Password, and Database Name.
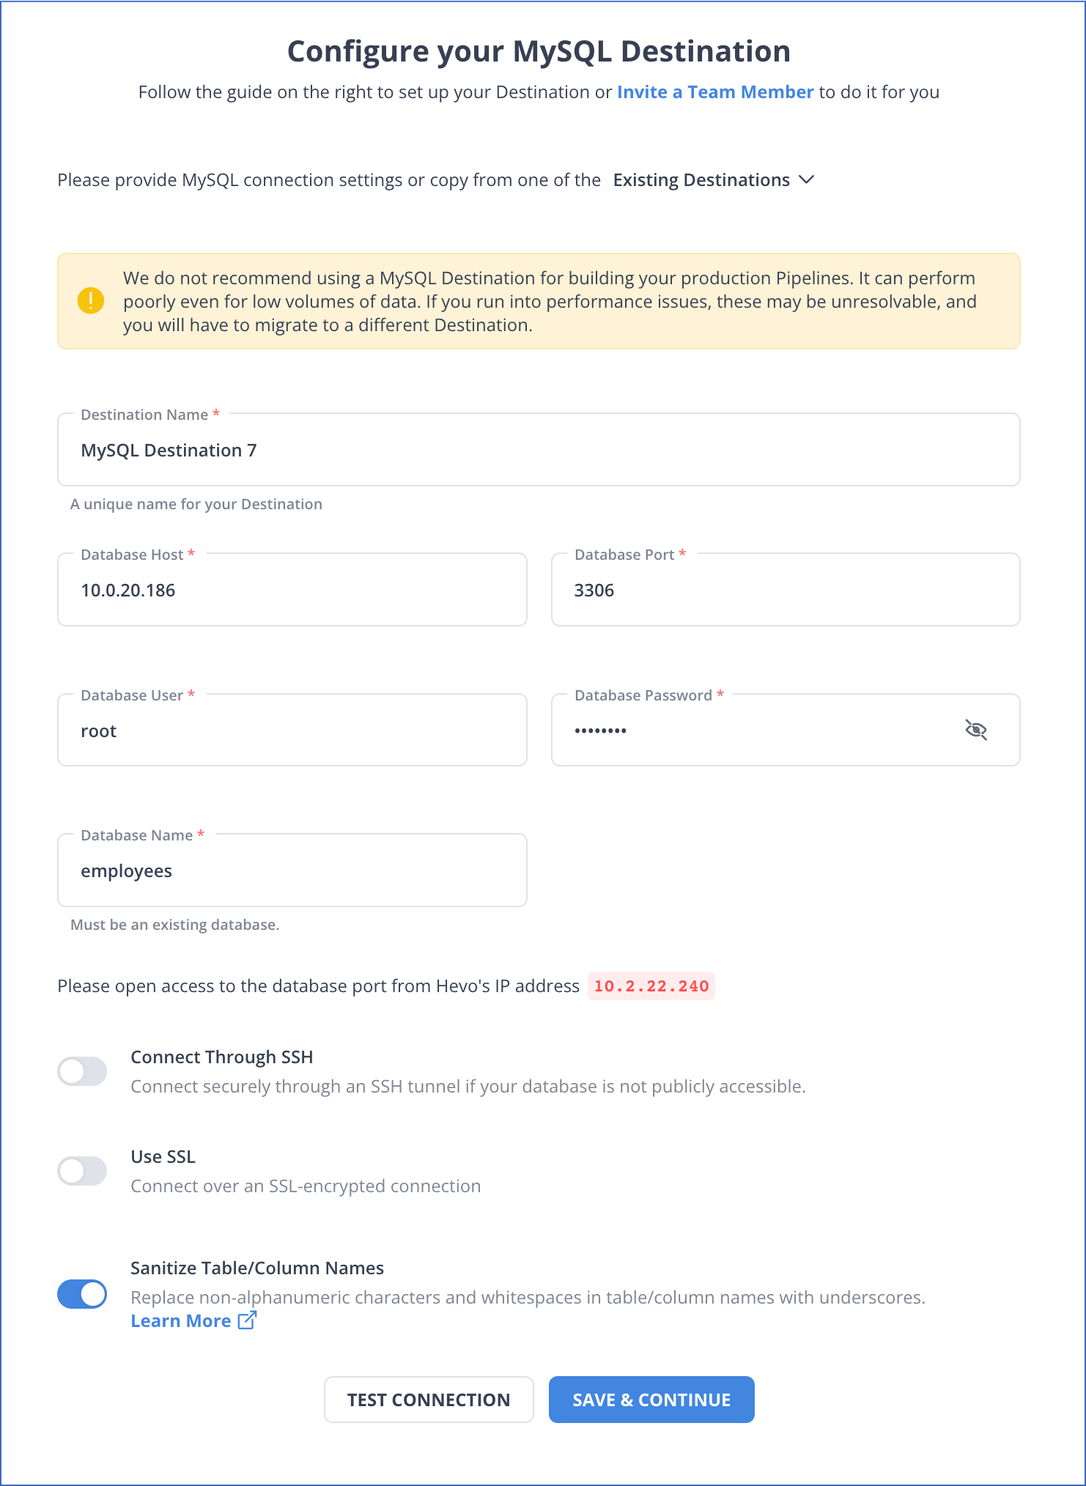
Additionally, you can enable Connect through SSH. Enable the Use SSL option by specifying CA File, Client Certificate, and Client Key, and Sanitize Table/Column Names to remove non-alphanumeric characters and spaces.
Finally, you must click on TEST CONNECTION and select SAVE & CONTINUE.
You must disable the foreign keys defined in the target tables since they do not allow data to be transferred until the reference table contains the associated key. This method can only replicate 4090 columns in a MySQL table. To learn more, refer to Limits on the Number of Columns.
To learn more about the steps, you can refer to Hevo Data MySQL Documentation.

Method 2: Using Amazon S3 for Aurora MySQL Data Migration
In this method, you will be using Amazon S3 for Amazon Aurora MySQL data integration.
1. Transfer Data from Aurora MySQL to S3
Follow the steps in this section to move your data from the Aurora MySQL instance to Amazon S3. For better clarification, you can also read the official AWS Documentation.
Step 1: Grant Aurora MySQL Access to Amazon S3
- After creating a new AWS identity and Access Management policy (IAM), allow your Aurora MySQL DB cluster to access Amazon S3. You can refer to Creating an IAM policy.
- You need to create an IAM role and associate the IAM policy you created in the previous step with the new IAM role. To complete this step, you can go through the Create an IAM role documentation.
- For Aurora MySQL version 2, configure either the aws_default_s3_role or aurora_select_into_s3_role DB cluster parameter to the Amazon Resource Name of the new IAM role. For the Aurora MySQL version 3, use aws_default_s3_role. To know more about DB cluster parameters, read DB cluster and DB instance parameters.
- Associate the role that you created in the previous step with the DB cluster to permit the database user in an Aurora MySQL DB cluster to access Amazon S3. You can read more about associating IAM roles with DB clusters.
- Allow outbound connections to Amazon S3 from Aurora MySQL DB cluster by following Enable network connection from Aurora to AWS services guide.
Step 2: Grant Privileges to Save Data in Aurora MySQL
You can use either of the given code snippets to grant necessary privileges to save data in Aurora MySQL.
For Aurora MySQL version 3, use the following statement by removing the placeholders:
GRANT AWS_SELECT_S3_ACCESS TO 'user'@'domain-or-ip-address'For Aurora MySQL version 2, you can use the statement given below:
GRANT SELECT INTO S3 ON *.* TO 'user'@'domain-or-ip-address'These privileges are specific to Aurora MySQL.
Step 3: Specifying a Path to an Amazon S3 Bucket
You need to specify the path of the Amazon S3 Bucket to store the data files. You can find this path from the LOAD DATA FROM S3 PREFIX statement. You can use this syntax to specify the path by replacing the variable values with your own required location.
s3-region://bucket-name/file-prefixStep 4: Create a Manifest to List the Data Files
You must use the MANIFEST ON option with the SELECT INTO OUTFILE S3 statement to generate JSON manifest files listing created files inside S3. The LOAD DATA FROM S3 statement loads back into the data files into the Aurora MySQL DB cluster using the manifest file.
The order of the data is organized to resemble the SELECT INTO OUTFILE S3 specifications.
Step 5: SELECT INTO OUTFILE S3 Statement
You can query data from a DB cluster using the SELECT INTO OUTFILE S3 statement and save it directly into the Amazon S3 bucket. Follow the syntax below by replacing the placeholder values:
SELECT
    [ALL | DISTINCT | DISTINCTROW ]
        [HIGH_PRIORITY]
        [STRAIGHT_JOIN]
        [SQL_SMALL_RESULT] [SQL_BIG_RESULT] [SQL_BUFFER_RESULT]
        [SQL_CACHE | SQL_NO_CACHE] [SQL_CALC_FOUND_ROWS]
    select_expr [, select_expr ...]
    [FROM table_references
        [PARTITION partition_list]
    [WHERE where_condition]
    [GROUP BY {col_name | expr | position}
        [ASC | DESC], ... [WITH ROLLUP]]
    [HAVING where_condition]
    [ORDER BY {col_name | expr | position}
         [ASC | DESC], ...]
    [LIMIT {[offset,] row_count | row_count OFFSET offset}]
INTO OUTFILE S3 's3_uri'
[CHARACTER SET charset_name]
    [export_options]
    [MANIFEST {ON | OFF}]
    [OVERWRITE {ON | OFF}]
    [ENCRYPTION {ON | OFF | SSE_S3 | SSE_KMS ['cmk_id']}]

export_options:
    [FORMAT {CSV|TEXT} [HEADER]]
    [{FIELDS | COLUMNS}
        [TERMINATED BY 'string']
        [[OPTIONALLY] ENCLOSED BY 'char']
        [ESCAPED BY 'char']
    ]
    [LINES
        [STARTING BY 'string']
        [TERMINATED BY 'string']
]
Use the FORMAT argument to save this in a CSV file. The SELECT INTO OUTFILE S3 statement returns a MySQL error number as a response to success or failure. If you cannot access the error number, you can use MANIFEST ON to find its whereabouts.
2. Download Your Data File from Amazon S3
Since you have transferred your data into an Amazon S3 bucket, you must follow the steps given to download your data:
- First, you need to open the Amazon S3 console by signing in to your AWS Management Console.
- From the Buckets list, you need to choose the name of the bucket where you stored the data.
- You need to select the checkbox next to the object and choose Download. Alternatively, you can also download the object to a specific folder using the Actions menu and choosing Download as.
3. Loading Data to MySQL
It’s time to get your answers about “How to insert Aurora data in MySQL table.” You can load data into your MySQL workbench by following the steps mentioned below:
- You need to create a table that matches the columns and the datatypes of your CSV data file.
- Right-click on the table to select the Table Data Import Wizard option, and browse through your local storage to select the data file.
- Configure the import settings by selecting the file encoding and matching the source and destination columns. Then click on the Next button.
- You can check for the imported data using this simple command. Be sure to remove the placeholder with the original table name:
SELECT * FROM ‘data_table_name’’By following the steps in this method, you can copy data from Aurora to MySQL.
Limitations of Amazon S3 for Aurora MySQL Data Migration
There are certain limitations that you must know of before using Amazon S3 for Aurora MySQL data migration:
- Time-Consuming: This method consumes your valuable time since you are required to manually perform all the tasks. It expects your attention while moving Aurora data to a MySQL location.
- Errors During Migration: The S3 method can lead to data duplication or errors if you are not extra careful during the Amazon Aurora MySQL data replication process.
- Technical Expertise: You must possess sufficient technical knowledge to move data and create tables to store and process the incoming data.
Use Cases of Aurora MySQL Integration
- Cost Optimization: Moving Amazon Aurora data to MySQL reduces the cost of managing data. Even though Aurora provides certain benefits in terms of performance and scalability, using MySQL reduces the overall costs.
- Data Backup: Aurora MySQL integration provides a better data backup. You will have more control over the data when it is present in MySQL.
- Experimentation Benefits: Connecting Aurora to MySQL enables you to conduct experiments on the data in your database. You can run A/B testing on your data to determine which factors suit your business better.
Learn More about: Export Data from Amazon RDS to Amazon Aurora
You can also learn more about:
- MySQL on Amazon RDS to Aurora
- AWS MySQL Deployment
- Migrate Data from MySQL to PostgreSQL
- Migrate Data from PostgreSQL to MySQL
Conclusion
Aurora MySQL integration offers multiple benefits. You can use either of the above-mentioned methods to connect Aurora to MySQL. However, the second method requires more effort, which you can minimize by using Hevo. Hevo Data provides you with automated data pipelines to integrate Aurora MySQL efficiently.
Want to take Hevo for a spin? Sign Up for a 14-day free trial and experience the feature-rich Hevo suite first hand. You can also have a look at the unbeatable Hevo pricing that will help you choose the right plan for your business needs.
Visit our Website to Explore Hevo
Share it with your connections.
-
 Share To X
-
 Share To LinkedIn
-
 Share To Facebook
-
 Copy Link


