Handling large volumes of business data is challenging. You can collect data from various sources using multiple techniques. This data can be thoroughly analyzed to gain valuable insights that optimize business performance.
There are various tools and platforms that facilitate data storage and analysis. SQL Server and Azure Synapse are potent and robust platforms that help you comprehensively analyze your business data and develop innovative solutions. Moving your SQL Server data to Azure Synapse offers you a flexible workspace for big data processing and integration. This article will help you understand SQL Server Azure Synapse data integration using different methods.
Let’s get started.
 Key Takeaways:
Using Hevo Data: Hevo Data’s no-code platform lets you connect SQL Server with Azure Synapse for quick and seamless data transfer in real-time. Although a paid tool, you can use its free plan for limited data transfer.
Using manual ETL method: Although the method is free, it requires you to write complex code to ensure accurate data transfer from SQL Server to Azure Synapse. If you are good with complex coding and need more control over the migration process, this is ideal.
Table of Contents
How to Migrate Data from SQL Server to Azure Synapse: Two Methods
There are two ways to migrate data to Azure Synapse from SQL Server. One is using the Hevo Data ETL tool, and the other is manual transfer by writing code.
Method #1: Migrate Data from SQL Server to Azure Synapse with Hevo Data
Step 1: Configure SQL Server as Your Source
Before we start, ensure you meet the following prerequisites before you start the process:
- A running SQL Server (not localhost).
- A supported SQL Server version (above 12)
- Enable VIEW CHANGE TRACKING and ALTER DATABASE privileges for the database user.
- Ensure the Select privileges for the user are checked.
- To create the Pipeline, have a Pipeline Administrator, Team Collaborator, or Team Administrator role in Hevo.
Once you have managed all the above, follow the process below:
- Go to the Navigation Bar and click PIPELINES.
- From the Pipelines List View, click + CREATE PIPELINE.
- Now, pick SQL Server from the Source Type page.
- Now, the Configure your SQL Server Source page will open.

- Now, specify the details shown below:
- Pipeline Name: Give the Pipeline a unique name within 255 characters.
- Database Host: The SQL Server host’s IP address or DNS.
- Database Port: This is the port on which your SQL Server listens for connections and has the default value of 1433.
- Database User: This is the authenticated user who has the privileges to read tables in your database.
- Database Password: This is the password for the database user.
- Select an Ingestion Mode: Here, you need to pick the desired mode to ingest data from your Source from options like Change Tracking, Table, and Custom SQL.
- Click TEST CONNECTION: After you specify all necessary fields, this button becomes enabled.
- Now, click TEST & CONTINUE to proceed with setting up the Destination
Step 2: Configure Azure Synapse As Your Destination
Before setting up the Destination, ensure you meet the following prerequisites:
- An Azure account with an active subscription.
- A user in your subscription with the Contributor role in Azure RBAC exists.
- The Azure Synapse Analytics instance is running.
- A dedicated SQL pool (data warehouse) is available.
- Hevo’s IP addresses are whitelisted.
- The connection settings for the Azure Synapse Analytics data warehouse are available.
- You are assigned the Team Collaborator, or any administrator role except the Billing Administrator role in Hevo.
Once you meet all of these, follow the steps below:
- Click DESTINATIONS in the Navigation Bar.
- Click + CREATE DESTINATION in the Destinations List View.
- On the Add Destination page, select Azure Synapse Analytics.
On the Configure your Azure Synapse Analytics Destination page, specify the following:
- Destination Name: Give the Destination a unique name in 255 characters.
- Connection Settings: This is the method to connect to your Azure Synapse Analytics data warehouse:
- Paste Connection String: Specify the connection string obtained in the Using a Connection String Method section.

- Connection String: The unique identifier for connecting to an Azure Synapse Analytics instance.
- Password: The password of the database username.
- Schema Name: The name of the Destination database schema. Default value: dbo.
- Enter Connection Settings Manually: Specify the connection settings obtained in the manual connection method section.

- Server Name: The dedicated SQL endpoint for connecting to your Azure Synapse Analytics data warehouse.
- Database Port: The port on which your Azure Synapse Analytics server listens for connections. Default value: 1433.
- Username: The name of the user with administrator access to your Synapse workspace.
- Password: The password of the specified username.
- Database Name: The name of the dedicated SQL pool where the data is to be loaded.
- Click TEST CONNECTION. Once all the mandatory fields are updated, this button becomes enabled.
- Click SAVE & CONTINUE. Once all the mandatory fields are updated, this button becomes enabled.
Method 2: Connecting Local SQL Server to Azure Synapse Using Azure Synapse Studio
Prerequisites
- Your SQL Server should have the necessary permissions to make the database accessible and ready for connection.
- The SQL Server should be running.
- You must set up and install the Azure Synapse Studio on your system.
Step 1: Set up a Self-hosted Integration Runtime
- Open Azure Synapse Studio.
- Go to the Runtime section to set up the Integration Runtime.
- Run and install the integration runtime on your system by specifying the following details. Switching to Synapse Studio Live on a self-hosted integration may cause an error. So, you must connect Git to Git.

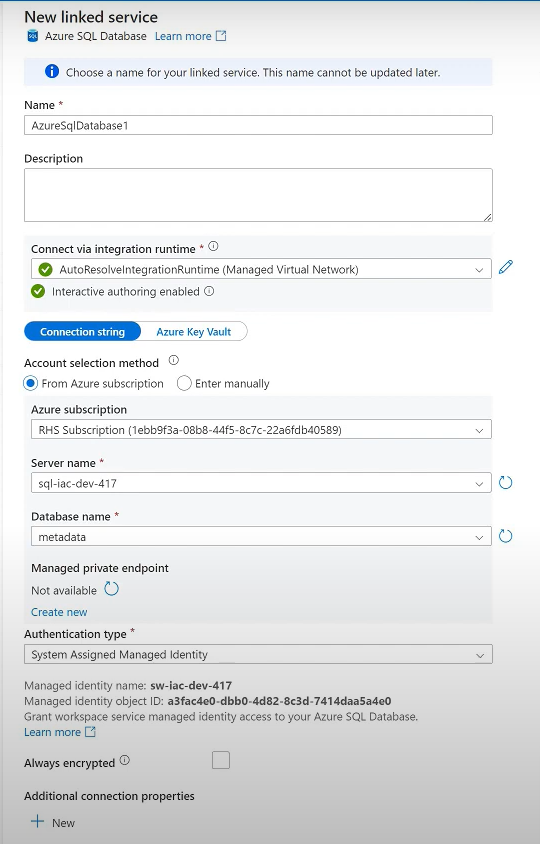
Step 2: Create a New Linked Server to Make a Connection
- Create a new linked server in your Azure studio.
- In the search bar, type SQL Server for the new linked service and click CONTINUE.
- Fill out the relevant details using the integration runtime you have installed before. You must add a server name to connect to the service running on your local host.
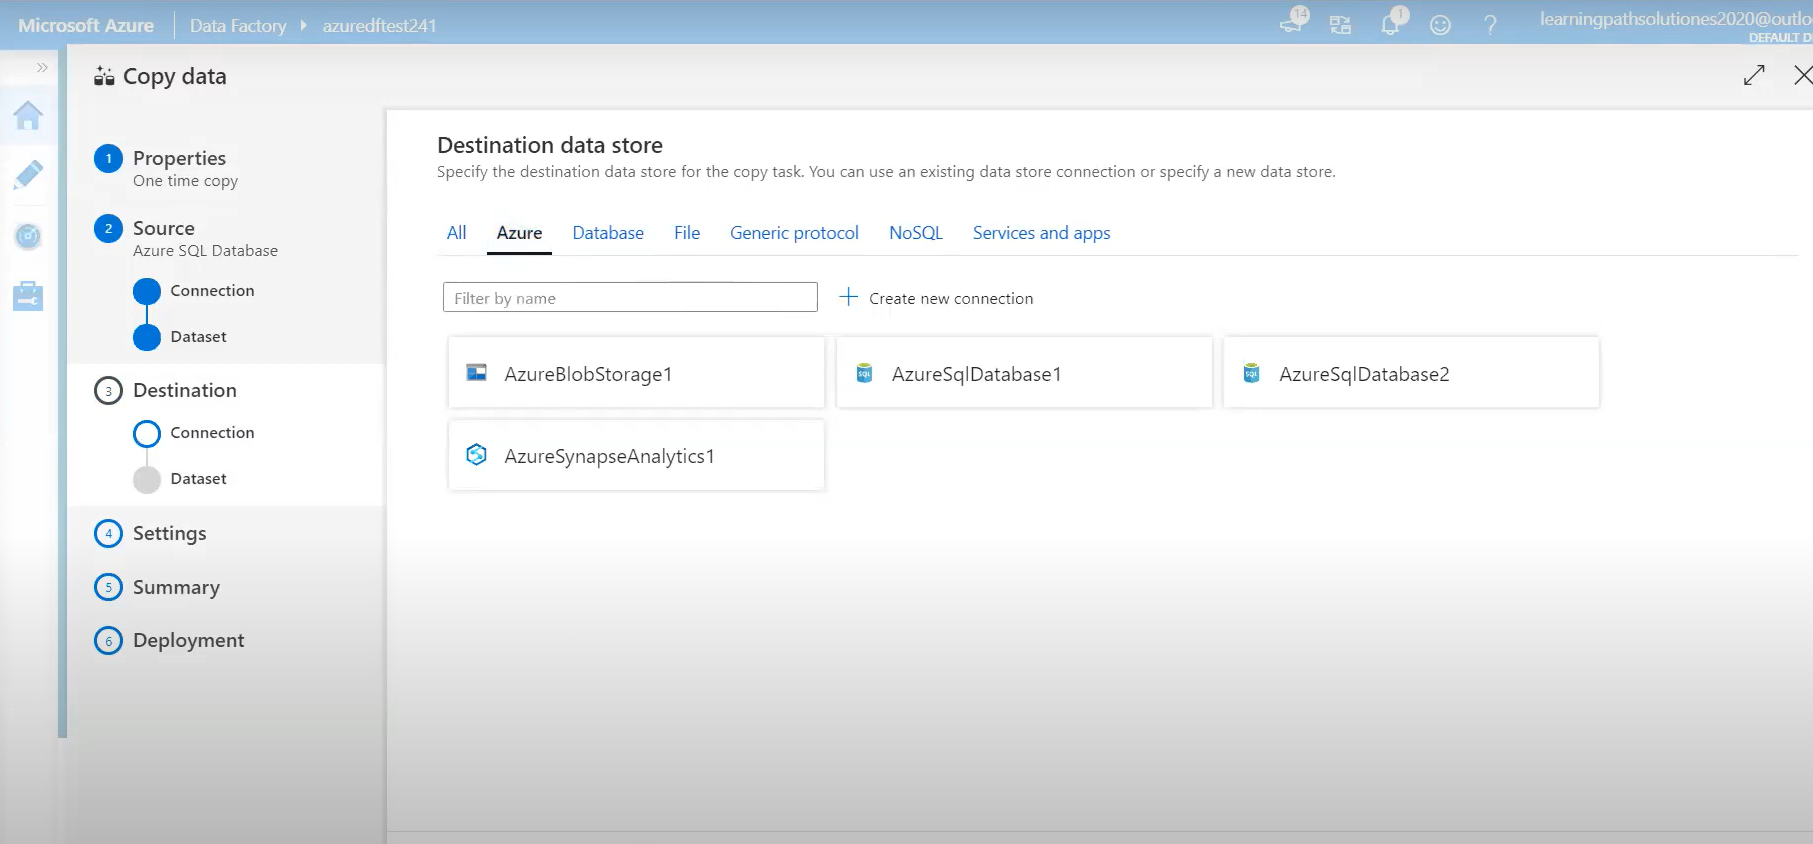
Step 3: Copy Data from SQL Server to Azure Synapse Studio
- Once Azure Synapse connects to SQL Server on the local database host, you can copy data by clicking on the Ingest option.
- The Copy Data Tool will appear, where you can select a Linked Service to select tables and views to store and analyze your data.
Overview of SQL Server

Microsoft developed a relational database called SQL Server to help you store, manage, and analyze data centrally. SQL Server stores data within tables that are interconnected by unique vital constraints. The latest versions of SQL Server have enhanced capabilities, such as data encryption, schema reading, and data analysis. Ít also includes integrations with BI (business intelligence) tools that help you create reports and optimize ETL workflows.
Use Hevo’s no-code data pipeline platform, which can help you automate, simplify, and enrich your data replication process in a few clicks. You can extract and load data from 150+ Data Sources, including SQL Server, straight into your Data Warehouse, such as Azure Synapse or any Database.
Why Choose Hevo?
- Offers real-time data integration, which enables you to track your data in real time.
- Get 24/5 live chat support.
- Eliminate the need for manual mapping with the automapping feature.
Discover why Postman chose Hevo over Stitch and Fivetran for seamless data integration. Try out the 14-day free trial today to experience an entirely automated, hassle-free Data Replication!
Get Started with Hevo for FreeOverview of Azure Synapse

Azure Synapse is a cloud-based analytical service developed by Microsoft Azure that combines big data with data warehouses to provide valuable insights. Its uniquified workspace reduces project development time, allowing your team of data scientists and engineers to swiftly develop end-to-end solutions. The platform also has a dedicated SQL pool that combines all the SQL technologies in one place to process on-demand queries. You can also leverage Azure’s Machine Learning feature for advanced data analysis.
Let’s see how you can migrate SQL Server to Azure Synapse using different methods.
Limitations for Connecting Local SQL Server to Azure Synapse Using Azure Synapse Studio
- When you move an SQL Server database to Azure Synapse, it requires manual intervention during data transfer. You must also plan regular data updates and backups to maintain data integrity across multiple environments.
- The cost of moving data from SQL Server to Azure could be high when transferring large amounts of data.
- Depending on the network infrastructure and connectivity, the process could take longer due to latency or bandwidth issues.
Use Cases for SQL Server Azure Synapse Integration
Here are some benefits of migrating from SQL Server to Azure Synapse:
- SQL Server Azure Synapse integration enables organizations to consolidate their data sources and workspace within a single environment, resulting in robust data management.
- Azure Synapse dynamically allocates resources according to your workload. It scales up the resources during heavy workloads and scales down during lower usage, helping reduce costs and optimize resource utilization.
- Azure’s SQL Pool offers a parallel processing architecture for data warehousing, which allows you to store large volumes of data and analyze it efficiently.
You can also read more about:
Conclusion
SQL Server Azure Synapse integration lets you optimize your data management capabilities and enhance your analytics performance. However, integrating your data through Azure Synapse Studio can be time-consuming and complex. On the other hand, Hevo makes data integration easy through its automated data pipeline.
Explore how Data Studio and Azure work together to provide powerful insights and visualizations. Try a 14-day free trial and experience the feature-rich Hevo suite firsthand. Also, check out our unbeatable pricing to choose the best plan for your organization.
Read more about Azure Synapse vs Azure SQL here.
FAQs (Frequently Asked Questions)
1. In which region is Azure Synapse Analytics available?
Azure Synapse Analytics is part of the Microsoft Azure suite, which consists of cloud-based services. As Microsoft expands its footprint globally, Azure Services will become easily accessible. You can refer to the Azure product region to find out which regions Azure Synapse is available in.
2. Is there a way to migrate data from SQL Server to Azure Synapse without using a data pipeline?
You can migrate your data from the SQL Server Database into Azure Synapse Analytics by connecting your local database host to Azure Studio through a Linked Server. Once you have made the connection between the two platforms, you can export your data easily.

Share it with your connections.
-
 Share To X
-
 Share To LinkedIn
-
 Share To Facebook
-
 Copy Link