


Data migration between different platforms is critical to consider when generating multiple organizational strategies. One such migration involves transferring data from a cloud-based data warehousing service environment to a relational database management system.
Amazon Redshift SQL Server Integration can give organizations an edge, allowing them to conduct enhanced analysis and reporting through custom report application development.
This article will guide you through easy-to-use methods that you can follow to migrate to SQL Server from Redshift.
Table of Contents
An Overview of Amazon Redshift
- Amazon Redshift, offered by Amazon Web Services (AWS), is a cloud data warehousing service that helps corporations manage large amounts of data and produce valuable insights.
- Amazon Redshift provides you with a wide variety of features that can assist you meet the needs of your business requirements.
- Some popular features include its parallel processing abilities, automated data compression to reduce storage space requirements, columnar storage that makes the data easy to query by only considering specific columns, and many more.
Method 1: Using Hevo Data to Connect Redshift to SQL Server
Hevo Data, an Automated Data Pipeline, provides you with a hassle-free solution to connect Redshift to SQL Server within minutes with an easy-to-use no-code interface. Hevo is fully managed and completely automates the process of not only loading data from Redshift but also enriching the data and transforming it into an analysis-ready form without having to write a single line of code.
Method 2: Accessing Amazon Redshift Data Using Linked Servers
This method of integrating Redshift into SQL Server would be time-consuming and somewhat tedious to implement. Users will have to write custom codes to enable Redshift SQL Server migration. This method is suitable for users with a technical background.
Get Started with Hevo for FreeAn Overview of SQL Server

- SQL Server is a popular Relational Database Management System (RDBMS) provided by Microsoft Corporation. It offers many features that you can use to create, manage, and analyze databases.
- Some of the key features that SQL Server provides include storing, retrieving, and securely managing relational data; it supports Transact SQL (TSQL), which enables you to query and manipulate data in your database. SQL Server also includes integration, analysis, and reporting capabilities that help in data modeling and generate useful insights.
Methods of Integrating Amazon Redshift to SQL Server
Let’s look at the methods to help you achieve this SQL Server Redshift Migration.
Method 1: Using Hevo Data to Connect Redshift to SQL Server
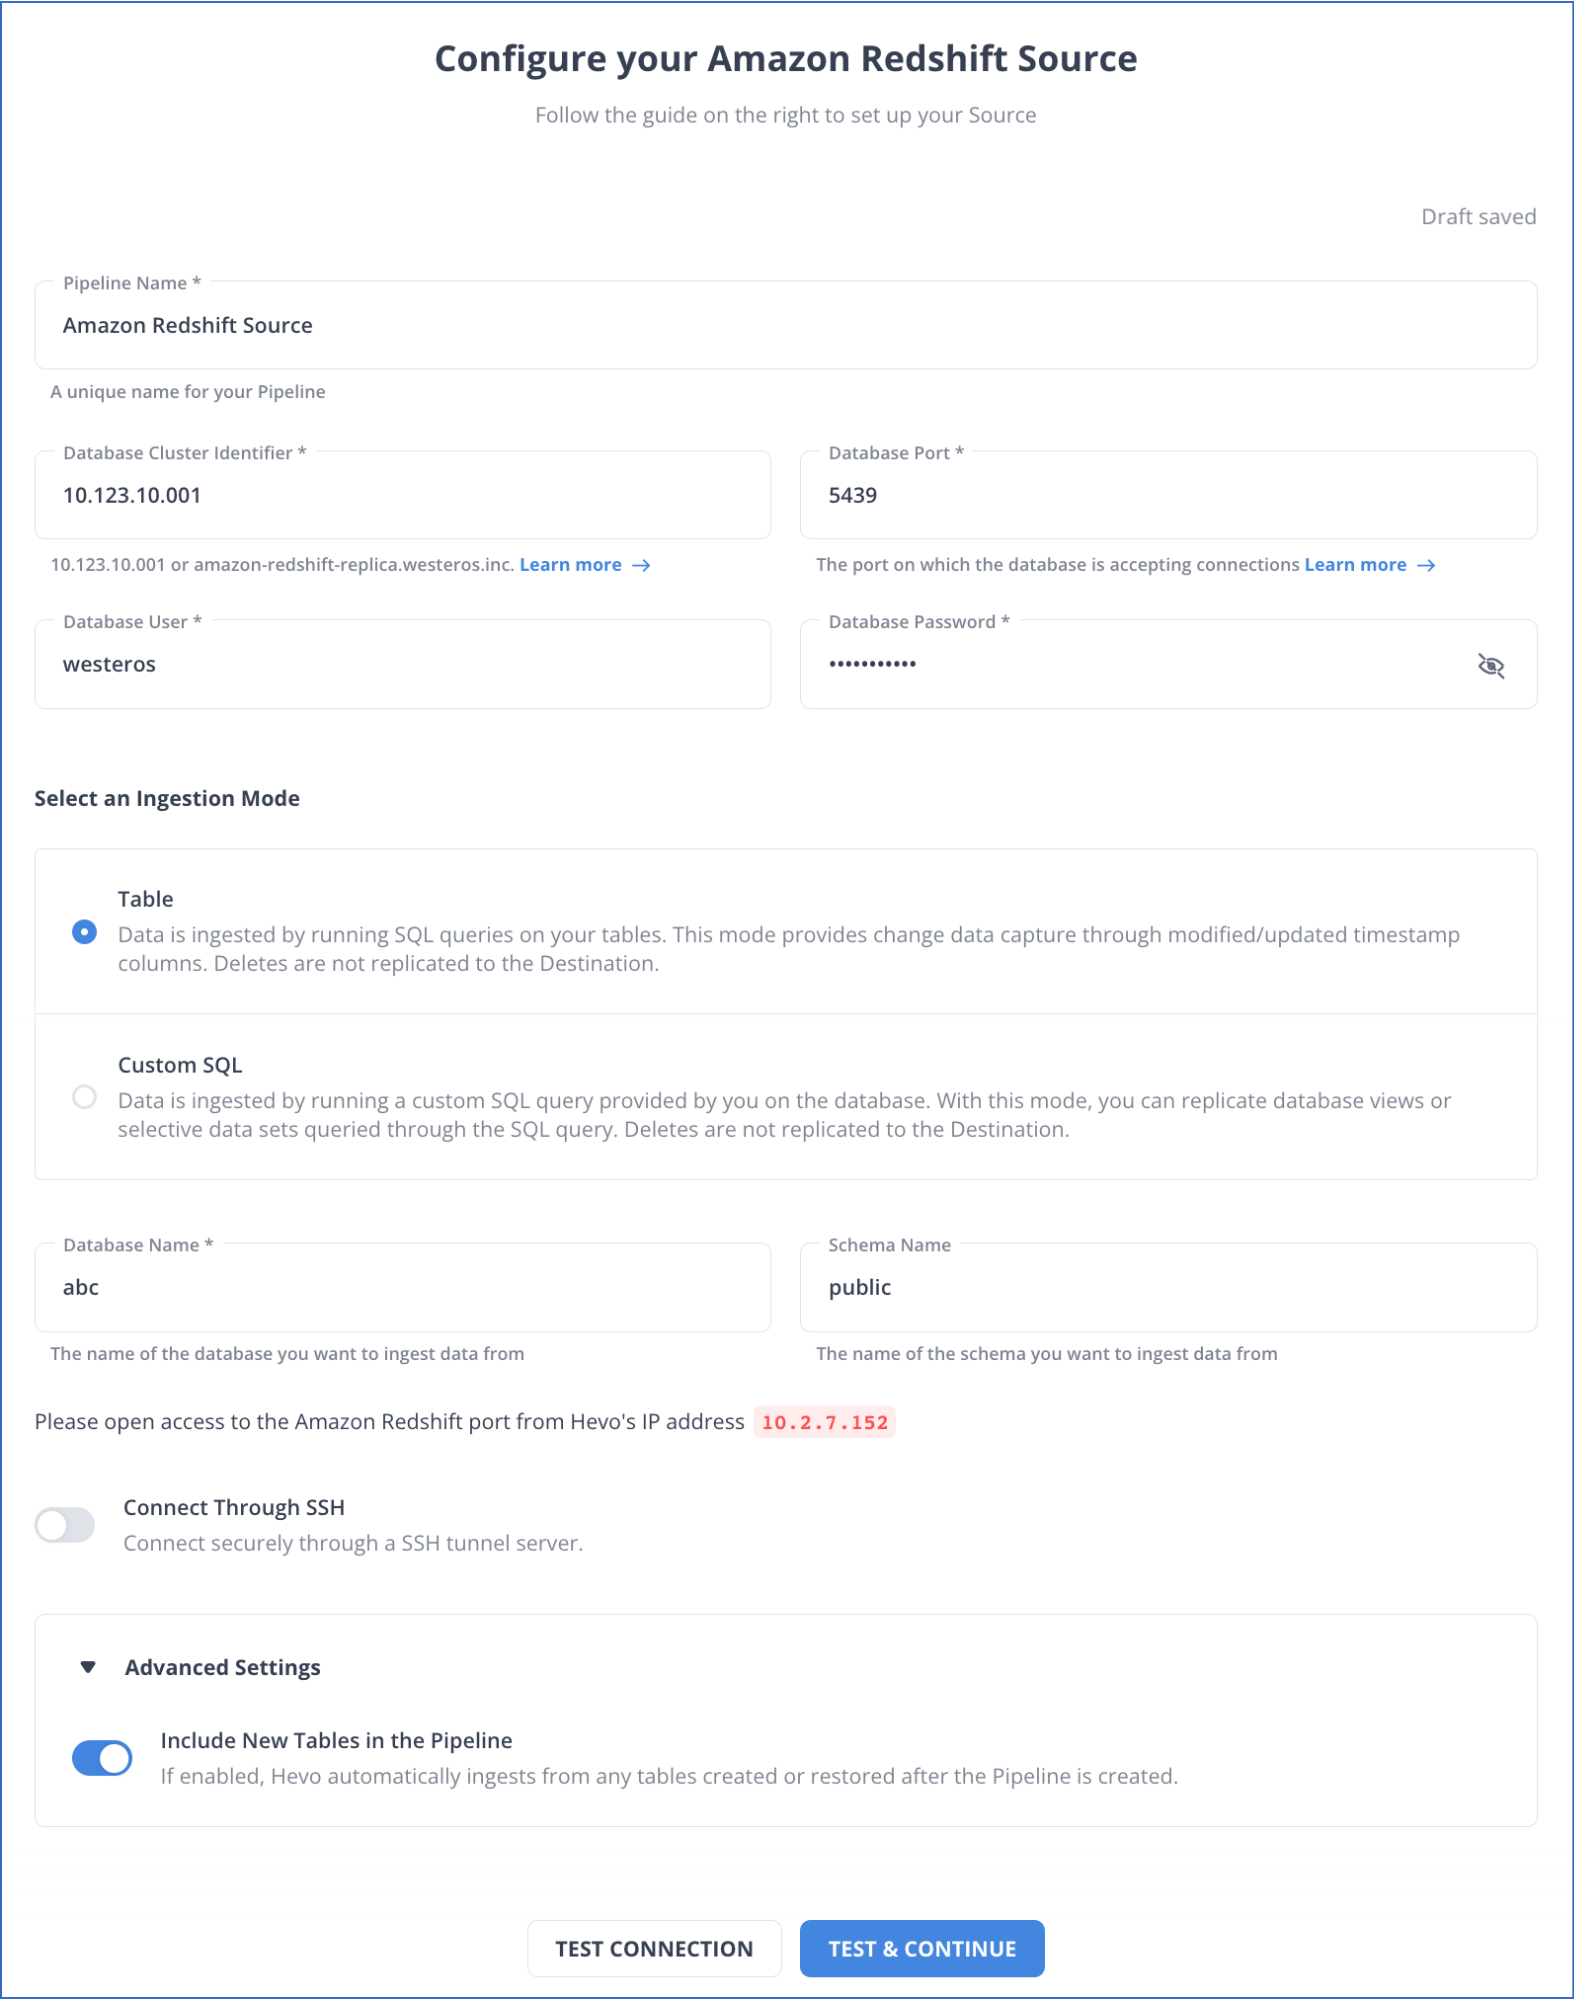
Step 1.1: Configuring Amazon Redshift as the Source
Prerequisites
- An active AWS account.
- A running instance of Amazon Redshift.
- The database hostname and port number of the Source instance.
- You are assigned a Team Administrator, Team Collaborator, or Pipeline Administrator role in Hevo.
Setting up Amazon Redshift as Your Source
Step 1.2: Configuring SQL Server as the Destination
Prerequisites
- A running SQL Server instance.
- SQL Server’s database host’s DNS or IP and port must be available. If you are not aware of these credentials, you can easily obtain them from your SQL Server administrator.
- You are assigned as a Team Collaborator, or some other administrative role apart from Billing Administrator role in Hevo.
Configuring Your SQL Server Connection Settings

Hevo’s Key Features
- Multi-Region Support: Hevo supports maintaining a single account across all the present Hevo regions, with a maximum of five workspaces.
- Data Transformation: Hevo provides simple Python-based and drag-and-drop data transformation techniques to help prepare your data for further analysis.
- Incremental Data Load: Hevo allows you to transfer modified data in real time; this results in effective bandwidth utilization on the source and the destination.
- Automated Schema Mapping: Hevo detects the format of the incoming data and maps the destination schema to complement it. You can choose the way to map your destination schema according to your requirements by selecting Full & Incremental Mappings.

Method 2: Accessing Amazon Redshift Data Using Linked Servers
In the second method, you will use a linked server to access Amazon Redshift data with the help of SQL Server. Linked servers allow you to read data from external sources and perform instructions outside the SQL Server instance. In this method, you will connect Redshift using SQL Server Management Studio.
Prerequisites
Before connecting the Redshift SQL Server through a linked server, ensure you satisfy the following prerequisites:
- Install and configure the Amazon Redshift ODBC Driver. You can refer to AWS Documentation to learn more.
- You must have Administrator rights for your system.
- Available disk space of 100 MB.
Step 2.1: Configure a SQL Server Linked Server to Amazon Redshift
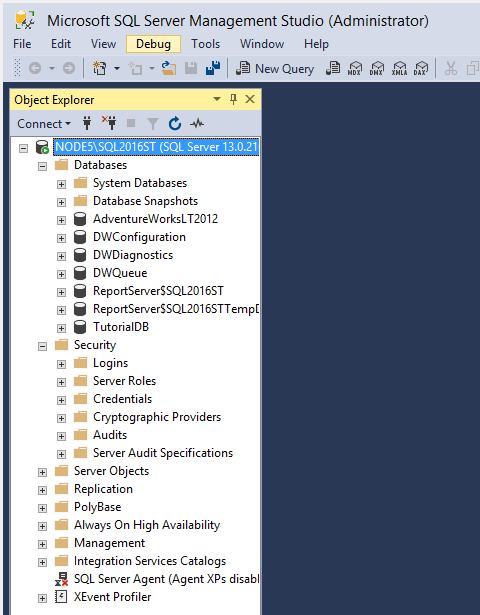
- Select your SQL Server instance in Management Studio and navigate to the Object Explorer.
- Right-click on Linked Servers in Server Objects, then select New Linked Server.
- Fill out the name of the SQL Server instance you want to link to on the General Page.
- Choose any OLE DB server type apart from SQL Server, and select the desired OLE DB data source, for instance, ODBC Drivers.
- Enter the Product name, and the Data source will be the ODBC data source that you created before.
The Remote Procedure Call (RPC) OUT setting is important for linked servers in SQL Server. An RPC is a stored procedure that runs from one server to another linked server.
You can also use these T-SQL commands to create a linked server by providing the placeholder credential; in the code given below, @datasrc is the placeholder.
USE [master]
GO
EXEC master.dbo.sp_addlinkedserver @server = N’REDSHIFT’
, @srvproduct=N’Redshift’
, @provider=N’MSDASQL’
, @datasrc=N’demo’

EXEC master.dbo.sp_addlinkedsrvlogin @rmtsrvname=N’REDSHIFT’
,@useself=N’False’
,@locallogin=NULL
,@rmtuser=NULL
,@rmtpassword=NULL
GO
Step 2.2: Access Amazon Redshift Data with SQL Server
After the linked server connection has been established, you will be able to see the remote data under the SSMS Object Explorer.
Step 2.3: Querying the Amazon Redshift Data with SQL Server
You can join and merge data into the Redshift environment, insert data into Redshift, or load data on the SQL server by following these commands:
USE demo
GO

CREATE TABLE tb01 (
id INT IDENTITY
, first_name VARCHAR(50)
, last_name VARCHAR(50)
, age SMALLINT
)
GO

TRUNCATE TABLE dbo.tb01
GO

INSERT INTO dbo.tb01 (first_name, last_name, age) VALUES ('douglas', 'correa', 36)
GO

EXEC('create table demodb.public.tbdemo(
id integer not null
,name varchar(100)
,birth timestamp ) ') AT DEMO

EXEC('insert into demodb.public.tbdemo values(1, ''douglas correa'', getdate() )') AT DEMO
EXEC('insert into demodb.public.tbdemo values(2, ''renato silvestre'', getdate() )') AT DEMO
GO

EXEC('delete from demodb.public.tbdemo') AT DEMO
GO

SELECT T.id, T.first_name, T.last_name, T.age
FROM OPENQUERY(DEMO,'select id, name, birth from demodb.public.tbdemo') AS OQ
INNER JOIN dbo.tb01 AS T ON OQ.id = T.id
GO

MERGE dbo.tb01 AS target
USING (SELECT *
FROM OPENQUERY(DEMO,'select id, name, birth from demodb.public.tbdemo') AS OQ
) AS source (id, name, birth)
ON target.id = source.id
WHEN MATCHED THEN
UPDATE SET target.age = DATEDIFF(yyyy, GETDATE(), source.birth)
WHEN NOT MATCHED THEN
INSERT (first_name, age)
VALUES (SUBSTRING(source.name, 0, CHARINDEX(' ',source.name)), DATEDIFF(yyyy, GETDATE(), source.birth))
OUTPUT Inserted.id, Inserted.first_name, Inserted.age;
GO
After running this script, you will see the option on your Results Console.
The results of these operations will depend upon the compatibility of the data type and the type conversion rules. Similar data types can be implicitly converted, whereas if different data types are present, you will see some differences in the results. By following the given steps, you can connect the Redshift SQL Server with a linked server.
If you notice any issues with the performance of the ODBC drivers or some large disk activities for simple query tasks, you can disable ODBC Tracing, or you can use the Tracing Panel of ODBC Data Source Administration to disable tracing within your system.
Limitations of Using Linked Servers
There are certain limitations associated with the use of linked servers to connect SQL Server to Amazon Redshift.
- Data Mapping Issues: If the data types are incompatible in Redshift and SQL Server, this might result in data conversion issues.
- Time Consumption: Following this method can be beneficial if you have all the prerequisites set up beforehand; as this method involves manual efforts, it can be time-consuming to follow the steps thoroughly.
- Lack of Automation: This method lacks automation; it requires effort and technical expertise. Performing the tasks also requires you to code the T-SQL commands.
Use Cases of Connecting Redshift to SQL Server
There are multiple advantages of connecting Amazon Redshift to an SQL Server; let’s look at some of the main positives of this integration.
- Moving data from Redshift to SQL Server allows a data backup facility, which can provide an extra security layer for disaster recovery. By moving your data to a SQL Server, you can minimize the risk of data loss.
- By transferring data from Redshift to SQL Server, you can leverage the capabilities of tools like SQL Server Reporting Services that can help you generate essential reports and create dashboards.
- Integrating SQL Server to Amazon Redshift can help you save historical data and optimize storage while reducing the cost of storage.
Explore More:
- How to Load Data from MS SQL Server to Redshift Within Minutes?
- Amazon Redshift vs SQL Server: Top 7 Unique Differences
Final Thoughts
- A Redshift SQL Server connection can provide various advantages to assist your business with analytics and reporting. It also introduces you to data backup opportunities that can be useful during any disaster that leads to data loss.
- In this article, you have seen two effective methods for establishing a Redshift SQL Server migration.
- One method is to use linked servers. However, this method has certain limitations, such as a lack of automation, time-consuming, and data mapping issues.
- Leveraging Hevo Data’s impressive capabilities for your Redshift SQL Server integration can help overcome the limitations associated with this method. It provides an intuitive UI that requires no coding expertise and 150+ sources for hassle-free integration.
Want to connect your Redshift data to some other destination? Here are some of the interesting integrations:
- Connect Amazon Redshift to DynamoDB
- Redshift to Snowflake Data Migration Made Easy
- Connect Redshift to PowerBI: A Comprehensive Guide
Sign up for a 14-day free trial and simplify your data integration process. Check out the pricing details to understand which plan fulfills all your business needs.
Frequently Asked Questions (FAQs)
1. What is the risk of using Redshift as the only database?
As an online analytical processing (OLAP) database, Redshift is a good choice, especially for companies working in the AWS ecosystem. It can help save overall costs. However, relying on Redshift as a database to conduct every operation is not a good consideration, specifically for online transaction processing (OLTP) workloads. Redshift is not optimized as an OLTP database.
2. What is the main difference between Redshift and SQL Server?
Redshift is a large-scale data warehousing service built for OLAP-style queries, while SQL Server, like any other relational database, is really efficient in performing OLTP workloads. Redshift can perform parallel processing on large amounts of data to perform analytical tasks. In contrast, SQL Server is incredibly powerful in storing, updating, and deleting data, as the data is stored in row-based format.
3. How to connect Redshift to SQL Server?
You can connect Redshift to SQL Server using data migration tools like Hevo, which provide a seamless integration. Alternatively, use custom ETL scripts or connectors to transfer data between the two databases.

Share it with your connections.
-
 Share To X
-
 Share To LinkedIn
-
 Share To Facebook
-
 Copy Link


