

GitHub, a widely used platform for version control and collaboration, often stores critical project data that organizations need to analyze alongside other business data. By setting up an efficient ETL (Extract, Transform, Load) process to transfer GitHub data into a PostgreSQL database, businesses can unlock valuable insights, streamline operations, and enhance their data-driven strategies. This guide explores two straightforward methods to achieve this integration.
Table of Contents
Methods to Set up GitHub Postgres ETL
Let us start with the manual method of ETL
What Hevo Offers:
Hevo provides a fully automated pipeline that handles data from various sources, ensuring real-time data integration with zero data loss. Whether you’re working with databases, cloud storage, or SaaS applications, Hevo ensures that your data is consistently accurate, secure, and ready for analysis.
Key Features:
- Real-Time Data Streaming: Capture and transfer data from multiple sources to your data warehouse with minimal latency, enabling timely insights.
- No-Code Setup: Quickly connect data sources, perform transformations, and load data without the need for complex coding or technical expertise.
- Scalable Architecture: Hevo’s fault-tolerant and scalable design ensures that it can handle growing data volumes and multiple sources, maintaining performance and reliability.
Method 1: Manual GitHub Postgres ETL
Step 1: PostgreSQL Installation
Before you begin setting up GitHub Postgres ETL, you will have to install it. Follow these steps to get started.
Step 1.1: There are several ways to install PostgreSQL. One of the easier and more popular ways among programmers to get started is with Postgres.app
- Navigate to http://postgresapp.com/ and then click “Download“:

Step 1.2: Once you’ve downloaded it on your system, double-tap to unzip the file and then move the PostgreSQL elephant symbol into your app folder. Double-tap the symbol to launch the app.
Step 1.3: You should see another window launched that shows “Welcome to Postgres“. If it says that it can’t connect with the Postgres server, the DEFAULT port is presumably already being used. Ensure you don’t have some other instances of Postgres on your PC. Uninstall them if you do so, and continue with these steps. Click the “Open psql” button:
Step 1.4: Postgres.app will create a role and database by default that match your current macOS username. Then proceed to connect straight away by running psql.
Step 1.5: You will then see something in your terminal looking like this (with your macOS username in front of the prompt rather than ‘Postgres)
Step 1.6: You can start using PostgreSQL now. For documentation on command-line tools etc. visit http://postgresapp.com/documentation/
Step 2: Installing PostgreSQL on Ubuntu
Ubuntu’s default repositories contain Postgres packages, so we can install these easily using the apt packaging system. Since this is our first time using apt in this session, you need to refresh your local package index. You can then install the Postgres package and a -contrib package that adds some additional utilities and functionalities:
sudo apt-get update
sudo apt-get install PostgreSQL PostgreSQL-contrib
By default the only role created is the default ‘Postgres’, so PostgreSQL will only respond to connections from an Ubuntu user called ‘Postgres’.
Now that your software is installed, you can go over how it works and how it may be different from similar Database Management Systems you may have used.
You’ve come across both operating systems to integrate PostgreSQL and GitHub in this post. However, you may use any of the environments available. For continuous integration, you can use GitHub Actions (PowerShell (pwsh)). GitHub Actions are an excellent mechanism for continuous integration or other automated tasks on your repo and a perfect fit for integrating PostgreSQL.
Besides, you will be using the latest GitHub Actions Virtual Environments that already has PostgreSQL installed by default after installation.
Each of the GitHub Actions in this guide will:
- Start PostgreSQL and check if PostgreSQL GitHub is integrated and running.
- Create a special user scheduler.
- Create a test database timetable.
Of course, you may want to add more steps in real life, e.g., import test data, checkout, build, test, gather coverage, release, etc.
Step 3: Integrating GitHub and PostgreSQL
Step 3.1: PostgreSQL GitHub Actions for MacOS
To integrate GitHub and PostgreSQL using GitHub Actions on MacOS, write the following lines of code on the PostgreSQL interface of the recently installed application.
Setup-PostgreSQL-macOS:
  If: true # false to skip job during debug
  name: Setup PostgreSQL on MacOS
  runs-on: macos-latest
  steps:
  - name: Start PostgreSQL on MacOS
    run: |
      brew services start postgresql
      echo "Check PostgreSQL service is running"
      i=10
      COMMAND='pg_isready'
      while [ $i -gt 0 ]; do
          echo "Check PostgreSQL service status"
          eval $COMMAND && break
          ((I--))
          If [$i == 0]; then
              echo "PostgreSQL service not ready, all attempts exhausted"
              exit 1
          fi
          echo "PostgreSQL service not ready, wait 10 more sec, attempts left: $i"
          sleep 10
      done
  # Homebrew creates an account with the same name as the installing user, but no password
  - name: Create scheduler user
    run: |
      psql --command="CREATE USER scheduler PASSWORD 'somestrong'" --command="du" postgres
  - name: Create timetable database
    run: |
      createdb --owner=scheduler timetable
      PGPASSWORD=somestrong psql --username=scheduler --host=localhost --list timetable
There are only a few differences between Ubuntu and macOS:
- Use brew services to start the server.
- The pg_is ready procedure is more complicated.
As you probably noticed, you may skip sudo -u Postgres prefixes since the current user has all the rights needed in this environment.
Step 3.2: PostgreSQL GitHub Actions for Ubuntu
setup-postgresql-ubuntu:
  if: true # false to skip job during debug
  name: Setup PostgreSQL on Ubuntu
  runs-on: ubuntu-latest
  steps:
  - name: Start PostgreSQL on Ubuntu
    run: |
      sudo systemctl start postgresql.service
      pg_isready
  - name: Create scheduler user
    run: |
      sudo -u postgres psql --command="CREATE USER scheduler PASSWORD 'somestrong'" --command="du"
  - name: Create timetable database
    run: |
      sudo -u postgres createdb --owner=scheduler timetable
      PGPASSWORD=somestrong psql --username=scheduler --host=localhost --list timetable
Nothing unusual here for Ubuntu users. You can use systemctl to start PostgreSQL and the pg_is ready utility to check if the server is running. To create a scheduler user, you can use a psql client in non-interactive mode. You can then send two commands to it:
- CREATE USER …;
- du — list users.
First, create the user. Second, output the list of users for control.
To create a timetable database, you can use the createdb utility. Pay attention to the fact that sudo -u Postgres allows you to not specify connection credentials because a system user is allowed to connect locally without any restrictions. Then, just like in the previous step, list the databases with psql for control. You have successfully integrated PostgreSQL GitHub.
Step 3.3: PostgreSQL GitHub Action for Windows
To integrate PostgreSQL GitHub on the Windows operating system, please write the following commands on the PostgreSQL Windows OS interface.
Setup-postgresql-windows:
  if: true # false to skip job during debug
  name: Setup PostgreSQL on Windows
  runs-on: windows-latest
  steps:
  - name: Start PostgreSQL on Windows
    run: |
      $pgService = Get-Service -Name postgresql*
      Set-Service -InputObject $pgService -Status running -StartupType automatic
      Start-Process -FilePath "$env:PGBINpg_isready" -Wait -PassThru
  - name: Create scheduler user on Windows
    run: |
      & $env:PGBINpsql --command="CREATE USER scheduler PASSWORD 'somestrong'" --command="du"
  - name: Create timetable database
    run: |
      & $env:PGBINcreatedb --owner=scheduler timetable
      $env:PGPASSWORD = 'somestrong'
      & $env:PGBINpsql --username=scheduler --host=localhost --list timetable
With Windows, everything is different, but not as scary as haters usually paint it to be:
- The Windows environment uses PowerShell (pwsh) by default.
- Windows administers services.
The code is straightforward. The only thing we want to highlight is the ampersand sign (& aka call operator) before some commands. The call operator (&) allows you to execute a command, script, or function.
Since the PostgreSQL utilities psql and createdb are not in the PATH, you need to specify their full path. You use the environmental variable PGBIN for that. But after the concatenation operation, you’ll have a regular string. Therefore, a call operator will allow you to execute a resulting command.
Challenges of Setting up GitHub Postgres ETL Manually
- For PostgreSQL, remembering psql commands can be challenging. You can try to decode them. For instance, dt – describe tables, du – describe users, etc.
- Make sure you are using the recent virtual environment for your PostgreSQL installation.

Method 2: Using Hevo to Setup PostgreSQL GitHub Integration
Hevo helps you directly transfer data from various sources to PostgreSQL, Data Warehouses, or a destination of your choice in a completely hassle-free & automated manner.
The following steps can be implemented to set up GitHub Postgres Integration using Hevo:
Step 1: Configure Github Webhook as your source
Here, you will have to name your Github Source

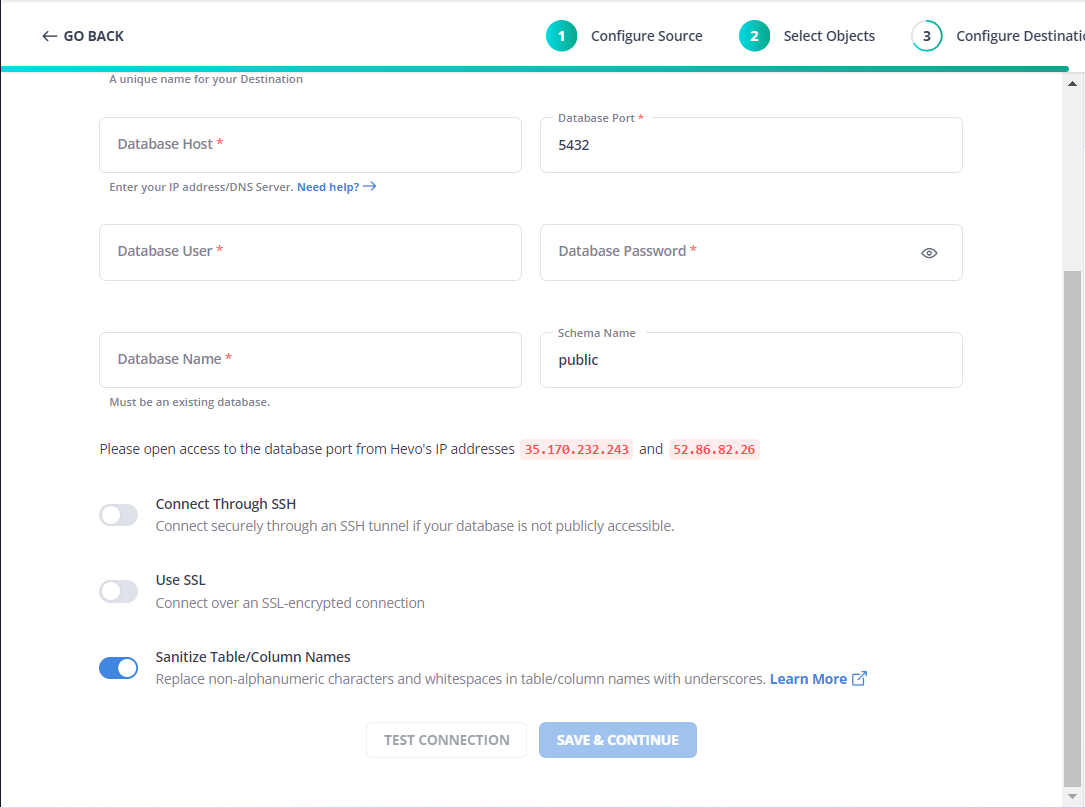
Step 2: Configure your Destination
Step 3: Give a Destination Table Prefix name
Give your table an appropriate prefix name so you can easily recognize your specific table in your suitable destination.

Step 4: Setup Github
You must paste this Webhook URL into your GitHub account to push data into the webhook url.

With these few quick and easy steps, you can seamlessly connect your GitHub as a source and move your data without any issues. To start your data journey today, click the widget below!
Conclusion
Integrating GitHub data into PostgreSQL through a well-structured ETL process empowers organizations to centralize their data for comprehensive analysis. Whether you opt for a fully managed solution or a custom-built approach, the key is to ensure that your ETL pipeline is robust, scalable, and aligned with your business needs. By implementing the methods discussed, you’ll be well-equipped to harness the power of your GitHub data, driving actionable insights and more informed decision-making within your organization.
FAQ on GitHub Postgres ETL
Is ETL still used?
Yes, ETL (Extract, Transform, Load) is still widely used, especially in data warehousing and business intelligence. It has evolved with modern data practices, but its core principles remain crucial for processing and integrating data from various sources.
What is repository in ETL?
In ETL, a repository is a centralized storage location where ETL metadata is stored. This metadata includes details about data transformations, workflows, and connections used in the ETL process.
What is ETL in Devops?
ETL in DevOps refers to integrating ETL processes into the DevOps pipeline, allowing for continuous data integration, testing, and deployment, ensuring that data processing is part of the overall CI/CD (Continuous Integration/Continuous Deployment) workflow.
Want to take Hevo for a spin?
[hevoButton text=”SIGN UP and experience the feature-rich Hevo suite first hand.
You can also look at pricing that is adaptable to your needs. Clear, simple, and predictable. Pick the ideal plan for your team based on your requirements.
Share your experience of learning the methods of GitHub Postgres ETL in the comments!
Share it with your connections.
-
 Share To LinkedIn
-
 Share To Facebook
-
 Share To X
-
 Copy Link


