


To empower your business decisions with data, you need Real-Time High-Quality data from all of your data sources in a central repository. Traditional On-Premise Data Warehouse solutions have limited Scalability and Performance, and they require constant maintenance.
Snowflake is a more Cost-Effective and Instantly Scalable solution with industry-leading Query Performance. It’s a one-stop-shop for Cloud Data Warehousing and Analytics, with full SQL support for Data Analysis and Transformations. One of the highlighting features of Snowflake is Snowflake Time Travel.
Snowflake Time Travel allows you to access Historical Data (that is, data that has been updated or removed) at any point in time. It is an effective tool for doing the following tasks:
- Restoring Data-Related Objects (Tables, Schemas, and Databases) that may have been removed by accident or on purpose.
- Duplicating and Backing up Data from previous periods of time.
- Analyzing Data Manipulation and Consumption over a set period of time.
In this article, you will learn everything about Snowflake Time Travel along with the process which you might want to carry out while using it with simple SQL code to make the process run smoothly.
Table of Contents
What is Snowflake?
Snowflake is the world’s first Cloud Data Warehouse solution, built on the customer’s preferred Cloud Provider’s infrastructure (AWS, Azure, or GCP). Snowflake (SnowSQL) adheres to the ANSI Standard and includes typical Analytics and Windowing Capabilities. There are some differences in Snowflake’s syntax, but there are also some parallels.
Snowflake’s integrated development environment (IDE) is totally Web-based. Visit XXXXXXXX.us-east-1.snowflakecomputing.com. You’ll be sent to the primary Online GUI, which works as an IDE, where you can begin interacting with your Data Assets after logging in. Each query tab in the Snowflake interface is referred to as a “Worksheet” for simplicity. These “Worksheets,” like the tab history function, are automatically saved and can be viewed at any time.
Key Features of Snowflake
- Query Optimization: By using Clustering and Partitioning, Snowflake may optimize a query on its own. With Snowflake, Query Optimization isn’t something to be concerned about.
- Secure Data Sharing: Data can be exchanged securely from one account to another using Snowflake Database Tables, Views, and UDFs.
- Support for File Formats: JSON, Avro, ORC, Parquet, and XML are all Semi-Structured data formats that Snowflake can import. It has a VARIANT column type that lets you store Semi-Structured data.
- Caching: Snowflake has a caching strategy that allows the results of the same query to be quickly returned from the cache when the query is repeated. Snowflake uses permanent (during the session) query results to avoid regenerating the report when nothing has changed.
- SQL and Standard Support: Snowflake offers both standard and extended SQL support, as well as Advanced SQL features such as Merge, Lateral View, Statistical Functions, and many others.
- Fault Resistant: Snowflake provides exceptional fault-tolerant capabilities to recover the Snowflake object in the event of a failure (tables, views, database, schema, and so on).
To get further information check out the official website here.
A Snowflake-native app to monitor Fivetran costs.

What is Time Travel in Snowflake?
Snowflake Time Travel is an interesting tool that allows you to access data from any point in the past. For example, if you have an Employee table, and you inadvertently delete it, you can utilize Time Travel to go back 5 minutes and retrieve the data. Snowflake Time Travel allows you to Access Historical Data (that is, data that has been updated or removed) at any point in time. It is an effective tool for doing the following tasks:
- Analyze Data Changes: Gain insights into how your data has changed over time, enabling you to identify trends, anomalies, and the impact of data modifications.
- Query Past Data: Access and query data as it existed at any point in time, even after updates or deletions. This is invaluable for auditing, debugging, and understanding data evolution.
- Clone Historical Objects: Create exact copies of tables, schemas, and even entire databases as they appeared at a specific point in time. This is incredibly useful for testing, development, and data analysis without impacting production data.
- Restore Deleted Objects: Recover accidentally dropped tables, schemas, or databases with ease. This significantly reduces the risk of data loss and minimizes downtime.
How Does Snowflake Time Travel Work?
Snowflake maintains a series of snapshots of your data at regular intervals. These snapshots capture the state of your data before each update, allowing you to travel back in time and access any previous version. The retention period for these snapshots is configurable, providing you with control over how far back in time you can access data.
How to Enable & Disable Snowflake Time Travel Feature?
1) Enable Snowflake Time Travel
To enable Snowflake Time Travel, no chores are necessary. It is turned on by default, with a one-day retention period. However, if you want to configure Longer Data Retention Periods of up to 90 days for Databases, Schemas, and Tables, you’ll need to upgrade to Snowflake Enterprise Edition. Please keep in mind that lengthier Data Retention necessitates more storage, which will be reflected in your monthly Storage Fees. See Storage Costs for Time Travel and Fail-safe for further information on storage fees.
For Snowflake Time Travel, the example below builds a table with 90 days of retention.
create table mytable(col1 number, col2 date) data_retention_time_in_days=90;To shorten the retention term for a certain table, the below query can be used.
alter table mytable set data_retention_time_in_days=30;
2) Disable Snowflake Time Travel
Snowflake Time Travel cannot be turned off for an account, but it can be turned off for individual Databases, Schemas, and Tables by setting the object’s DATA_RETENTION_TIME_IN_DAYS to 0.
Users with the ACCOUNTADMIN role can also set DATA_RETENTION_TIME_IN_DAYS to 0 at the account level, which means that by default, all Databases (and, by extension, all Schemas and Tables) created in the account have no retention period. However, this default can be overridden at any time for any Database, Schema, or Table.
alter table mytable set data_retention_time_in_days=0;3) What are Data Retention Periods?
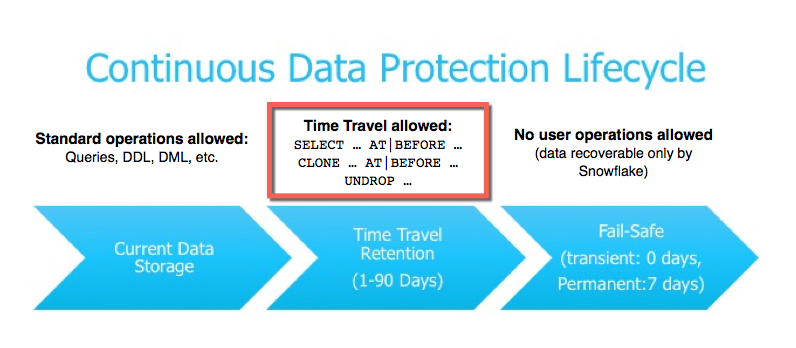
Data Retention Time is an important part of Snowflake Time Travel. Snowflake preserves the state of the data before the update when data in a table is modified, such as deletion of data or removing an object containing data. The Data Retention Period sets the number of days that this historical data will be stored, allowing Time Travel operations (SELECT, CREATE… CLONE, UNDROP) to be performed on it.
All Snowflake Accounts have a standard retention duration of one day (24 hours), which is automatically enabled:
- At the account and object level in Snowflake Standard Edition, the Retention Period can be adjusted to 0 (or unset to the default of 1 day) (i.e. Databases, Schemas, and Tables).
- If you’re using Snowflake Enterprise Edition (or higher), you’ll need to do the following:
- The Retention Period can be set to 0 for temporary Databases, Schemas, and Tables (or unset back to the default of 1 day). The same can be said of Temporary Tables.
- The Retention Time for permanent Databases, Schemas, and Tables can be configured to any number between 0 and 90 days.
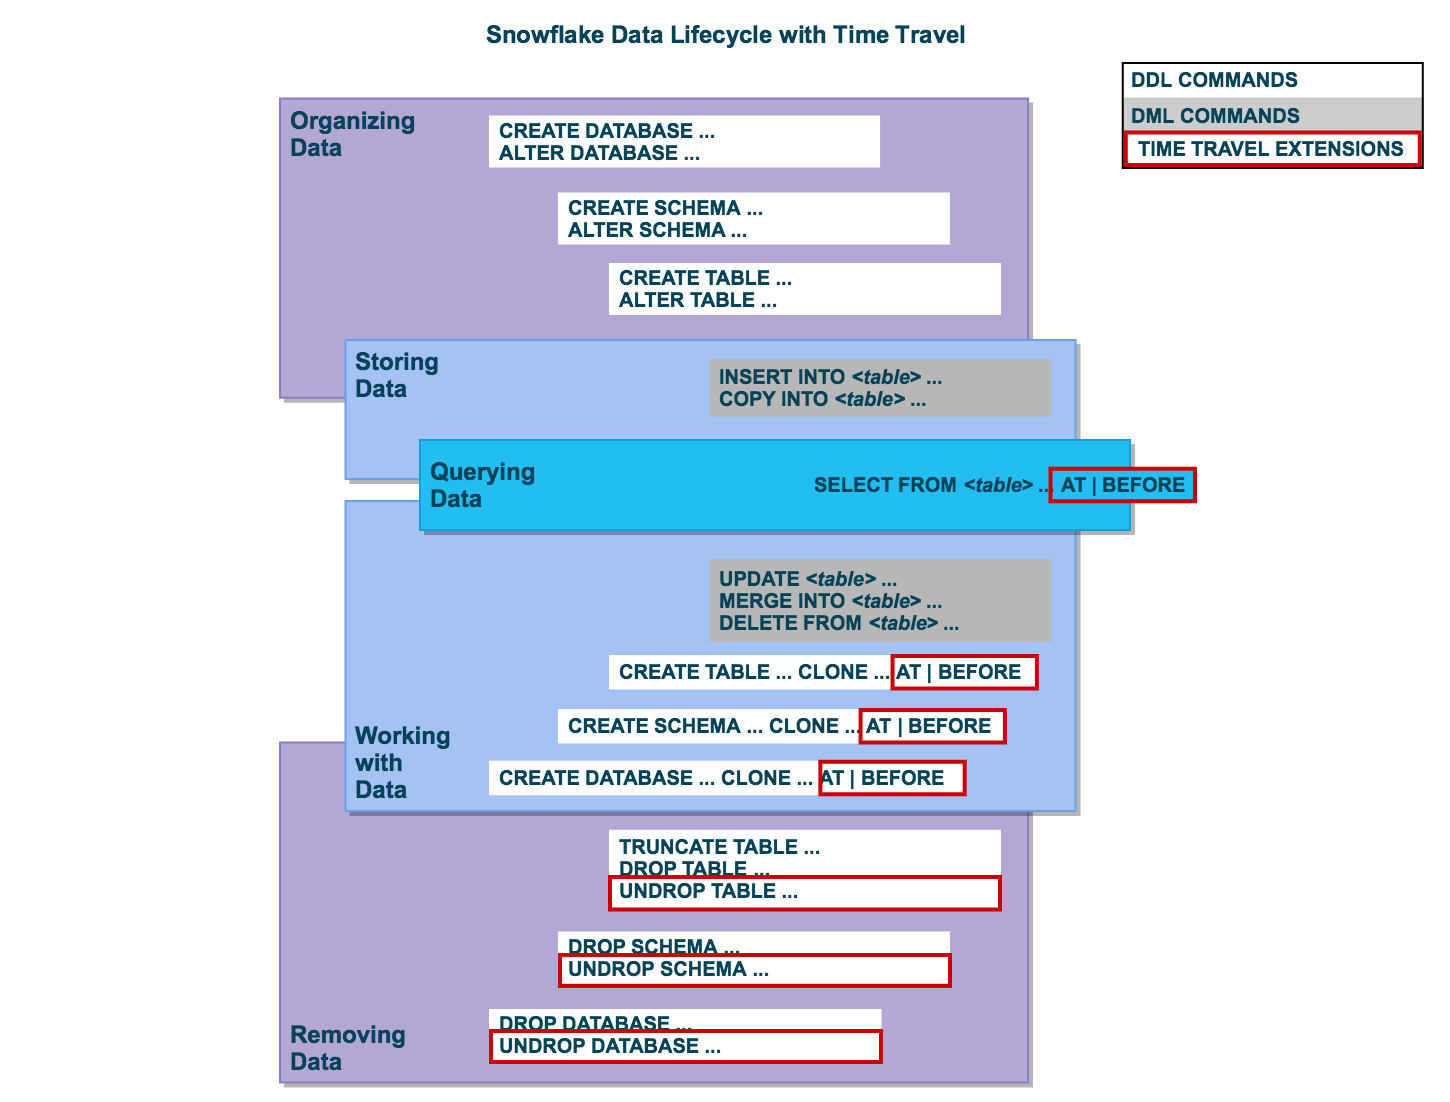
4) What are Snowflake Time Travel SQL Extensions?
The following SQL extensions have been added to facilitate Snowflake Time Travel:
- SELECT statements and CREATE… CLONE commands both have an AT | BEFORE Clause that can be provided (immediately after the object name). To pinpoint the particular Historical Data that you want to view, the Clause employs one of the following parameters:
- TIMESTAMP
- OFFSET (time difference in seconds from the present time)
- STATEMENT (identifier for statement, e.g. query ID)
- For Tables, Schemas, and Databases, use the UNDROP command.
How Many Days Does Snowflake Time Travel Work?
| Table Type | Time Travel Retention Period (Days) | Fail-safe Period (Days) | Total Historical Data Maintained (Days) |
|---|---|---|---|
| Permanent | 1 day (for Snowflake Standard Edition) 90 days (for Snowflake Enterprise Edition) | 7 days | 8 days for Standard, 97 days for Enterprise |
| Transient | 0 days (Standard) or 1 day (Enterprise) | 0 days | 0 days (Standard) or 1 day (Enterprise) |
| Temporary | 0 days (Standard) or 1 day (Enterprise) | 0 days | 0 days (Standard) or 1 day (Enterprise) |
Interested in mastering Snowflake Max Date? Read our comprehensive guide to discover how this feature can enhance your data analysis and management.
How to Specify a Custom Data Retention Period for Snowflake Time Travel?
The maximum Retention Time in Standard Edition is set to 1 day by default (i.e. one 24 hour period). The default for your account in Snowflake Enterprise Edition (and higher) can be set to any value up to 90 days:
- The account default can be modified using the DATA_RETENTION_TIME IN_DAYS argument in the command when creating a Table, Schema, or Database.
- If a Database or Schema has a Retention Period, that duration is inherited by default for all objects created in the Database/Schema.
The Data Retention Time can be set in the way it has been set in the example below.
create table mytable(col1 number, col2 date) data_retention_time_in_days=90;How to Modify Data Retention Period for Snowflake Objects?
When you alter a Table’s Data Retention Period, the new Retention Period affects all active data as well as any data in Time Travel. Whether you lengthen or shorten the period has an impact:
1) Increasing Retention
This causes the data in Snowflake Time Travel to be saved for a longer amount of time.
For example, if you increase the retention time from 10 to 20 days on a Table, data that would have been destroyed after 10 days is now kept for an additional 10 days before being moved to Fail-Safe. This does not apply to data that is more than 10 days old and has previously been put to Fail-Safe mode.
2) Decreasing Retention
- Temporal Travel reduces the quantity of time data stored.
- The new Shorter Retention Period applies to active data updated after the Retention Period was trimmed.
- If the data is still inside the new Shorter Period, it will stay in Time Travel.
- If the data is not inside the new Timeframe, it is placed in Fail-Safe Mode.
For example, If you have a table with a 10-day Retention Term and reduce it to one day, data from days 2 through 10 will be moved to Fail-Safe, leaving just data from day 1 accessible through Time Travel.
However, since the data is moved from Snowflake Time Travel to Fail-Safe via a background operation, the change is not immediately obvious. Snowflake ensures that the data will be migrated, but does not say when the process will be completed; the data is still accessible using Time Travel until the background operation is completed.
Use the appropriate ALTER <object> Command to adjust an object’s Retention duration. For example, the below command is used to adjust the Retention duration for a table:
alter table mytable set data_retention_time_in_days=30;How to Query Snowflake Time Travel Data?
When you make any DML actions on a table, Snowflake saves prior versions of the Table data for a set amount of time. Using the AT | BEFORE Clause, you can Query previous versions of the data.
This Clause allows you to query data at or immediately before a certain point in the Table’s history throughout the Retention Period. The supplied point can be either a time-based (e.g., a Timestamp or a Time Offset from the present) or a Statement ID (e.g. SELECT or INSERT).
- The query below selects Historical Data from a Table as of the Date and Time indicated by the Timestamp:
select * from my_table at(timestamp => 'Fri, 01 May 2015 16:20:00 -0700'::timestamp_tz);- The following Query pulls Data from a Table that was last updated 5 minutes ago:
select * from my_table at(offset => -60*5);- The following Query collects Historical Data from a Table up to the specified statement’s Modifications, but not including them:
select * from my_table before(statement => '8e5d0ca9-005e-44e6-b858-a8f5b37c5726');How to Clone Historical Data in Snowflake?
The AT | BEFORE Clause, in addition to queries, can be combined with the CLONE keyword in the Construct command for a Table, Schema, or Database to create a logical duplicate of the object at a specific point in its history.
Consider the following scenario:
- The CREATE TABLE command below generates a Clone of a Table as of the Date and Time indicated by the Timestamp:
create table restored_table clone my_table
at(timestamp => 'Sat, 09 May 2015 01:01:00 +0300'::timestamp_tz);- The following CREATE SCHEMA command produces a Clone of a Schema and all of its Objects as they were an hour ago:
create schema restored_schema clone my_schema at(offset => -3600);+- The CREATE DATABASE command produces a Clone of a Database and all of its Objects as they were before the specified statement was completed:
create database restored_db clone my_db
  before(statement => '8e5d0ca9-005e-44e6-b858-a8f5b37c5726');
Using UNDROP Command with Snowflake Time Travel: How to Restore Objects?
The following commands can be used to restore a dropped object that has not been purged from the system (i.e. the item is still visible in the SHOW object type> HISTORY output):
- UNDROP DATABASE
- UNDROP TABLE
- UNDROP SCHEMA
UNDROP returns the object to its previous state before the DROP command is issued.
A Database can be dropped using the UNDROP command. For example,

UNDROP DATABASE EMPSimilarly, you can UNDROP Tables and Schemas.
Snowflake Fail-Safe vs Snowflake Time Travel: What is the Difference?
In the event of a System Failure or other Catastrophic Events, such as a Hardware Failure or a Security Incident, Fail-Safe ensures that Historical Data is preserved. While Snowflake Time Travel allows you to Access Historical Data (that is, data that has been updated or removed) at any point in time.
Fail-Safe mode allows Snowflake to recover Historical Data for a (non-configurable) 7-day period. This time begins as soon as the Snowflake Time Travel Retention Period expires.
Looking for the best ETL tools to connect your data sources? Rest assured, Hevo’s no-code platform helps streamline your ETL process. Try Hevo and equip your team to:
- Integrate data from 150+ sources(60+ free sources).
- Utilize drag-and-drop and custom Python script features to transform your data.
- Risk management and security framework for cloud-based systems with SOC2 Compliance.
Try Hevo and discover why 2000+ customers have chosen Hevo over tools like AWS DMS to upgrade to a modern data stack.
Get Started with Hevo for FreeConclusion
This article has exposed you to the various Snowflake Time Travel to help you improve your overall decision-making and experience when trying to make the most out of your data.
However, as a Developer, extracting complex data from a diverse set of data sources like Databases, CRMs, Project management Tools, Streaming Services, and Marketing Platforms to your Database can seem to be quite challenging.
If you are from non-technical background or are new in the game of data warehouse and analytics, Hevo can help!
FAQ on Snowflake Time Travel
How long does Snowflake get execution time?
You can get the execution time of queries in Snowflake by checking the QUERY_HISTORY view, where EXECUTION_TIME is reported in milliseconds.
What is Snowflake Time Travel?
Time Travel in Snowflake allows you to access historical data by querying data as it existed at a specific point in time, enabling recovery of deleted or updated data.
What is the max Time Travel for Snowflake?
The maximum retention period for Time Travel is 90 days for Enterprise editions and above, while the default retention period is 1 day for the Standard edition.

Share it with your connections.
-
 Share To X
-
 Share To LinkedIn
-
 Share To Facebook
-
 Copy Link


