


Managing infrastructure manually across multiple cloud providers leads to consistency, deployment delays, and difficulty in scaling. You need a solution that automates infrastructure provisioning, ensures consistency, and supports rapid deployment across diverse environments, from development to production, while maintaining security and compliance standards.
This solution is none other than using Snowflake Terraform. In this blog, we will explore how to harness Terraform’s capabilities to provision, configure, and maintain Snowflake instances. Let’s get started.
Table of Contents
What is Terraform?

Terraform is an open-source Infrastructure-as-Code (IaC) tool. It lets users define and manage infrastructure resources, such as virtual machines and networks, declaratively using configuration files. It supports multiple cloud providers such as AWS, Azure, and Google Cloud and on-premise infrastructure, enabling consistent deployment and management of your infrastructure.
What is IaC?
IaC stands for Infrastructure as Code, which refers to managing and provisioning computing infrastructure through machine-readable files rather than physically configuring the hardware.
Tools like Terraform and Chef are commonly used for implementing IaC, allowing you to automate the provisioning and management of infrastructure across different environments, from cloud platforms to on-premises data centers.
A Snowflake-native app to monitor Fivetran costs

Why Terraform?
In this section, I have discussed why someone would use Terraform and what problem it will solve.
- Continuous Integration and Delivery (CI/CD): Integrates with CI/CD pipelines and automates infrastructure deployment and updates, increasing deployment speed.
- Infrastructure Tracking: It alerts you for your approval before modifying your infrastructure.
- Automate Changes: The files describe the end state of your infrastructure, so you do not need to write step-by-step instructions because Terraform handles the underlying logic.
Hevo Data is now available on Snowflake Partner Connect, making it easier than ever to integrate your data seamlessly. With Hevo’s powerful data integration capabilities, Snowflake users can connect to Hevo directly from their Snowflake environment and streamline their data pipelines effortlessly. Hevo offers:
- More than 150 source connectors from databases, SaaS applications, etc.
- A simple Python-based drag-and-drop data transformation technique that allows you to transform your data for analysis.
- Automatic schema mapping to match the destination schema with the incoming data. You can also choose between Full and Incremental Mapping.
- Proper bandwidth utilization on both the source and destination allows for the real-time transfer of modified data.
- Transparent pricing with no hidden fees allows you to budget effectively while scaling your data integration needs.
Try Hevo today to seamlessly integrate data into Snowflake.
Get Started with Hevo for FreeManaging your Infrastructure with Terraform
Prerequisites:
- You need to have access to a Terraform Cloud Account.
- You should have a Snowflake Account.
- You will require a GitHub account to publish your terraform code.
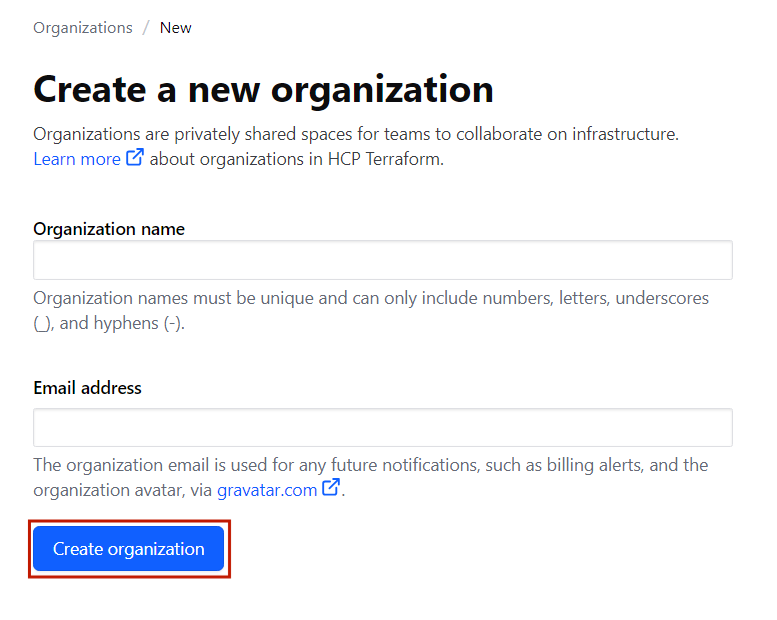
Step 1: Create a new Organization
To do this, you will need to create a new organization. To do so, go to Terraform cloud>> sign in>> click Create a new organization.
Step 2: Creating a new Workspace
Now, we will create a new Workspace in the organization that we just created.
To create a new Workspace, click on API-driven workflow in the left panel.
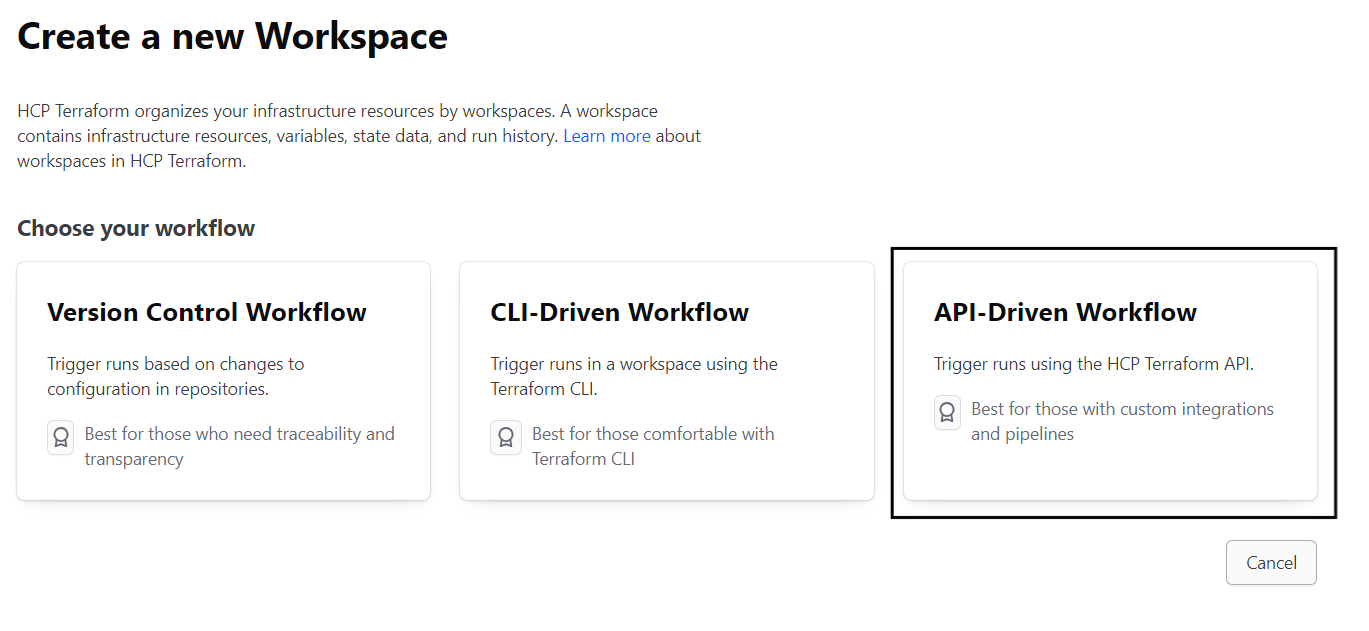
Note: Create an API-Driven Workflow. We are doing this because we will require HCP Terraform API to manage our Snowflake account.
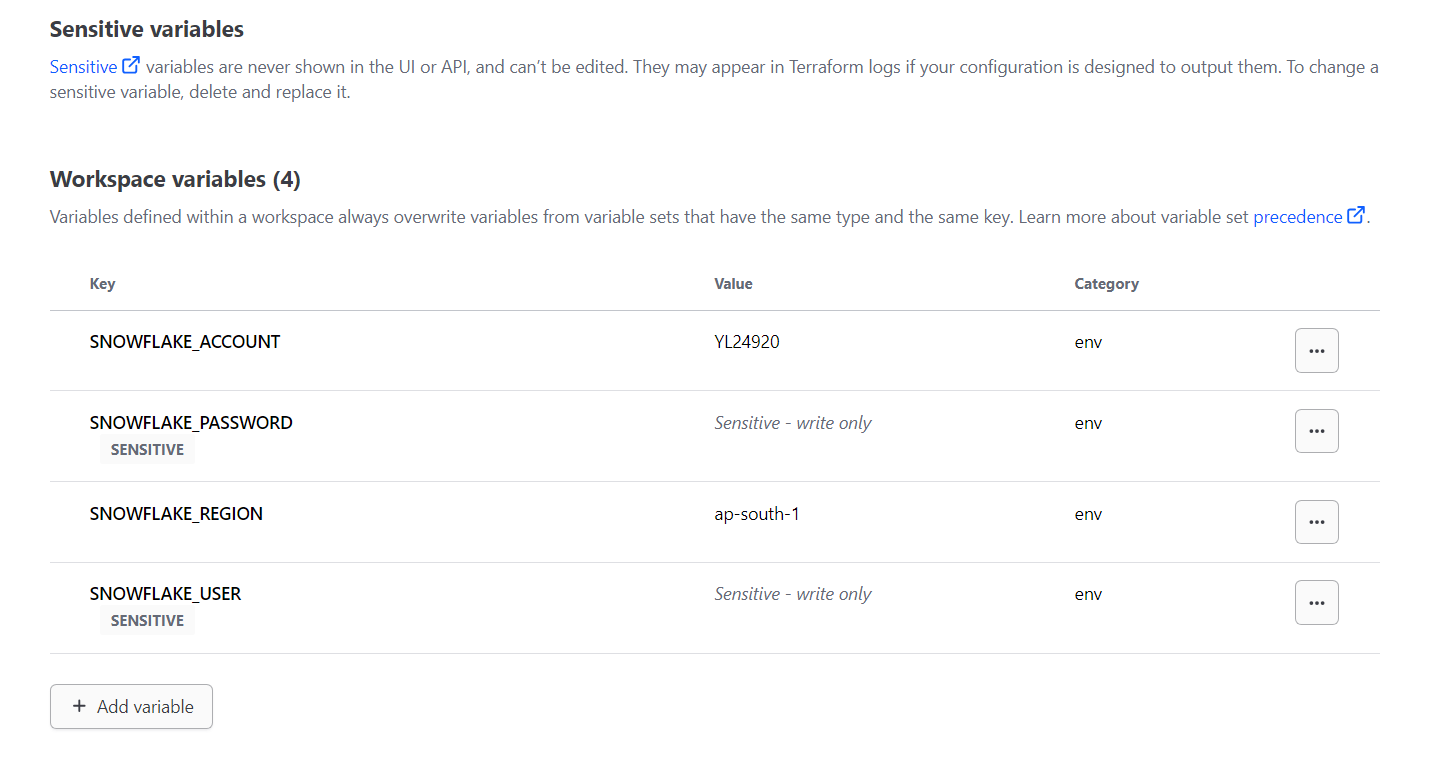
Step 3: Adding Environment Variables
We must add a few variables to our Workspace for the next step.
Step 3. a) Go to workspace variables and click on Add Variable
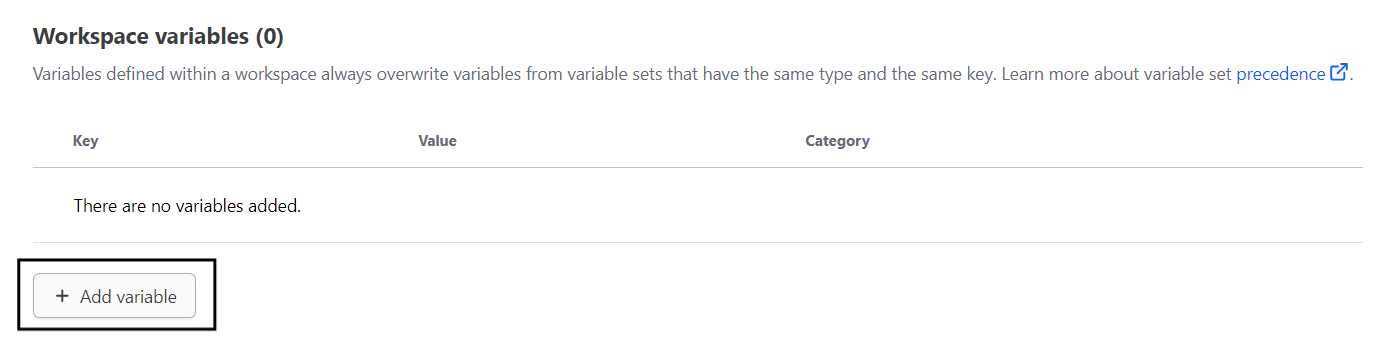
Note: In select Variable category, click on Environment Variable

Step 3. b) To add the first variable, we need the locator ID of your Snowflake account.
Go to your Snowflake account and copy your locator ID.
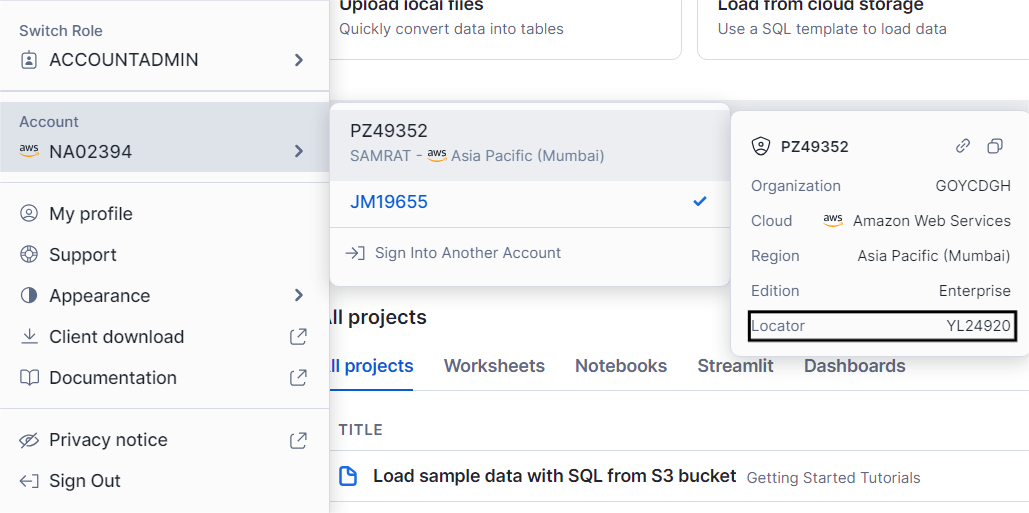
Step 3. c) Add a variable named SNOWFLAKE_ACCOUNT, and paste your locator ID in the value area.

Step 3. d) Next, we need to add a few more variables:
- Snowflake Region – My region is Mumbai, so I have added ap-south-1.aws; you can check yours. It will be just above your locator ID.
- Snowflake Password – Create a variable and store your Snowflake password.
- Snowflake User – Create a variable and store your Snowflake username.
Once you add all the variables required, your workspace variables should look like this:
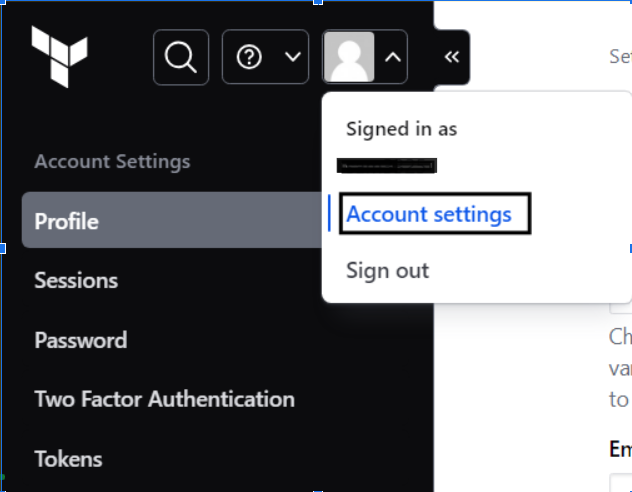
Step 4: Creating an API Token
We need to create an API token so that our GitHub actions can use that token to have a channel with Terraform Cloud.
Step 4. a) To generate an API Token, go to Account Settings.
Step 4. b) Click on tokens and Create an API Token from there.

Step 4. c) Give the token description as TF_API_TOKEN, set its expiration date, and finally click on generate a token to generate a new token.
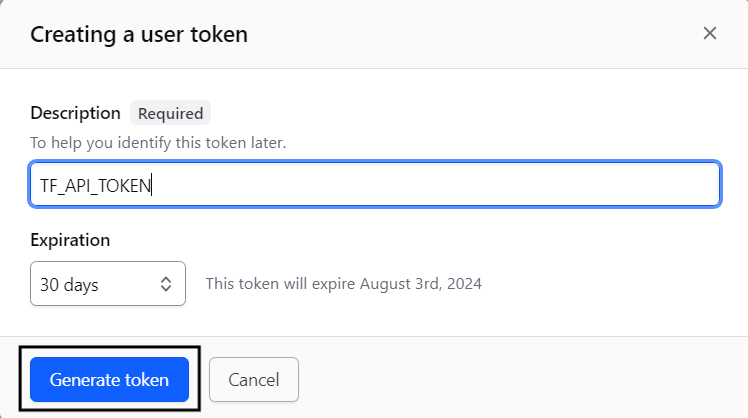
After generating, the token will look something like this:

Copy the token and keep it, as we require it later.
Step 5: Configure your GitHub repository.
Your token has been successfully created. Now, go to Git Hub and create a new repository.
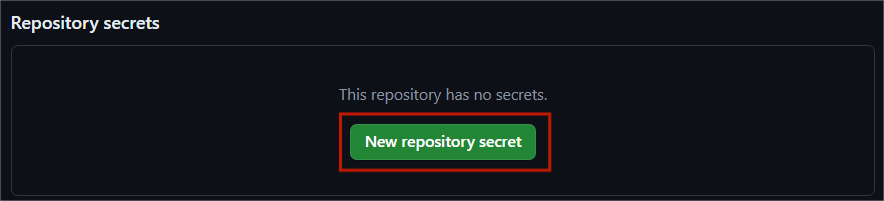
Step 5. a) In the newly created repository, go to settings>>Secrets and Variables and click on Action.
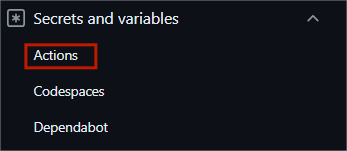
Step 5. b) Click on New Repository secret
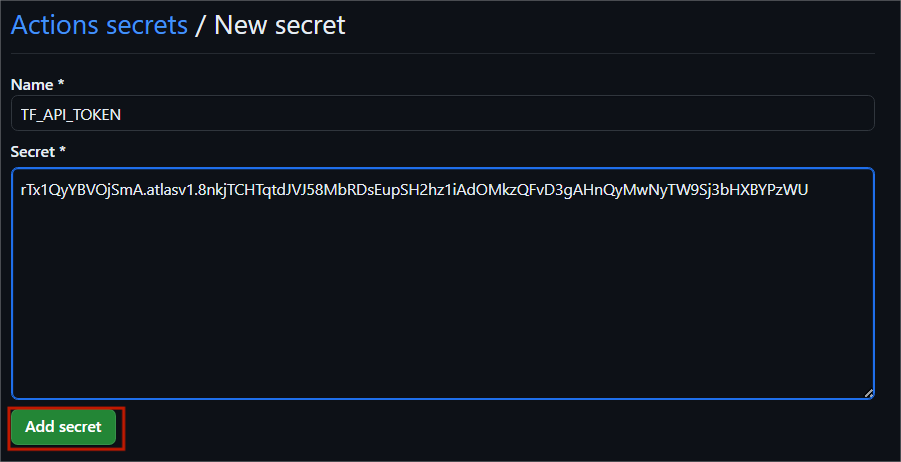
Step 5. c) Give the secret name TF_API_SECRET and paste the secret value you had previously saved from API in Secret.
Step 6: We need to set up a Workflow now
To set up a workflow, go to your repository in the actions tab and click set up a workflow yourself.

Step 7: Creation of main.yaml file
Create main.yaml file and paste the following code snippet into that file.
name: "Snowflake Demo Workflow"

on:
  push:
    branches:
      - main

jobs:
  snowflake-terraform-demo:
    name: "Snowflake Terraform Demo Job"
    runs-on: ubuntu-latest
    steps:
      - name: Checkout
        uses: actions/checkout@v2

      - name: Setup Terraform
        uses: hashicorp/setup-terraform@v1
        with:
          cli_config_credentials_token: ${{ secrets.TF_API_TOKEN }}

      - name: Terraform Format
        id: fmt
        run: terraform fmt -check

      - name: Terraform Init
        id: init
        run: terraform init

      - name: Terraform Validate
        id: validate
        run: terraform validate -no-color

      - name: Terraform Apply
        id: apply
        run: terraform apply -auto-approve
Note: Rename the file to snowflake-terraform-demo.yml before committing the changes

Step 8: Set up Database Migration
To create your first database migration, paste the following code snippet.
To do so, you need to create a new file in your GitHub repo and paste the code given below.
terraform {
  required_providers {
    snowflake = {
      source  = "chanzuckerberg/snowflake"
      version = "0.25.17"
    }
  }

  backend "remote" {
    organization = "my-organization-name"

    workspaces {
      name = "gh-actions-demo"
    }
  }
}

provider "snowflake" {
}

resource "snowflake_database" "demo_db" {
  name    = "DEMO_DB"
  comment = "Database for Snowflake Terraform demo"
}

Note: Change your organization name to the one you used in Terraform; I have used Snowflake_terraform_project.
Step 8. a) Name the file main.tf and commit changes
Note: Create main.tf file outside workflow.

Step 8. b) Go to actions and click on create main.tf.

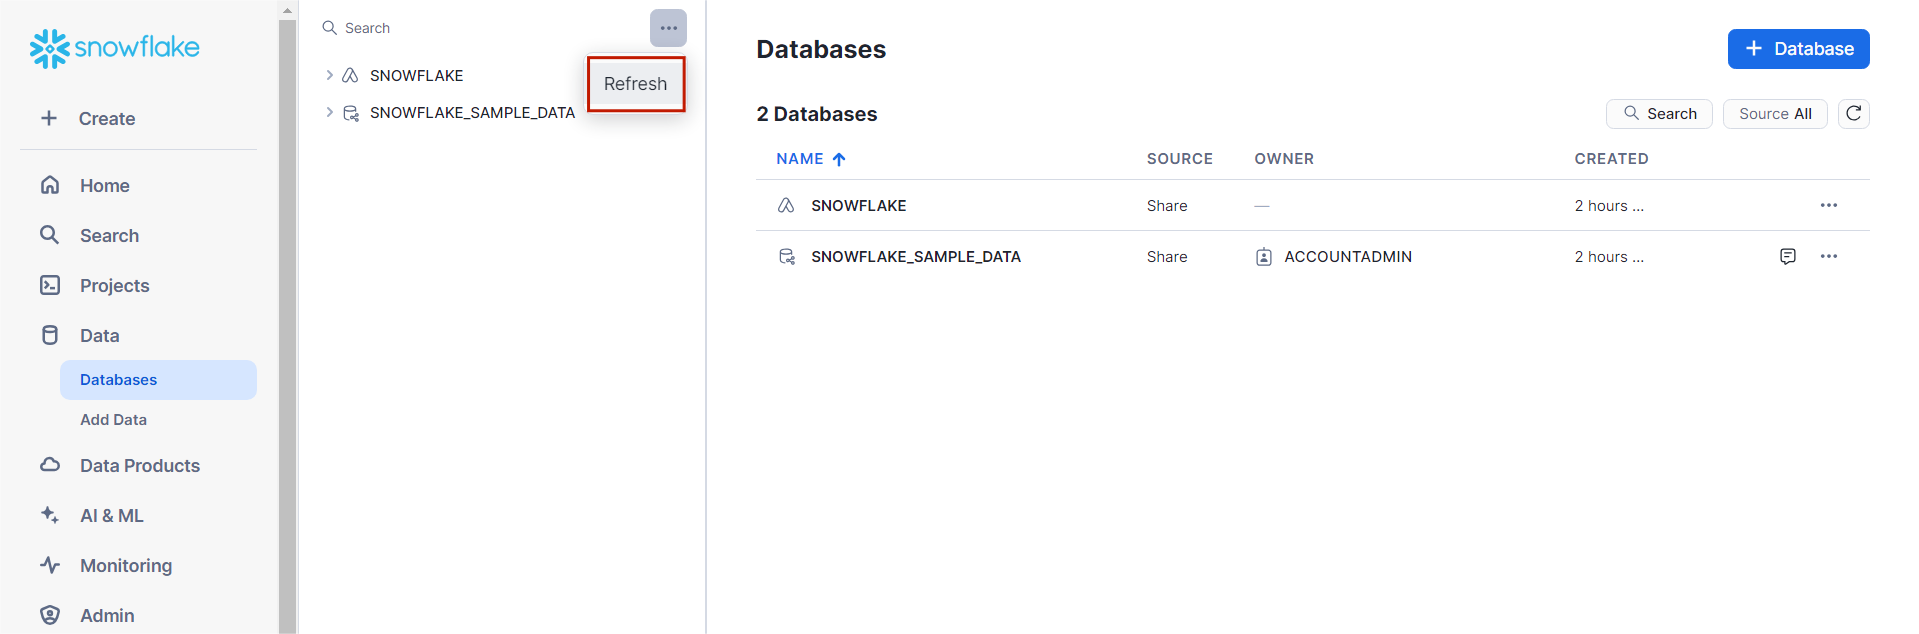
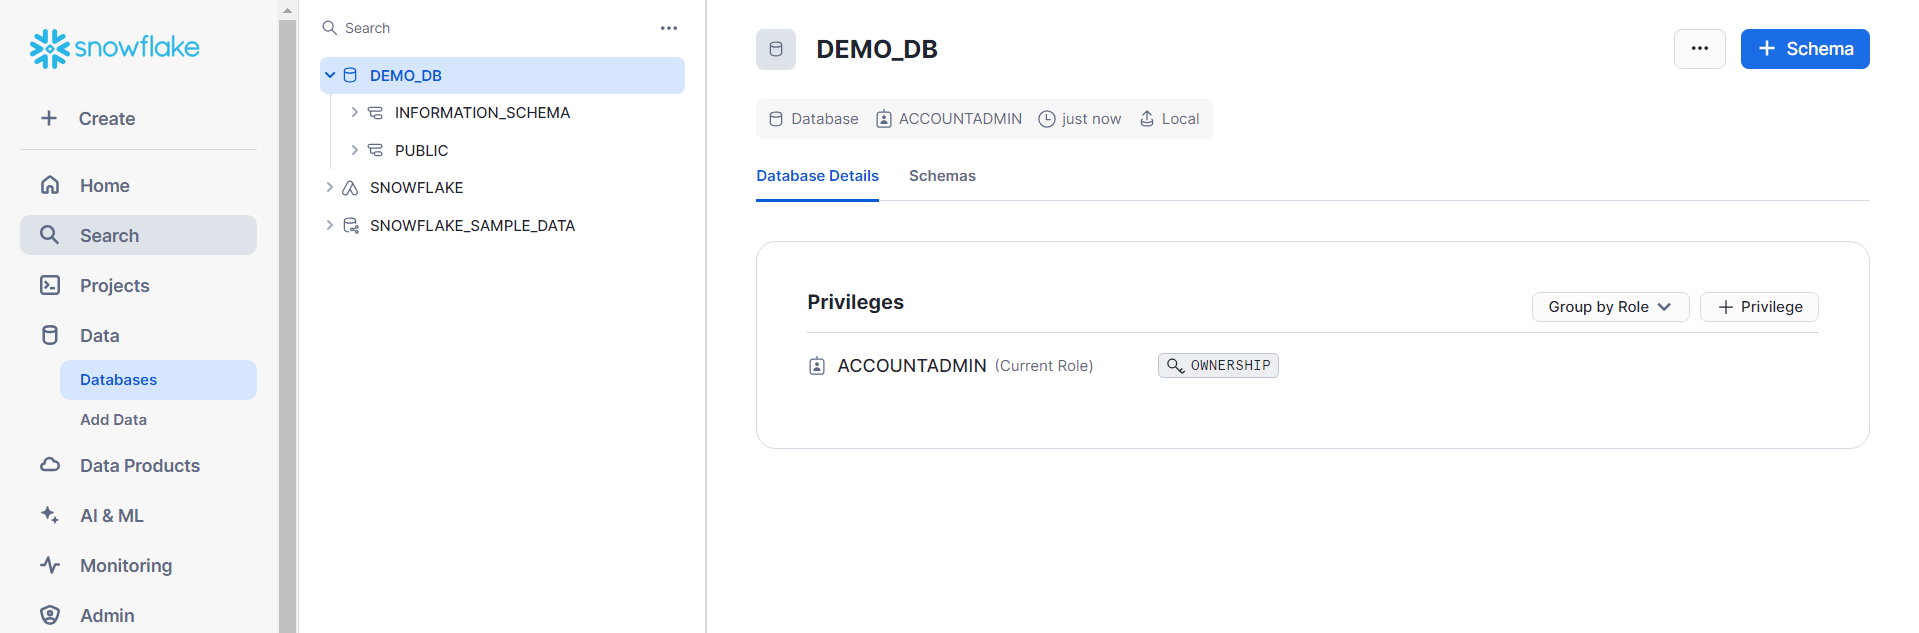
Step 8. c) After the process is completed, go to your Snowflake account, click on databases, and click on refresh. You will be able to see the demo database after refreshing.
With this, we have successfully created one ci/cd data change management pipeline using GitHub actions and Terraform Cloud.
Note: To create a new schema, add this code snippet to the main.tf file, save the file, and refresh again your new schema will be added in your Snowflake account.
resource "snowflake_schema" "demo_schema" {
  database = snowflake_database.demo_db.name
  name     = "DEMO_SCHEMA"
  comment  = "Schema for Snowflake Terraform demo"
}

Advantages and Disadvantages of Snowflake Terraform Integration
Let’s understand the advantages and disadvantages of using snowflake terraform integration.
Advantages:
- Plan Execution: It provides a ‘plan’ feature to preview changes before modifying the infrastructure, reducing risks associated with infrastructure updates.
- Automation: It automates infrastructure provisioning, updates, and deployments, enhancing operational efficiency.
Disadvantages:
Snowflake Terraform integration’s potential complexity in managing state files, where it keeps track of your real infrastructure, requires technically sound people to configure and implement it. It is not for beginners and is challenging to integrate with existing continuous integration pipelines.
Conclusion
In this tutorial, we have deep-dived into the basics of Terraform, why someone would prefer using it to manage their infrastructure, its significant advantages, and the problems people face while configuring it. It enables you to streamline infrastructural operations, reduce manual intervention, and accelerate time-to-market, making it a revolutionizing tool for infrastructure automation in today’s dynamic tech landscape.
The Snowflake Data Warehouse is a great tool for storing your surplus data. However, at times, you need to accumulate data from multiple sources in your Snowflake Data Warehouse for further analysis. Building an in-house solution for this process could be an expensive and time-consuming task.
Hevo Data, on the other hand, offers a no-code data pipeline that can automate your data transfer process, allowing you to focus on other aspects of your business, such as analytics, customer management, etc. This platform allows you to transfer data from various sources to Cloud-based Data Warehouses like Snowflake, Google BigQuery, Amazon Redshift, etc. Sign up for Hevo’s 14-day free trial and experience seamless data migration.
Frequently Asked Questions (FAQs)
1. Is Terraform an AWS Tool?
Terraform is similar to AWS CloudFormation, which manages your AWS infrastructure.
2. What is Terraform vs Kubernetes?
Terraform is an infrastructure-as-code tool for managing your infrastructure, whereas Kubernetes is a container orchestration platform for automating deployment.
3. What language is Terraform?
Terraform uses a configuration language called HarshiCorp Configuration Language or JSON optionally.
4. Why is Terraform used in DevOps?
Terraform is used in DevOps because it lets you update or change your infrastructure securely.

Share it with your connections.
-
 Share To X
-
 Share To LinkedIn
-
 Share To Facebook
-
 Copy Link


