If you’re looking for DynamoDB Snowflake migration, you’ve come to the right place. Initially, the article provides an overview of the two Database environments while briefly touching on a few of their nuances. Later on, it dives deep into what it takes to implement a solution on your own if you are to attempt the ETL process of setting up and managing a Data Pipeline that moves data from DynamoDB to Snowflake.
The article wraps up by pointing out some of the challenges associated with developing a custom ETL solution for loading data from DynamoDB to Snowflake and why it might be worth the investment in having an ETL Cloud service provider, Hevo, implement and manage such a Data Pipeline for you.
Table of Contents
Overview of DynamoDB and Snowflake
DynamoDB is a fully managed, NoSQL Database that stores data in the form of key-value pairs as well as documents. It is part of Amazon’s Data Warehousing suite of services called Amazon Web Services (AWS). DynamoDB is known for its super-fast data processing capabilities that boast the ability to process more than 20 million requests per second. In terms of backup management for Database tables, it has the option for On-Demand Backups, in addition to Periodic or Continuous Backups.
Method 1: Using Custom ETL Scripts to Connect DynamoDB to Snowflake
Manually connect DynamoDB to Snowflake using custom ETL scripts. This method offers greater customization but requires programming skills and manual setup.
Method 1: Using HevoData to Connect DynamoDB to Snowflake
Effortlessly integrate DynamoDB data with Snowflake using Hevo’s no-code platform. Enjoy seamless data transfer, real-time synchronization, and flexible transformations without any coding required.
Snowflake is a fully managed, Cloud Data Warehousing solution available to customers in the form of Software-as-a-Service (SaaS) or Database-as-a-Service (DaaS). Snowflake follows the standard ANSI SQL protocol that supports fully Structured as well as Semi-Structured data like JSON, Parquet, XML, etc. It is highly scalable in terms of the number of users and computing power while offering pricing at per-second levels of resource usage.
Method 1: Moving Data from DynamoDB to Snowflake using Custom ETL
In this section, you understand the steps to create a Custom Data Pipeline to load data from DynamoDB to Snowflake.
A Data Pipeline that enables the flow of data from DynamoDB to Snowflake can be characterized through the following steps –
- Step 1.1: Set Up Amazon S3 to Receive Data from DynamoDB
- Step 1.2: Export Data from DynamoDB to Amazon S3
- Step 1.3: Copy Data from Amazon S3 to Snowflake Tables
Step 1.1: Set Up Amazon S3 to Receive Data from DynamoDB
Amazon S3 is a fully managed Cloud file storage, also part of AWS used to export to and import files from, for a variety of purposes. In this use case, S3 is required to temporarily store the data files coming out of DynamoDB before they are loaded into Snowflake tables. To store a data file on S3, one has to create an S3 bucket first. Buckets are placeholders for all objects that are to be stored on Amazon S3. Using the AWS command-line interface, the following is an example command that can be used to create an S3 bucket:
$aws s3api create-bucket --bucket dyn-sfl-bucket --region us-east-1Name of the bucket – dyn-sfl-bucket
It is not necessary to create folders in a bucket before copying files over, however, it is a commonly adopted practice, as one bucket can hold a variety of information and folders help with better organization and reduce clutter. The following command can be used to create folders –
aws s3api put-object --bucket dyn-sfl-bucket --key dynsfl/Folder name – dynsfl
Step 1.2: Export Data from DynamoDB to Amazon S3
Once an S3 bucket has been created with the appropriate permissions, you can now proceed to export data from DynamoDB. First, let’s look at an example of exporting a single DynamoDB table onto S3. It is a fairly quick process, as follows:
- First, you export the table data into a CSV file as shown below.
aws dynamodb scan --table-name YOURTABLE --output text > outputfile.txtThe above command would produce a tab-separated output file which can then be easily converted to a CSV file.
- Later, this CSV file (testhevo.csv, let’s say) could then be uploaded to the previously created S3 bucket using the following command:
$aws s3 cp testhevo.csv s3://dyn-sfl-bucket/dynsfl/ In reality, however, one would need to export tens of tables, sequentially or parallelly, in a repetitive fashion at fixed intervals (ex: once in a 24 hour period). For this, Amazon provides an option to create Data Pipelines. Here is an outline of the steps involved in facilitating data movement from DynamoDB to S3 using a Data Pipeline:
- Create and validate the Pipeline. The following command can be used to create a Data Pipeline:
$aws datapipeline create-pipeline --name dyn-sfl-pipeline --unique-id token { "pipelineId": "ex-pipeline111" }- The next step is to upload and validate the Pipeline using a pre-created Pipeline file in JSON format
$aws datapipeline put-pipeline-definition --pipeline-id ex-pipeline111 --pipeline-definition file://dyn-sfl-pipe-definition.json- Activate the Pipeline. Once the above step is completed with no validation errors, this pipeline can be activated using the following –
$aws datapipeline activate-pipeline --pipeline-id ex-pipeline111- Monitor the Pipeline run and verify the data export. The following command shows the execution status:
$aws datapipeline list-runs --pipeline-id ex-pipeline111- Once the ‘Status Ended’ section indicates completion of the execution, go over to the S3 bucket s3://dyn-sfl-bucket/dynsfl/ and check to see if the required export files are available.
Defining the Pipeline file dyn-sfl-pipe-definition.json can be quite time consuming as there are many things to be defined. Here is a sample file indicating some of the objects and parameters that are to be defined:
{
  "objects": [
    {
      "myComment": "Write a comment here to describe what this section is for and how things are defined",
      "id": "dyn-to-sfl",
      "failureAndRerunMode": "cascade",
      "resourceRole": "DataPipelineDefaultResourceRole",
      "role": "DataPipelineDefaultRole",
      "pipelineLogUri": "s3://",
      "schedule": {
        "ref": "DefaultSchedule"
      },
      "scheduleType": "cron",
      "name": "Default",
      "id": "Default"
    },
    {
      "type": "Schedule",
      "id": "dyn-to-sfl",
      "startDateTime": "2019-06-10T03:00:01",
      "occurrences": "1",
      "period": "24 hours",
      "maxActiveInstances": "1"
    }
  ],
  "parameters": [
    {
      "description": "S3 Output Location",
      "id": "DynSflS3Loc",
      "type": "AWS::S3::ObjectKey"
    },
    {
      "description": "Table Name",
      "id": "hevo_dynamo",
      "type": "String"
    }
  ]
}
As you can see in the above file definition, it is possible to set the scheduling parameters for the Pipeline execution. In this case, the start date and time are set to June 1st, 2019 early morning and the execution frequency is set to once a day.
Step 1.3: Copy Data from Amazon S3 to Snowflake Tables
Once the DynamoDB export files are available on S3, they can be copied over to the appropriate Snowflake tables using a ‘COPY INTO’ command that looks similar to a copy command used in a command prompt. It has a ‘source’, a ‘destination’ and a set of parameters to further define the specific copy operation. A couple of ways to use the COPY command are as follows:
File format
copy into hevo_sfl
from s3://dyn-sfl-bucket/dynsfl/testhevo.csv
credentials=(aws_key_id='ABC123' aws_secret_key='XYZabc)
file_format = (type = csv field_delimiter = ',');
Pattern Matching
copy into hevo_sfl
from s3://dyn-sfl-bucket/dynsfl/
credentials=(aws_key_id='ABC123' aws_secret_key=''XYZabc)
pattern='*hevo*.csv';
Just like before, the above is an example of how to use individual COPY commands for quick Ad Hoc Data Migration, however, in reality, this process will be automated and has to be scalable. In that regard, Snowflake provides an option to automatically detect and ingest staged files when they become available in the S3 buckets. This feature is called Automatic Data Loading using Snowpipe.
Here are the main features of a Snowpipe:
- Snowpipe can be set up in a few different ways to look for newly staged files and load them based on a pre-defined COPY command. An example here is to create a Simple-Queue-Service notification that can trigger the Snowpipe data load.
- In the case of multiple files, Snowpipe appends these files into a loading queue. Generally, the older files are loaded first, however, this is not guaranteed to happen.
- Snowpipe keeps a log of all the S3 files that have already been loaded – this helps it identify a duplicate data load and ignore such a load when it is attempted.
Hurray!! You have successfully loaded data from DynamoDB to Snowflake using Custom ETL Data Pipeline.
Challenges of Moving Data from DynamoDB to Snowflake using Custom ETL
Now that you have an idea of what goes into developing a Custom ETL Pipeline to move DynamoDB data to Snowflake, it should be quite apparent that this is not a trivial task.
To further expand on that, here are a few things that highlight the intricacies and complexities of building and maintaining such a Data Pipeline:
- DynamoDB export is a heavily involved process, not least because of having to work with JSON files. Also, when it comes to regular operations and maintenance, the Data Pipeline should be robust enough to handle different types of data errors.
- Additional mechanisms need to be put in place to handle incremental data changes from DynamoDB to S3, as running full loads every time is very inefficient.
- Most of this process should be automated so that real-time data is available as soon as possible for analysis. Setting everything up with high confidence in the consistency and reliability of such a Data Pipeline can be a huge undertaking.
- Once everything is set up, the next thing a growing data infrastructure is going to face is scaling. Depending on the growth, things can scale up really quickly and if the existing mechanisms are not built to handle this scale, it can become a problem.
Method 2: Using Hevo Data to Load Data from DynamoDB to Snowflake
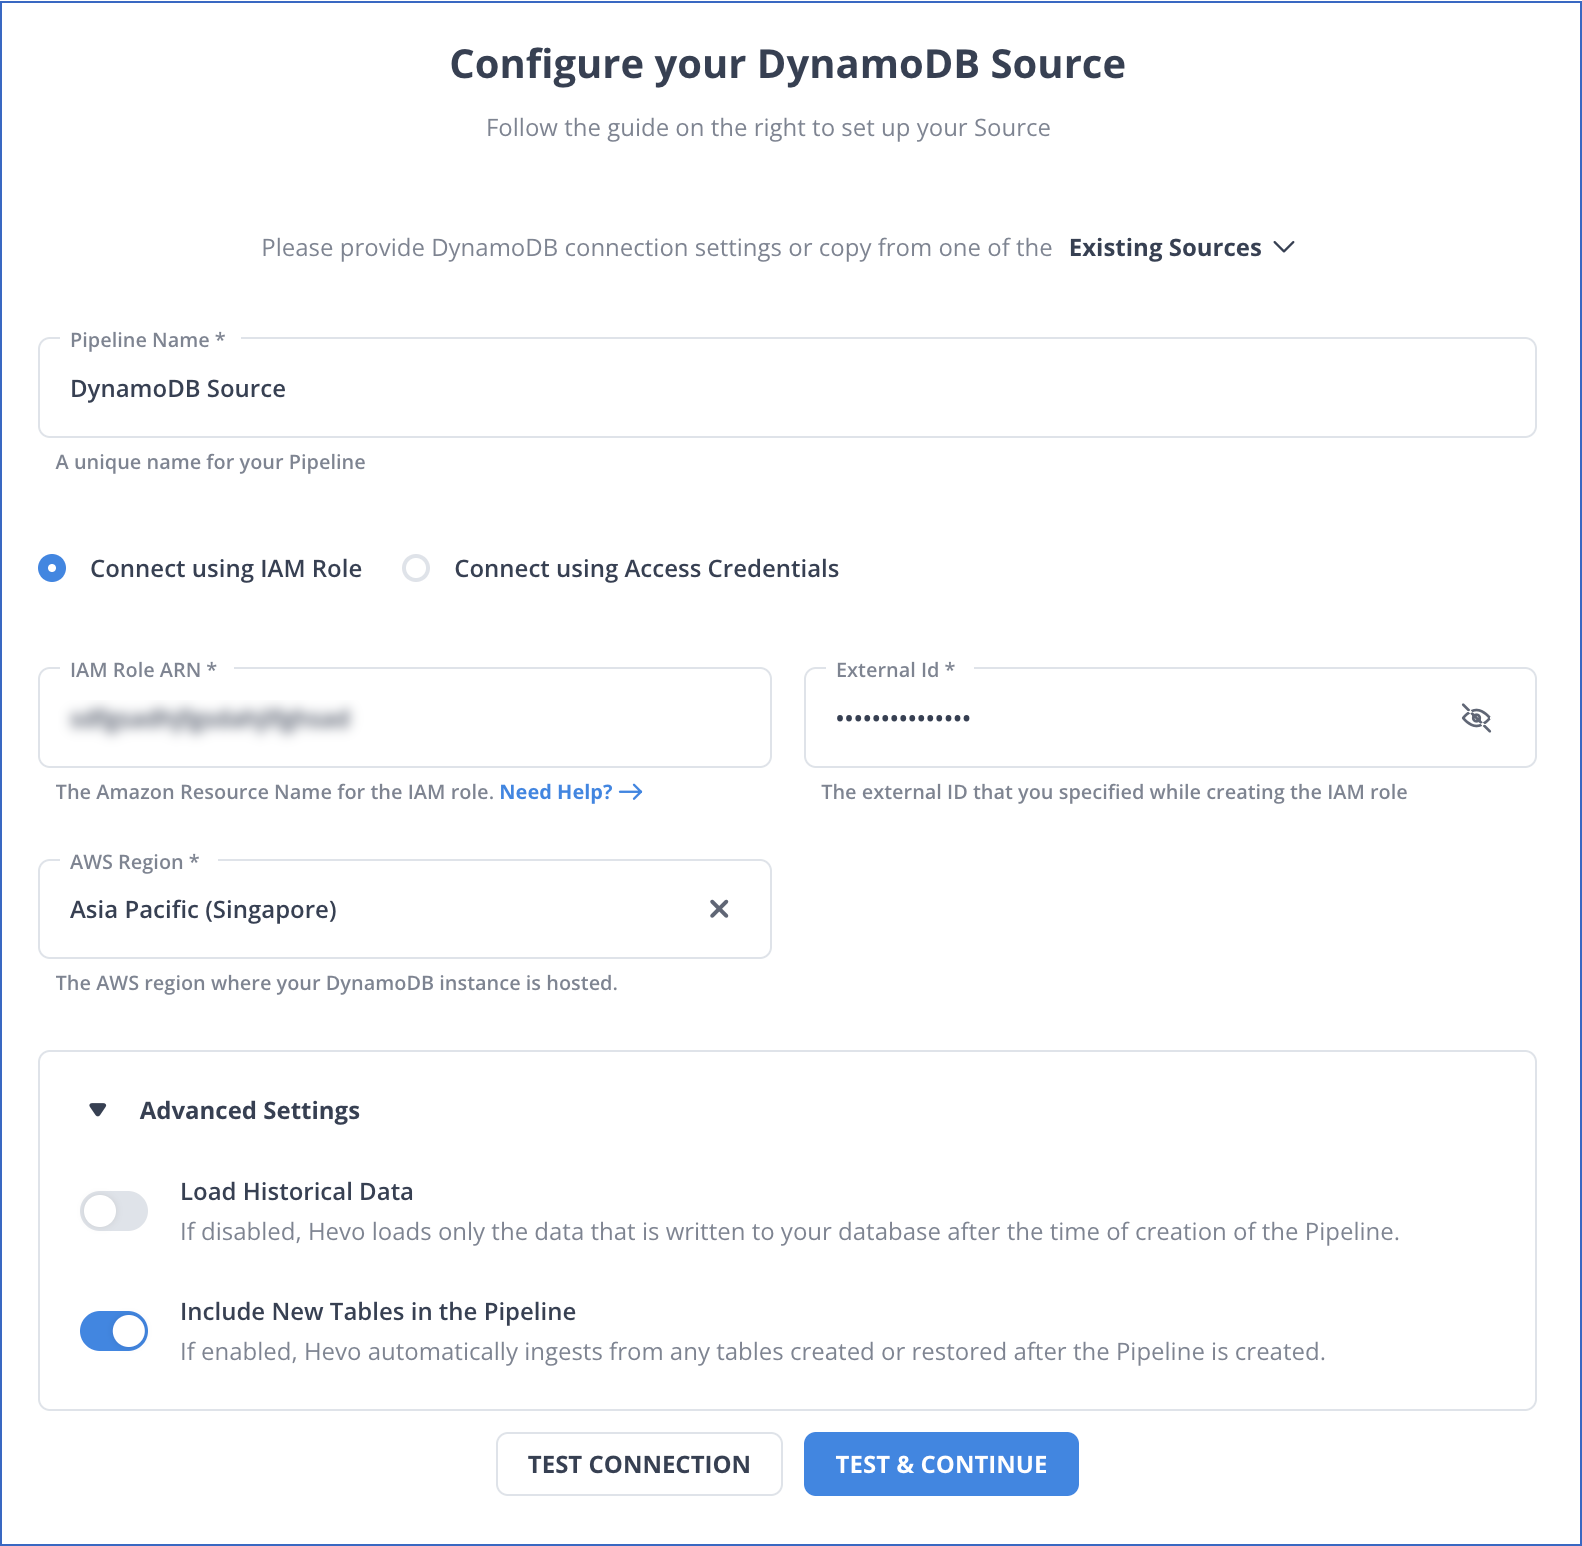
Step 2.1: Configure DynamoDB as your Source

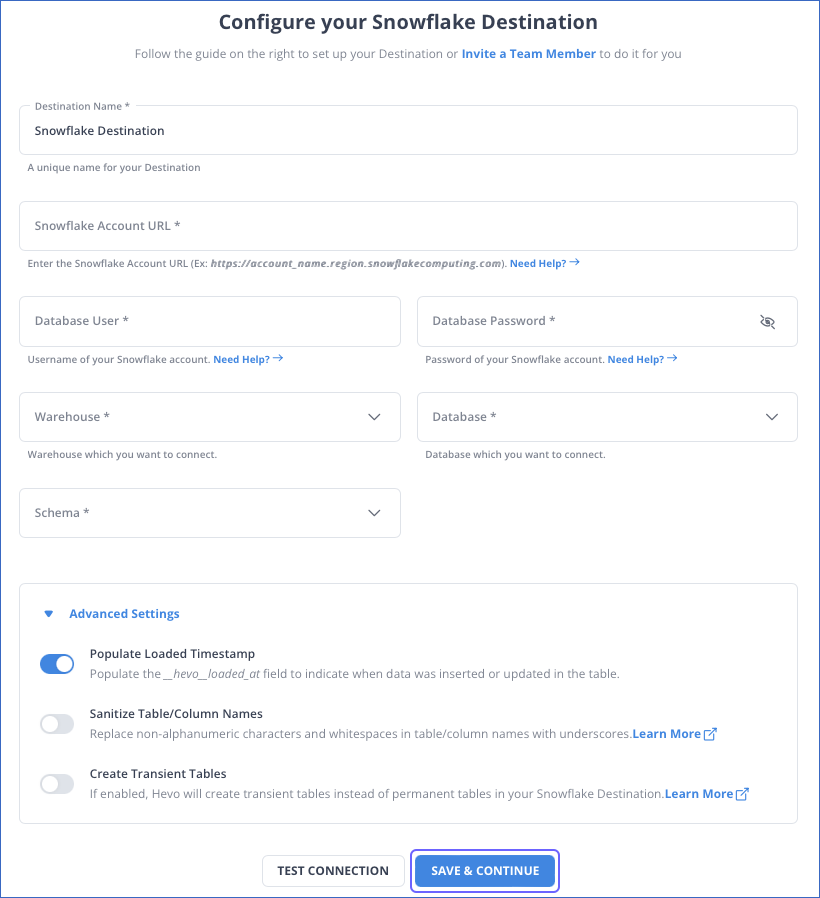
Step 2.2: Configure Snowflake as your Destination

Hevo will now move your data from DynamoDB to Snowflake in a consistent, secure, and reliable fashion. In addition to DynamoDB, Hevo can load data from a multitude of other data sources including Databases, Cloud Applications, SDKs, and more. This allows you to scale up on demand and start moving data from all the applications important for your business.
Significant Features of Hevo
- Transformation: Hevo provides a drag-and-drop transformation feature, a user-friendly method of performing simple data transformations. Alternatively, you can use the Python interface for specific data transformations.
- Fully Managed Service & Live Support: Hevo manages the entire ETL process, from data extraction to loading, ensuring flawless execution. Additionally, Hevo provides round-the-clock support for your data integration queries via email, call, or live chat.
- Pre-Built Connectors: Hevo offers 150+ pre-built connectors for various data sources, enabling you to establish an ETL pipeline quickly.
- Live Monitoring: Hevo provides live monitoring support, allowing you to check the data flow at any point in time. You can also receive instant notifications about your data transfer pipelines across devices.
Conclusion
In conclusion, this article offers a step-by-step description of creating Custom Data Pipelines to move data from DynamoDB to Snowflake. It highlights the challenges a Custom ETL solution brings along with it. In a real-life scenario, this would typically mean allocating a good number of human resources for both the development and maintenance of such Data Pipelines to ensure consistent, day-to-day operations. Knowing that it might be worth exploring and investing in a reliable cloud ETL service provider, Hevo offers comprehensive solutions to use cases such as this one and many more.
Sign up for a 14-day free trial and simplify your data integration process. Check out the pricing details to understand which plan fulfills all your business needs.
Frequently Asked Questions (FAQs)
Q1) How do I replicate DynamoDB to Snowflake?
You can use Hevo, a no-code data pipeline, to quickly replicate data from DynamoDB to Snowflake. Hevo handles the process automatically, ensuring data flows smoothly and stays updated in Snowflake.
Q2) How do I connect Snowflake to DynamoDB?
You can connect Snowflake to DynamoDB by exporting data to an intermediary like Amazon S3, and then importing it into Snowflake using the Snowflake COPY command.
Q3) How do I migrate a database to Snowflake?
To migrate a database to Snowflake, you can export data from your source, transform it to match Snowflake’s format, and load it using tools like Snowflake’s data loading features or third-party ETL platforms.


