


 KEY TAKEAWAY
Choosing SQL Server Data Tools (SSDT) in 2025 provides developers and DBAs with a unified, version-controlled environment for designing, validating, and deploying SQL Server databases directly within Visual Studio. Here are the top 5 SQL Server Data Tools Alternatives:
- DbForge Studio for SQL Server: Intuitive UI, schema comparison, and strong refactoring tools.
- PopSQL: Web-based collaborative SQL editor with visualization and dashboards.
- DbVisualizer: Universal database tool with cross-platform management and ER diagramming.
- Valentina Studio: Multi-database support with an integrated report builder.
- Aqua Data Studio: Advanced data modeling, version control, and statistical analytics features
A client tool is required for any SQL Server DBA, Developer, or end-user to connect to SQL Server and utilize its functionalities. This is where SQL Server Data Tools (SSDT) helps you. You can leverage SSDT to create database projects in Visual Studio.
Read this article to know more about Microsoft SQL Server Data Tools and their amazing features. You will also understand the need for SSDT. In addition, you will understand the detailed steps to set up SQL Server Data Tools to make your workflows easy.
Hevo is a powerful data integration platform that simplifies the process of moving data across your ecosystem. With 150+ plug-and-play integrations, Hevo streamlines your data workflows without the need for coding.
Get Effortless Data Streaming, Customizable Pipelines, and Sacalable Performance. Explore our ratings on Capterra and G2.
Move your SQL Server Data for FreeTable of Contents
Steps to Set Up SQL Server Data Tools
Now that you have understood the significance of SQL Server Data Tools, let’s explore the key steps involved to work with SQL Server Data Tools. Follow the detailed steps below to leverage SSDT in your use case:
Step 1: Install SQL Server Data Tools
While installing SSDT, you need to select the important features. In case you already have it installed in you system, check that the required features are available.
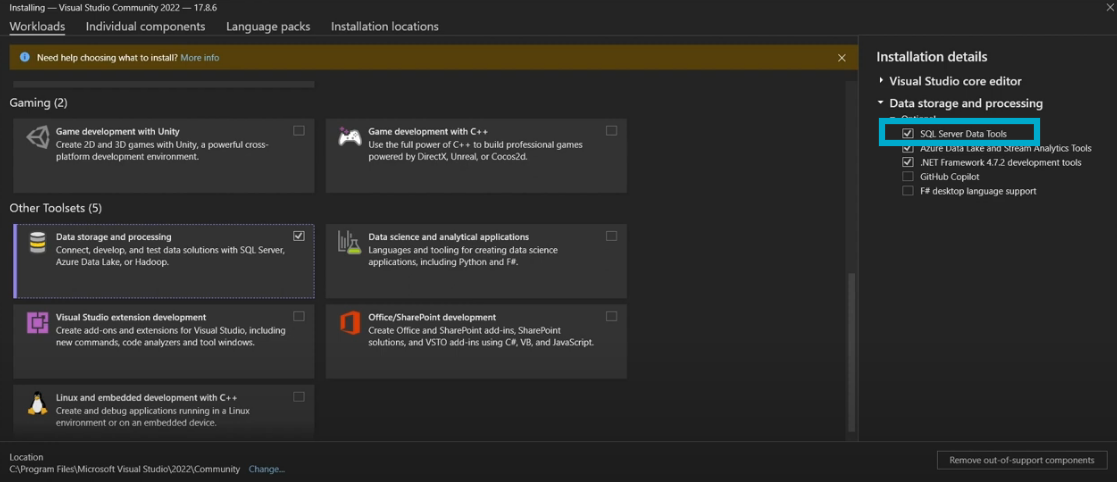
You can check the box next to SQL Server Data Tools.
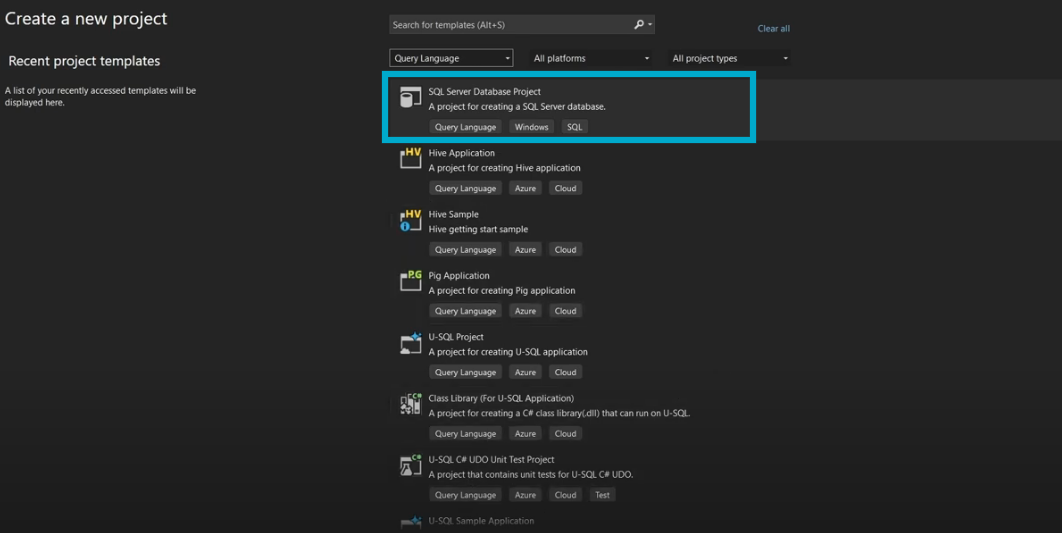
Step 2: Create SQL Server Data Tools Project
The SQL Server project makes it possible to create an SQL Server database in an integrated environment that includes typical Visual Studio capabilities like code navigation, validation, and debugging that developers are used to.
Step 2.1: After the SSDT installation is complete, go to the Start menu and choose Microsoft SQL Server Data Tools 2012.
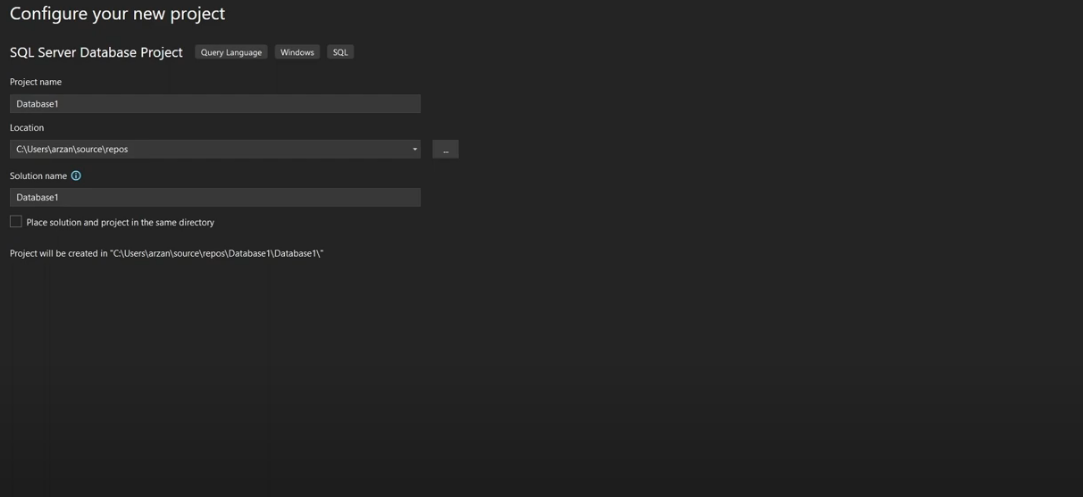
Step 2.2: Open the SQL Server Data Tools and choose File→ New → Project. Next, fill in the project name and location as shown below.
Step 2.3: By right-clicking on the project in the Solution Explorer and selecting Import, you can import the schema from an existing database.
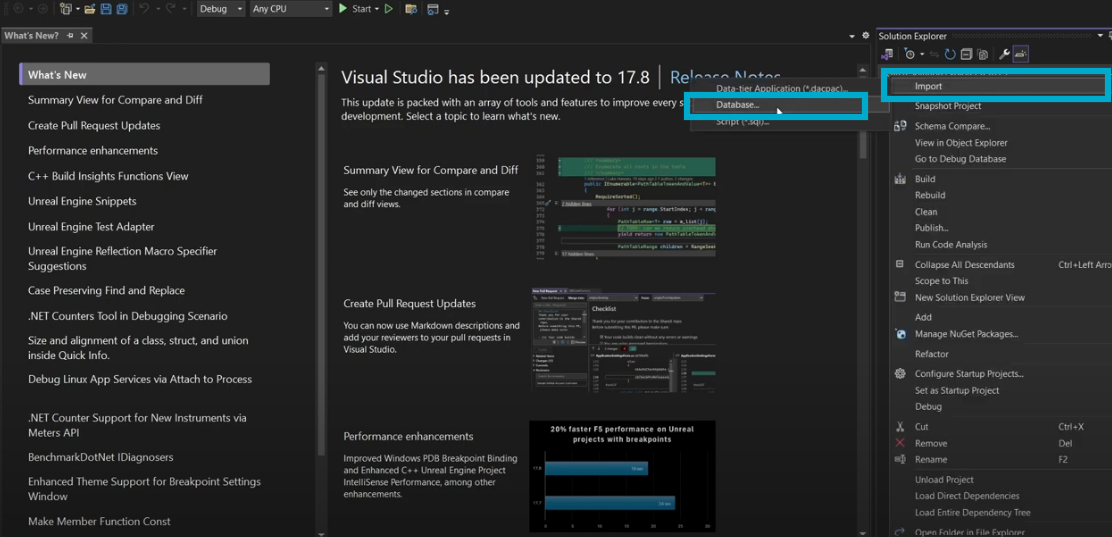
Step 2.4: Click on Start once you are done.
Step 3: Publish the Project with the SQL Server Data Tools
You can use Publish to publish your database project to SQL Server 2005, 2008, 2008 R2, 2012, or SQL Azure.
Step 3.1: To publish a project, right-click it in the Solution Explorer and choose to Publish; then fill in the fields as shown below.
You have now learned the detailed steps to install, configure, create, and publish your SQL Data Server Tool Projects.

Great Work! You have learned the detailed steps to install, configure, create and publish your SQL Data Server Tool Projects.
Also, check out the 10 Best Microsoft SQL Server ETL Tools.
Some Alternatives to SQL Server Data Tools
Now that you know how to install, configure, and set up SSDT, it can be a complex process. I have listed down 5 SQL Server Data Tools alternatives that you can use for seamless database development.
1. DbForge Studio for SQL Server
DbForge Studio for SQL Server is a fully-fledged development environment. It offers comprehensive tools for database design, management, and query development with advanced schema and data comparison, database refactoring, and robust query editing in an easy-to-use interface.
Key Features
- Query Building and Execution: It has an advanced query editor with syntax highlighting, code completion, and excellent execution capabilities.
- Database Refactoring: It has built-in refactoring capabilities to rename objects, change data types, and restructure database schema.
Pricing
You can request a demo and also buy their plans. It offers three main pricing plans:
- Standard
- Professional
- Enterprise
To know the exact prices, you can visit DbForge Studio’s pricing page.
Advantages over SSDT
- It has a more intuitive and user-friendly interface, as compared to SSDT, which makes it easy to use for some users.
- While DbForge Studio for SQL Server allows integrated database design, query building, and data management in a single tool, SSDT typically requires integration with other tools for handling data, which can be expensive.
Cons
- It is primarily focused on SQL Server and, therefore, might not work in environments using multiple database platforms.
- While this tool comes with a very feature-rich set, there might be a steeper learning curve for users who are new to it.
2. PopSQL

PopSQL is a collaborative SQL editor that makes it easy for you to create, share, and visualize SQL queries using a simple interface. It integrates with a bunch of databases and provides features to drive collaborative analysis and reporting.
Key Features
- Collaborative SQL Editor: You can collaborate in real-time on SQL queries with your teammates.
- Multi-Database Support: It can connect to a variety of databases, including SQL Server, MySQL, and PostgreSQL, among others.
- Visual Query Building: It consists of tools that can visualize the result of your queries by creating information-centric, interactive dashboards.
Pricing
The pricing structure is divided into 4 plans, that are:
- Free
- Premium
- Business
- Enterprise
Read more about PopSql’s pricing plans.
Advantages over SSDT
Let us discuss the major advantages of PopSQL that make it better than SSDT.
- It allows several users to edit SQL statements at the same time; it is one of the features that SSDT does not support.
- It offers a modern, web-based interface with visualization of query building and dashboards, that provides a better user experience as compared to SSDT.
Cons
- Since it is a web-based tool, it can face performance and connectivity issues.
- It may lack some advanced features like schema comparison and database refactoring.
3. DbVizualizer
DbVisualizer is a universal database tool that provides a complete user interface environment for database management, querying, and visualization across a variety of database platforms. It supports most of the databases available and provides comprehensive tools for data analysis and management.
Key Features
- Database Management Tools: It offers schema management, backup, and monitoring tools to evaluate the performance of databases.
- ER Diagrams: It generates entity-relationship diagrams automatically to visualize database schema for your better understanding.
- SQL Editor: It consists of a full-featured SQL editor that supports code completion, syntax highlighting, and execution capabilities.
Pricing
It offers three main pricing plans:
- Free
- Pro – Full Feature Set + 60 Days Support
- Pro – Full Feature Set + Premium Support
For more details, you can check out DbVizualizer’s pricing plans.
Advantages over SSDT
- It supports a wide range of databases and is not only oriented to SQL Server like SSDT.
- It facilitates advanced data visualization and ER diagram capabilities, whereas SSDT has only basic visualization tools.
Cons
- Since it contains an extensive feature set, this may result in a steep learning curve as compared to other tools.
- It can be expensive in terms of its subscription fees as compared to others.
4. Valentina Studio

Valentina Studio is one of the multi-database management tools that allows advanced designing, querying, and managing in various database platforms. It provides users with a single interface for all types of database work, from SQL Server to MySQL, PostgreSQL, and many more.
Key Features
- Report Builder: It provides an inbuilt report builder to create and design reports right within the application.
- Data Management: It provides tools for importing, exporting, and managing data and also allows one to make database backups and restores.
- Database Design Tools: It provides features related to designing a schema, making ER diagrams, and modeling databases.
Pricing
It has three pricing plans that are:
- Free
- Valentina Studio Single
- Valentina Studio Pro Universal
You can visit their pricing page to learn more about the associated costs.
Advantages over SSDT
- It provides advanced schema synchronization tools for greater database platform support in an environment with multiple types of databases.
- It comes with an in-built report designer that can be used to fabricate custom reports right inside the tool, which is more integrated than SSDT.
Cons
- It might integrate less seamlessly with DevOps and contemporary CI/CD tools than SSDT, which is tightly integrated within Visual Studio and the development ecosystem of Microsoft.
- It has very few community resources, tutorials and third party extensions available.
5. Aqua Data Studio
Aqua Data Studio is a fully integrated database administration and development tool that supports a variety of databases while providing advanced features in areas such as querying, modeling, and managing data. It facilitates a unified environment in which database administrators and developers can operate across multi-platforms.
Key Features
- Version Control Integration: It integrates with source systems to provide version control for database scripts and changes.
- Customizable User Interface: You can customize the workspace and toolbars according to your preferences with different layouts as desired, which will result in increased workflow efficiency.
- Integrated ER Diagram Editor: It supports interactive Entity-Relationship diagram creation and editing, for generating schema updates.
Pricing
The pricing structure of Aqua Data consists of:
- A 14 Day Free Trial
- Standard
- Ultimate
Visit the pricing page of Aqua Data to know more about the subscription fees.
Advantages over SSDT
Let us discuss some of the key advantages that make Aqua Data Studio better than SSDT.
- It keeps a history of executed queries and changes made to a database, allowing you to review it and track past work.
- It provides advanced functionalities in data profiling, exploration, and statistical analytics to help you develop a better understanding of data quality and the underlying patterns hidden.
Cons
- The costs associated with the Pro and Enterprise versions can be relatively high as compared to other tools.
- The initial setup and configuration can be complex.
What is Microsoft SQL Server?

Microsoft SQL Server is a Relational Database Management System (RDBMS) used in corporate IT operations to serve a wide range of applications, including Transaction Processing, Business Intelligence, and Analytics. SQL Server, as the name implies, is built on top of SQL, a database management and search language used by database administrators and IT professionals.
Key Features
Let us discuss some of its key features.
- SQL Language Support: It uses T-SQL(Transaction SQL), which is an extension of SQL that includes features such as procedural programming and error handling to enhance query processing.
- Scalability and Performance: It provides in-memory processing for performance improvement of transaction-intensive workloads. It divides larger tables into smaller manageable pieces to improve performance.
- Disaster Recovery: It provides solutions for high availability and disaster recovery, backing them with auto-failover and read-only replicas. It also backs up, copies, and restores the transaction logs on a secondary server.
What are Microsoft SQL Server Data Tools?

Microsoft’s SQL Server Data Tools (SSDT) is a Visual Studio development solution for developing SQL Server relational databases. SSDT is a broader term that includes more than simply new database tools. It’s essentially a repackaging of the Business Intelligence Developer Studio (BIDS) product from Visual Studio 2008. In addition to the new database tools, SSDT supports the conventional BIDS project types for SQL Server Analysis Services (SSAS), Reporting Services (SSRS), and Integration Services (SSIS). As a result of SSDT, Microsoft has now consolidated all SQL Server database development experiences into a single Visual Studio edition.
The Need for SQL Server Data Tools
In this section, you will get a better understanding of what is the need of using SQL Server Data Tools.
- Efficient Database Development: It allows you to design, develop, and manage SQL Server databases within the same environment.
- Version Control and Collaboration: It enables integration with source control to track changes and collaborate with different team members.
- Automated Deployment: It generates deployment scripts and automates database changes, reducing manual intervention and, hence, the associated risk of errors.
Key Features of SQL Server Data Tools
Let us take a glance at some of the significant features of SSDT:
Generate XML Reports
It also supports Integration Services, Analysis Services, and Reporting Services, and generates XML reports of the changes via .dacpac files.
Declarative-Schema-Based Database Design
You can automate the management and deployment of different database versions without manual ALTER scripts. It can work in both connected and disconnected modes.
Reverse Engineer Databases
You can create new databases or import existing ones in order to modify the schema and import existing schemas into SSDT.
Schema and Data Comparison
You can compare and reconcile differences between database schemas and data and then develop T-SQL scripts to address these discrepancies.
Conclusion
In this article, you were introduced to Microsoft SQL Server and its promising SQL Server Data Tools. You understood the need for SQL Server Data Tools and its various features. Moreover, you learned the key steps to set up your SQL Server Data Tools. However, there can be some limitations to it such as its narrow focus on SQL Server, less advanced data visualization features, and limited cross-database support.
Finding the right SQL Server alternative involves evaluating your needs around scalability and ease of integration. Explore the various options to identify the best fit for your projects! For additional insights, visit SQL Server alternatives.
By exploring alternatives such as DbForge Studio, Valentina and many more, you can leverage a broader range of functionalities and better align your toolsets with your specific needs, whether you require multi-database support, advanced data management, or enhanced reporting capabilities. Each of these tools offers unique advantages that can complement or even surpass the capabilities of SSDT, helping you achieve greater efficiency and flexibility in their database management tasks.
FAQs about SSDT
What exactly are SQL Server Data Tools (SSDT)?
SSDT is Microsoft’s Visual Studio-based toolkit for SQL Server database development and BI projects (SSIS/SSAS/SSRS). It enables declarative, schema-first projects, so the database state is defined in code and compiled into deployable artifacts (e.g., .dacpac). You get design-time validation, refactoring, and drift detection before deployment. This reduces production surprises and speeds up consistent releases.
Why use SSDT instead of ad-hoc scripts in SQL Server?
Ad-hoc scripts are hard to version, test, and roll back at scale. SSDT centralizes schema, scripts, and references in a single project with diff-based publishing, improving repeatability and auditability. Teams gain source control history and automated build checks that catch errors before deployment. It’s a cleaner path to CI/CD and safer releases.
How does SSDT help with schema and data comparison?
Schema Compare highlights differences between project and target (or between two databases) and generates safe deployment scripts. Data Compare aligns lookup/reference data across environments. Together, they reduce manual SQL and prevent drift. You retain control via script review while still accelerating delivery.
What are practical alternatives to SQL Server Data Tools?
Tools like dbForge Studio, Aqua Data Studio, DbVisualizer, Valentina Studio, and PopSQL offer collaborative editing, data visualization, and multi-DB support. They can complement SSDT when you need richer ERDs, profiling, or cross-platform workflows. If your stack spans many engines, a universal tool may simplify daily operations. Keep SSDT for declarative deployments and use these for exploration and collaboration.

Share it with your connections.
-
 Share To X
-
 Share To LinkedIn
-
 Share To Facebook
-
 Copy Link


