


Unlock the full potential of your Segment data by integrating it seamlessly with Databricks. With Hevo’s automated pipeline, get data flowing effortlessly—watch our 1-minute demo below to see it in action!
So, you’re a Segment user, right? It’s always a delight to speak with someone who has streamlined their process of collecting and leveraging the data of their digital users. Focusing on having all the data about your customers in a unified repository is what makes you stand out of the crowd.
Segment provides a complete data toolkit of all the customer data. But, there would be times when this data needs to be integrated with that of other functional teams. That’s where you come in. You take the responsibility of replicating data from Segment to a centralized repository so that analysts and key stakeholders can make super-fast business-critical decisions.
We’ve prepared a simple and straightforward guide to help you replicate data from Segment to Databricks. Read the 2 simple methods to understand the replication process quickly.
Why spend time on manual data transfers? With Hevo’s easy, no-code pipeline, you can transfer data from Segment to Databricks in just a few clicks! With support for over 150 integrations, Hevo keeps your data continuously updated and ready for analysis.
Why Choose Hevo?
- Data Transformation: Smoothly load data with drag-and-drop transformations in the pipeline.
- Auto Schema Mapping: It automatically maps schemas for seamless data compatibility during migration.
- Models and Workflow: Hevo’s intelligent assistant helps make your data analysis-ready, providing full visibility over the process.
Discover why Databricks partnered with Hevo for seamless data integration!
Let Hevo take care of the hard work. Start your 14-day free trial now and enjoy effortless data migration!
Get Started with Hevo for FreeTable of Contents
Method 1: Replicate Data from Segment to Databricks Using Hevo
Step 1: Configure Segment as a Source
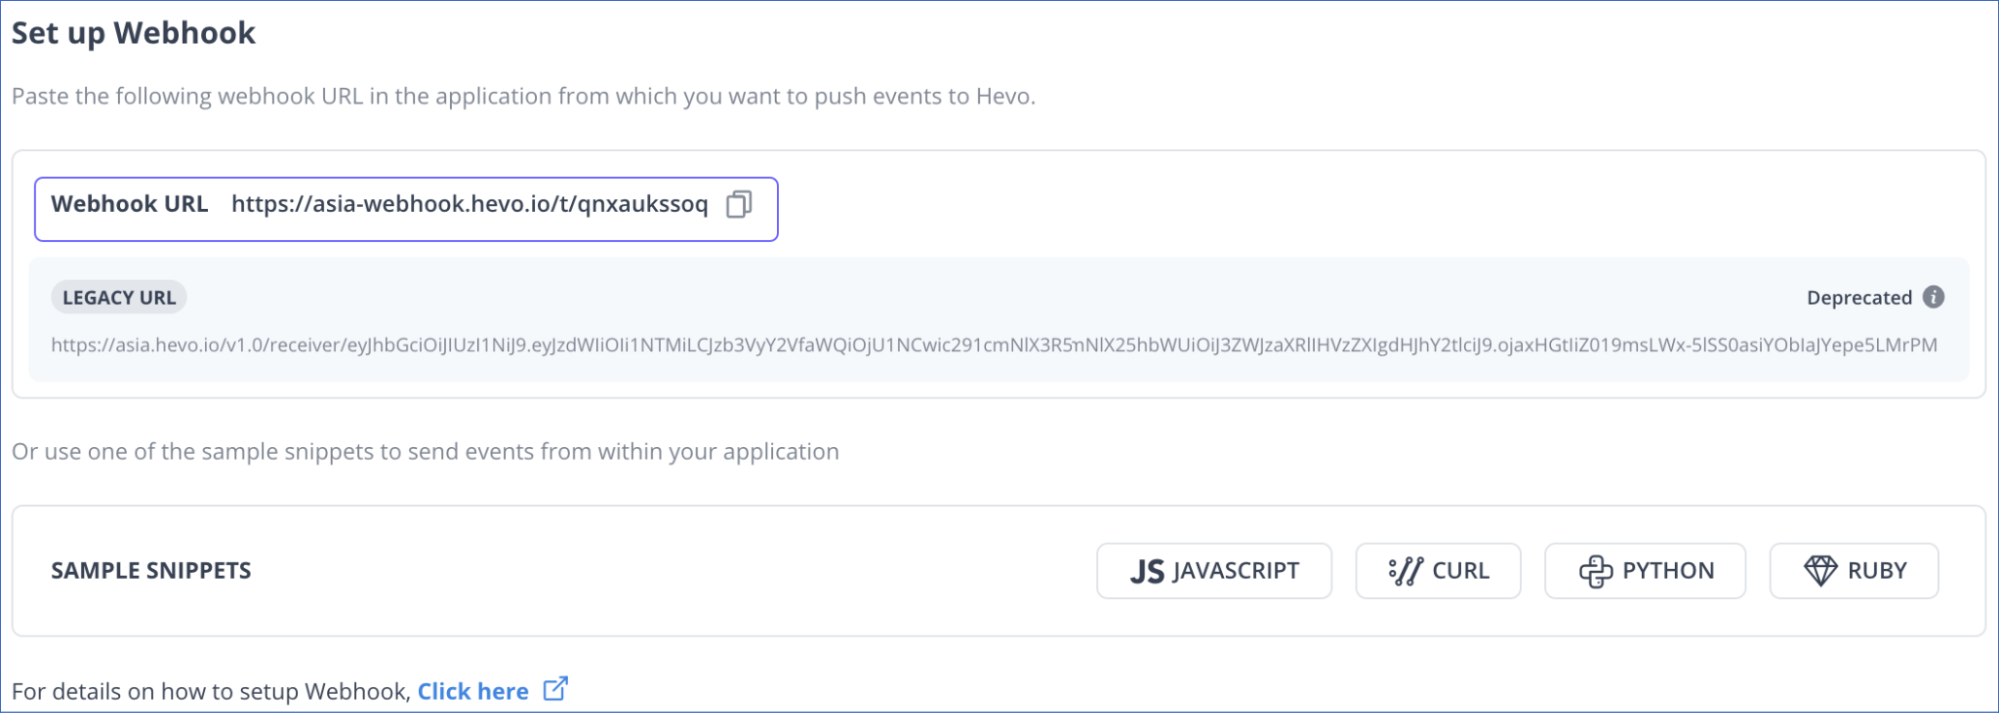
- Authenticate and configure your Segment Source. Hevo connects to Segment through Webhooks.
- Go to the “Set up Webhook” section of your pipeline. Now, copy the generated webhook URL and add it to your Segment account as a destination.
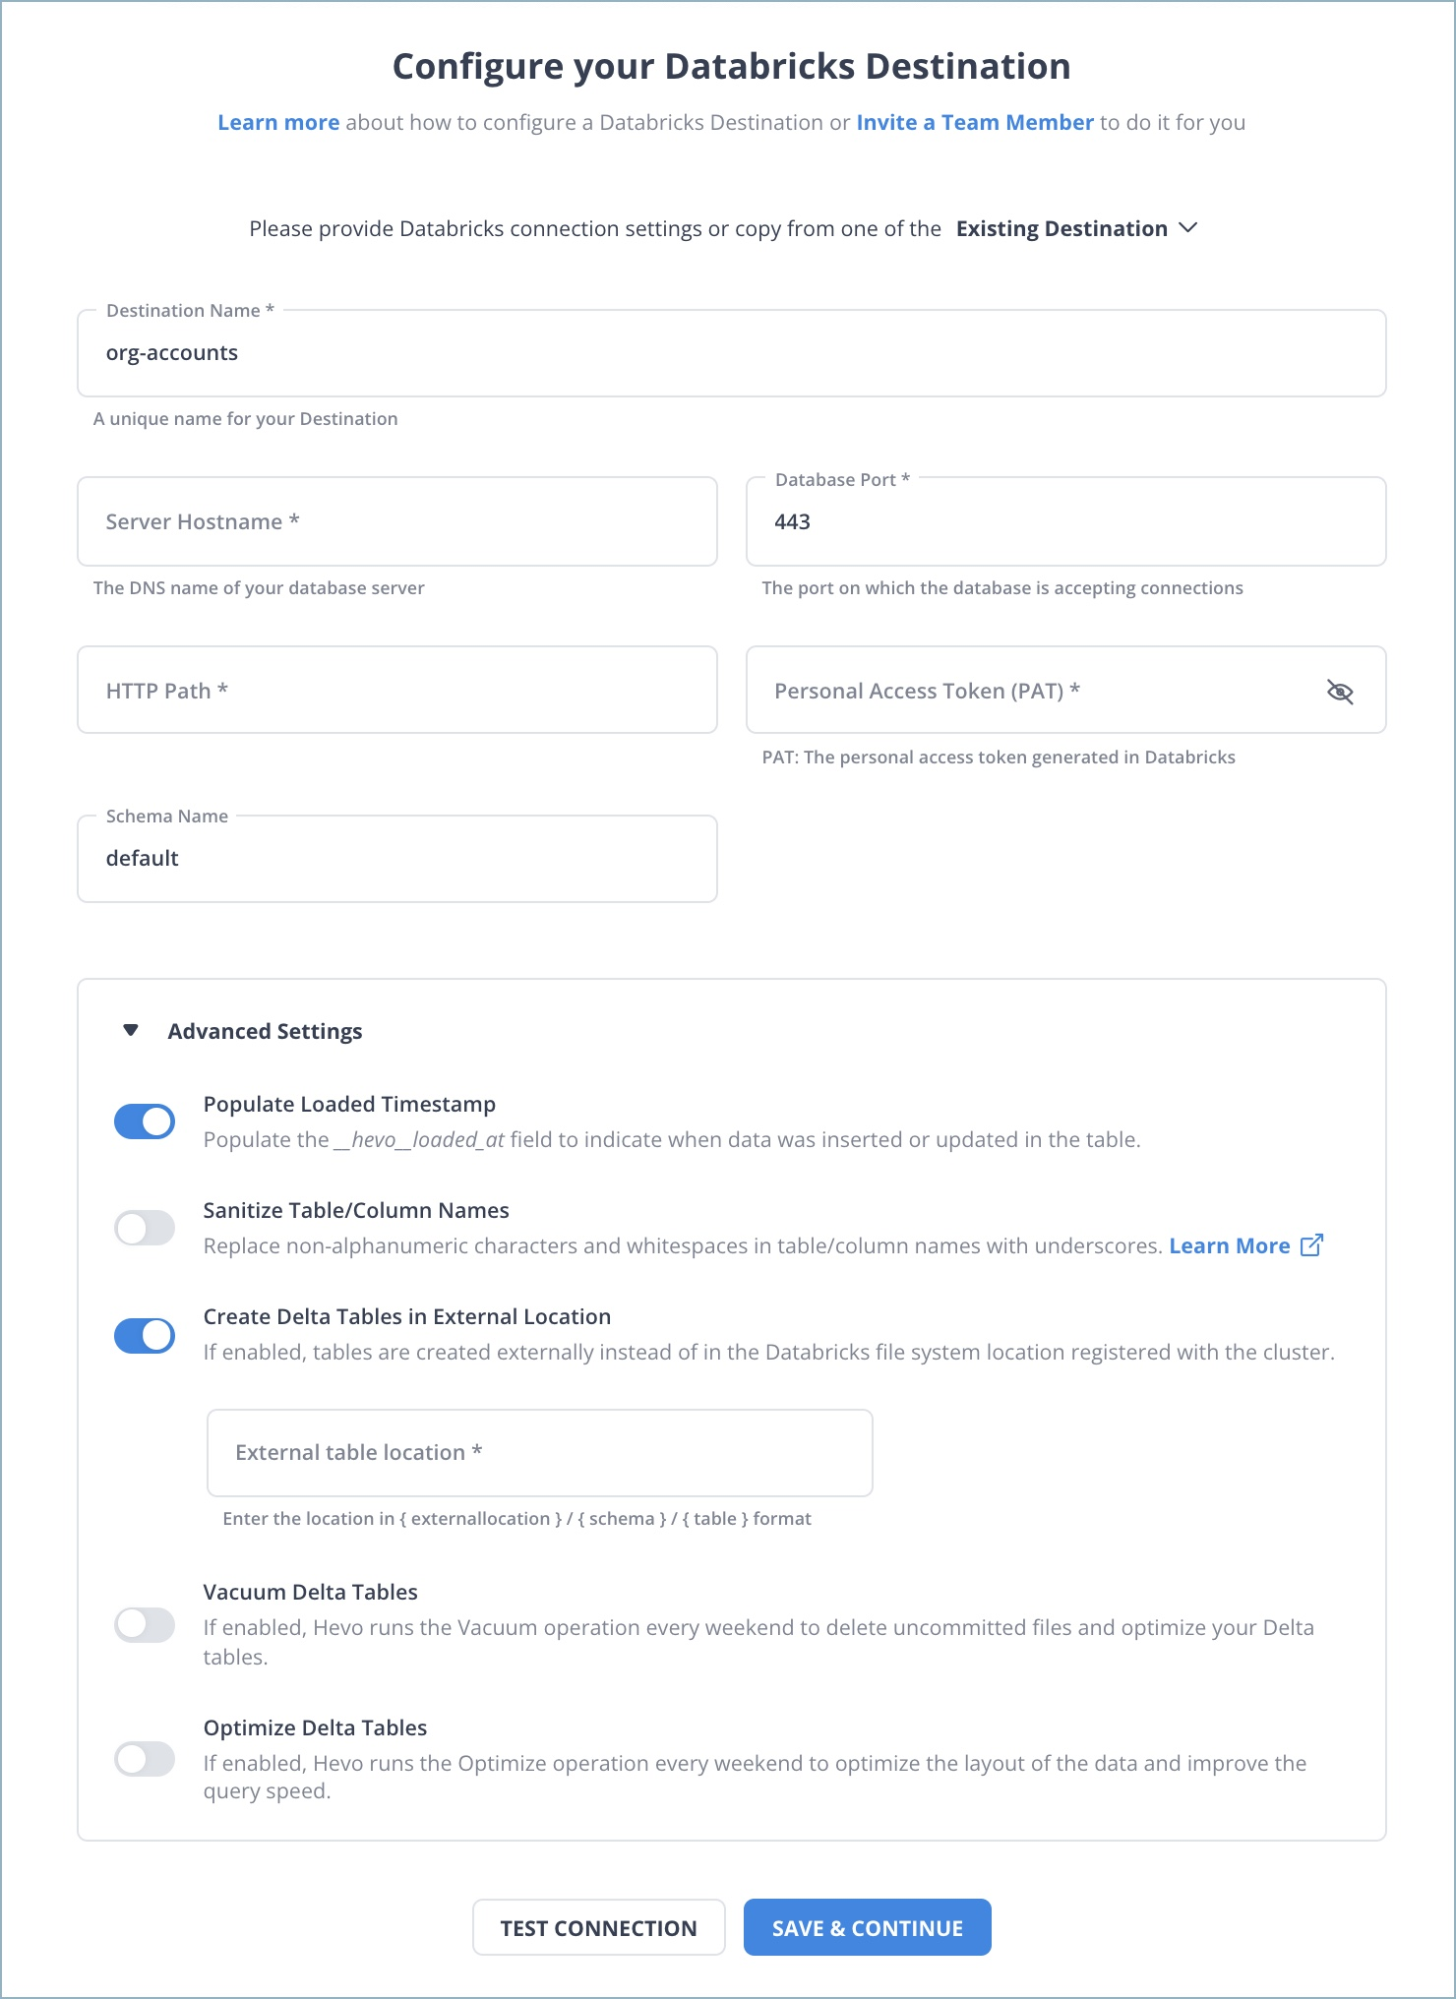
Step 2: Configure Databricks as a Destination
Choose Databricks as the destination and fill in the required details.
Once your Segment to Databricks ETL Pipeline is configured, Hevo will collect new and updated data from Segment and duplicate it into Databricks.
Why consider Hevo
- Reliability at Scale: With Hevo Data, you get a world-class fault-tolerant architecture that scales with zero data loss and low latency.
- Monitoring and Observability: Monitor pipeline health with intuitive dashboards that reveal every state of the pipeline and data flow. Bring real-time visibility into your ELT with Alerts and Activity Logs.
- Stay in Total Control: When automation isn’t enough, Hevo Data offers flexibility – data ingestion modes, ingestion, and load frequency, JSON parsing, destination workbench, custom schema management, and much more – for you to have total control.
- Auto-Schema Management: Correcting improper schema after the data is loaded into your warehouse is challenging. Hevo Data automatically maps the source schema with the destination warehouse so that you don’t face the pain of schema errors.
- 24×7 Customer Support: With Hevo Data, you get more than just a platform, you get a partner for your pipelines. Discover peace with round-the-clock “Live Chat” within the platform. Moreover, you get 24×7 support even during the 14-day full-feature free trial.
- Transparent Pricing: Say goodbye to complex and hidden pricing models. Hevo Data’s Transparent Pricing brings complete visibility to your ELT spending. Choose a plan based on your business needs. Stay in control with spend alerts and configurable credit limits for unforeseen spikes in the data flow.
Method 2: Replicate Data from Segment to Databricks Using REST APIs
Step 1: Export Data From Segment
- Log in to your workspace owner Segment account.
- Go to the Settings tab, then click on the “Access Management” option.
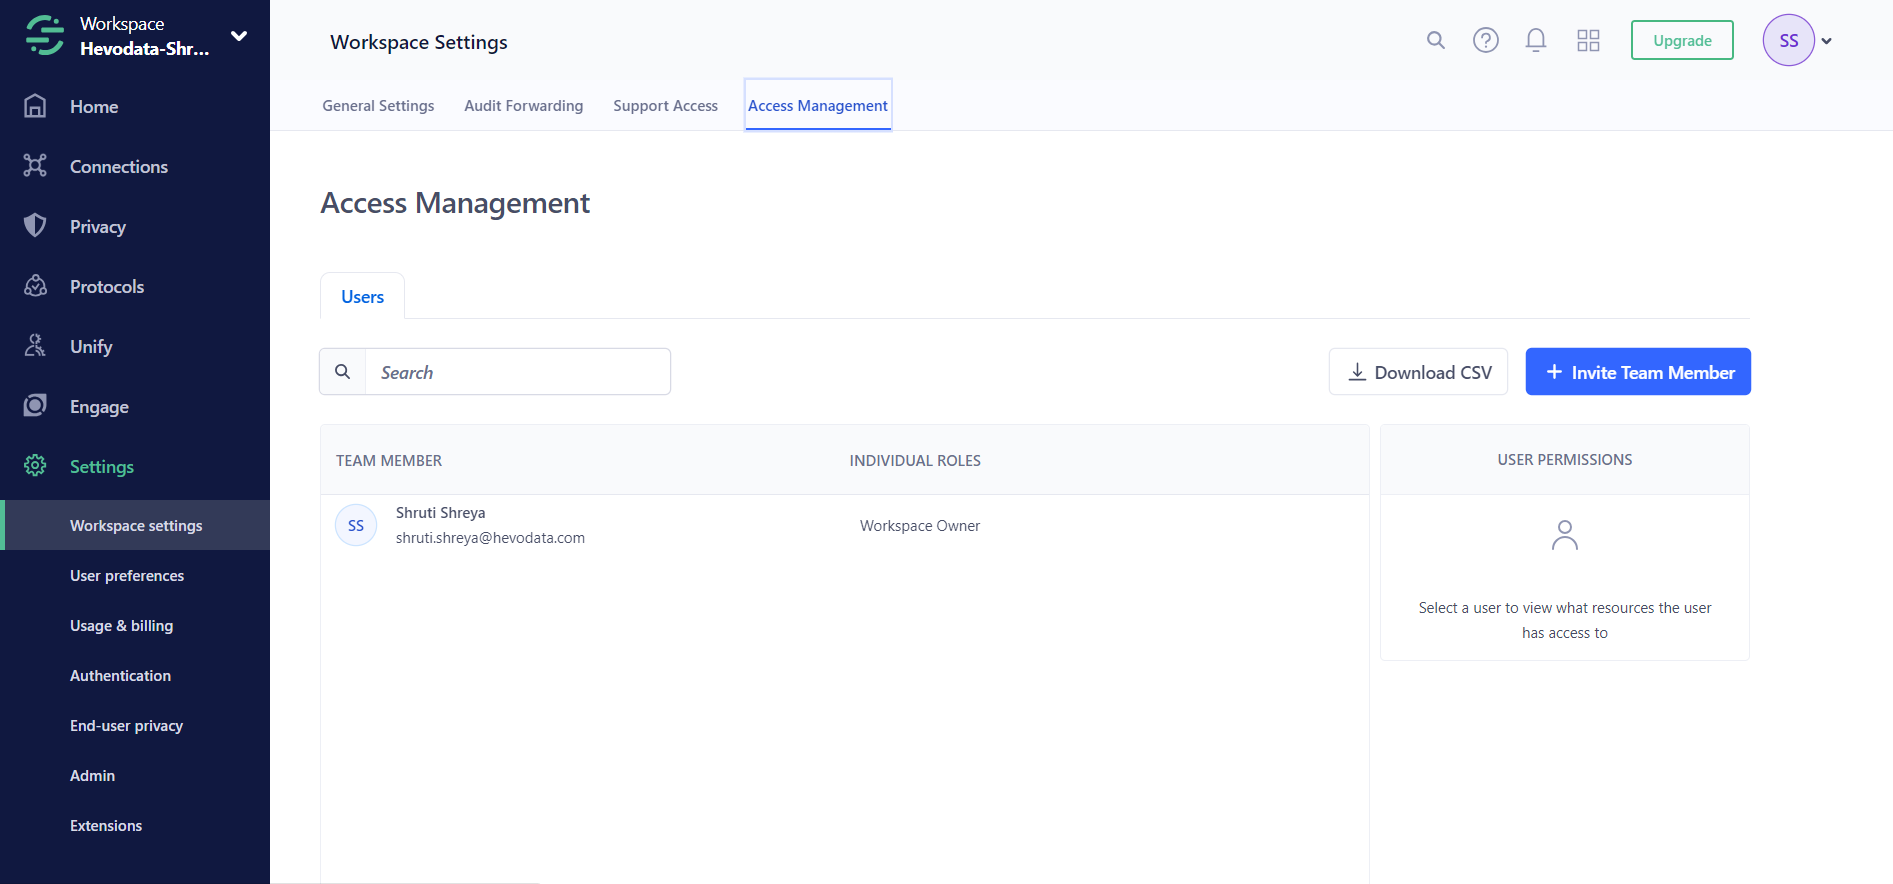
- Assign permissions and resources to a new token. A new token is generated.
- Now, paste the token where you need authentication. For example, the Postman API development environment.
- Now, you need to write your GET API requests in curl.
A sample GET API call to list catalog destinations is:
curl --location --request GET 'https://platform.segmentapis.com/v1beta/catalog/destinations?page_size=2&page_token=NTQ1MjFmZDUyNWU3MjFlMzJhNzJlZTkw' \
--header 'Authorization: Bearer ...' \
--header 'Content-Type: application/json'
The sample response for the above GET API request is as follows:
{
  "destinations": [
    {
      "name": "catalog/destinations/alexa",
      "display_name": "Alexa",
      "description": "Get an insider's edge with Alexa's Competitive Intelligence toolkit. Uncover opportunities for competitive advantage, benchmark any site against its competitors and track companies over time.",
      "type": "STREAMING",
      "website": "https://www.alexa.com",
      "status": "PUBLIC",
      "logos": {
        "logo": "https://cdn.filepicker.io/api/file/taHbRV4TsGP64UN7upNv",
        "mark": "https://cdn.filepicker.io/api/file/jplK0HFyT5CKTc6FHkfP"
      },
      "categories": {
        "primary": "Analytics",
        "secondary": "",
        "additional": []
      },
      "components": [
        {
          "type": "WEB"
        }
      ],
      "settings": [
        {
          "name": "domain",
          "display_name": "Domain",
          "type": "STRING",
          "deprecated": false,
          "required": true,
          "string_validators": {
            "regexp": ""
          },
          "settings": []
        },
        {
          "name": "account",
          "display_name": "Account ID",
          "type": "STRING",
          "deprecated": false,
          "required": true,
          "string_validators": {
            "regexp": ""
          },
          "settings": []
        },
        {
          "name": "trackAllPages",
          "display_name": "Track All Pages to Amplitude",
          "type": "BOOLEAN",
          "deprecated": false,
          "required": false,
          "settings": []
        },
        {
          "name": "trackReferrer",
          "display_name": "Track Referrer to Amplitude",
          "type": "BOOLEAN",
          "deprecated": false,
          "required": false,
          "settings": []
        }
      ]
    }
  ],
  "next_page_token": "NTQ1MjFmZDUyNWU3MjFlMzJhNzJlZTky"
}
If you have data from third-party sources in Segment then you may require their respective reporting APIs. For example, if your data includes Google Analytics, you must use the GET method to call its API. Using third-party APIs is not very flexible, and you may have to manually combine the data if necessary.
For further information on Segment APIs, you can visit here.
You can store the API response JSON file in your local system
Step 2: Import CSV Files into Databricks
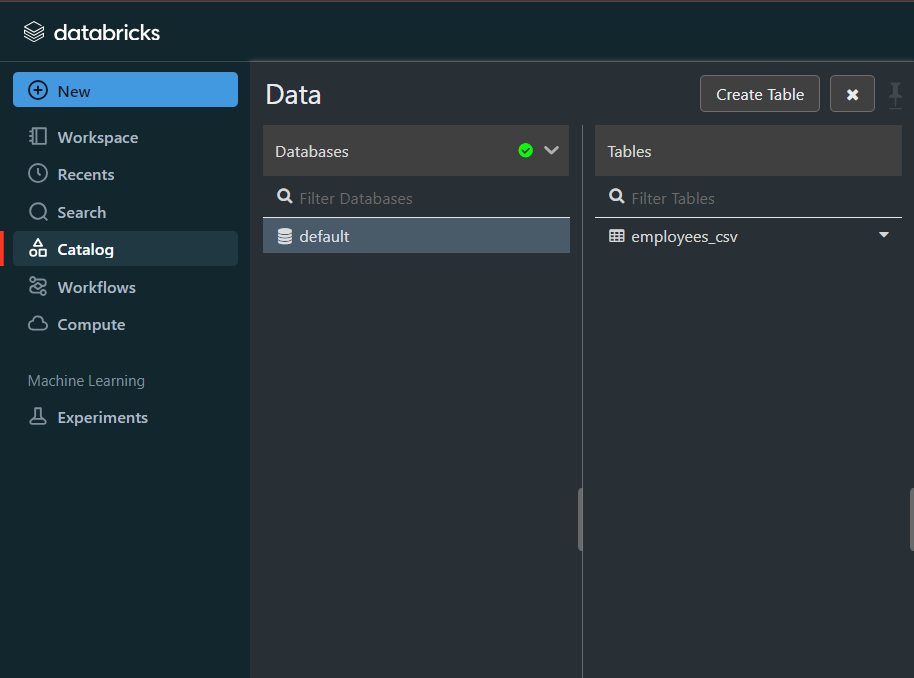
- In the Databricks UI, go to the side navigation bar. Click on the “Data” option.
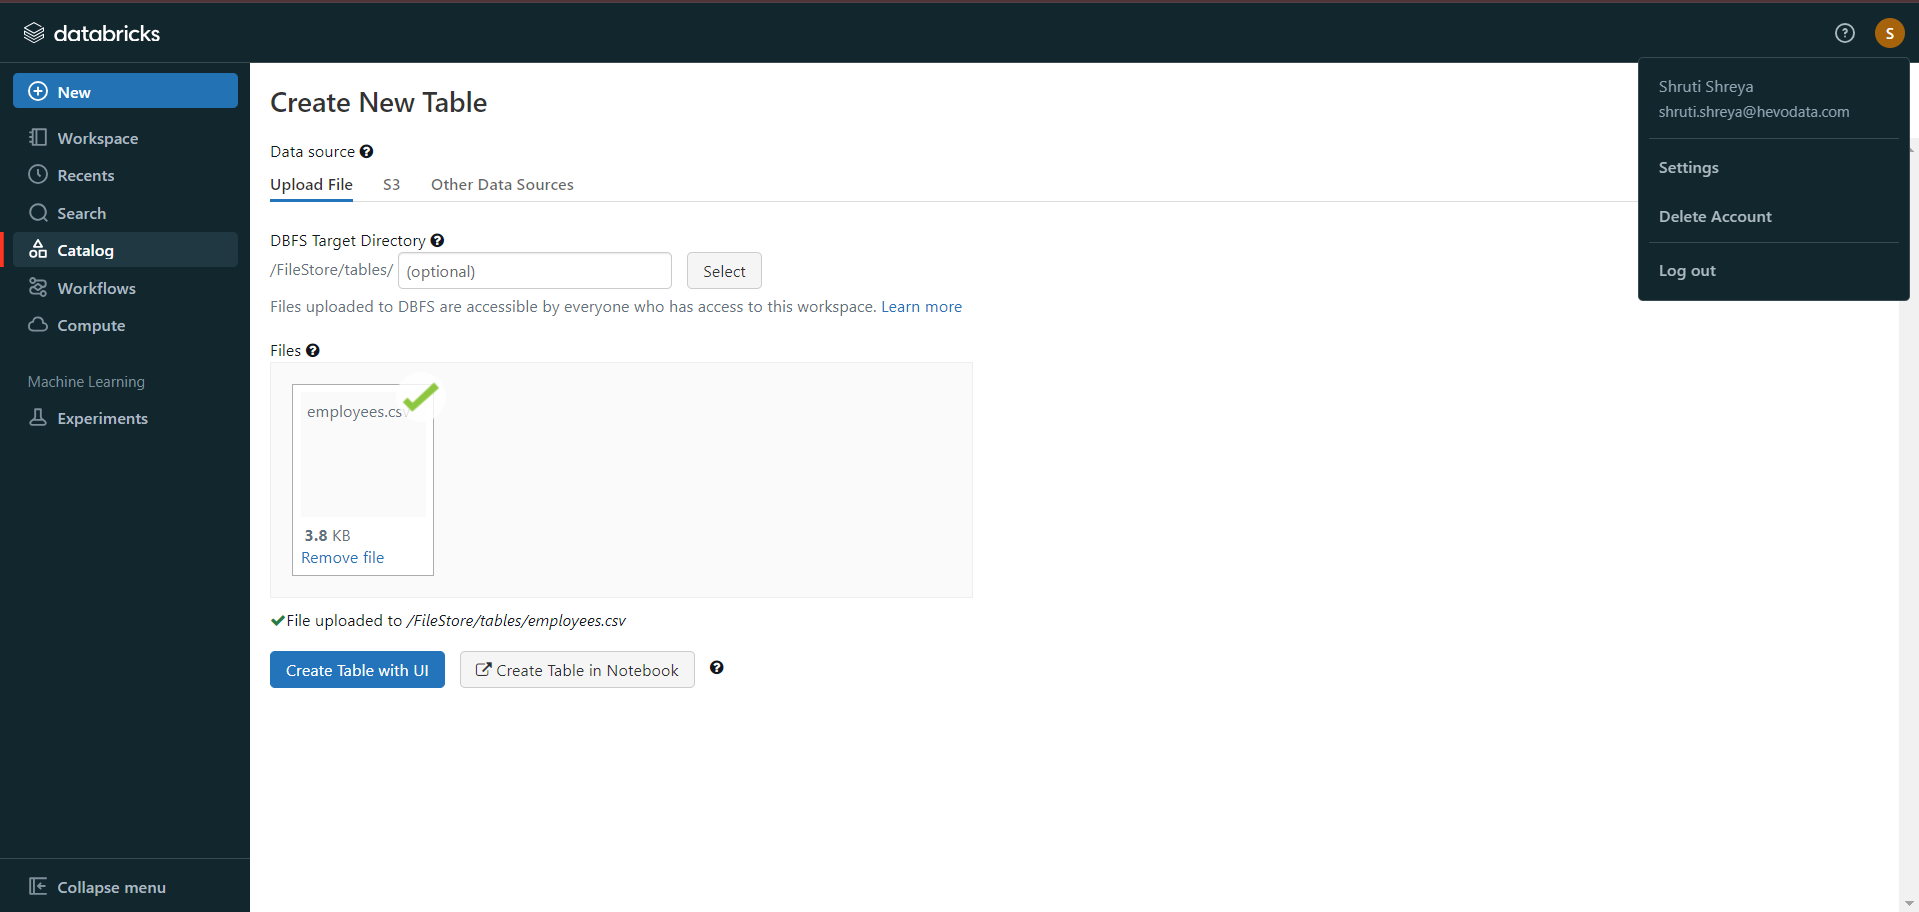
- Now, you need to click on the “Create Table” option.
- Then drag the required CSV files to the drop zone. Otherwise, you can browse the files in your local system and then upload them.
Once the CSV files are uploaded, your file path will look like:
/FileStore/tables/<fileName>-<integer>.<fileType>
If you click on the “Create Table with UI” button, then follow along:
- Then select the cluster where you want to preview your table.
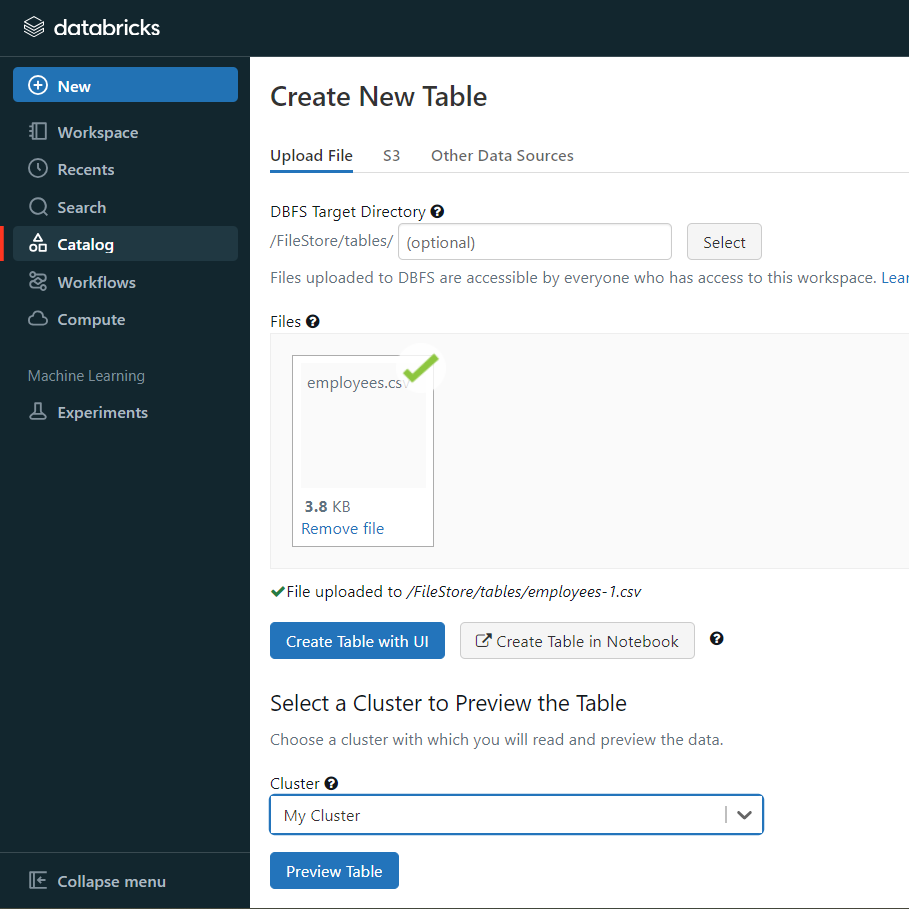
- Click on the “Preview Article” button. Then, specify the table attributes such as table name, database name, file type, etc.
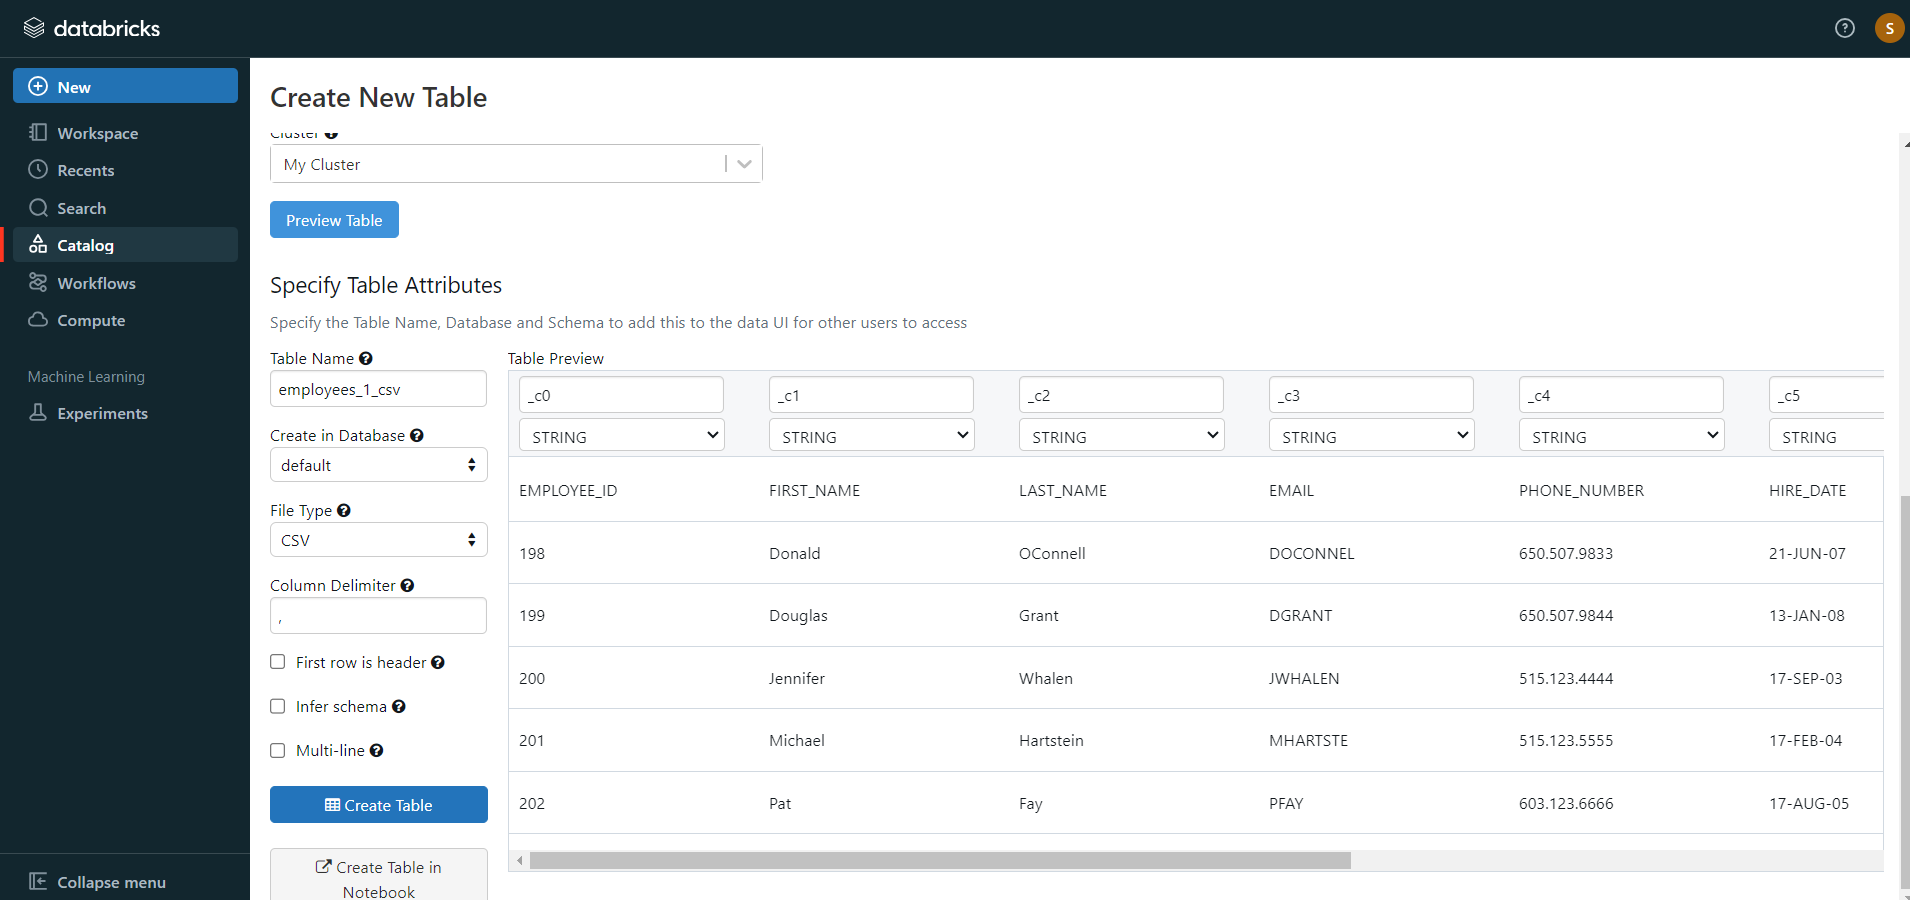
- Then, select the “Create Table” button.
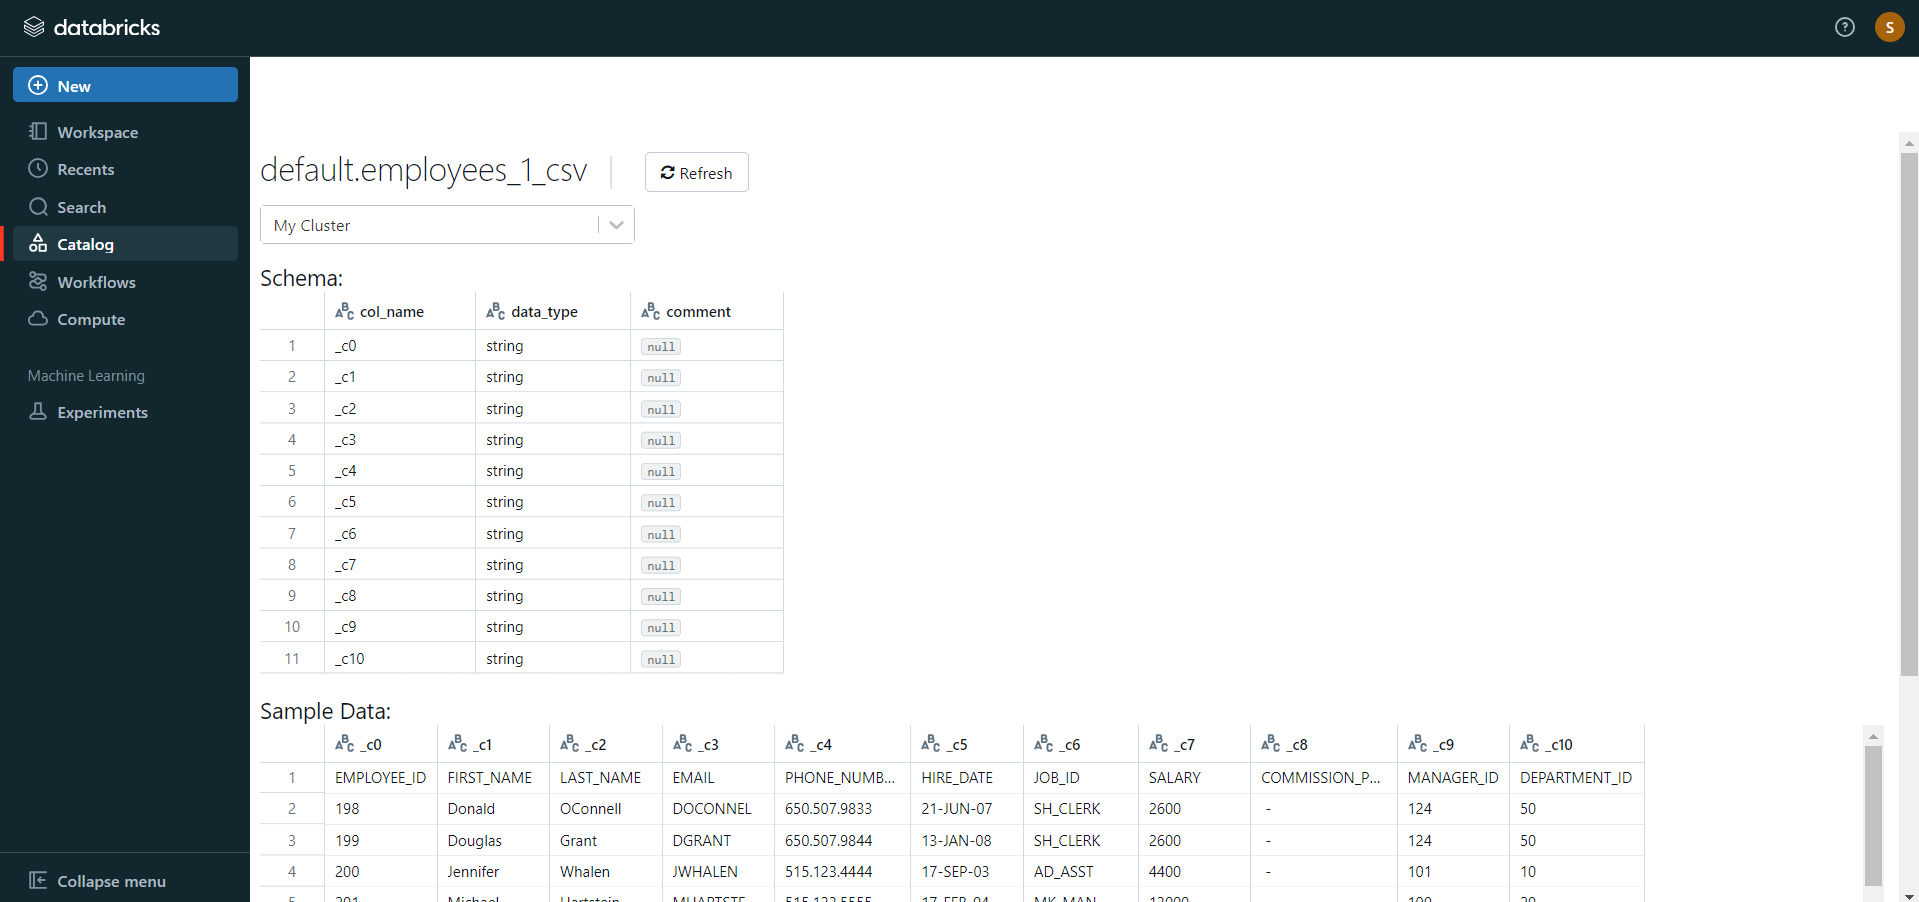
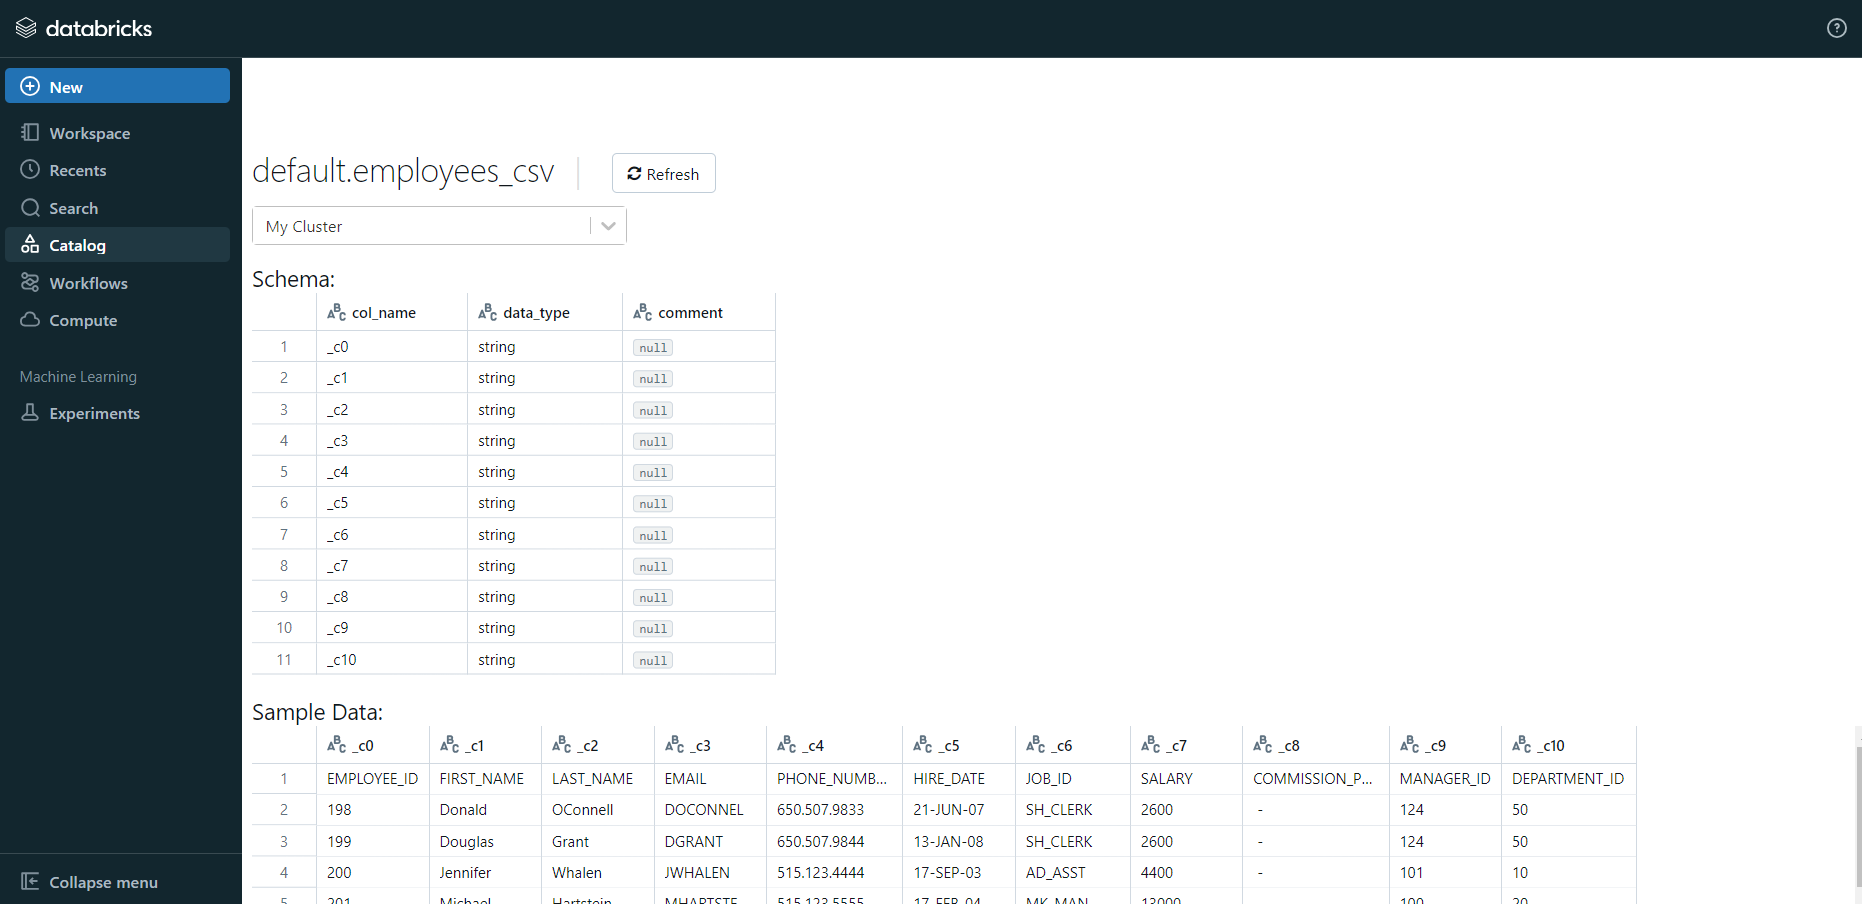
- Now, the database schema and sample data will be displayed on the screen.
If you click on the “Create Table in Notebook” button, then follow along:
- A Python notebook is created in the selected cluster.
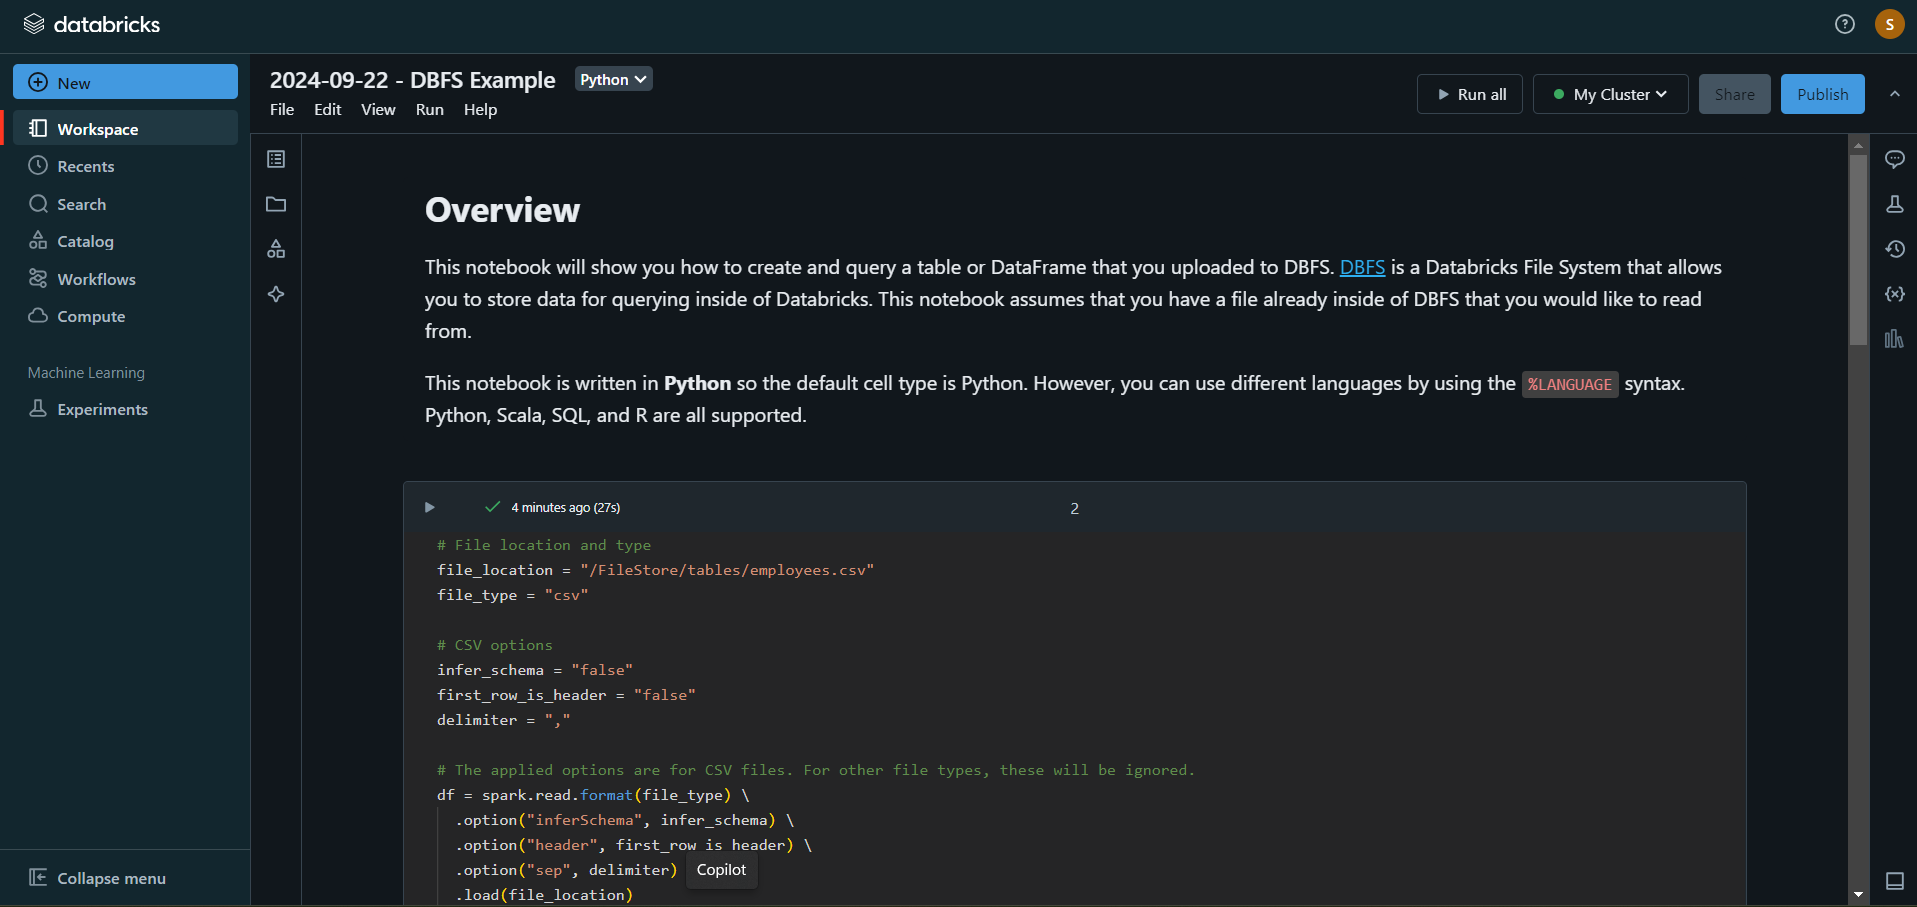
- You can edit the table attributes and format using the necessary Python code. You can refer to the below image for reference.
- You can also run queries on SQL in the notebook to get a basic understanding of the data frame and its description.

In this case, the name of the table is “employees_csv.” However, in your case, we can keep it as according to your requirements.
- Now, on top of the Pandas data frame, you need to create and save your table in the default database or any other database of your choice.

- After you save the table, you can click on the “Data” button in the left navigation pane and check whether the table has been saved in the database of your choice.
Step 3: Modify & Access the Data
- The data now gets uploaded to Databricks. You can access the data via the Import & Explore Data section on the landing page.
- To modify the data, select a cluster and click on the “Preview Table” option.
- Then, change the attributes accordingly and select the “Create Table” option.
With the above 3-step approach, you can easily replicate data from Segment to Databricks using REST APIs. This method performs exceptionally well in the following scenarios:
- Low-frequency Data Replication: This method is appropriate when your marketing team needs the Segment data only once in an extended period, i.e., monthly, quarterly, yearly, or just once.
- Dedicated Personnel: If your organization has dedicated people who have to manually write GET API requests and download and upload JSON data, then accomplishing this task is not much of a headache.
- Low Volume of Data: It can be a tedious task to repeatedly write API requests for different objects and download & upload JSON files. Moreover, merging these JSON files from multiple departments is time-consuming if you are trying to measure the business’s overall performance. Hence, this method is optimal for replicating only a few files.
- No Data Transformation Required: This method is ideal if there is a negligible need for data transformation and your data is standardized.
When the frequency of replicating data from Segment increases, this process becomes highly monotonous. It adds to your misery when you have to transform the raw data every single time. With the increase in data sources, you would have to spend a significant portion of your engineering bandwidth creating new data connectors. Just imagine — building custom connectors for each source, transforming & processing the data, tracking the data flow individually, and fixing issues. Doesn’t it sound exhausting?
Instead, you should be focussing on more productive tasks. Being relegated to the role of a ‘Big Data Plumber‘ that spends their time mostly repairing and creating the data pipeline might not be the best use of your time.

What Can You Achieve by Migrating Your Data from Segment to Databricks?
Here’s a little something for the data analyst on your team. We’ve mentioned a few core insights you could get by replicating data from Segment to Databricks. Does your use case make the list?
- What metrics should be considered if your target is to increase conversions?
- What are the different stages of the sales funnel?
- Which content is performing the best based on clickstream metrics?
- What is the order of the marketing channels based on their conversion ratio?
- Which traffic sources give the highest conversion from a particular geography?
Curious about Segment ETL? Check out our detailed guide to discover how it can enhance your data workflows and integration strategies.
You can also read more about:
- Mixpanel to Databricks
- Power BI to Databricks
- Amazon S3 to Databricks
- Databricks Snowflake Connector
Summing It Up
Collecting an API key, sending a GET request through REST APIs, downloading, transforming and uploading the JSON data would be the smoothest process when your marketing team requires data from Segment only once in a while. But what if the marketing team requests data of multiple objects with numerous filters in the Segment data every once in a while? Going through this process over and again can be monotonous and would eat up a major portion of your engineering bandwidth. The situation worsens when these requests are for replicating data from multiple sources.
So, would you carry on with this method of manually writing GET API requests every time you get a request from the Marketing team? You can stop spending so much time being a ‘Big Data Plumber’ by using Hevo instead.
FAQs
1. How do I transfer data to Databricks?
Use Hevo to set up a pipeline, select Databricks as the destination, and automate the data transfer with minimal configuration.
2. How do I import data into Databricks?
Hevo allows you to import data into Databricks seamlessly by setting it as a destination and defining your data source for automatic ingestion.
3. How to load data from SQL to Databricks?
With Hevo, you can easily connect your SQL database as a source and Databricks as the destination to load data efficiently.

Share it with your connections.
-
 Share To X
-
 Share To LinkedIn
-
 Share To Facebook
-
 Copy Link


