


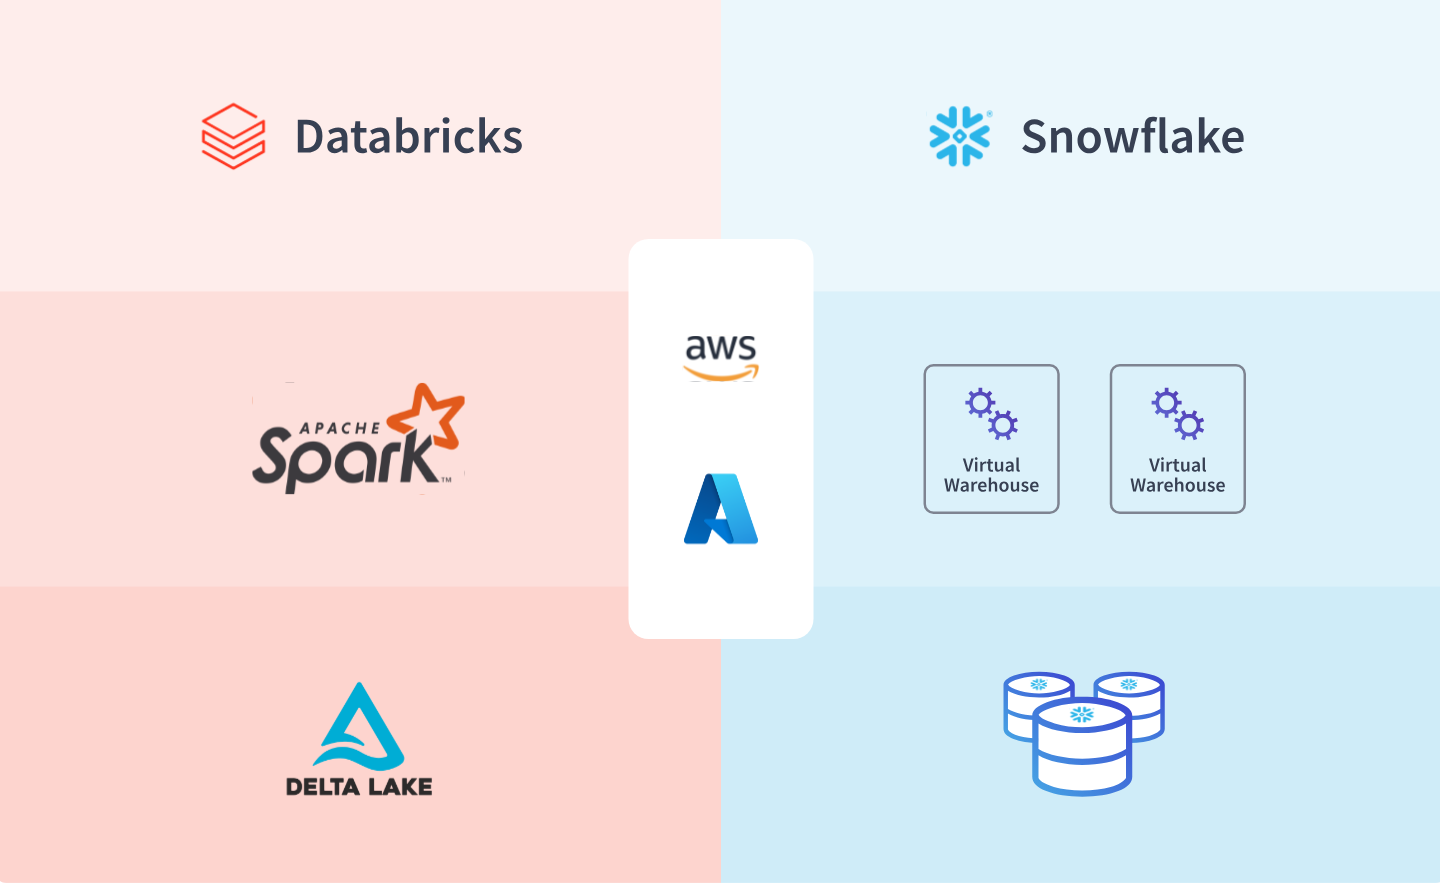
Databricks provides a comprehensive platform for analyzing large datasets and building scalable AI projects, with features like Collaborative Notebooks and managed ML Flow. Snowflake, as a Cloud-based Data Warehouse, offers faster, more flexible data management than traditional systems, centralizing data access for streamlined analytics.
The Databricks Snowflake Connector seamlessly integrates both platforms, combining the best in ETL, Data Warehousing, and Machine Learning without complex setups. This article covers their key features, the integration’s importance, and how to implement Databricks Snowflake Pushdown, highlighting the connector’s benefits.
Table of Contents
Prerequisites
To successfully set up Databricks Snowflake Connection, you need to meet the following requirements:
- You must use the Databricks Runtime version 4.2 or later and have a Databricks account. In addition
- Your Databricks secret manager should already have your Snowflake user login name and password established;
- you can read it back by executing
dbutils.secrets.get (...). The Databricks secret manager is described in greater detail in its documentation.
- An account with Snowflake is required. You require the following details in order to read or write from this account:
- Your Snowflake account’s URL
- Snowflake user’s username and password to access the account.
- After connecting, the default database and schema will be used for the session.
- After connecting, the default virtual warehouse will be used for the session.
To learn more about this, visit Databricks.
If yours is anything like the 2000+ data-driven companies that use Hevo, more than 70% of the business apps you use are SaaS applications. Integrating the data from these sources in a timely way is crucial to fuel analytics and the decisions that are taken from it.
But given how fast API endpoints etc can change, creating and managing these pipelines can be a soul-sucking exercise.
Hevo’s no-code data pipeline platform lets you connect over 150+ sources in a matter of minutes to deliver data in near real-time to your warehouse.
What’s more, the in-built transformation capabilities and the intuitive UI means even non-engineers can set up pipelines and achieve analytics-ready data in minutes.
Get started for Free with Hevo!What is Databricks Snowflake Connector?
The Databricks Snowflake Connector for Spark has been included in the Databricks Unified Analytics Platform to allow native Spark-Snowflake communication. The native Snowflake Connector in Databricks version 4.2 allows you to read data from Snowflake and publish it without loading any libraries. In contrast, the earlier versions of Databricks required you to load the Spark Connector libraries into your Databricks clusters.
The Databricks Snowflake Connector automatically distributes processing between Spark and Snowflake without requiring the user to specify the processing systems. Snowflake’s automated Query Pushdown optimization also helps push specific queries into the database.
Without using the connector, customers had to deal with sophisticated data transformation pipelines to transport datasets back and forth from Snowflake, resulting in data duplication and redundancy.
However, Snowflake can leverage Databricks API to build real-time pipelines using Apache Spark and other Machine Learning frameworks like TensorFlow.
Steps to Set Up the Databricks Snowflake Connector
Now that you have gained a basic understanding of Databricks Snowflake Connector, you will learn the steps to configure, read and write data to Snowflake using Databricks Snowflake Connector in this section. So follow the steps listed below.
- Step 1: Set Up Databricks Snowflake Connector
- Step 2: Configure the Snowflake Databricks Connection
- Step 3: Perform ETL on Snowflake Data
- Step 4: Query Data into Snowflake
Step 1: Set Up Databricks Snowflake Connector
Log into Databricks and make sure that you have created a cluster in it using Databricks Runtime version 4.2. Moreover, ensure that you have created a Virtual Warehouse (Compute Cluster) in Snowflake.
Note: Ensure that Databricks and Snowflake accounts are set to the same region to achieve the best performance at low costs.
Hence, you don’t need to install or load any libraries, and there’s no requirement to manage your configurations.
Step 2: Configure the Snowflake Databricks Connection
In this step, you will learn how to connect Snowflake with Databricks using Databricks Secrets API. This API will encrypt and store your Snowflake credentials securely. You can enter the following commands to get your Snowflake credentials using Scala or Python Script, as shown below.
For Python
# Use secrets DBUtil to get Snowflake credentials.
user = dbutils.secrets.get("data-warehouse", "<snowflake-user>")
password = dbutils.secrets.get("data-warehouse", "<snowflake-password>")

# snowflake connection options
options = {
  "sfUrl": "<snowflake-url>",
  "sfUser": user,
  "sfPassword": password,
  "sfDatabase": "<snowflake-database>",
  "sfSchema": "<snowflake-schema>",
  "sfWarehouse": "<snowflake-cluster>"
}
For Scala
// Use secrets DBUtil to get Snowflake credentials.
val user = dbutils.secrets.get("data-warehouse", "<snowflake-user>")
val password = dbutils.secrets.get("data-warehouse", "<snowflake-password>")


// Set options for reading and writing the data
val options = Map(
  "sfUrl" -> "<snowflake-url>",
  "sfUser" -> user,
  "sfPassword" -> password,
  "sfDatabase" -> "<snowflake-database>",
  "sfSchema" -> "<snowflake-schema>",
  "sfWarehouse" -> "<snowflake-cluster>"
)
Step 3: Perform ETL on Snowflake Data
Now let’s learn how you can read and write to Snowflake using write and read commands as shown below using Python and Scala. Here, you are trying to create a simple dataset having 5 values, and then you write this dataset to Snowflake. After this, you read this dataset and display it.
For Python
- Write to Snowflake
# Generate a simple dataset containing five values and write the dataset to Snowflake.
spark.range(5).write
  .format("snowflake")
  .options(**options)
  .option("dbtable", "<snowflake-database>")
.save()- Read and Display Dataset from Snowflake
# Read the data written by the previous cell back.
df = spark.read
  .format("snowflake")
  .options(**options)
  .option("dbtable", "<snowflake-database>")
  .load()

display(df)
For Scala
- Write to Snowflake
// Generate a simple dataset containing five values and write the dataset to Snowflake.
spark.range(5).write
  .format("snowflake")
  .options(options)
  .option("dbtable", "<snowflake-database>")
.save()- Read and Display Dataset from Snowflake
// Read the data written by the previous cell back.
val df: DataFrame = spark.read
  .format("snowflake")
  .options(options)
  .option("dbtable", "<snowflake-database>")
  .load()

display(df)
The output for the above codes is shown below. It displays 5 numbers in random order.

Step 4: Query Data into Snowflake
After loading the data in Snowflake, you can perform simple to complex queries. Enable the Snowflake Virtual Warehouse and open the Snowflake worksheet, now you can query the data easily. Otherwise, you can also perform queries directly by writing the Scala and Python Scripts as shown below.
df = spark.read
  .format("snowflake")
  .options(**options)
  .option("query",  "select 1 as my_num union all select 2 as my_num")
  .load()

df.show()
Benefits of Databricks Snowflake Connector
- Databricks and Snowflake offer the best solution for bringing together Big Data and AI by reducing all the complexities associated with integration and automating price performance through automatic Query Pushdown.
- Snowflake’s automatic Query Pushdown feature can push certain queries into the database. This eliminates all of the uncertainty and complication associated with determining what processing should take place where.
- Customers benefit immensely from Databricks Snowflake Integration as they get started faster with less set-up complexity and are automatically kept up to date on both products and upgrades.
- Spark handles complex workloads with this optimal Connector, while Snowflake processes workloads that can be converted to SQL. This can help boost performance and cost savings without requiring manual tasks or ongoing maintenance.
You can also read more about:
- Databricks to SQL Server
- Databricks to Salesforce
- Amazon RDA to Databricks
- Google Cloud Storage to Databricks
Conclusion
You gained a basic understanding of Databricks Snowflake Connector and learnt the steps to read and write data to Snowflake using Databricks Snowflake Connector.
Snowflake and Databricks collaboration using Databricks Snowflake Connector combine a Cloud Data Warehouse with predictive Analytics tools to provide you the best of both worlds.
However, extracting complex data from diverse data sources like CRMs, Streaming Services, Databases, etc., to Snowflake can be pretty challenging and cumbersome. This is where an easier alternative like Hevo saves your day!
Hevo Data is an Official Snowflake Partner. It is a No-Code Data Pipeline that offers a faster way to move data from 150+ Data Sources into your Data Warehouse, such as Snowflake, to be visualized in a BI tool.
FAQs
Can you connect Databricks to Snowflake?
Yes, you can connect Databricks to Snowflake using the Snowflake Spark Connector.
What does Snowflake connector do?
It allows you to read from and write to Snowflake from Spark, facilitating data transfer and integration.
Why use Databricks and Snowflake together?
Combining them leverages Databricks’ advanced analytics and ML capabilities with Snowflake’s scalable data warehousing and storage.
What are use cases for Snowflake and Databricks Connection?
In case you want to deploy Data Science/machine learning functionalities of Databricks with your data as well as there is frequent addition and modification of your data, then Snowflake and Databricks connection would be an ideal solution.
When to use Snowflake and Databricks?
While Databricks offers storage via running on top of AWS S3, Azure Blob Storage, and Google Cloud Storage, Snowflake includes a storage layer. Snowflake triumphs for those seeking a world-class data warehouse. However, Databricks is the winner for those who require data science, and machine learning functionalities.
What is Databricks Secret API?
Using the Secrets API, secrets, secret scopes, and access rights can be managed. By managing secrets you can make a covert scope by filling out the scope with the secrets. If one has the Premium Plan, he/she can give the secret scope access control as well. Learn more about managing Databricks Secret Scopes.
Share your experience of reading about the Databricks Snowflake Connector in the comments section below!
Share it with your connections.
-
 Share To LinkedIn
-
 Share To Facebook
-
 Share To X
-
 Copy Link


