On a late Friday evening, just when you’re about to call your day at the office, you receive an email stating a priority task. The Marketing Head has requested you to help him build an ETL pipeline for moving data from Mailchimp to Databricks.
What would you do? You know that you can’t delay it because the end of the quarter is approaching, and the marketing team is working on tight deadlines for preparing the strategy of different email & ad campaigns.
Don’t worry; you’re in the right place. This article will give you the methods for building an ETL pipeline for replicating data from Mailchimp to Databricks. Enough talk! Let’s get to it.
Easily replicate your Mailchimp data to Databricks for seamless analysis and reporting using a no-code data pipeline like Hevo Data. Hevo’s platform simplifies data integration, allowing you to move data with zero manual coding.
Key Benefits:
- Quick Setup: Configure your data pipeline in minutes without the need for technical expertise.
- Real-Time Sync: Continuously sync your Mailchimp data to Databricks to keep it up-to-date.
- Transformations: Preload and post-load transformations to prepare your data for analysis.
- Scalable and Reliable: Handle growing data volumes without compromising on performance.
Know how Hevo Data and Databricks partnered to automate data integration for the Lakehouse
Get Started with Hevo for FreeTable of Contents
How to Replicate Data From Mailchimp to Databricks?
To replicate data from Mailchimp to Databricks, you can either:
Method 1: Replicate Data from Mailchimp to Databricks Using Hevo
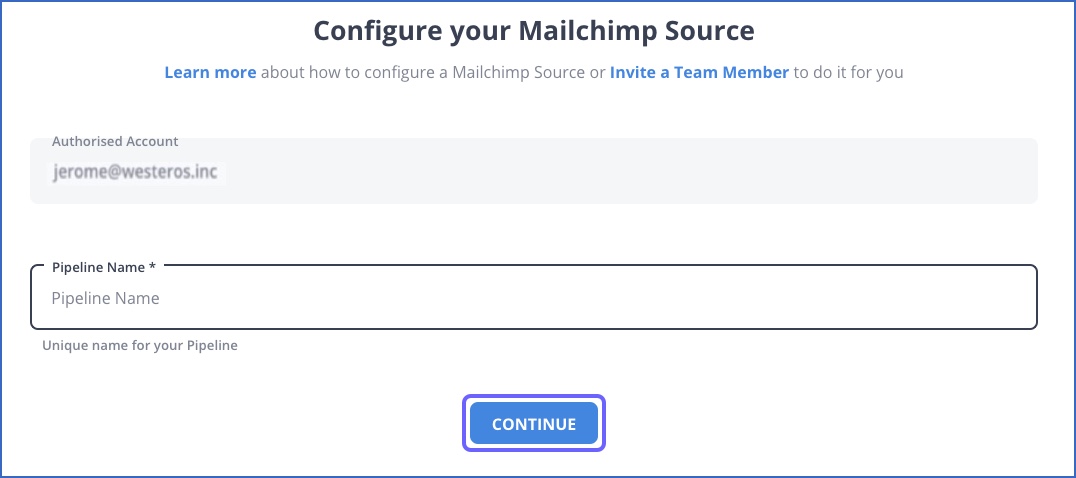
Step 1: Configure Mailchimp as a Source
Choose Mailchimp as source.
Step 2: Configure Databricks as a Destination
Choose Databricks as destination.
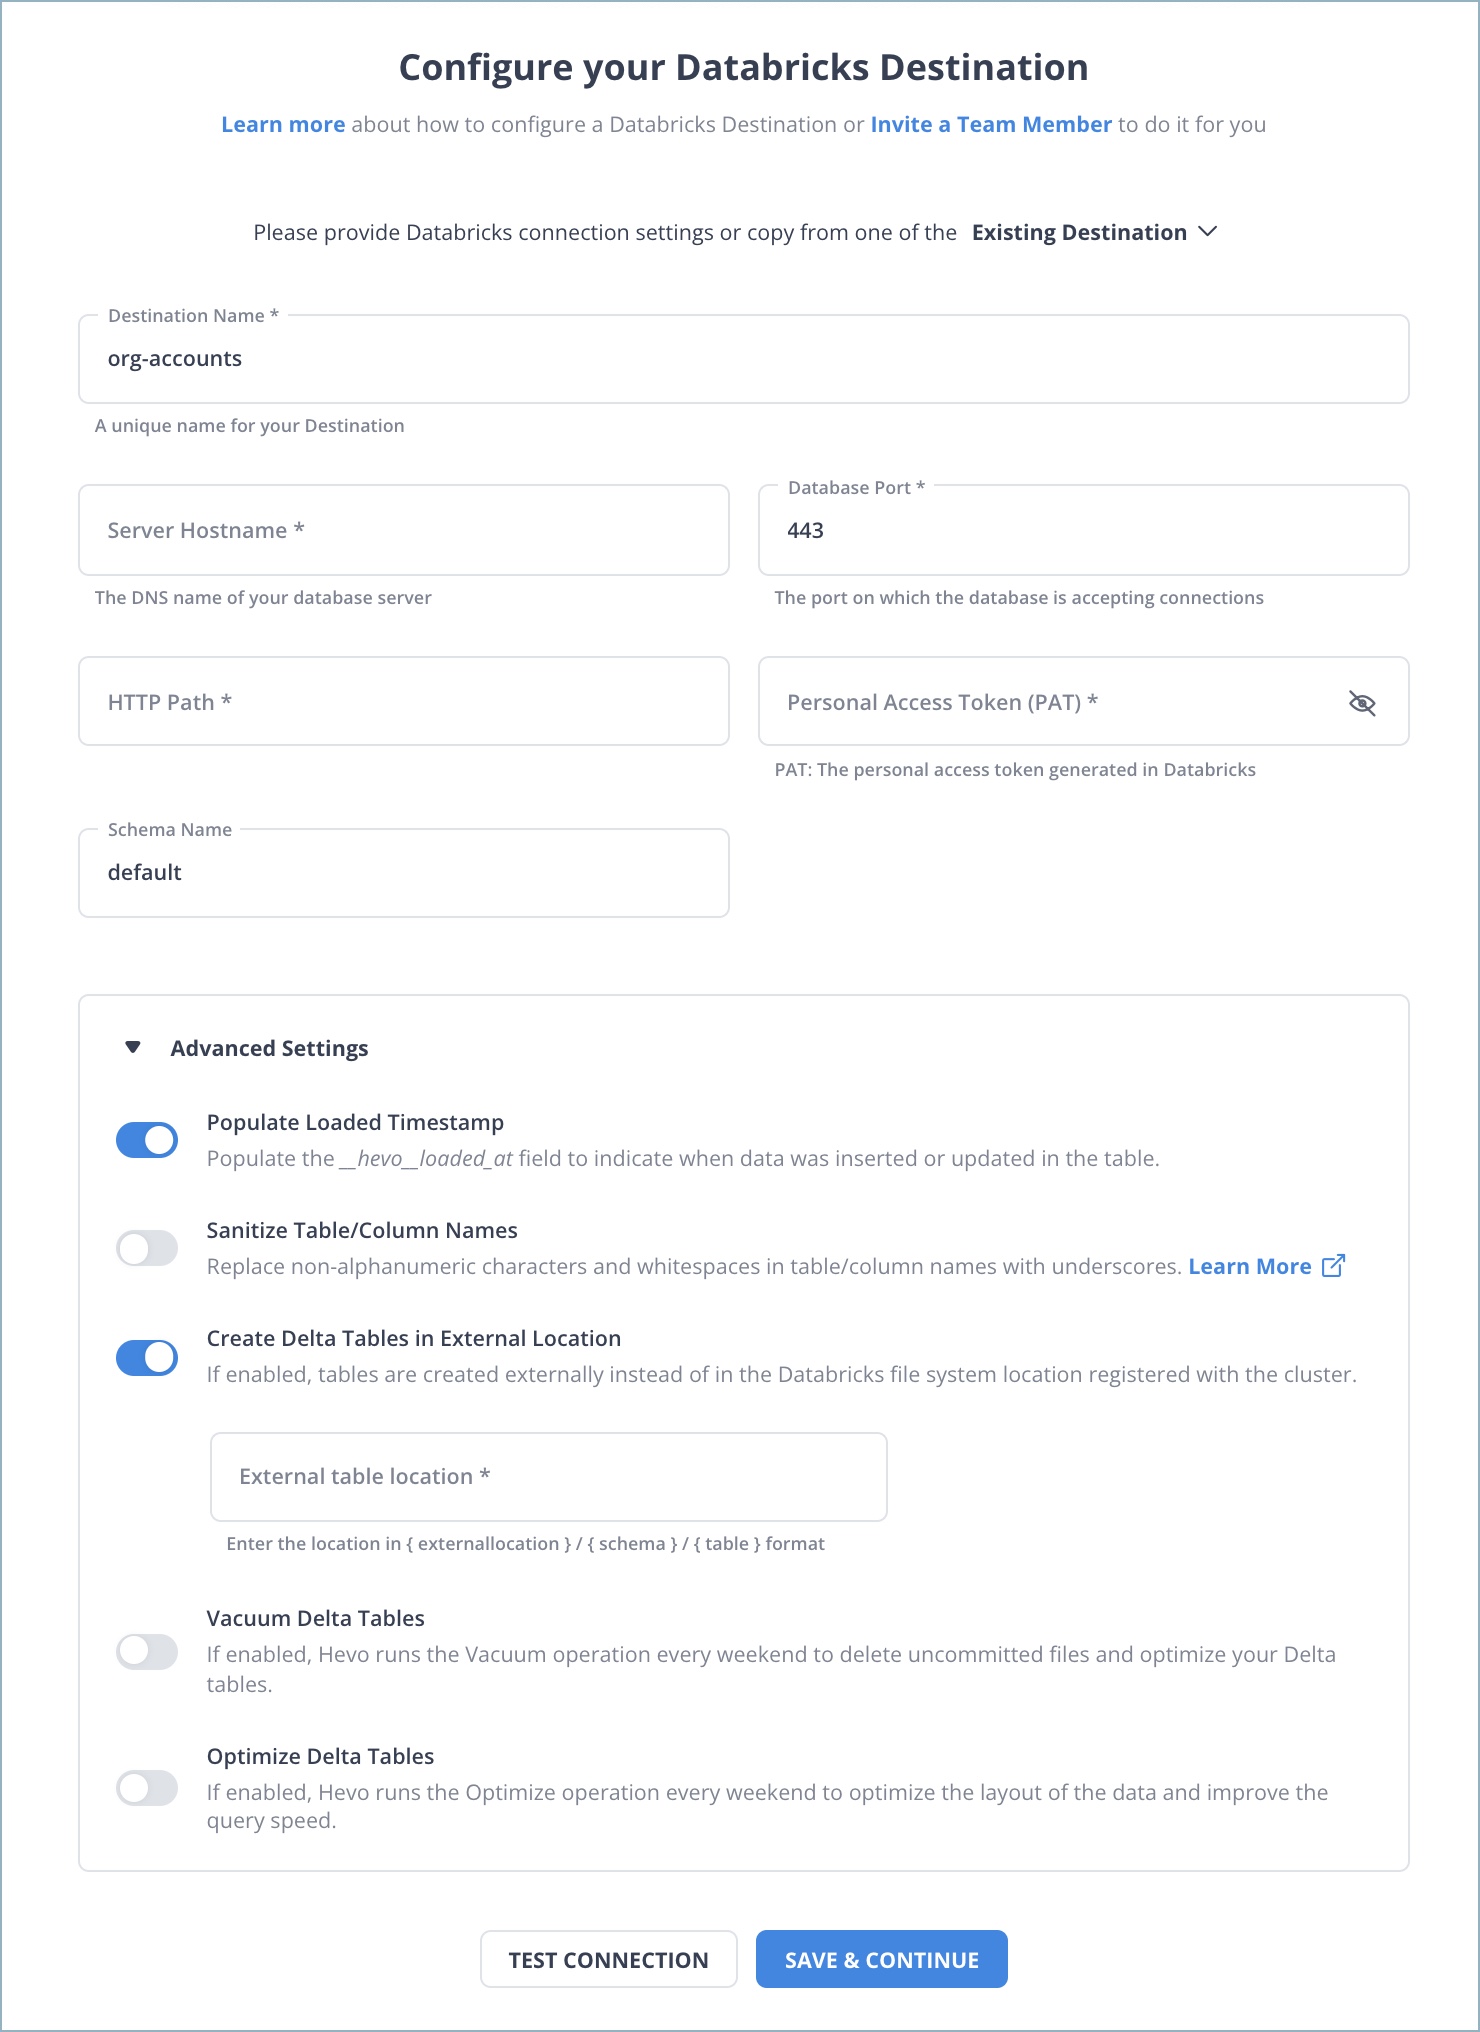
After implementing the 2 simple steps, Hevo Data will take care of building the pipeline for replicating data from Mailchimp to Databricks based on the inputs given by you while configuring the source and the destination.
The pipeline will automatically replicate new and updated data from Mailchimp to Databricks every 1 hr (by default). However, you can also adjust the data replication frequency as per your requirements.
Data Pipeline Frequency
| Default Pipeline Frequency | Minimum Pipeline Frequency | Maximum Pipeline Frequency | Custom Frequency Range (Hrs) |
| 1 Hr | 1 Hr | 48 Hrs | 1-48 |
Why Consider Hevo
- Reliability at Scale: With Hevo Data, you get a world-class fault-tolerant architecture that scales with zero data loss and low latency.
- Monitoring and Observability: Monitor pipeline health with intuitive dashboards that reveal every state of the pipeline and data flow. Bring real-time visibility into your ELT with Alerts and Activity Logs.
- Stay in Total Control: When automation isn’t enough, Hevo Data offers flexibility – data ingestion modes, ingestion, and load frequency, JSON parsing, destination workbench, custom schema management, and much more – for you to have total control.
- Auto-Schema Management: Correcting improper schema after the data is loaded into your warehouse is challenging. Hevo Data automatically maps the source schema with the destination warehouse so that you don’t face the pain of schema errors.
- 24×7 Customer Support: With Hevo Data, you get more than just a platform, you get a partner for your pipelines. Discover peace with round-the-clock “Live Chat” within the platform. Moreover, you get 24×7 support even during the 14-day full-feature free trial.
- Transparent Pricing: Say goodbye to complex and hidden pricing models. Hevo Data’s transparent pricing brings complete visibility to your ELT spending. Choose a plan based on your business needs. Stay in control with spend alerts and configurable credit limits for unforeseen spikes in the data flow.
Method 2: Replicate Data from Mailchimp to Databricks Using CSV Files
Mailchimp, being a Marketing Automation platform, helps you create, manage and analyze email and ad campaigns. It collects data on clicks, opens, social activity, purchases, and other interactions with customers.
Let’s dive into the process of replicating this data from Mailchimp to Databricks in CSV format:
Step 1: Export Data from Mailchimp
Here’s what you can export from your Mailchimp account:
- Audiences
- Reports
- Templates
- Campaigns
- Content studio files
- Events
And here’s what you can’t export from your account:
- Deleted audiences
- Billing receipts
- Third-party information
- Website, landing page, and ad content
Let’s dive into the steps for exporting data from Mailchimp in CSV format.
- Click your profile icon in the bottom-left corner.
- Now, select the “Account” button.
- Click the Settings drop-down menu. Now, select the “Manage my data” option.

- Now, check the boxes for each type of data you want to export. Then, click on the “Export Data” button.

- Your data will be bundled into a single ZIP file. You can download it from the “Manage my data” page.
- You’ll also receive an email with the link after the download is ready. Click the link to go to the “Export My Data” page, and then click the “Download My Account Data” button.
NOTE: Keep the following points in mind while exporting data from Mailchimp.
- You can do only one account export per 24-hour period.
- You will receive an email from Mailchimp when your data export is ready. The export process might be time-consuming, especially if you have a large volume of data to export.
- When the export is done, Mailchimp will create a ZIP file of all your requested data. This file is only accessible within your account and will not be included in the email you would receive from Mailchimp.
Step 2: Import CSV Files into Databricks
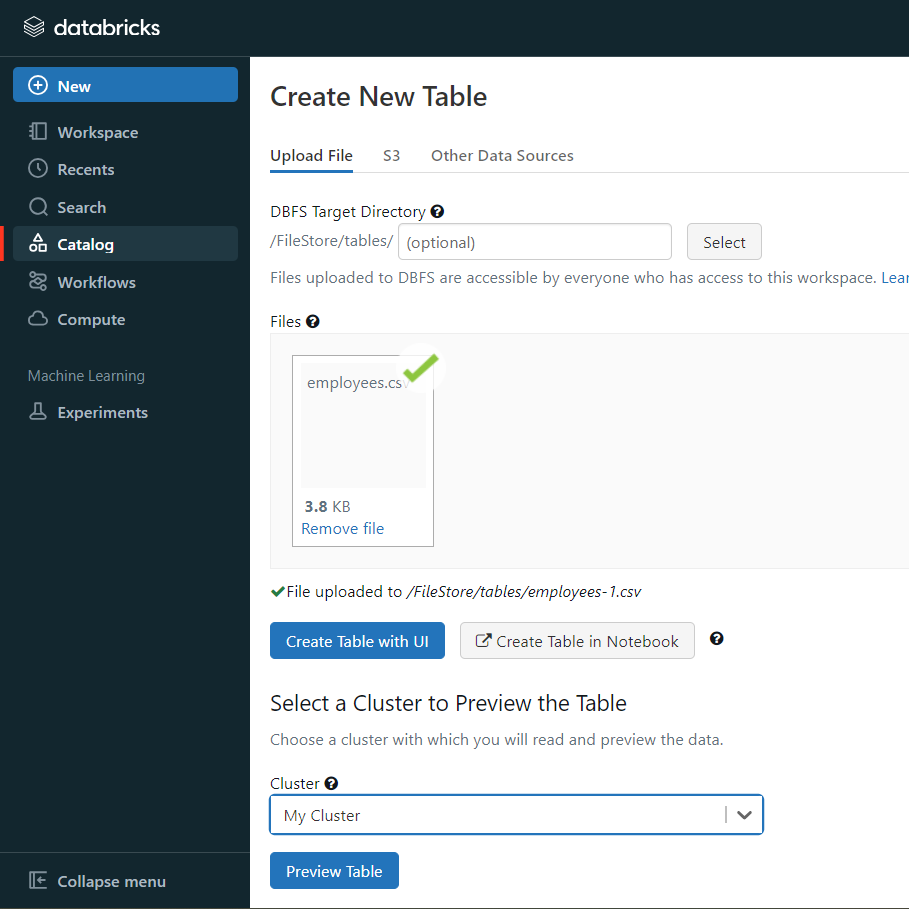
- In the Databricks UI, go to the side navigation bar. Click on the “Data” option.
- Now, you need to click on the “Create Table” option.
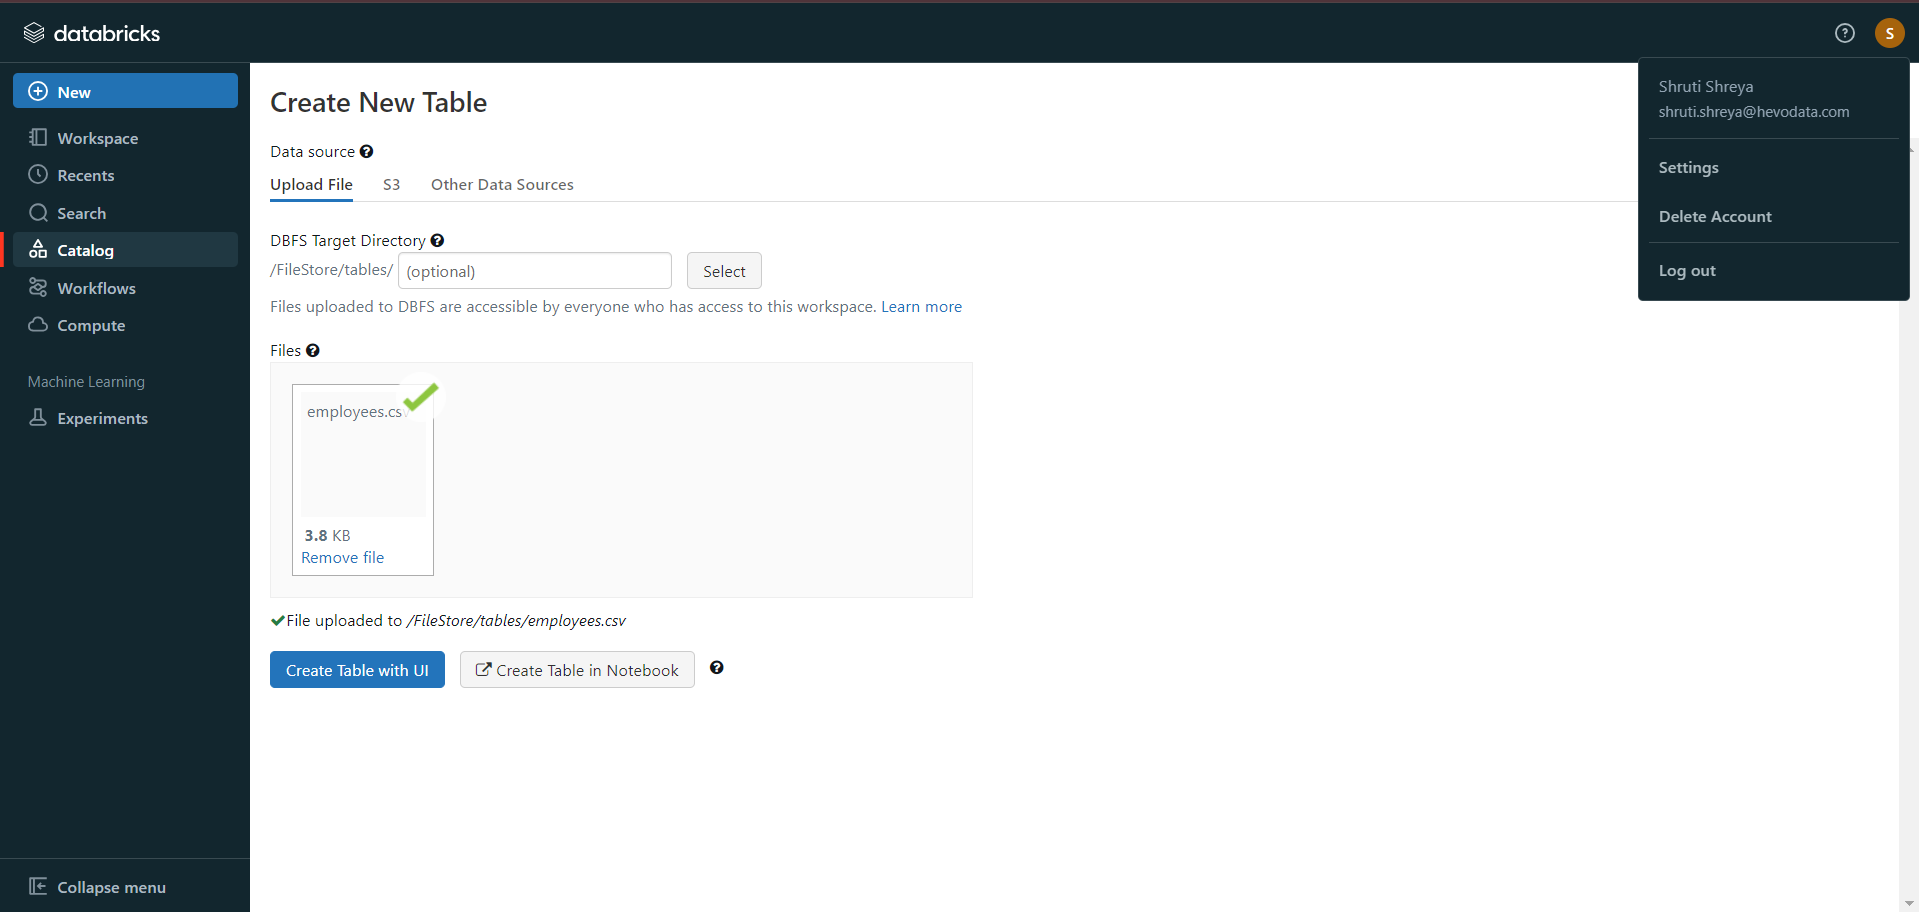
- Then drag the required CSV files to the drop zone. Otherwise, you can browse the files in your local system and then upload them.
Once the CSV files are uploaded, your file path will look like:
/FileStore/tables/<fileName>-<integer>.<fileType>
If you click on the “Create Table with UI” button, then follow along:
- Then select the cluster where you want to preview your table.
- Click on the “Preview Article” button. Then, specify the table attributes such as table name, database name, file type, etc.
- Then, select the “Create Table” button.
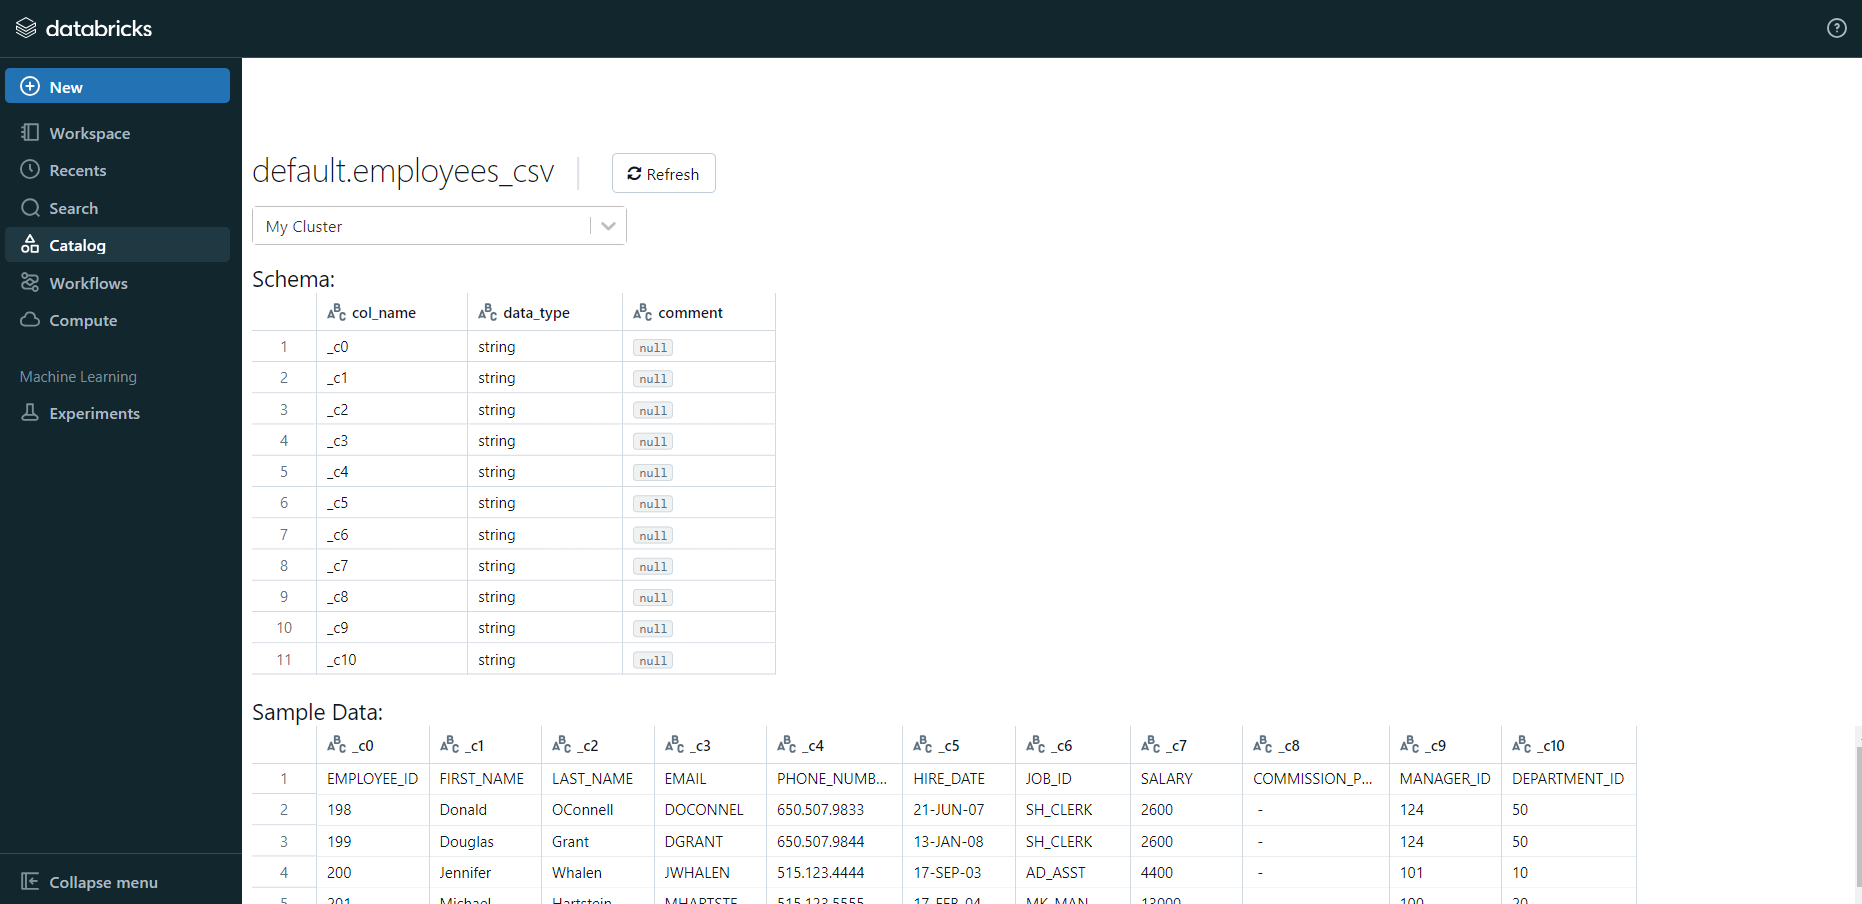
- Now, the database schema and sample data will be displayed on the screen.
If you click on the “Create Table in Notebook” button, then follow along:
- A Python notebook is created in the selected cluster.
- You can edit the table attributes and format using the necessary Python code. You can refer to the below image for reference.
- You can also run queries on SQL in the notebook to understand the data frame and its description.
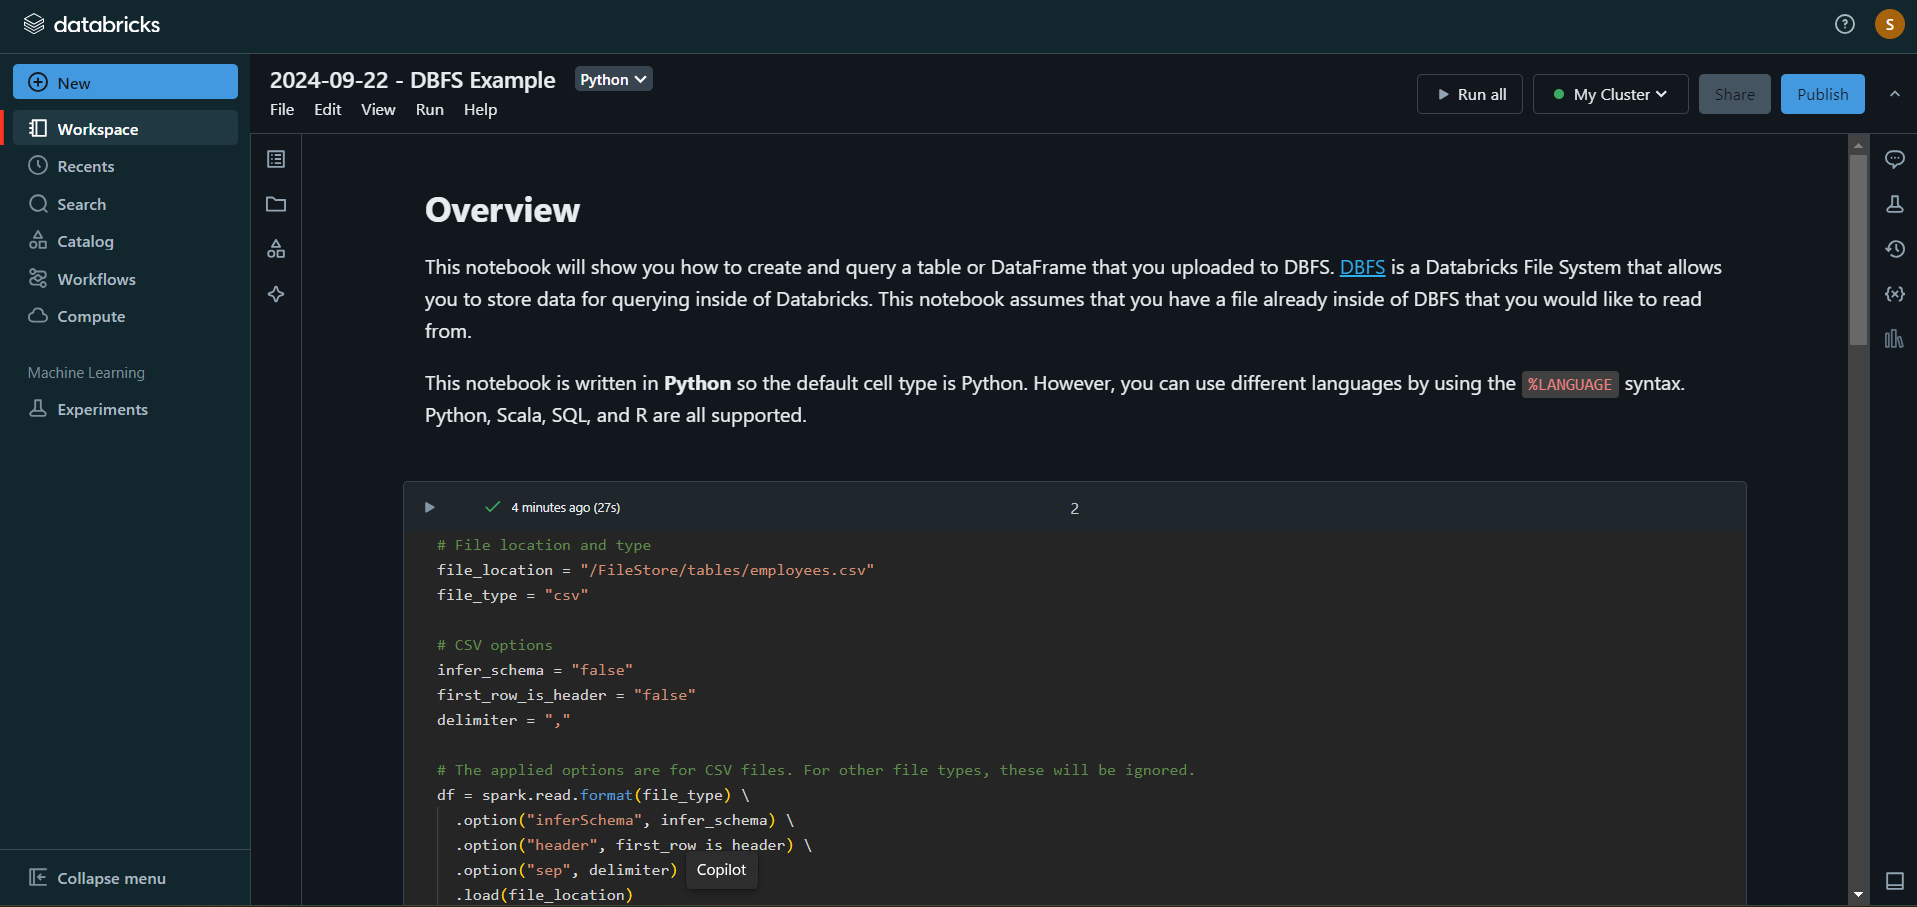
In this case, the name of the table is “emp_csv.” However, in your case, we can keep it as according to your requirements.
- Now, on top of the Pandas data frame, you need to create and save your table in the default database or any other database of your choice.
In the above table, “mytestdb” is a database where we intend to save our table.
- After you save the table, you can click on the “Data” button in the left navigation pane and check whether the table has been saved in the database of your choice.
Step 3: Modify & Access the Data
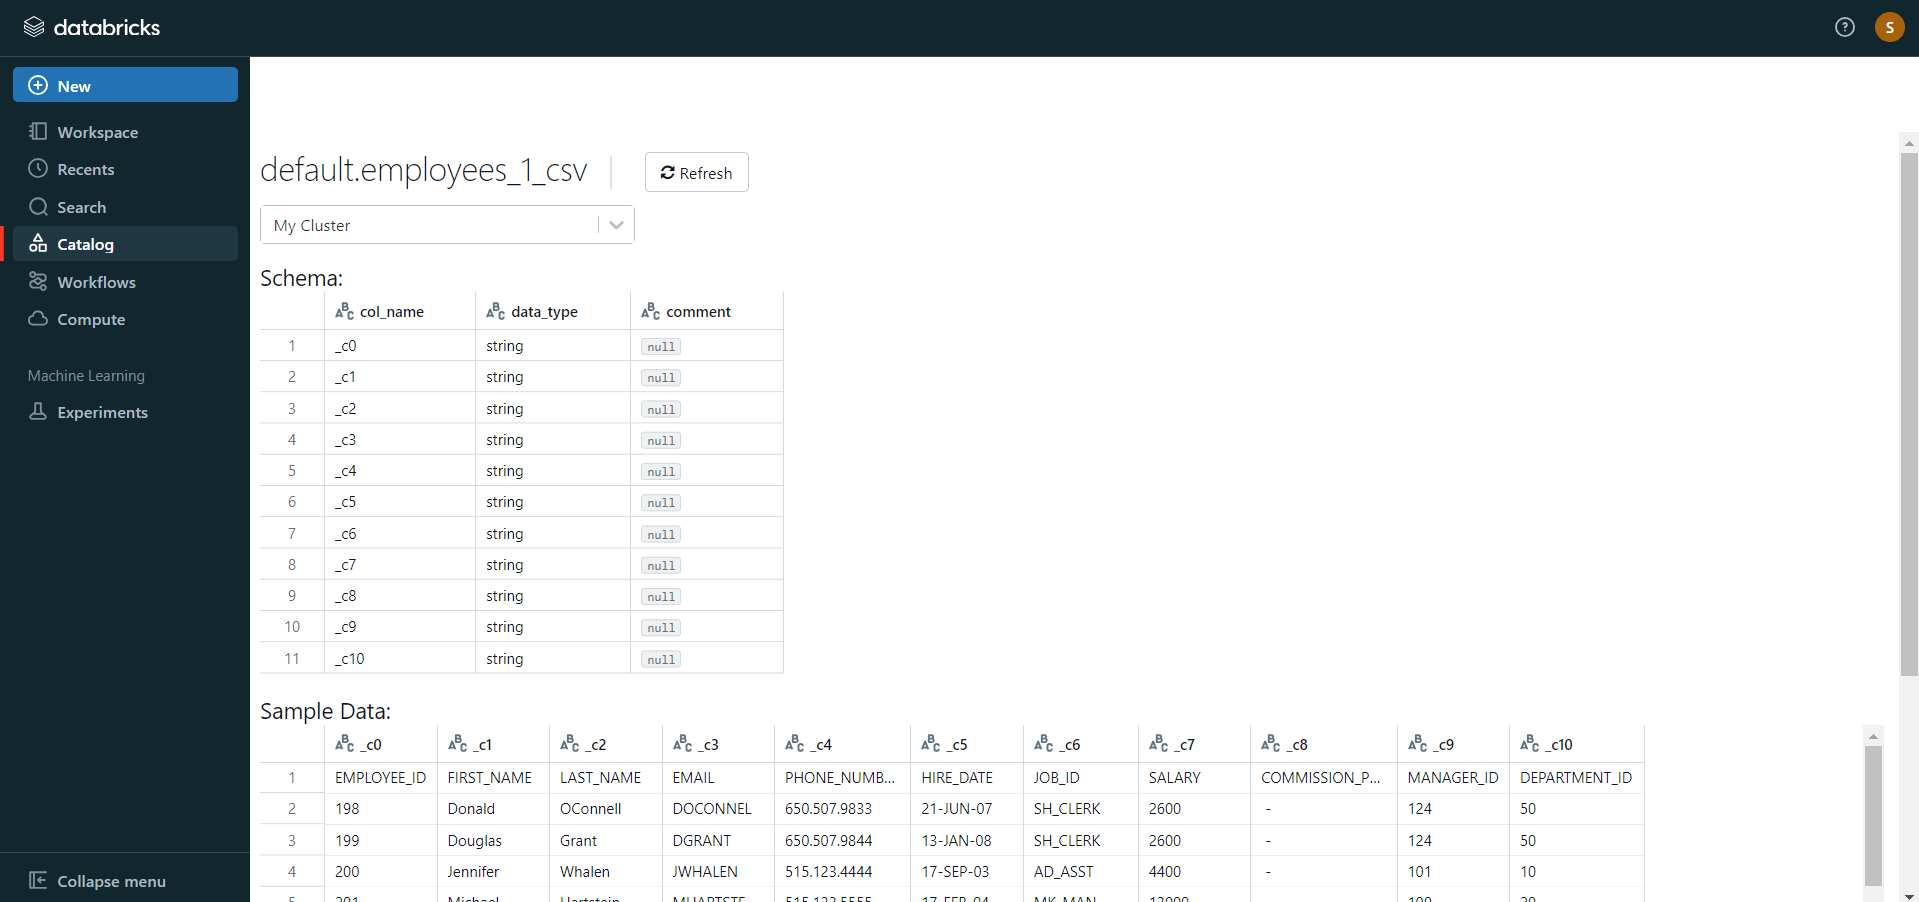
- The data now gets uploaded to Databricks. You can access the data via the landing page’s Import & Explore Data section.
- To modify the data, select a cluster and click on the “Preview Table” option.
- Then, change the attributes accordingly and select the “Create Table” option.
With the above 3-step approach, you can easily replicate data from Mailchimp to Databricks using CSV files. This method performs exceptionally well in the following scenarios:
- Low-frequency Data Replication: This method is appropriate when your product and marketing teams need the Mailchimp data only once in an extended period, i.e., monthly, quarterly, yearly, or just once.
- Dedicated Personnel: If your organization has dedicated people who have to select categories manually, customize templates, then download and upload CSV files, then accomplishing this task is not much of a headache.
- Low Volume Data: It can be a tedious task to repeatedly select different categories, select templates or customize them, and download & upload CSV files. Moreover, merging these CSV files from multiple departments is time-consuming if you are trying to measure the business’s overall performance. Hence, this method is optimal for replicating only a few files.
When the frequency of replicating data from Mailchimp increases, this process becomes highly monotonous. It adds to your misery when you have to transform the raw data every single time. With the increase in data sources, you would have to spend a significant portion of your engineering bandwidth creating new data connectors. Just imagine — building custom connectors for each source, transforming & processing the data, tracking the data flow individually, and fixing issues. Doesn’t it sound exhausting?
Instead, you should be focussing on more productive tasks. Being relegated to the role of a ‘Big Data Plumber‘ that spends their time mostly repairing and creating the data pipeline might not be the best use of your time.
What Can You Achieve by Replicating Your Data from Mailchimp to Databricks?
Replicating data from Mailchimp to Databricks can help your data analysts get critical business insights. Does your use case make the list?
- How does customer SCR (Sales Close Ratio) vary by Email Marketing campaign?
- What message would take a customer from one lifecycle stage to another?
- How likely is the lead to purchase a product?
- What are your best-converting subject lines?
- How to segment your most engaged customers based on email touchpoints?
You can also read more about:
Summing It Up
Exporting and importing CSV files would be the smoothest process when your marketing team requires data from Salesforce only once in a while. But what if the marketing team requests data from multiple sources at a high frequency? Would you carry on with this method of manually importing & exporting CSV files from every other source? In this situation, wouldn’t you rather focus on something more productive? You can stop spending so much time being a ‘Big Data Plumber’ by using Hevo instead.
Want to take Hevo Data for a spin?Try Hevo’s 14-day free trial and simplify your data integration process. Check out the pricing details to understand which plan fulfills all your business needs.Share your experience of connecting Mailchimp to Databricks! Let us know in the comments section below!
FAQs
1. How do I transfer data to Databricks?
You can transfer data to Databricks using a no-code data pipeline platform like Hevo. It simplifies the process by integrating with multiple data sources and automatically loading data into Databricks.
2. How do I import data into Databricks?
Use Hevo to import data into Databricks seamlessly. It supports various data sources and provides easy data integration through its connectors, or you can directly upload files to Databricks using its built-in “Upload Data” feature or cloud storage integrations.
3. How do I connect Mailchimp to Data Studio?
Connect Mailchimp to Google Data Studio using Hevo Data, which allows you to transfer data from Mailchimp to your preferred data warehouse like BigQuery or other destinations. From there, you can link the data to Data Studio for visualization, ensuring a smooth data analysis process.


