Tableau is a rapidly growing Business Intelligence (BI) tool and a Data Visualization software developed to transform the way Data Analytics is used by organizations to solve business problems. Tableau comes with an extensive set of features and tools that help in making the most of business data. Tableau presents the Data Visualization in an easy-to-understand format of dashboards and worksheets. In short, Data Analysis is a walk in the park with Tableau tools and this blog will take you through the Tableau Content Migration tool.
Tableau makes working with data really easy with real-time high-level analytics, extensive modeling, and custom development. However, users are constantly seeking ways to copy content between projects and this is where the Tableau Content Migration tool comes in. The Tableau Content Migration tool provides an easy way to migrate content between Tableau Server projects. Let’s get started.
Table of Contents
What is Tableau?
Tableau is a prominent Business Intelligence (BI) & Data Visualization tool used by companies and organizations all over the world for reporting and analyzing huge volumes of data. Developed by Pat Hanrahan, Christian Chabot, and Chris Stolte, Tableau helps in transforming raw data to a format that is easily understood by professionals at any level in an organization. Since its inception in 2003, Tableau has allowed leading industries to cut analysis time and make their organizations more data-driven.
Looking for the best ETL tools to connect your data sources? Rest assured, Hevo’s no-code platform helps streamline your ETL process. Try Hevo and equip your team to:
- Integrate data from 150+ sources(60+ free sources).
- Utilize drag-and-drop and custom Python script features to transform your data.
- Risk management and security framework for cloud-based systems with SOC2 Compliance.
Try Hevo and discover why 2000+ customers have chosen Hevo over tools like AWS DMS to upgrade to a modern data stack.
Get Started with Hevo for FreeKey Features of Tableau
Here a some of the key features responsible for the immense popularity of Tableau.
- Multipurpose Dashboard: Tableau comes with an intuitive dashboard that allows even the non-technical users to perform quick Data Analysis and create visualizations. Users can create high-level graphs and dashboards using its easy-to-use drag and drop functionality.
- Extensive Data Sources: Tableau houses over 200 connectors and drivers that allow users to securely connect to multiple third-party applications and external data sources such as Relational Databases, Big Data, Cloud, Spreadsheets, and more.
- Powerful Collaboration: Users working on different projects can collaborate with each other on Tableau. Users can further share the dashboard on the Cloud, making it accessible to anyone from anywhere.
- Advanced Visualizations: Tableau has a vast collection of advanced Data Visualization techniques. Users can easily visualize data in the form of Charts, Tables, Graphs, Plots, Maps, etc.
- Tableau Community: Tableau has a large community of active users, Developers, and Analysts. Being a part of this community allows you to continuously learn, upskill, build powerful connections, and offer mentorship to newcomers.
What is Tableau Content Migration Tool?
With every organization generating data like never before, companies often look to have a competitive edge in the market. Data Analytics and Business Intelligence are the best ways to gain business-critical insights in this age of Data-Driven Decision-Making. The term’s meaning is really in the name itself, it means collecting and using relevant content to make informed and smarter business decisions. This solely leads to an increase in the net content volume. With more and more people working with data on a regular basis, it becomes necessary to ensure that Tableau content can be discovered, migrated, and collaborated upon.
Tableau Content Migration tool, as the name suggests, is primarily used to move Tableau Server content from one project to another. You can migrate content between projects on a single Tableau Server installation or between projects on separate Tableau Server installations. Users can further build a “Migration Plan” that can be used a single time or can be used as a template for multiple migrations.
The Tableau Migration tool gives users the flexibility to move, maintain, and manage content based on specific requirements. This helps in making the content more discoverable by users and streamlines the collaboration process. Tableau Content Migration tool comes with many features that help in accomplishing multiple tasks related to content migration and maintenance.
Installation Requirements
The Tableau Content Migration tool supports only Windows Operating System, hence you’d need a Windows OS to install the Content Migration tool. Before installing the migration tool, you must be able to connect the site you’re migrating (source site) to the Tableau Server Computer and the Tableau Server Computer to the site you’re migrating to (destination site). One must ensure that both the source and destination sites have a valid Server Management Add-on license.
The Tableau Content Migration Tool can connect to Tableau Server versions 2019.3 and later. Before installing the Tableau Migration tool, make sure that your system supports the minimum requirements as mentioned below:
- Microsoft Windows 10 or newer (x64)
- 4 GB memory or larger
- Intel Core i3 or AMD Ryzen 3 (Dual-Core)
- 2 GB HDD or larger.
- Enough free disk space to store the application and its logs.
Also, make sure that the REST API is enabled on Tableau Server. If not enabled, you can run the tsm configuration get -k api.server.enabled command to enable this.
Content Migration Tool Installation
You would need the Administrator access to the computer to proceed with the installation. Follow the below-mentioned steps to install the Tableau Content Migration Tool:
- You can download the Content Migration Tool installer (Tabcmt-64bit-<version>.exe) from the Tableau Server Management release page. Download the installer as per the version of your Tableau Server.
- Once the download is finished, you can open and run the Tableau Migration Tool Setup file.
- Accept the License Agreement and click on “Install”.
- The User Account Control dialog box will now open up, click on “Yes” to allow the installer to make necessary changes.
Content Migration Tool Installation from the Command Line
Installing the Tool
The Tableau Content Migration Tool can be installed using the command line if you have Administrator privileges on the machine.
How to Install
- Run the installer file (e.g.,
Tabcmt-64bit-2022-3-0.exe) in the command prompt. - Use switches like
/quiet(for a silent installation) or/norestart(to prevent automatic restarts).
Who Can Install
Only users with Administrator access on the system can perform this installation.
How to Use Tableau Content Migration Tool?
Tableau Content Migration tool makes the process of Tableau Server migrations quite straightforward. Users can easily build a Migration Plan that can be scrutinized and repeated over time for migrations. A Migration Plan is based on batch processing meaning any number of Workbooks and Data Sources can be migrated with ease. However, the Tableau Server user account(s) must have an Explorer role or higher to proceed.
Before getting started, it is important to understand that each Migration Plan file is generated with a unique Encryption Key corresponding to the application that created the plan. You can view your Encryption Key from Help > Settings.
Follow the below-mentioned steps to get started with the Content Migration Tool Tableau.
Step 1: Start
The first step of the Migration Process is to create a plan. This plan can be saved, modified, and re-used for further migration processes.
- Now, click on “Create New Plan” to create a new plan, or click on “Browse for a Plan” to select an existing plan.
- All of your saved Migration Plans will be stored in the My Documents > Tableau Content Migration Tool Plans folder by default.

- You can also duplicate and modify an existing Migration Plan and save it as a new plan. To do so, select the plan you want to copy and click on “Duplicate”.
Step 2: Planning
Once you’ve created your plan, it’s now time to build it. To build a Migration Plan you must select the Source and Destination Servers in the Servers section of the Planning phase.
Use the below-mentioned steps to sign in to Tableau Server.
- Click on “Sign in to Tableau”.
- The “Select a Server” dialog box will open, you can select a saved connection and click on “Continue”.
- However, if there are no saved connections, click on “Add or edit saved connections” to add a new connection.
- Enter your credentials and click on “Sign In”.
- After signing in, you can select the site you wish to use.
- To modify your selection, click on “Select a different source/destination”. You can use these steps to sign in to Source and Destination Servers.
- After you’ve successfully signed in to both Source and Destination Servers, click on “Next”.
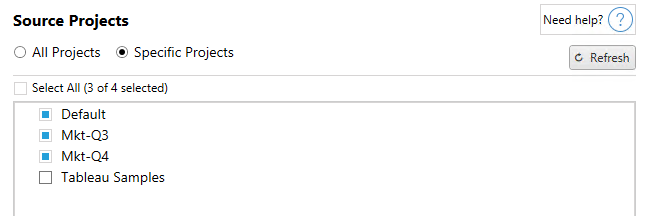
Next up, you need to select the Source Projects from which the Workbooks and Published Data Sources will be migrated. You’ll have 2 options when selecting Source Projects: All Projects, and Specific Projects.

- Select the “All Projects” option to select all the projects from the Source Site specified.
- Or, you can select the “Specific Projects” option to select only specific projects from the Source Site specified.

- After the Source Projects are selected, select the Project Options to apply for the destination.

- After selecting the “Source Projects”, click on “Next”.
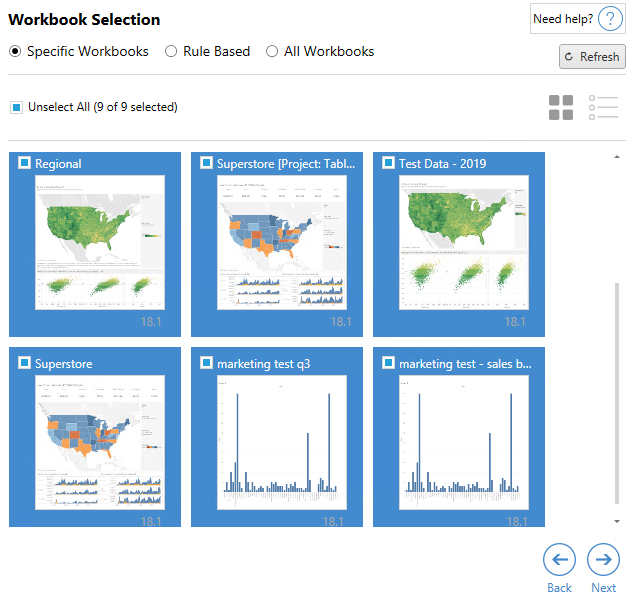
The next step requires you to prepare your Workbooks for migration. All of the Workbooks available in the Source Site and Projects are displayed on the “Workbook Selection” page.

- There are 3 ways to choose the Workbooks, you can either select specific Workbooks by clicking on each of them, or you can select Workbooks based on a rule/criteria, or you can entirely select all the Workbooks in the source. You can refer to the Workbooks section for detailed instructions.
- After selecting the Workbooks, click on “Next”.
The next step requires you to select Published Data Sources.
- This process is very much similar to the Workbooks selection process. You can refer to the Published Data Sources Section for detailed instructions.
- After selecting the Published Data Sources, click on “Next” to continue to the Migration Plans: User Permissions Mapping.
Once you’re done with that, the next step requires you to create any scripts that you want to run with your Migration Plan before or after migration.
- The Pre Migration step is for the scripts that you want to run before the migration process. You can click on “Enable” to activate the script run. Hovering the cursor over the active fields will help you fetch the help information available.
- You can select the “Custom script” option from the Run drop-down to enter your custom pre-migration script. The script will be executed as a *.cmd file.
- The Post Migration step is for the scripts that you want to run after the migration process. You can click on “Enable” to activate the script run. Hovering the cursor over the active fields will help you fetch the help information available.
- You can select the “Custom script” option from the Run drop-down to enter your custom pre-migration script. The script will be executed as a *.cmd file.
- Click on “Next” to configure the Plan Options.

- You can hover your cursor over the ‘question mark’ appearing next to every option to get contextual assistance for a particular option.
- After configuring the Plan Options, click on “Verify & Run” to complete the Planning phase of your migration.
Step 3: Migration
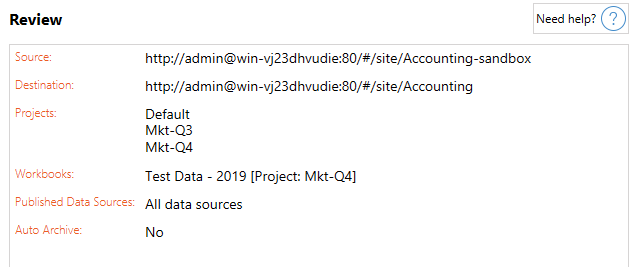
You are now ready to run the batch process for migration. Before running the migration, a plan summary will be displayed for your verification.

- You can click on any section to modify it. Once you’ve verified the details, click on “Run’ to start the migration process.
- You will now be prompted about any unsaved changes that will be saved while running the migration. Click on “Yes” to proceed.

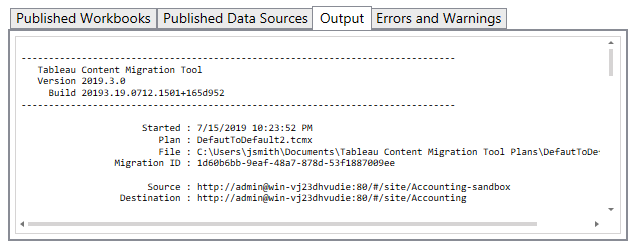
- The migration process will start and you can view the overall plan progress from the status bar.

- Once the Migration Plan finishes running, you can click the bottom tabs to check the output and other relevant information regarding the migration process.

- Click on “Done” to finish.
Use Cases of Tableau Content Migration Tool
- Content Promotion: The Content Migration Tool Tableau can be used to create content in development sites. You can further perform routine migrations to staging or production environments.
- Tailoring Content for Customers: You can use the Content Migration tool to customize content for your customers when working in a consulting scenario. Each Workbook can be used as a template for your Migration Plan, allowing you to customize them with text, images, etc., for specific customers.
- Content Migration: The primary use case of the Content Migration Tool Tableau is to migrate content between Tableau Servers.
- External Content Sharing: In addition to moving content between Tableau Servers, you can also share internal content with external users fostering collaboration. And, you can do so without allowing access to your site using the Content Migration tool. This allows collaborators to view and modify only select content, without affecting content stored on your internal Server.
- Maintenance Tasks: You can use the Content Migration Tool to perform a variety of maintenance tasks such as restoring accidentally removed content from the production Tableau Server, managing archiving stale content, maintaining a backup Tableau Server environment, etc.
You can also take a look at how you can effortlessly set up Tableau REST API Connection and Tableau Hive Connection step-by-step to explore how you can get more from your Tableau data.
Limitations of Tableau Content Migration Tool
- Tableau Content Migration Tool will not migrate the Users, Groups, and Site settings server-level configurations from the Source Site to the Destination Site.
- Content Migration Tool will not migrate the Data-driven alerts, Subscriptions, Custom views, Favorites, and Comments user configurations from the Source Site will not be migrated to the Destination Site.
- Content Migration Tool can only connect to Tableau Server versions 2019.3 and later. Hence, it can’t support the migration of Workbooks and Published Data Sources saved before version 2018.1.x.
- Content Migration Tool will not migrate the content metrics and descriptions of Workbooks and Data sources on the Source Site to the Destination Site.
- Content Migration Tool will not migrate the Tableau Prep flows published to the Source Site to the Destination Site.
Conclusion
Tableau is a prominent Data Visualization and BI tool that allows users to integrate various Data Sources and create attractive Charts, Dashboards, and Reports according to user-specified data that can be shared easily. However, the Tableau content must be maintained and governed such that users can discover, consume, and share content between Tableau Servers easily.
This blog introduced you to Tableau and took you through various aspects of the Tableau Content Migration tool. Tableau makes Business Analysis more efficient through intuitive, interactive, and easy-to-use services. Moreover, analyzing and visualizing your data by loading it into a Data Warehouse from Tableau can be cumbersome. This is where Hevo comes in.
Hevo, with its strong integration with 150+ sources and BI tools allows you to not only export & load data but also transform & enrich your data & make it analysis-ready in a jiffy.
Try Hevo and see the magic for yourself. Sign up for a free 14-day trial to streamline your data integration process. You may examine Hevo’s pricing plans and decide on the best plan for your business needs.
Frequently Asked Questions
1. How do you migrate data in Tableau?
You can migrate data in Tableau by exporting Tableau workbooks, data sources, and dashboards from one environment to another. This can be done manually by saving the files and publishing them to a new Tableau server or using tools like the Tableau Content Migration Tool (CMT) for automated migration.
2. What is a content migration tool?
A Content Migration Tool (CMT) in Tableau is a utility that helps move Tableau content such as workbooks, data sources, and dashboards between Tableau environments, like from development to production.
3. What is CMT in Tableau?
CMT stands for Content Migration Tool in Tableau. It streamlines the migration process by automating tasks like transferring content, maintaining permissions, and ensuring consistency between environments.


