


Your organization may store large volumes of data in a single Snowflake data warehouse. However, extracting data specific to individual departments from the data warehouse can be time-consuming, delaying your analytical and business intelligence tasks. To address this issue, consider building a data mart within Snowflake.
These separate data marts allow your organization’s departments to quickly access and analyze their subset of relevant data. By focusing on department-specific data, the Snowflake data mart facilitates better insights and also helps guide the decision-making process at the department level.
This article highlights the benefits of a Snowflake data mart, the steps to create one, and the differences from a traditional data mart. You can also explore data mart optimization strategies and how to build a data mart using Snowflake data in Power BI.
Table of Contents
What is Snowflake Data Mart?
A data mart is a specialized storage subsystem involving information specific to your organization’s department, business unit, or user group. For instance, your marketing team can store all its information in a data mart to analyze the monthly goals in a period.
Similarly, other departments can store their operational data in separate data marts to achieve better results.
Snowflake’s modern architecture allows you to build specific data marts within your organization. Snowflake data mart architecture leverages the capabilities of a data warehouse to store and process volumes of departmental data.
However, compared to data warehouses, data marts are smaller and collect data from limited sources.

Your organization can enable data sharing for data mart consolidation in Snowflake. It helps other departments utilize information from the data warehouse or other data marts, reducing data silos and facilitating faster decision-making.
A Snowflake-native app to monitor Fivetran costs

Why Should You Implement Snowflake Data Marts?
As your organization’s datasets and analytical needs keep growing, your Snowflake data warehouse can become overloaded. When more queries and data processing tasks are executed, the data warehouse’s performance may slow, affecting your business’s operational efficiency.
A slow and overloaded data warehouse is the key reason for implementing a data mart within the Snowflake platform. A data mart serves as a specialized subset of the central data warehouse, specifically designed to handle different analytical tasks across your organization. By exporting the relevant data into data marts for specific analytical purposes, you can optimize query performance and improve the workings of your Snowflake data warehouse.
Snowflake Data Mart vs. Traditional Data Mart
The following table distinguishes a Snowflake data mart from a traditional one.
| Snowflake Data Mart | Traditional Data Mart |
| You can create a data mart in Snowflake using its cloud-based modern data warehouse architecture. | You can create a traditional data mart using a standalone database application or an on-premise data warehouse. |
| Snowflake data mart provides flexibility in independently scaling the computing and storage resources for data mart and optimizes performance. | Traditional data mart provides limited flexibility as it is tightly coupled with the underlying database architecture. |
| Snowflake’s architecture allows quick scaling up or down cloud resources for your data marts based on demand. | Scalability in traditional data marts may be limited by on-premises hardware constraints or the capacity of the infrastructure. |
| Snowflake operates on a pay-as-you-go pricing model, where you only pay for the resources you utilize for your data mart. | The cost model for traditional data marts involves upfront hardware and software investments along with maintenance costs. |
How to Create a Data Mart in Snowflake?
Here are the steps you must follow while creating a data mart in Snowflake:
Step 1: Planning and Preparation
Identify Business Requirements
Recognize the particular business requirements of each department in your organization. It involves understanding the relevant data, the type of analysis you need to perform, and the key performance indicators (KPIs) to measure the data mart’s success.
Define the Scope of the Data Mart
Determine the data mart’s capacity, including the specific data sources, models, and integration needs. This step ensures that the data mart can meet the department’s needs and is scalable enough to accommodate new datasets.
Identify Data Sources
Determine the data sources that align with your data mart’s needs, including SaaS applications, flat files, backend storage systems, or existing data warehouses. High-quality data or trusted sources allow you to extract the most value from the data when querying the data mart.
Step 2: Design a Snowflake Schema Model for Data Mart
Snowflake schema is a multidimensional data modeling approach that helps guide how to organize data in the data mart for efficient retrieval and analysis. The normalization process allows you to reduce redundancy and improve data quality.
To create the data mart Snowflake schema, follow the steps:
- Log into your Snowflake using the appropriate credentials.
- Create a new database in Snowflake dedicated to your data mart using the following command:
CREATE DATABASE datamart_name;- Using the following sample SQL code, create the required dimensional tables and a fact table to hold data within the Snowflake data mart.
CREATE TABLE table_name ( column1 datatype, column2 datatype, …., columnN datatype)- You can establish relationships between the dimensional tables using foreign keys.


Step 3: Streamline ELT workflows Using Hevo Data
You must consolidate and integrate all your departmental data into a Snowflake data warehouse before loading it into a data mart. The data can be in varying formats and may have other inconsistencies. You must spend time cleaning and preparing your data for better performance. You can utilize a near-real-time ELT, no-code data pipeline platform like Hevo Data to automate this process.
With Hevo Data, you can use automated data pipelines cost-effectively to consolidate and export data into your Snowflake data warehouse. Once the data is ready for use, you can load it into the Snowflake data mart.
Step 4: Create an External Stage Pointing to an AWS S3 Bucket for a Data Mart
You can create an external stage using Snowsight or the following SQL commands:
CREATE OR REPLACE STAGE stage_name

URL = 's3://your_bucket_name/path-to-folder/'
CREDENTIALS = (AWS_KEY_ID = 'your_access_key_id' AWS_SECRET_KEY = 'your_secret_access_key')
FILE_FORMAT = (TYPE = CSV);
Step 5: Load Data into the Snowflake Data Mart
You can load the relevant data from your central data warehouse into the corresponding tables within the data mart using Snowpipe or COPY INTO command:
COPY INTO @stage_name
FROM table_name
FILE_FORMAT = (FORMAT_NAME = CSV);
Step 6: Implement Data Mart Security Measures
To control unauthorized access to the data mart, you can enforce multi-factor authentication or employ role-based access control (RBAC). Continuous auditing and monitoring can help detect and manage potential threats quickly.
Step 7: Develop Reports and Analytics
Once the data mart is ready, you can perform better analytics and reporting to identify valuable insights effectively. To do this, Snowflake allows you to integrate with business intelligence tools like Power BI. These tools help develop reports and dashboards for quickly analyzing the data in the data mart.
How Do You Build a Power BI Datamart Using Snowflake Data?
Power BI data marts offer a low/no-code solution, allowing you to integrate data from multiple datasets and import the data into a cloud platform. Once the data is loaded into the data mart, you can define relationships and establish policies for business intelligence and analytics.
In addition, you can query the Power BI data mart using a visual builder within the data mart UI or a T-SQL endpoint. This allows you to develop reports and dashboards quickly and gain valuable insights.
Let’s see how you can develop a Power BI data mart using Snowflake Data. Before you begin, ensure you have a Power BI Premium license, as the data mart feature comes under the premium plan.
Follow the steps to build a Power BI data mart:
- Open the Power BI premium sandbox and choose +New > Data Mart (Preview) to create the data mart.
- Click on the Get Data option and select the Snowflake data source.
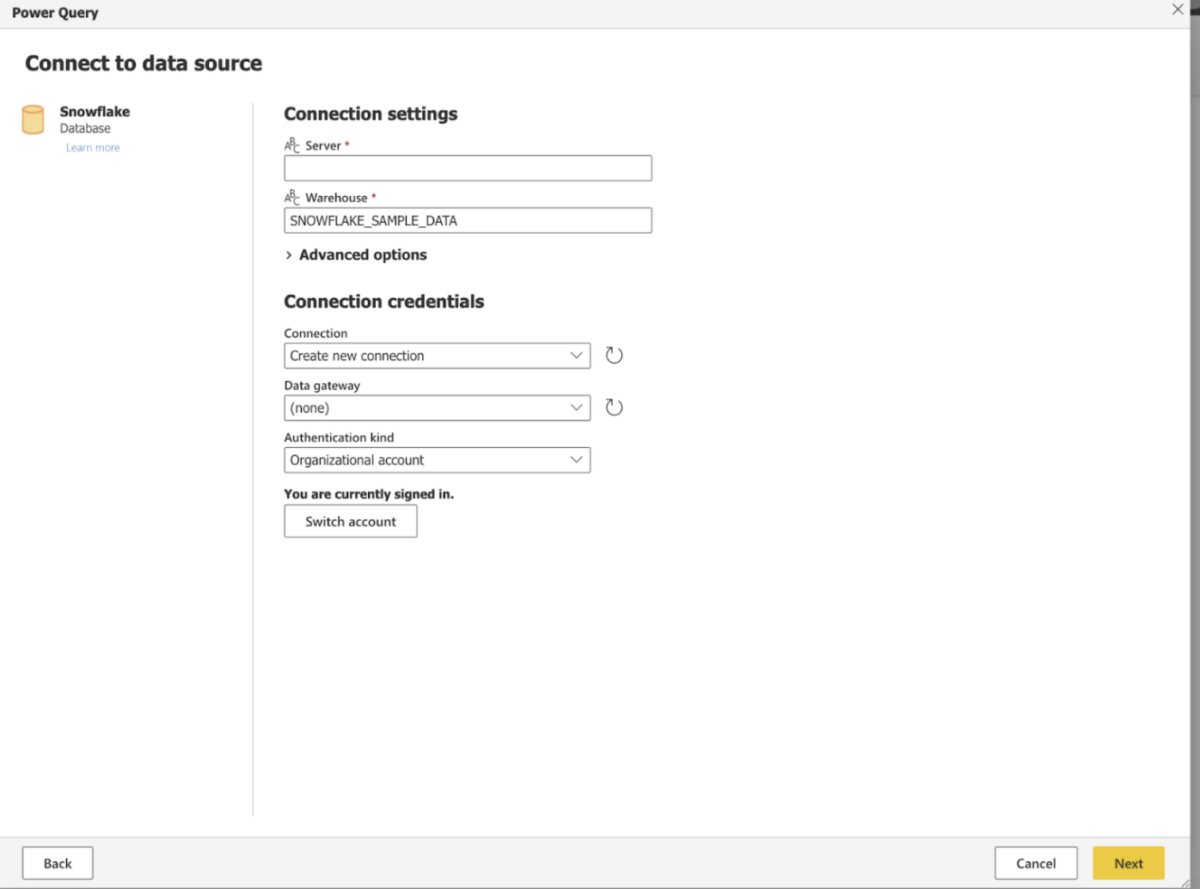
- In the Power Query window, specify the connection details.
- Expand the Snowflake folder and select the tables and views to be added to the data mart.
- Click the Transform data button to make necessary transformations within the selected tables.
- Click the Save button to begin data loading into the data mart.
- Once data is loaded, click the Model button to design a star schema model with proper relationships between the Power BI data mart tables.
- To establish relationships, drag and drop the key fields from one table to another. Once the Edit Relationship screen appears, you can change the defined relationships’ cardinalities or fields.
- Click the Confirm button to apply this relationship to your model. Repeat this process for all the relationships.
After creating your data mart with the Snowflake data, you can follow the steps to create a new report on your Power BI Desktop:
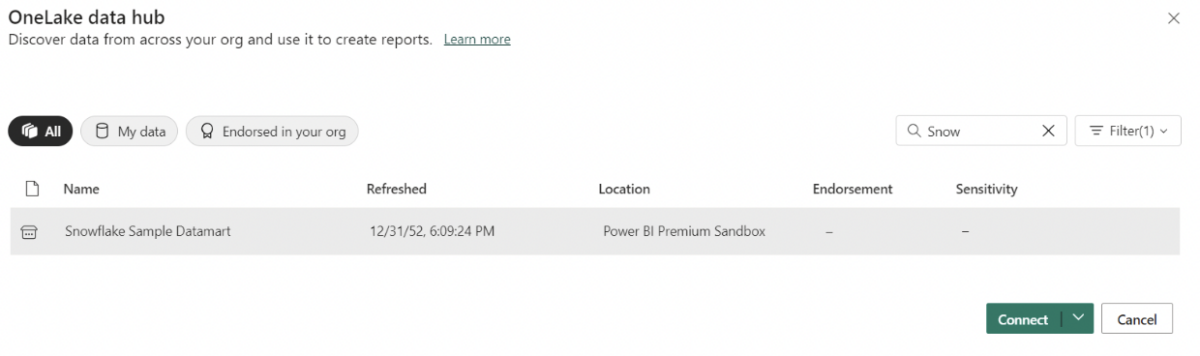
- Select the OneLake data hub drop-down menu from the Home tab and choose the Datamarts (Preview).
- Search for your Snowflake data mart and then click the Connect button.
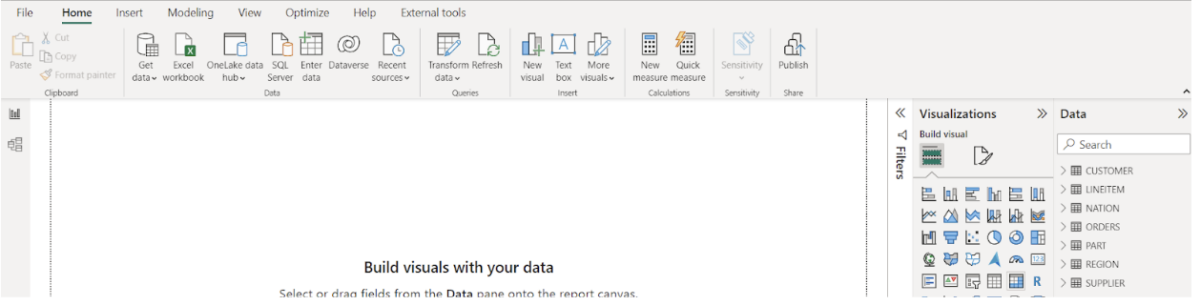
- To build your report, you can drag and drop the Snowflake data from the data mart in the Data panel into Canvas.
Data Mart Optimization in Snowflake
The following section will help you understand how to optimize your data mart in Snowflake:
Use of Snowflake Schema
Building a Snowflake data mart based on the Snowflake schema model normalizes the dimensional tables and reduces data redundancy to save storage space efficiently. A Snowflake schema with more SQL joins improves the data mart’s performance, reducing the amount of data fetched during queries.
Automatic Clustering
Snowflake allows you to store table data in micro-partitions in the Snowflake data mart. By configuring a cluster key, you can arrange the data within these micro-partitions based on the specific columns within the table.
Snowflake’s automatic clustering feature maintains table clustering immediately upon defining a cluster key. Once enabled, automatic clustering continuously updates micro-partitions whenever new data is introduced.
Search Optimization Service
You can perform point lookup queries that help return only a single or small number of records from a table in the Snowflake data mart. With the search optimization service, you can optimize the performance of point lookup queries using selective filters. You can enable this service for an entire table or particular columns.
Migrate your data into Snowflake seamlessly with Hevo. Our platform offers both pre and post-load transformations, ensuring your data is ready for analysis.
- Easy Integration: Connect and migrate data into Snowflake in minutes without any coding.
- Flexible Transformations: Use simple drag-and-drop transformations or custom Python scripts.
- Pre and Post-Load Transformations: Transform your data at any stage of the migration process.
Join over 2000 satisfied customers, including companies like Cure.Fit and Pelago, who trust Hevo for their data management needs.
Get Started with Hevo for FreeConclusion
Separate, well-structured data marts enable targeted data analysis within the Snowflake platform and provide better support for business intelligence tools. By utilizing Snowflake data marts, your organization can ensure optimal performance of the central data warehouse while meeting diverse analytical needs across departments. Snowflake’s data model supports various schema designs to meet diverse business needs. Find out more at Snowflake Data Structuring.
Integrating your data mart with platforms like Power BI and Hevo Data further streamlines data management and optimization. With Hevo Data, you can integrate varied data into Snowflake and leverage its features to drive timely insights. You can use Power BI for data visualization and creating reports on key factors affecting your business performance.
Frequently Asked Questions (FAQs)
What is the difference between a data warehouse and a data mart?
– A Snowflake data warehouse is a centralized virtual storage system that can help store data from multiple sources across an organization.
– On the other hand, a data mart is a subside of a data warehouse that focuses on a specific department within your organization.
What are the best practices for building data marts in Snowflake?
– Instead of storing all data marts within a single Snowflake database, you can create individual databases for each mart.
– For each data mart, use schemas within a database to keep development data separate from production data.
How do data marts work in Snowflake better than a data warehouse?
– Snowflake’s unique architecture, which separates compute and storage, enhances the efficiency of a data mart.
– This separation allows for faster query processing and analytical operations specific to each data mart compared to the data warehouse.
– In addition, your organization ensures that only relevant information is accessible to the members of each department.
Share it with your connections.
-
 Share To LinkedIn
-
 Share To Facebook
-
 Share To X
-
 Copy Link


