Are you trying to derive deeper insights from PostgreSQL by moving the data into a Data Warehouse like Google BigQuery? Well, you have landed on the right article. Now, it has become easier to replicate data from PostgreSQL to BigQuery.

This article will give you a brief overview of PostgreSQL and Google BigQuery. You will also get to know how you can set up your PostgreSQL to BigQuery integration using 2 methods. Moreover, the limitations in the case of the manual method will also be discussed in further sections. Read along to decide which method of connecting PostgreSQL to BigQuery is best for you.

Prerequisites

You will have a much easier time understanding the ways for setting up the PostgreSQL to BigQuery integration if you have gone through the following aspects:

  • An active PostgreSQL account.
  • An active Google Cloud Platform account.
  • Working knowledge of Databases and Data Warehouses.
  • Working knowledge of Structured Query Language.
  • Clear idea regarding the type of data to be transferred.
Solve your data replication problems with Hevo’s reliable, no-code, automated pipelines with 150+ connectors.
Get your free trial right away!

Introduction to PostgreSQL

PostgreSQL to BigQuery: PostgreSQL Logo
Image Source

PostgreSQL, although primarily used as an OLTP Database, is one of the popular tools for analyzing data at scale. Its novel architecture, reliability at scale, robust feature set, and extensibility give it an advantage over other databases.

However, as the data volume and velocity need to increase, it requires a huge effort and expertise to optimize PostgreSQL to make it run analytics queries within the desired time.

Due to this, there can be an impact on your transaction workloads directly or indirectly. This is why most organizations prefer a separate system for analytical workloads.

If that solution is in the cloud additional benefits like elasticity in scaling, minimal upfront cost, etc. come to play. Hence, companies choose to move data from PostgreSQL to BigQuery.

To know more about PostgreSQL, visit this link.

Introduction to Google BigQuery

PostgreSQL to BigQuery: BigQuery Logo
Image Source

Google BigQuery is a serverless, cost-effective, and highly scalable Data Warehousing platform with Machine Learning capabilities built-in.

The Business Intelligence Engine is used to carry out its operations. It integrates speedy SQL queries with Google’s infrastructure’s processing capacity to manage business transactions, data from several databases, and access control restrictions for users seeing and querying data.

BigQuery is used by several firms, including UPS, Twitter, and Dow Jones. BigQuery is used by UPS to predict the exact volume of packages for its various services.

BigQuery is used by Twitter to help with ad updates and the combining of millions of data points per second.

To know more about Google BigQuery, visit this link.

Benefits of Replicating Data to Google BigQuery

Here are some points to be considered while comparing BigQuery with alternative solutions like Redshift. Read a complete comparison between Redshift and BigQuery.

  • BigQuery automatically scales both up and down based on data volume and the complexities of queries. Cluster sizing or scaling is easily handled by BigQuery which means it is truly serverless.
  • There is no cost for infrastructure. We have to pay for storing data ($0.020 per GB per month) and for querying data ($5 per 1 TB of data analyzed). BigQuery is storing data in columnar format. So most of the time volume of data analyzed for the query is much lesser than the total table size. Please refer to their website to know the recent pricing details.
  • Google BigQuery supports streaming data into the destination table without impacting query performance.
  • All the data in BigQuery is encrypted by default. Security is guaranteed and no user configuration is required.
  • BigQuery supports semi-structured data like JSON format. One does not have to convert it to relational data.
  • The Google Cloud team has added ML modules on top of BigQuery. These ML models can be created and trained using basic SQL.
Save 20 Hours of Frustration Every Week

Did you know that 75-90% of data sources you will ever need to build pipelines for are already available off-the-shelf with No-Code Data Pipeline Platforms like Hevo? 

Ambitious data engineers who want to stay relevant for the future automate repetitive ELT work and save more than 50% of their time that would otherwise be spent on maintaining pipelines. Instead, they use that time to focus on non-mediocre work like optimizing core data infrastructure, scripting non-SQL transformations for training algorithms, and more. 

Step off the hamster wheel and opt for an automated data pipeline like Hevo. With a no-code intuitive UI, Hevo lets you set up pipelines in minutes. Its fault-tolerant architecture ensures zero maintenance. Moreover, data replication happens in near real-time from 150+ sources to the destination of your choice including Snowflake, BigQuery, Redshift, Databricks, and Firebolt. 

Start saving those 20 hours with Hevo today.

Get Started with Hevo for Free

Methods to Set up PostgreSQL to BigQuery Integration

For the scope of this blog, the main focus will be on Method 1 and detail the steps and challenges. Towards the end, you will also get to know about both methods, so that you have the right details to make a choice. Below are the 2 methods:

Download the Cheatsheet on How to Set Up High-performance ETL to BigQuery
Learn the best practices and considerations for setting up high-performance ETL to BigQuery

Method 1: Manual ETL Process to Set Up PostgreSQL to BigQuery Integration

The COPY command is used to migrate data from PostgreSQL tables and standard file-system files. It can be used as a normal SQL statement with SQL functions or PL/pgSQL procedures which gives a lot of flexibility to extract data as a full dump or incrementally.

The picture given above represents the high-level steps to be followed to migrate Postgres to BigQuery:

Let’s take a detailed look at each step.

Step 1: Extract Data From PostgreSQL

COPY TO command is the well-accepted method to extract data from the PostgreSQL table. You can also consider using the pg_dump utility for the first time for full data extraction. This blog post will cover both methods.

a. Data Extraction using the COPY command

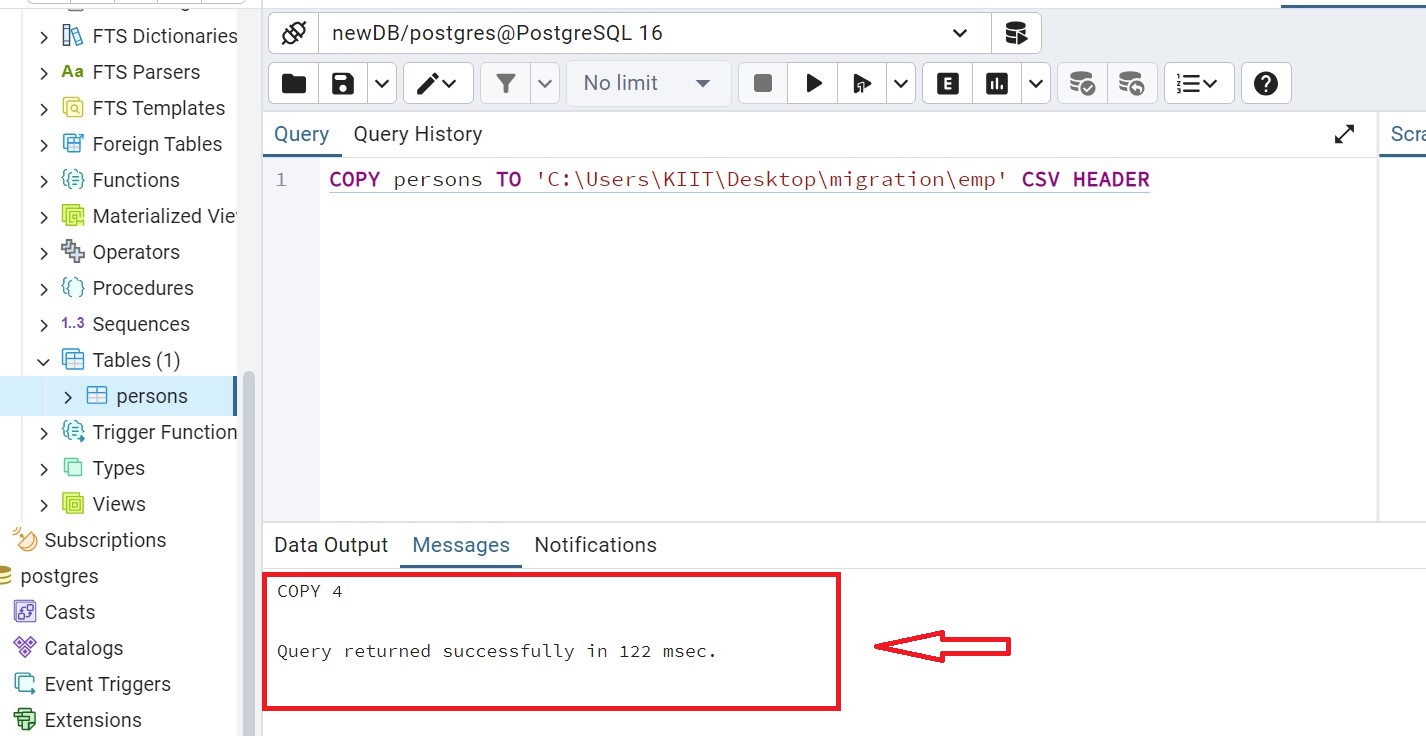
Copy Command is the most efficient way to move data between PostgreSQL tables and the standard file system. The COPY TO command copies the results of a SELECT query or contents of a table to that file. The syntax of Commands is:

COPY table_name or query TO file_name WITH options.

Example:

COPY persons TO 'C:tmppersons_db.csv'  WITH DELIMITER ',' CSV HEADER;
COPY (select * from persons where age >25) TO 'C:tmppersons_db.csv'  WITH DELIMITER ',' CSV HEADER;

Some frequently used options:

  • FORMAT – Data format to be read or written: text, CSV, or binary. By default, this is set to text.
  • DELIMITER- This indicates what character separates columns within each row of the file.
  • NULL – This is the string that represents a null value. By default, it is an unquoted empty string in CSV format and N (backslash-N) in text format.
  • HEADER – In the output file, the column names/headers are from the table. These are mentioned in the first line.
  • QUOTE – When a data value is quoted, this specifies the quoting character to be used. A double-quote is used by default.
  • ESCAPE – This represents the character that should appear before the data character that matches the value for QUOTE.
  • ENCODING – This specifies the encoding of the output file. The existing client encoding is used, if this option is not specified.

Now, let’s look into how the COPY command can be used to extract data from multiple tables using a procedure. The list_of_tables contains details of tables to be exported.

CREATE OR REPLACE FUNCTION to_csv(path TEXT) RETURNS void AS $
declare
   tables RECORD;
   statement TEXT;
begin
FOR tables IN 
   SELECT (table_schema || '.' || table_name) AS schema_table
   FROM list_of_tables
LOOP
   statement := 'COPY ' || tables.schema_table || ' TO ''' || path || '/' || tables.schema_table || '.csv' ||''' DELIMITER '';'' CSV HEADER';
   EXECUTE statement;
END LOOP;
return;  
end;
$ LANGUAGE plpgsql;

SELECT db_to_csv('/home/user/dir'); -- This will create one csv file per table, in /home/user/dir/

If you want to extract data incrementally, add more metadata like the timestamp of the last data extraction to table list_of_tables and use that information while creating a copy command to extract data changed after that timestamp.

For example, say you are using a column name last_success_pull_time corresponding to each table in the table list_of_tables which stores the last successful data pull time.

Each time data in the table which are modified after that timestamp has to be pulled. The body of the loop in the procedure will change like this:

Here, a dynamic SQL is created with a predicate comparing last_modified_time_stamp  from the table to be extracted and last_success_pull_time from table list_of_tables.

begin
FOR tables IN 
   SELECT (table_schema || '.' || table_name) AS schema_table, last_success_pull_time AS lt
   FROM list_of_tables
LOOP
   statement := 'COPY (SELECT * FROM ' || tables.schema_table ||   ' WHERE last_modified_time_stamp > ' || last_success_pull_time ')  TO ' '' || path || '/' || tables.schema_table || '.csv' ||''' DELIMITER '';'' CSV HEADER';
   EXECUTE statement;
END LOOP;
return;  
End;

b. Extract data using the pg_dump

pg_dump is a utility for backing up a PostgreSQL database. It can be used to extract data from the table also.

pg_dump --column-inserts --data-only --table=<table> <database> > my_dump.sql

Here, the output file table_name.sql will be in the form of insert statements like

INSERT INTO table_name (column1, column2, column3, ...)
VALUES (value1, value2, value3, ...);

This output has to be converted into a CSV file. You have to write a small script to perform this.

Step 2: Transform Data

Apart from transformations to accommodate business logic, there are some basic things to keep in mind while preparing data for BigQuery.

  • BigQuery expects CSV data to be UTF-8 encoded. If data is encoded in ISO-8859-1(Latin-1), explicitly specify it while loading to BigQuery.
  • BigQuery doesn’t enforce Primary Key and unique key constraints. Your ETL process has to take care of that.
  • Column types are slightly different between Postgres and BigQuery. Most of the types have either equivalent or convertible types. The following table contains a list of common data types.
PostgreSQL Data TypeBigQuery Data Type
TINYINTINT64
SMALLINTINT64
MEDIUMINTINT64
INT, INTEGERINT64
BIGINTINT64
DECIMALNUMERIC
NUMERIC(p,s)NUMERIC
REALFLOAT64
DOUBLE PRECISIONFLOAT64
BOOLEANBOOL
CHAR(n), CHARACTER(n)STRING
VARCHAR(n)STRING
BYTEABYTES
TINYTEXTSTRING
TEXTSTRING
MEDIUMTEXTSTRING
LONGTEXTSTRING
ENUMNo type for ENUM.Must use any type which can represent values in ENUM
DATEDATE
TIME [WITHOUT TIME ZONE]TIME
TIMESTAMP [WITHOUT TIME ZONE]TIMESTAMP

You can visit their official page to know more about BigQuery data types.

  • DATE value must be a dash(-) separated and in the form YYYY-MM-DD (year-month-day).

Fortunately, the default date format in Postgres is the same, YYYY-MM-DD.So if you are simply selecting date columns it should be the incorrect format.

If the data is stored as a string in the table for any reason, it can be converted while selecting data.

The TO_DATE function in PostgreSQL helps in converting string values into dates.

Syntax : TO_DATE(str,format)
Example : SELECT  TO_DATE('31,12,1999','%d,%m,%Y');
Result : 1999-12-31
  • In TIMESTAMP type, the hh:mm:ss (hour-minute-second) portion must use a colon (:) separator.

Similar to the Date type, The TO_TIMESTAMP function in PostgreSQL is used to convert strings into timestamps.

Syntax : TO_TIMESTAMP(str,format)
Example : SELECT TO_TIMESTAMP('2017-03-31 9:30:20','YYYY-MM-DD HH:MI:SS');
Result: 2017-03-31 09:30:20-07
  • Make sure text columns are quoted if they can potentially have delimiter characters.

Step 3: Upload to Google Cloud Storage(GCS)

There are multiple ways in which you can achieve this:

Using Gsutil:

Gsutil is the standard tool from GCP to handle objects and buckets in GCS. It has options to upload a file from your local machine to GCS.

To copy a file to GCS :

gsutil cp table_data.csv  gs://my-bucket/path/to/folder/

To copy an entire folder :

gsutil cp -r dir gs://my-bucket/path/to/parent/

If the files to be copied are already in S3, the same command can be used to transfer them to GCS. Note that AWS credentials should be present in the default path to work this.

gsutil cp -R s3://bucketname/source/path gs://bucketname/destination/path

Storage Transfer Service:

Storage Transfer Service from Google Cloud Platform is another alternative to upload files to GCS from S3 or other online data sources like HTTP/HTTPS location given destination or sink is Cloud Storage bucket. A GCS bucket can also be the source.

When it comes to moving data to GCS, this service is extremely useful. Here are the top reasons to use Storage Transfer Service:

  • Using the Storage Transfer service, you can schedule both repeating and one-time transfers.
  • If no corresponding source object is present, the service supports the deletion of existing objects in the destination. This is very helpful in syncing source and destination.
  • After transferring data, you can delete the source object.
  • The service supports source and sink synchronization with advanced filters like file creation dates, file names, etc.

Upload Data from Web Console:

In case you are uploading data from the local machine, you can use web console UI to upload files to GCS. The steps along with relevant screenshots are mentioned below:

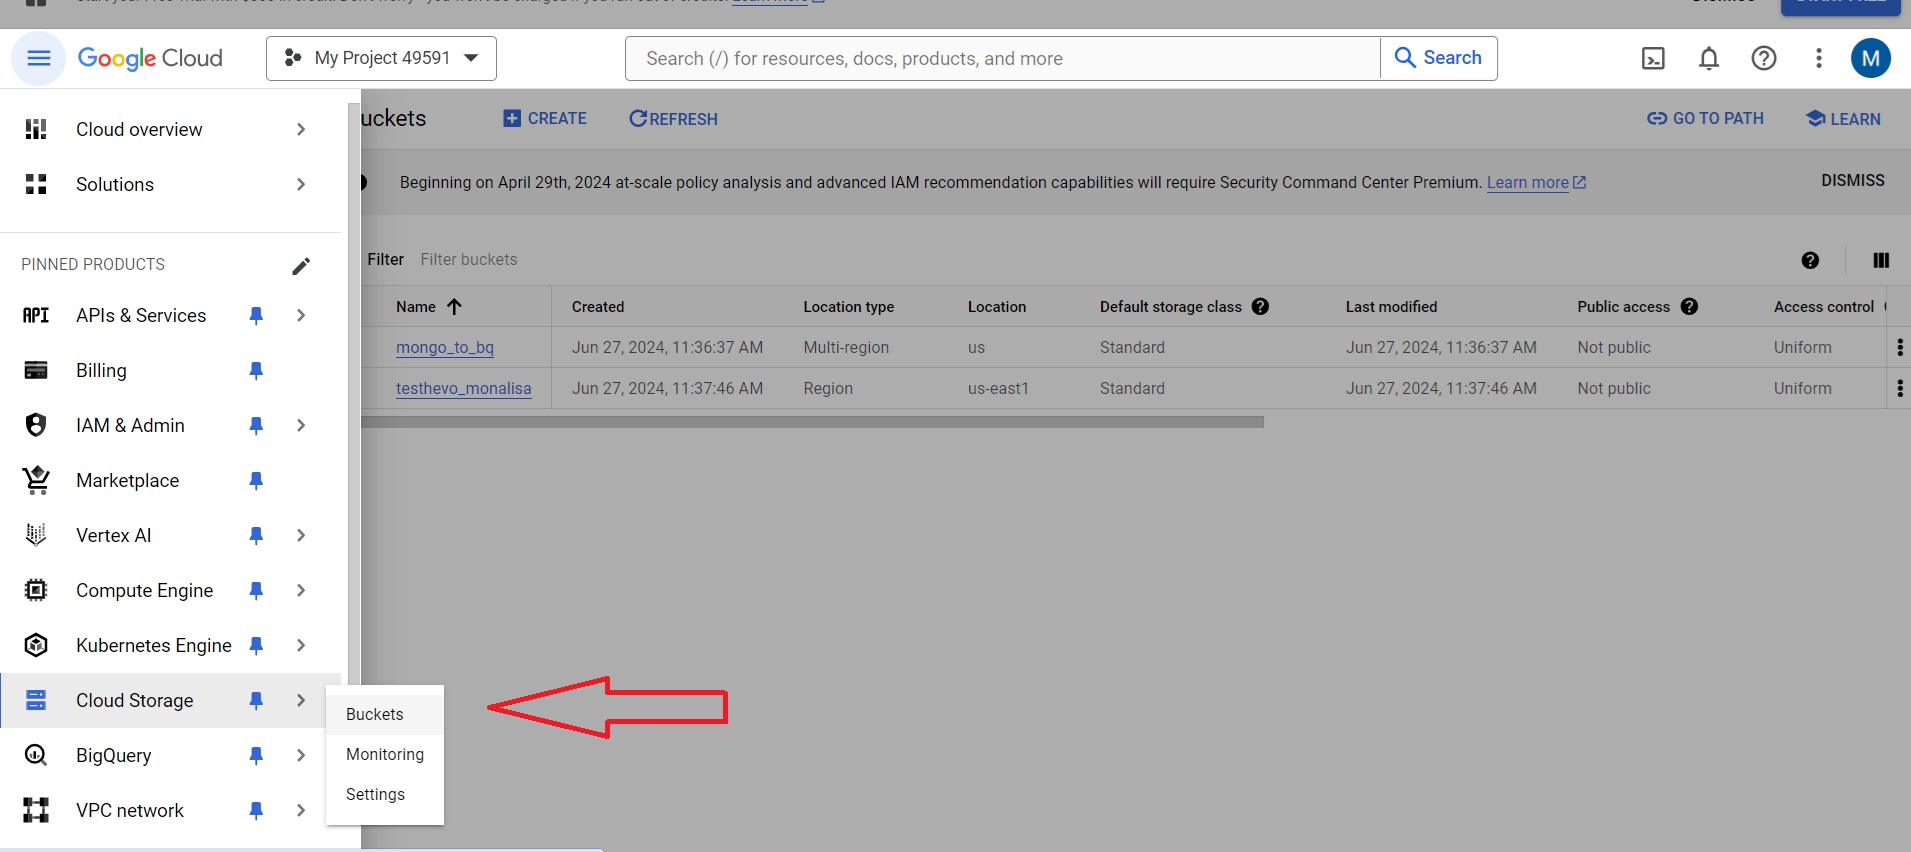
1. First thing, you will have to log in to your GCP account. On the left sidebar, click on Storage and go to the Browser.

PostgreSQL to BigQuery: Google Cloud Platform Sidebar Menu
Image Source

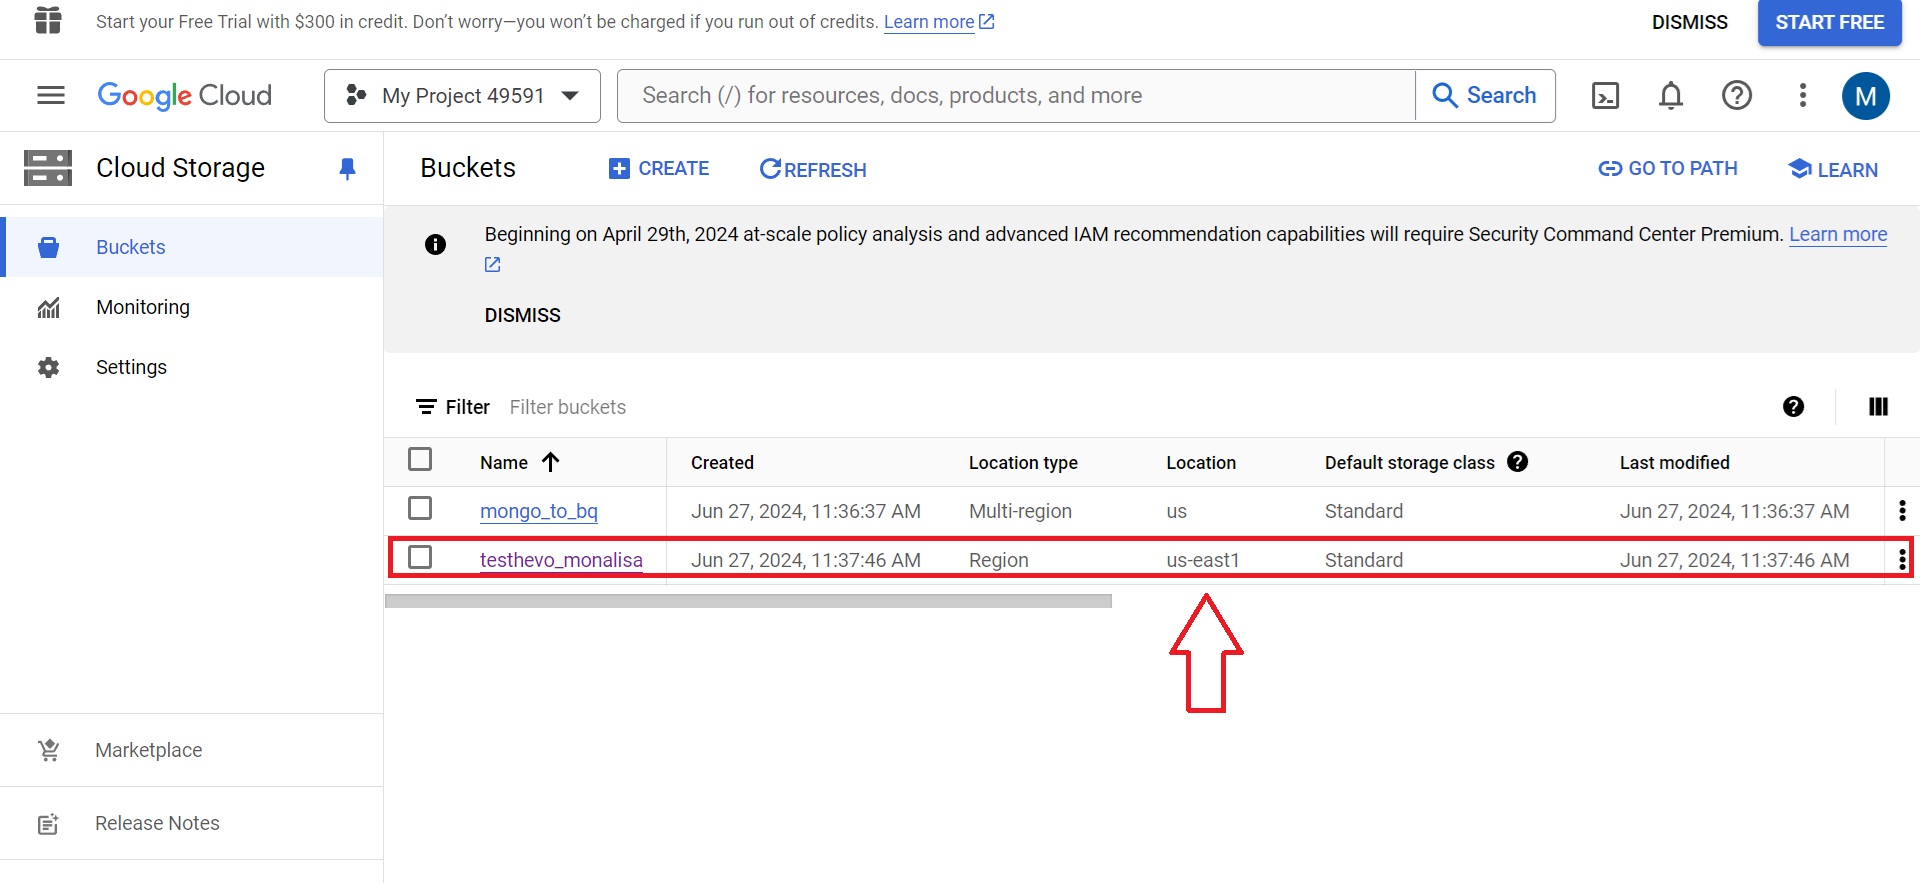
2. Select the GCS bucket that you want to upload the file. Here the bucket is named test-data-hevo. Click on the bucket.

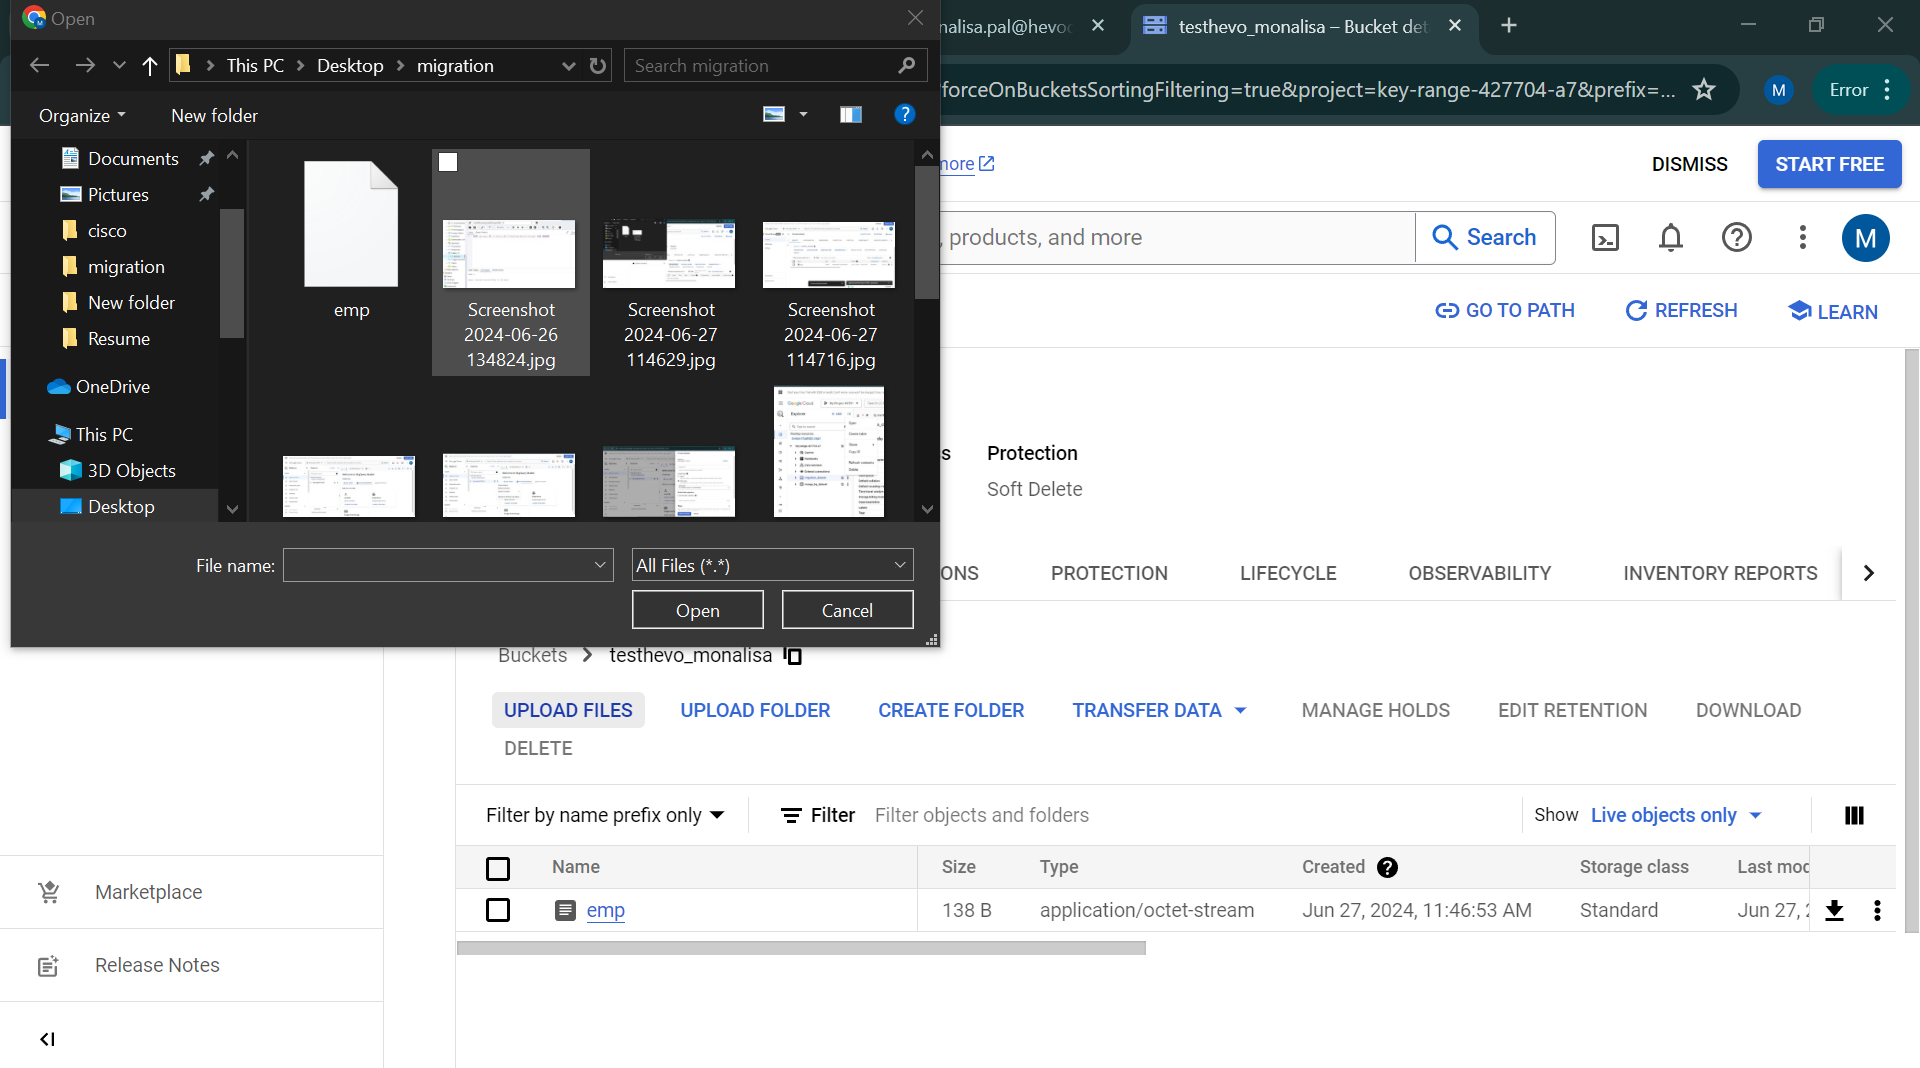
3. In the bucket details page, you have to click on the Upload files button and select relevant files from your system.
4. Once the upload is completed, the file will be listed in the bucket as follows :

PostgreSQL to BigQuery: View the Bucket in Google BigQuery
Image Source

Step 4: Upload to the BigQuery Table from GCS

You can use web console UI or a command-line tool called bq to load data to the BigQuery table. First, let’s look into how to achieve this using the web console:

  • Go to the BigQuery console from the left side panel.
PostgreSQL to BigQuery: Google Cloud Platform Sidebar Menu
Image Source
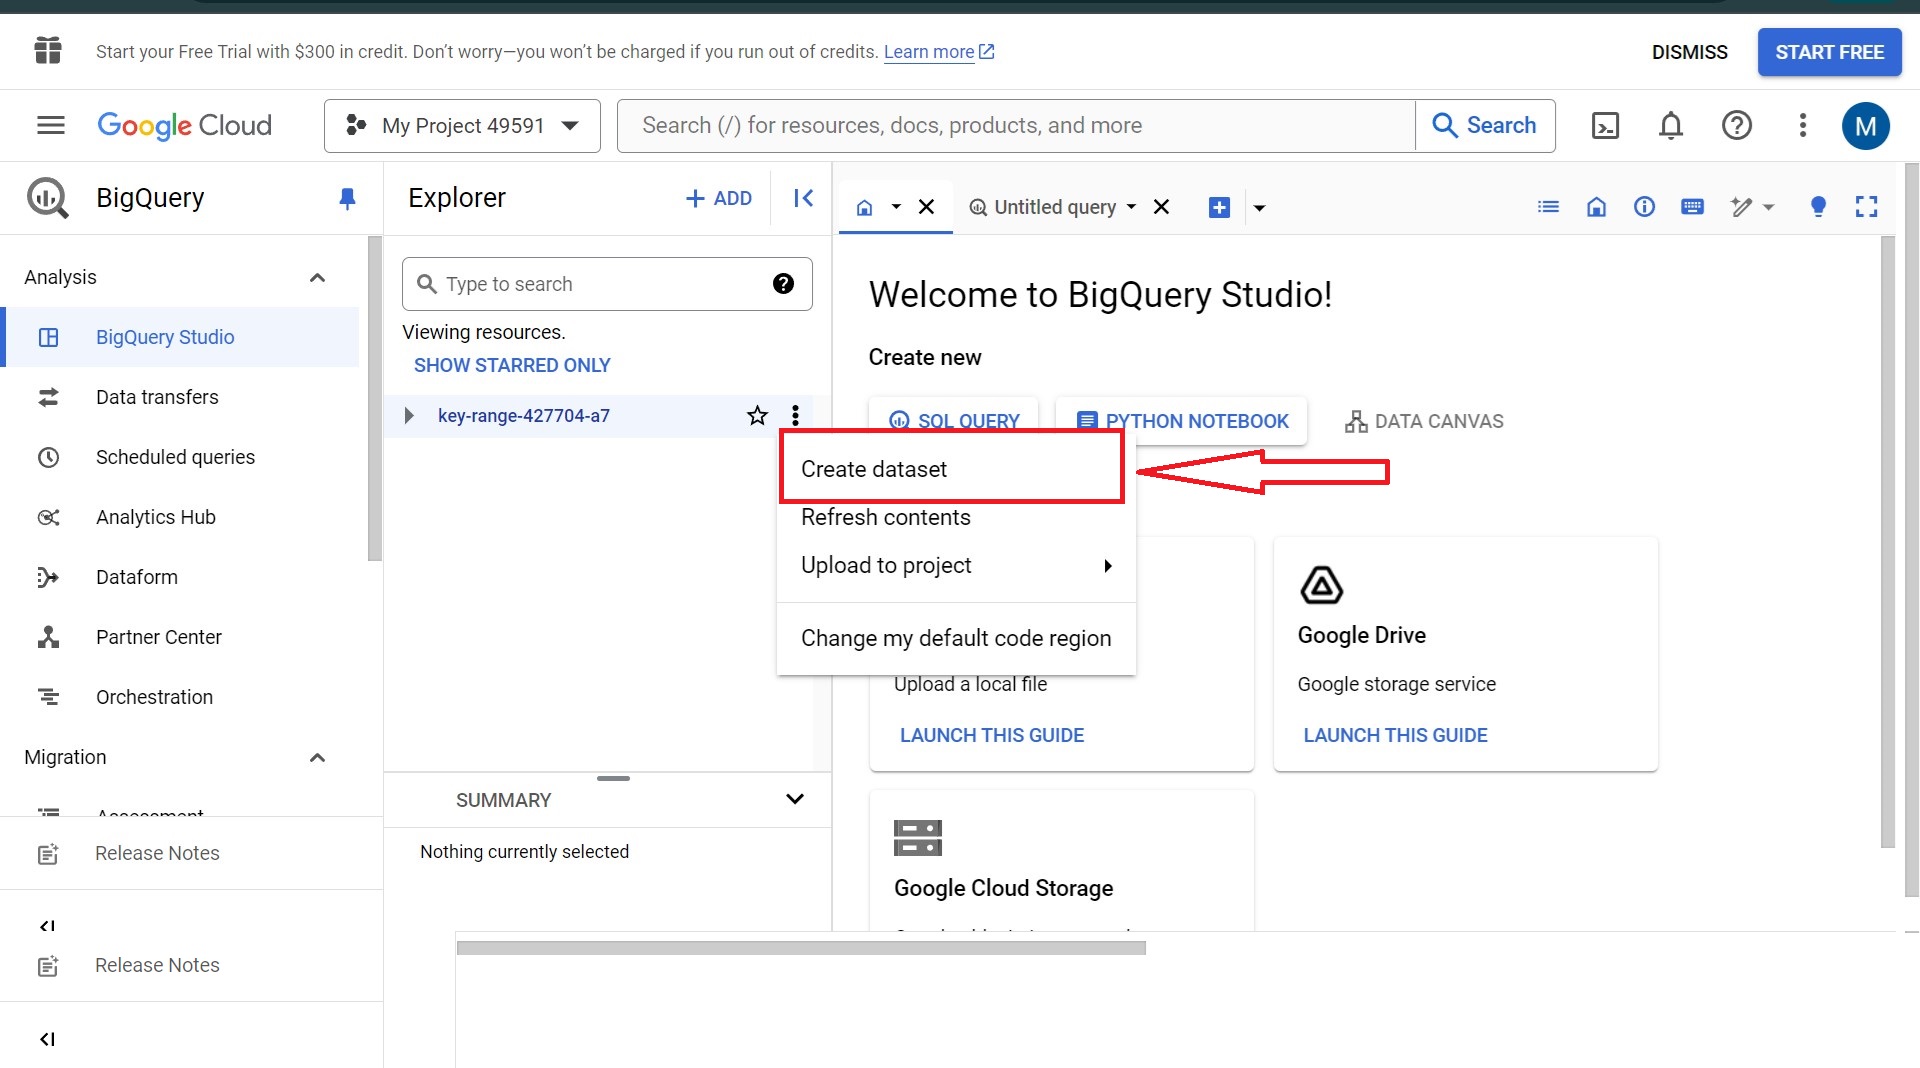
  • Create a Dataset if not present already.
PostgreSQL to BigQuery: Creating the Dataset
Image Source
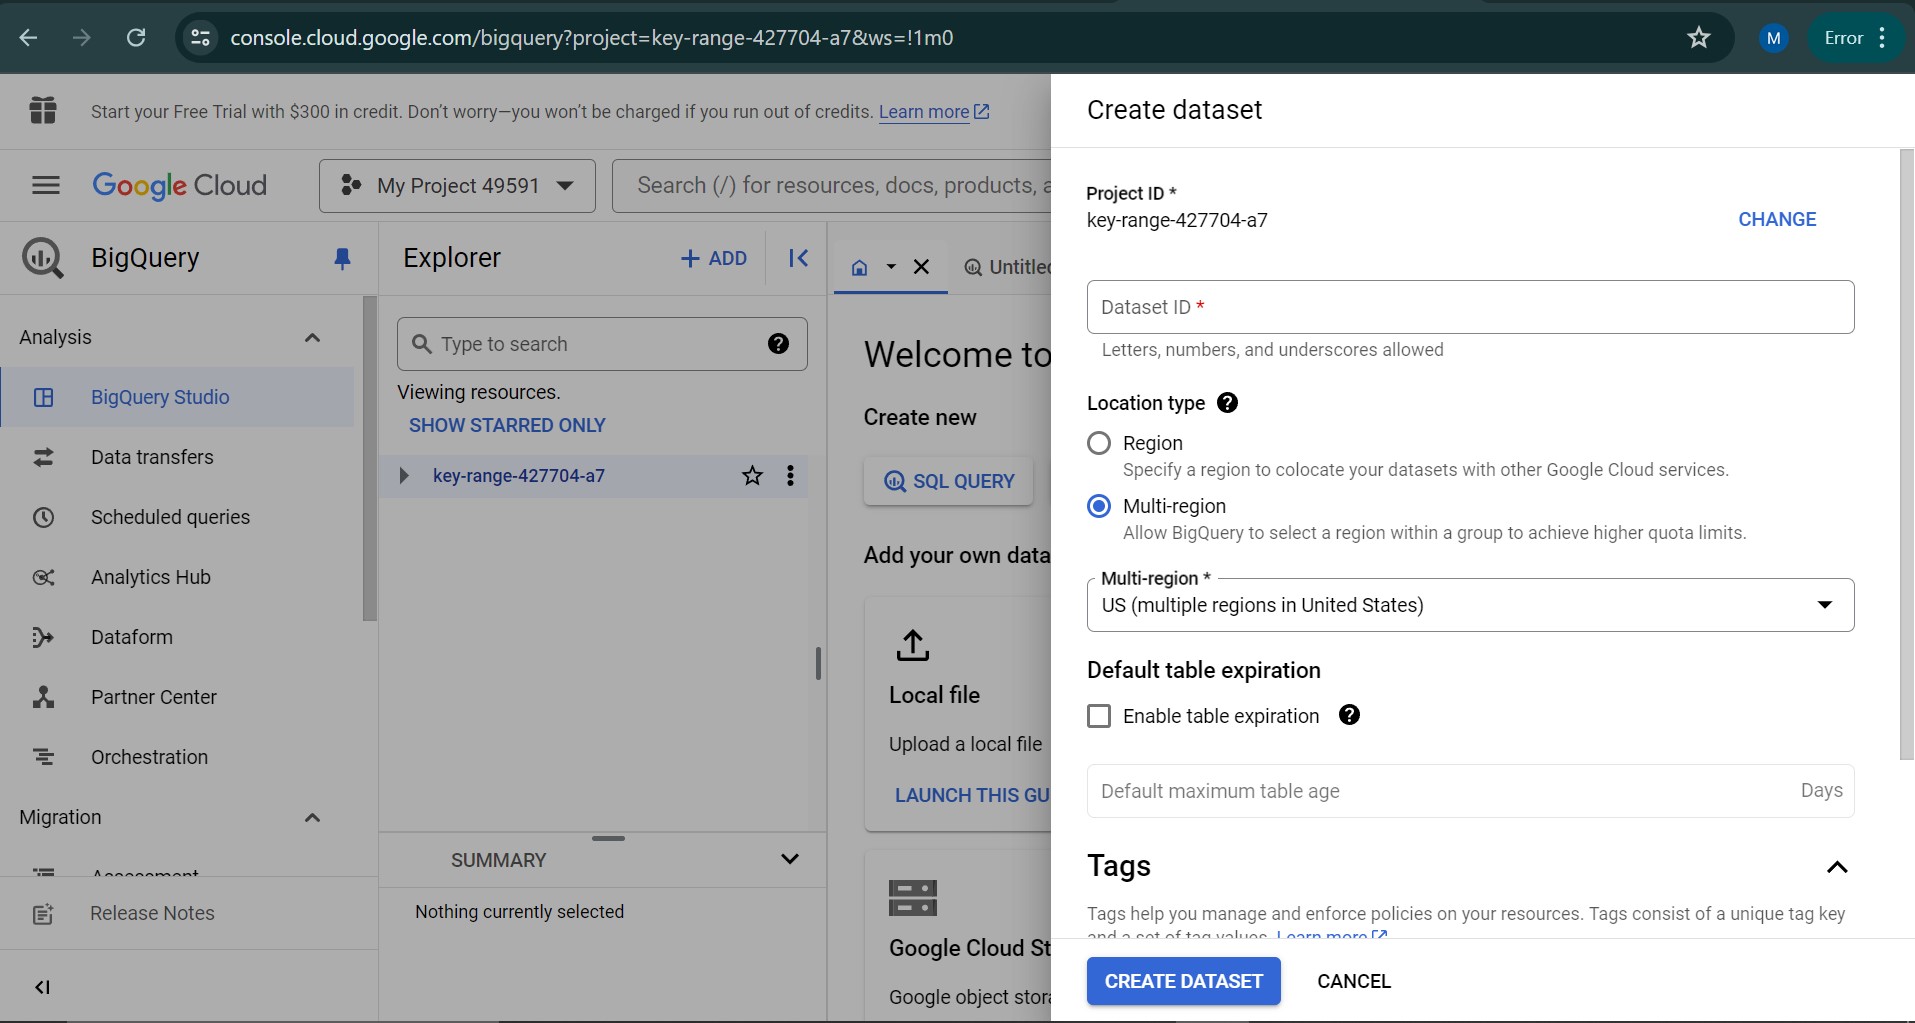
  • Now click on the created datasets on the left side. Then create table option will appear below the Query editor.
PostgreSQL to BigQuery: Creating the Tables
Image Source
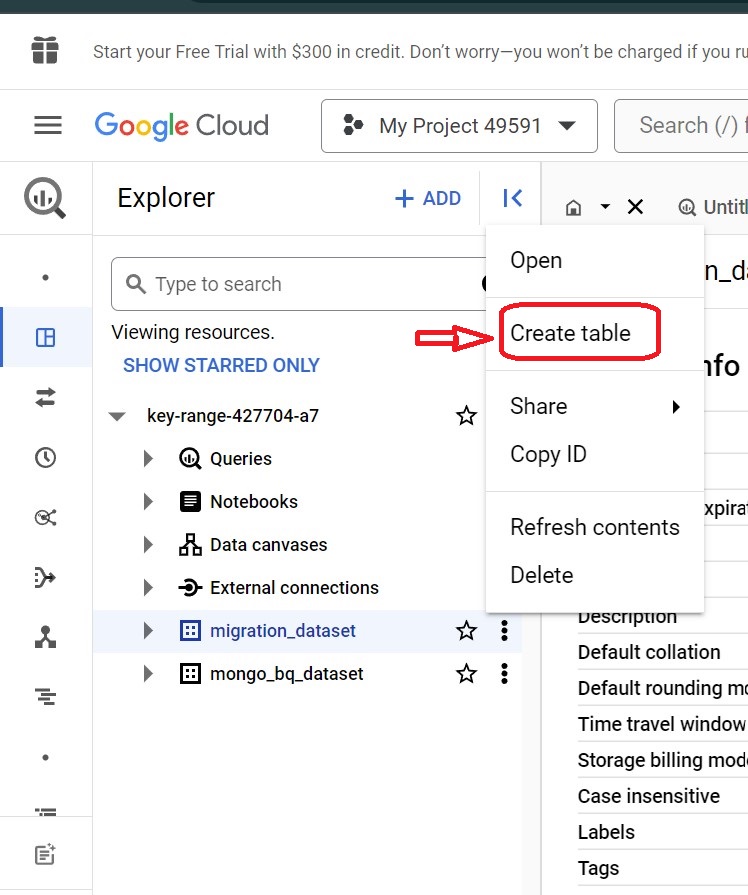
  • Create Table button will open a wizard with options to specify input source and other specifications for the table.
PostgreSQL to BigQuery: Entering Input Source and other Specifications for the Tables
Image Source

As shown in the screenshot, there are options to specify schema or auto-detect. There are many more options available. Feel free to choose them as per your need.

To interact with BigQuery, you can use bq, the command-line tool. Using this tool, uploading data to GCS is a cakewalk. All you need to do is use the bq load command and specify CSV as the source_format.

The syntax of bq load:

bq --location=[LOCATION] load --source_format=[FORMAT] [DATASET].[TABLE] [PATH_TO_SOURCE] [SCHEMA]
  • [LOCATION] is an optional parameter and represents your Location.
  • [FORMAT] is to be set to CSV.
  • [DATASET] represents an existing dataset.
  • [TABLE] is the table name into which you’re loading data.
  • [PATH_TO_SOURCE] is a fully-qualified Cloud Storage URI.
  • [SCHEMA] is a valid schema. The schema must be a local JSON file or inline.
  • Note that here an autodetect flag can also be used instead of supplying a schema definition.

There are a bunch of options specific to CSV data load:

CSV optionbq command flagDescription
Field Delimiter-F or –field_delimiterField delimiter: Comma, Tab, Pipe, Other
Header rows–skip_leading_rowsHeader rows to skip
Number of bad records allowed–max_bad_recordsNumber of errors allowed
Newline characters–allow_quoted_newlinesAllow quoted newlines
Custom null values–null_markerSpecifies a string that represents a null value in a CSV file
Trailing optional columns–allow_jagged_rowsAllow jagged rows
Unknown values–ignore_unknown_valuesIgnore unknown values
Quote–quoteThe value that is used to quote data sections in a CSV file
Encoding-E or –encodingThe character encoding of the data

Refer to BigQuery documentation to explore more about data cloud storage CSV.

For Schema Specification using a JSON file:

bq --location=US load --source_format=CSV your_dataset.your_table gs://your_bucket/your_data.csv ./your_schema.json

For schema auto-detection using file:

bq --location=US load --autodetect --source_format=CSV your_dataset.your_table  gs://mybucket/data.csv

BigQuery offers 3 options to write to an existing table:

  1. Write if empty.
  2. Append to the table.
  3. Overwrite table.

Additionally, while uploading data it is possible to add new fields to the table. Here is an example.

Overwriting existing table:

bq --location=US load --autodetect --replace --source_format=CSV your_dataset.your_table gs://mybucket/your_data.csv

Appending data to the existing table:

bq --location=US load --autodetect --noreplace --source_format=CSV your_dataset.your_table gs://mybucket/your_data.csv ./your_schema.json

Adding a new field to the table. Here, the new schema file with an extra field is given :

bq --location=asia-northeast1 load --noreplace --schema_update_option=ALLOW_FIELD_ADDITION --source_format=CSV your_dataset.your_table gs://mybucket/your_data.csv ./your_schema.json

Step 5: Update Target Table in BigQuery

Upload the data into a staging table before upserting newly extracted data to the BigQuery table. It needs to be a full load. Refer to the full data load section above for more details.

Let’s call it intermediate_delta_table. You can refer to any of the following two steps to load data to the target table :

a. Update the values of existing records in the final table and insert new rows from the delta table which are not in the final table.

UPDATE data_set.final_target_table t
SET t.value = s.value
FROM  data_set.intermediate_delta_table s
WHERE t.id = s.id;
INSERT data_set.final_target_table (id, value)
SELECT id, value
FROM  data_set.intermediate_delta_table
WHERE NOT id IN (SELECT id FROM data_set.final_target_table);

b. Delete rows from the final table which are present in the delta table. Then insert all rows from the delta table to the final table.

DELETE data_set.final_target_table f
WHERE f.id IN (SELECT id from data_set.intermediate_delta_table);
INSERT data_set.final_target_table (id, value)
SELECT id, value
FROM  data_set.intermediate_delta_table;

Limitations of Manual ETL Process to Set Up PostgreSQL to BigQuery Integration

In the modern era of data-driven business, getting value from data should be quick with minimum friction. Data Warehouses like BigQuery play an extremely important role in this. Below are the limitations associated with replicating data from PostgreSQL to BigQuery:

  1. Moving data to these cloud-based solutions takes multiple steps like extract data, clean/transform it and upload.
  2. It requires huge engineering resources and time to ensure data correctness and consistency across the process.

Method 2: Using Hevo Data to Set Up PostgreSQL to BigQuery Integration

PostgreSQL to BigQuery: Hevo Banner
Image Source

Hevo Data, a No-code Data Pipeline, helps you directly transfer data from PostgreSQL and 150+ other data sources to Google BigQuery and other Data Warehouses, BI tools, or a destination of your choice in a completely hassle-free & automated manner.

Hevo is fully managed and completely automates the process of not only loading data from your desired source but also enriching the data and transforming it into an analysis-ready form without having to write a single line of code.

Its fault-tolerant architecture ensures that the data is handled in a secure, consistent manner with zero data loss.

Hevo Data takes care of all your Data Preprocessing needs and lets you focus on key business activities and draw a much more powerful insight on how to generate more leads, retain customers, and take your business to new heights of profitability.

It provides a consistent & reliable solution to manage data in real-time and always has analysis-ready data in your desired destination. 

Sign up here for a 14-Day Free Trial!

The steps to load data from PostgreSQL to BigQuery using Hevo Data are as follows:

  • Step 1: Connect your PostgreSQL account to Hevo’s platform. Hevo has an in-built PostgreSQL Integration that connects to your account within minutes.
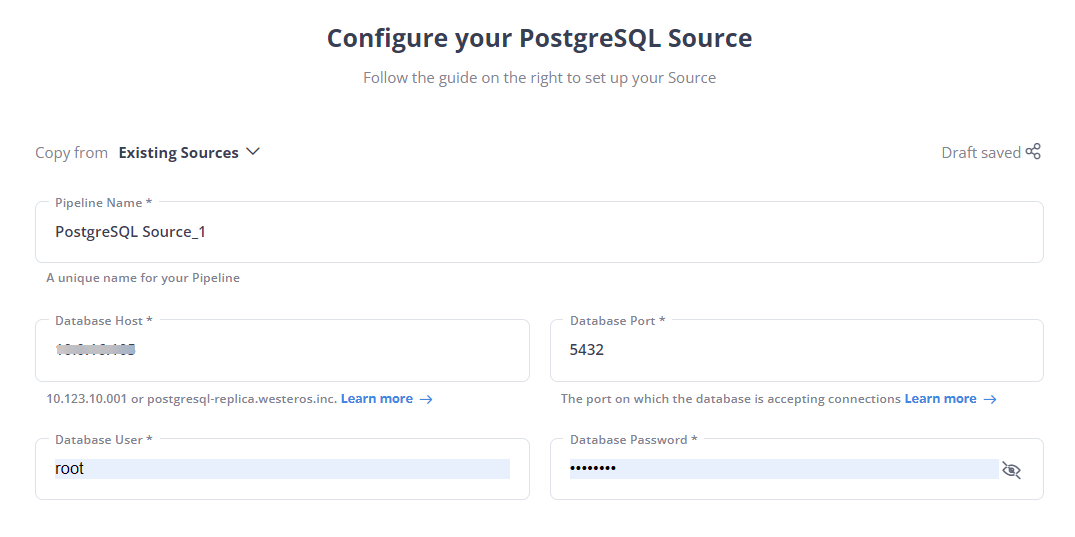
  • Step 2: Select Google BigQuery as your destination and start moving your data.

With this, you have successfully set up Postgres to BigQuery replication using Hevo Data.

Here are more reasons to try Hevo:

  • Secure: Hevo has a fault-tolerant architecture that ensures that the data is handled in a secure, consistent manner with zero data loss.
  • Schema Management: Hevo takes away the tedious task of schema management & automatically detects the schema of incoming data and maps it to the destination schema.
  • Minimal Learning: Hevo, with its simple and interactive UI, is extremely simple for new customers to work on and perform operations.
  • Hevo Is Built To Scale: As the number of sources and the volume of your data grows, Hevo scales horizontally, handling millions of records per minute with very little latency.
  • Incremental Data Load: Hevo allows the transfer of data that has been modified in real-time. This ensures efficient utilization of bandwidth on both ends.
  • Live Support: The Hevo team is available round the clock to extend exceptional support to its customers through chat, email, and support calls.
  • Live Monitoring: Hevo allows you to monitor the data flow and check where your data is at a particular point in time.

Conclusion

This article provided an introduction to PostgreSQL and BigQuery and explained their features. Moreover, it elaborated on the 2 methods which you can use to sync PostgreSQL to BigQuery.

The manual method although effective will require a lot of time and resources.

Data Migration from PostgreSQL to BigQuery is a painful and time taking process but using a data integration tool like Hevo can perform this process with no effort and no time.

Visit our Website to Explore Hevo

Businesses can use automated platforms like Hevo Data to set this integration and handle the ETL process. It helps you directly transfer data from a source of your choice to a Data Warehouse, Business Intelligence tools, or any other desired destination in a fully automated and secure manner without having to write any code and will provide you with a hassle-free experience.

Want to try Hevo? Sign Up for a 14-day free trial and experience the feature-rich Hevo suite firsthand. Have a look at our unbeatable pricing, which will help you choose the right plan for you.

Share your experience of loading data from PostgreSQL to BigQuery in the comment section below.

No-code Data Pipeline for your Data Warehouse