

With the increase in data size and the diversity of data sources and destinations, companies and data teams are always on the lookout for tools that can simplify creating and managing data workflows. Many of these teams target cloud services because of their simplicity, low cost, and ability to scale and process terabytes of data.
Azure Data Factory (ADF), one of the leading cloud ETL tools, is Microsoft Azure’s managed cloud ETL service for scale-out serverless data integration and data transformation. It supports complex hybrid extract-transform-load (ETL), extract-load-transform (ELT), and data integration projects. In this article, we will dive into the Azure Data Factory ETL tutorial, features, use cases, and best practices of using ADF.
Table of Contents
What is Azure Data Factory?

As we mentioned earlier, Azure Data Factory (ADF) is a serverless platform for managing data integration and data transformation. Serverless means that Microsoft Azure manages our servers, allowing us to focus on transforming and working with our data.
Another feature Azure Data Factory provides is Continuous Integration / Continuous Deployment (CI/CD). ADF utilizes Azure Resource Manager templates to store the configuration of your various ADF entities (pipelines, datasets, and data flows). It also provides integration with Git.
Using ADF, we can enjoy the following benefits:
- Pay-as-you-go. As ADF is serverless, its pricing schema depends mainly on the number of pipeline runs and the data size it processes. This allows us to avoid investing early in infrastructure that will not be utilized completely until later.
- Single-pane-of-glass for developing, deploying, and monitoring. You can develop, deploy, and monitor pipelines from the Data Factory Studio. The Data Factory Studio also allows you to preview data and run checks on it to make sure that your pipelines produce the expected results.
- Integration with other Azure services. Azure Data Factory can extend its functionality by using other Azure services. You can use your existing Databricks notebooks, HDInsight jobs, Azure functions, and Synapse Spark job definitions. Additionally, ADF can run machine learning jobs from Azure Machine Learning Studio.
- Use pre-defined SSIS packages. One of the features of ADF is that you can reuse your existing SSIS packages. You do not need to re-develop those packages or re-configure them. You just upload your SSIS ETL packages to ADF and choose the SSIS integration runtime.
Azure Data Factory Architecture
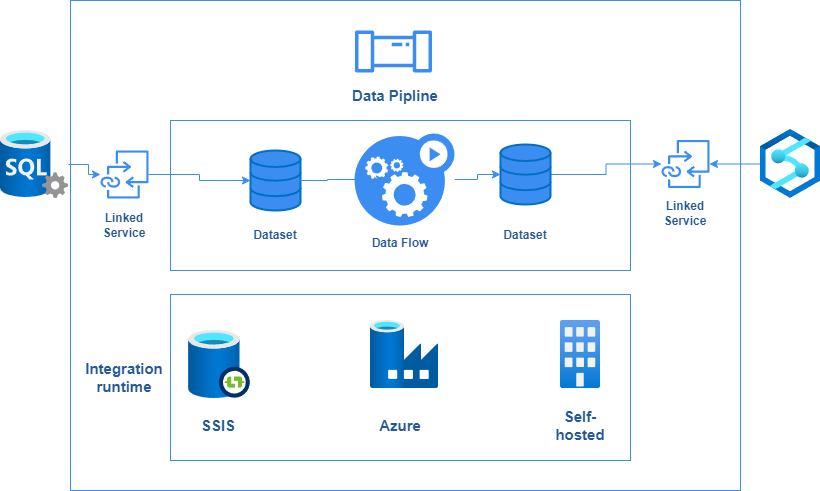
ADF follows a modular ETL architecture that separates compute from control flow, ensuring scalable data processing. At the core of Azure Data Factory lies the integration runtime. The Integration Runtime (IR) is the compute infrastructure used by Azure Data Factory and Azure Synapse pipelines to provide orchestration tasks such as executing data flows, initiating data movement, dispatching different activities that run on different services such as Azure Databricks or Azure HDInsight, and running SSIS packages.
There are three types of integration runtime currently:
- Azure runtime
- Self-Hosted runtime
- Azure-SSIS runtime
Note: There is also an Apache Airflow runtime that is currently in preview.
A default Azure runtime is created and used for all activities when creating an Azure Data Factory instance. However, you can replace it with another integration runtime at any time.
Besides integration runtimes, there are ADF triggers that we talked about earlier. There are also pipelines, data flows, and datasets.
- Data Flows are no-code data transformations that are run using scaled-out Apache Spark clusters. They are executed as activities within pipelines.
- Pipelines are logical groupings of activities that perform a task together. These activities can originate from Azure Data Factory as data flows or other Azure services, such as Azure Databricks notebooks and Azure Functions.
- Datasets represent a way to identify data sets that pipelines and dataflows read and write. You define a dataset by specifying where it is stored, its schema if applicable, its format, and any other metadata.
- Linked services are how Azure Data Factory can communicate with other services to pull or push data. Linked services can be other Azure services, other SaaS such as Google BigQuery and SAP HANA, or self-hosted services such as HDFS and Apache HBase.
Walkthrough of Azure Data Factory
In the following sections of this article, we will create an ADF instance and build a simple ETL pipeline to read a CSV file from an Azure Storage bucket, filter some of the records based on a condition, and then save the result in another Azure Storage bucket.
To be able to follow along, you need a Microsoft Azure account with a valid subscription. If you do not have a free account, you can create one and enjoy 200$ in credit.
Trusted by 2000+ companies, Hevo offers a user-friendly alternative with 4.3/5 stars on G2. Discover a more intuitive data integration solution with Hevo:
- No-code Platform: Build complex pipelines without writing a single line of code
- 150+ pre-built Connectors: Integrate data from multiple sources effortlessly
- Real-time Replication: Ensure your data is always up-to-date
- Automatic Schema Mapping: Save time with intelligent data handling
Create an Azure Data Factory Instance
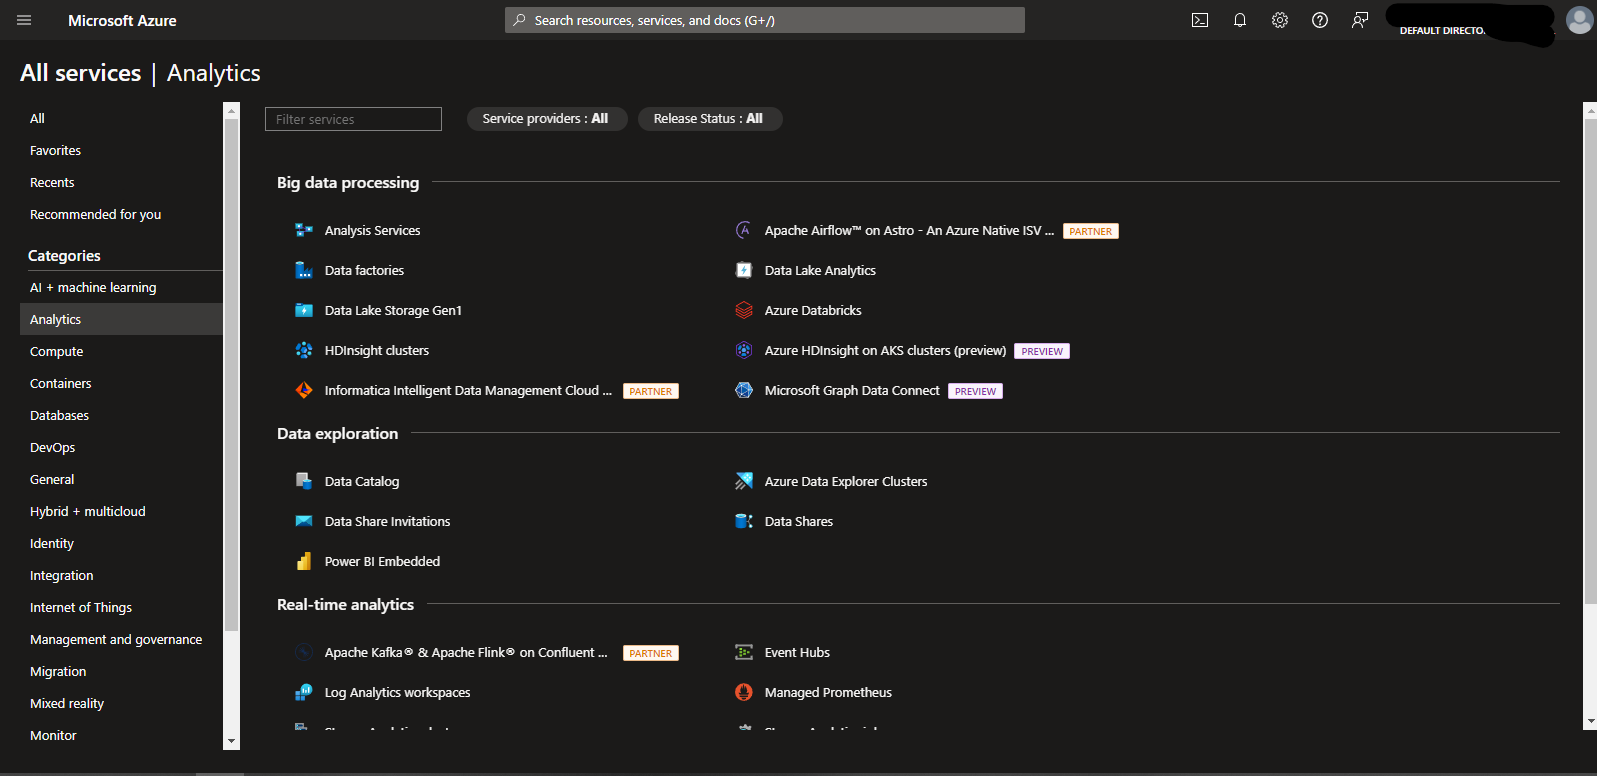
- On the Azure Portal home page, click the navigation menu to the left and choose “All Services.” Look for the “Analytics” category. Inside it, you will find “Data Factories.” You can also open data factories by searching for them on the search bar at the top of the page.
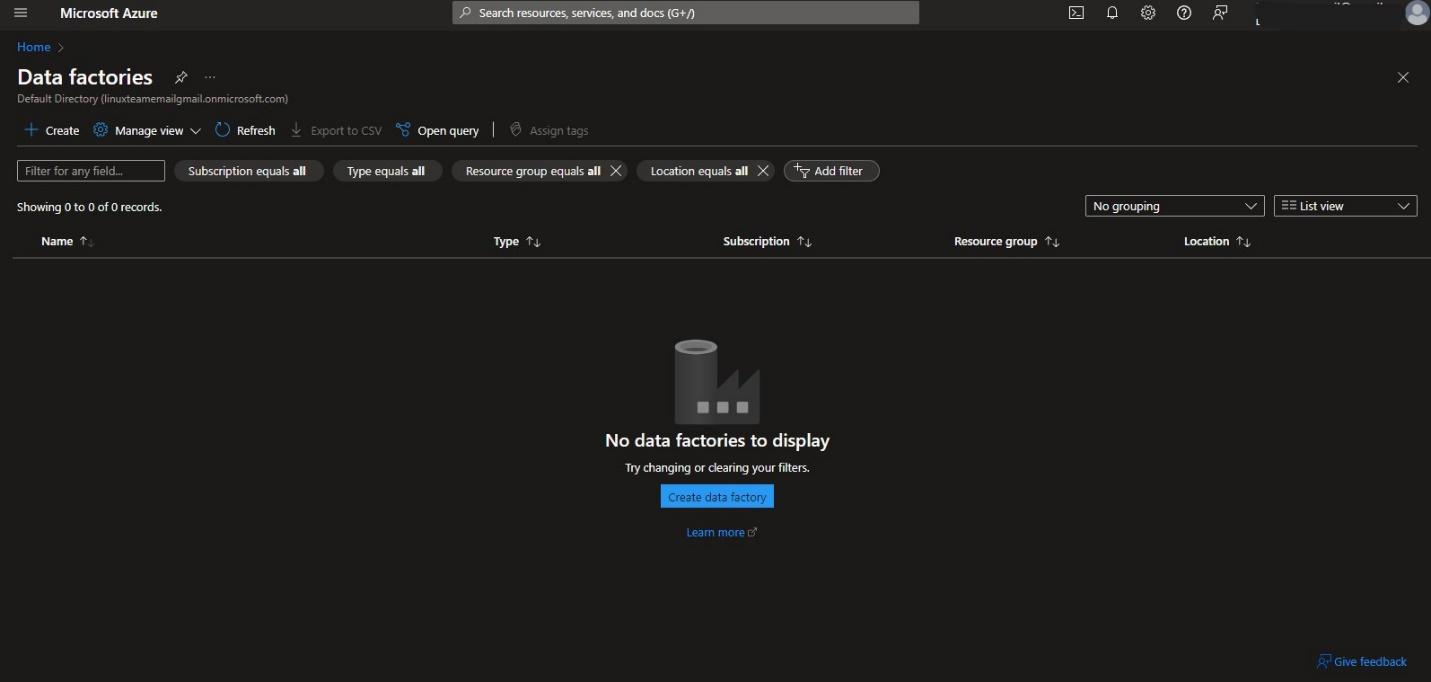
- When you click “Data Factories,” you will see a page showing a list of all your ADF instances. If this is a new account, this list should be empty. Click “+Create” at the top left of your page.
- On the “Basics” tab, you need to choose a subscription and a resource group to create this instance. Then, you need to name the instance, choose a region for it, and set the version to “V2.”

- On the “Git Configuration” tab, select “Configure Git Later” if it is not selected. Then click “Review + Create” and create the instance. You should wait a couple of minutes until your ADF instance is deployed successfully.
- When the instance is deployed successfully, we will see a “Go to Resource” link. Click it to open the instance overview page. The side panel shows options related to Azure Data Factory as a resource. You can manage things such as tagging and access to ADF from this panel. To manage Azure Data Factory as a service you need to launch the Data Factory Studio. Click “Launch Studio” to launch it.
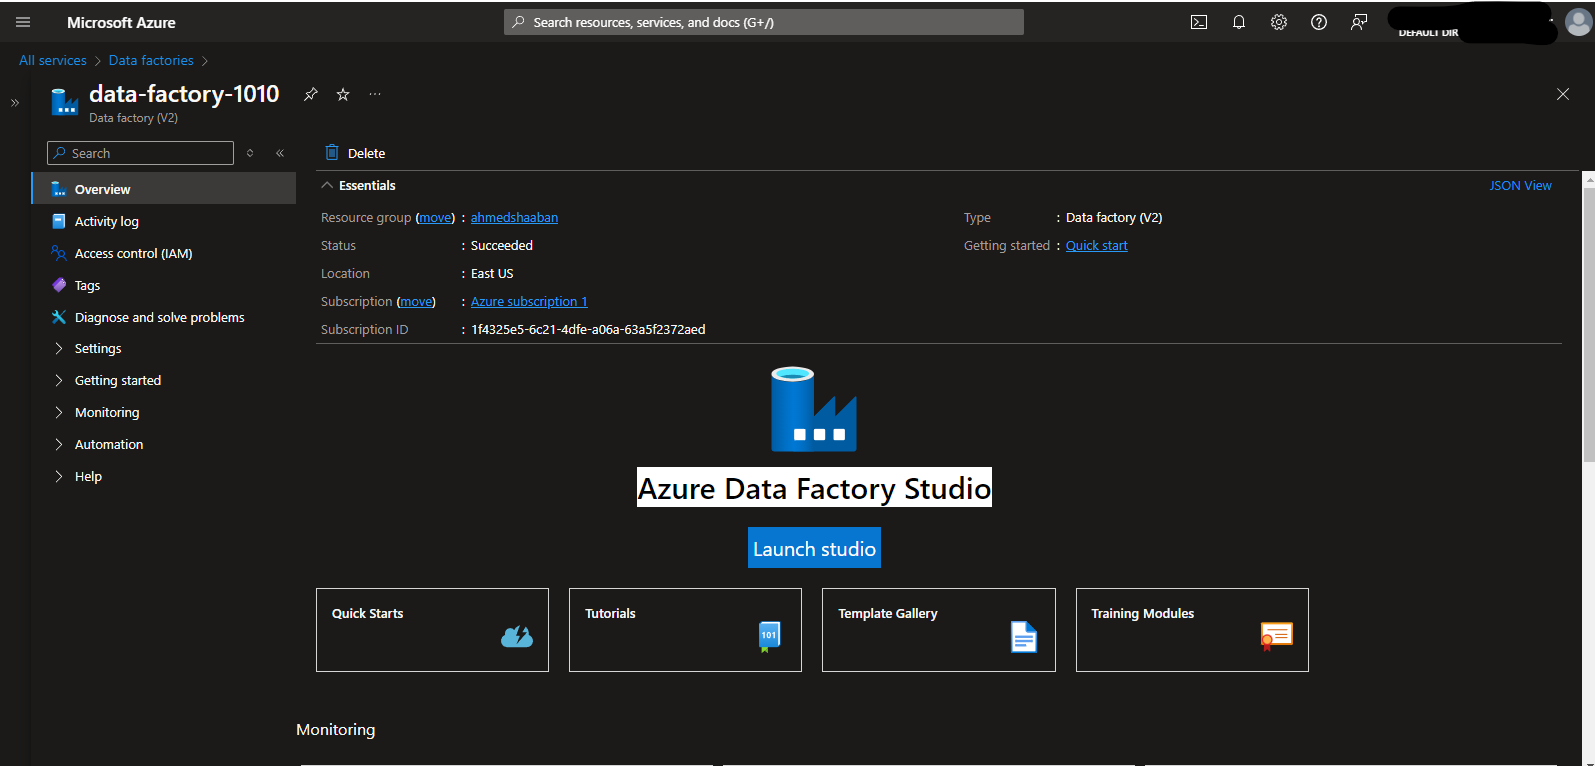
6. When the Data Factory Studio opens, you will see the following page.
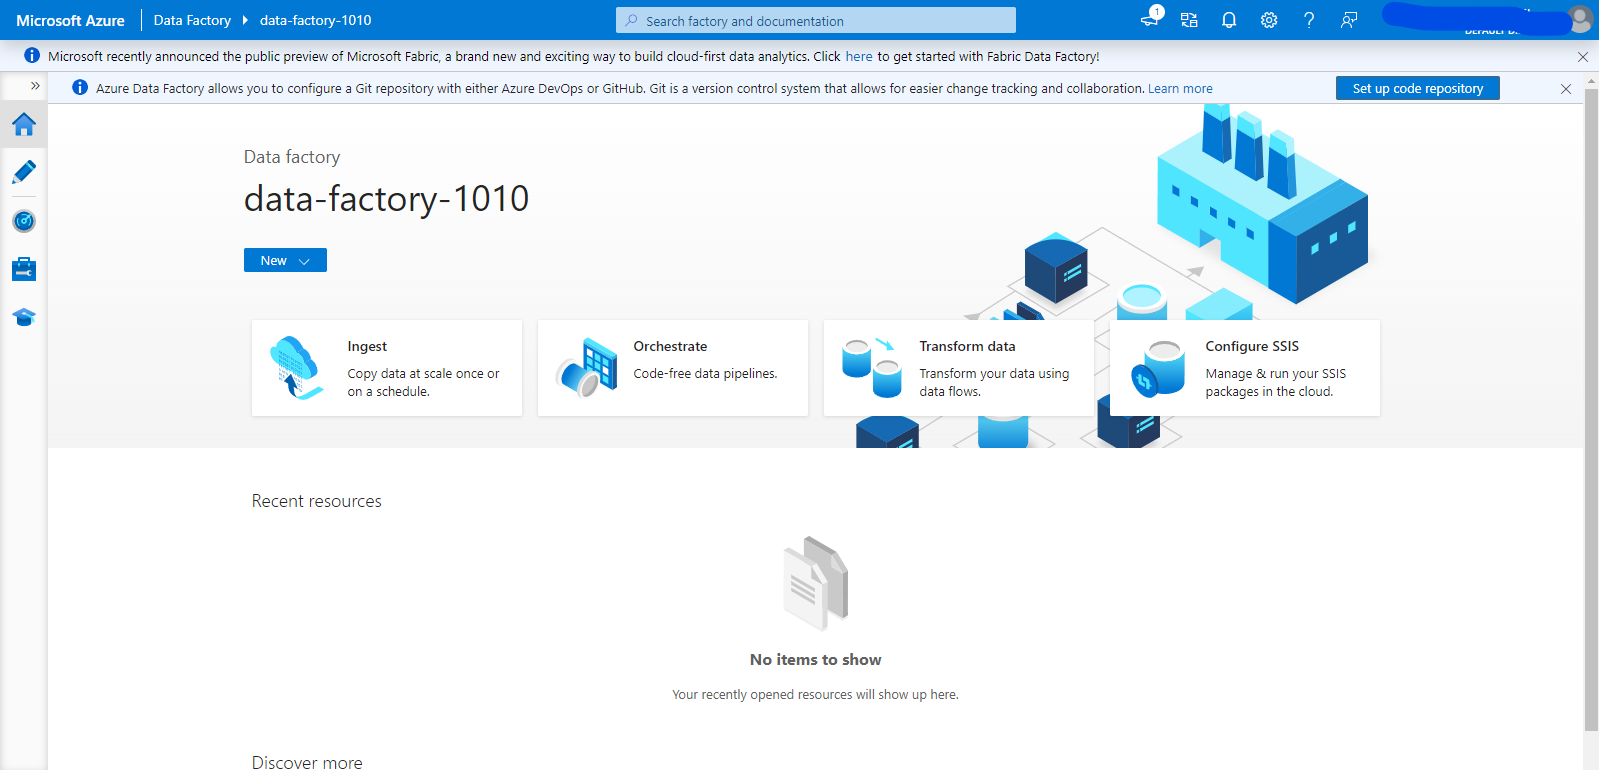
On the side panel, you can see five links.
- “Home” which represents this welcome page.
- “Author” where you can design and develop datasets, pipelines, and data flows.
- “Monitor” where you can check metrics about the runs and performance of your pipelines.
- “Manage” where you can manage settings in your ADF instance such as creating integration runtimes and defining global parameters.
- Finally, the “Learning Center” can be used for learning about all the features and settings in Azure Data Factory.
Example Use Case: Remove Duplicates From a File
In our example use case, we will read a file from Azure Storage, remove the duplicates, and then save it in another Azure Storage.
1. Create The Source and Target Azure Storage.
- From the Azure portal home page, click or search for “Storage Accounts.” Then, click “+Create” at the top left of the page to create a new storage account.
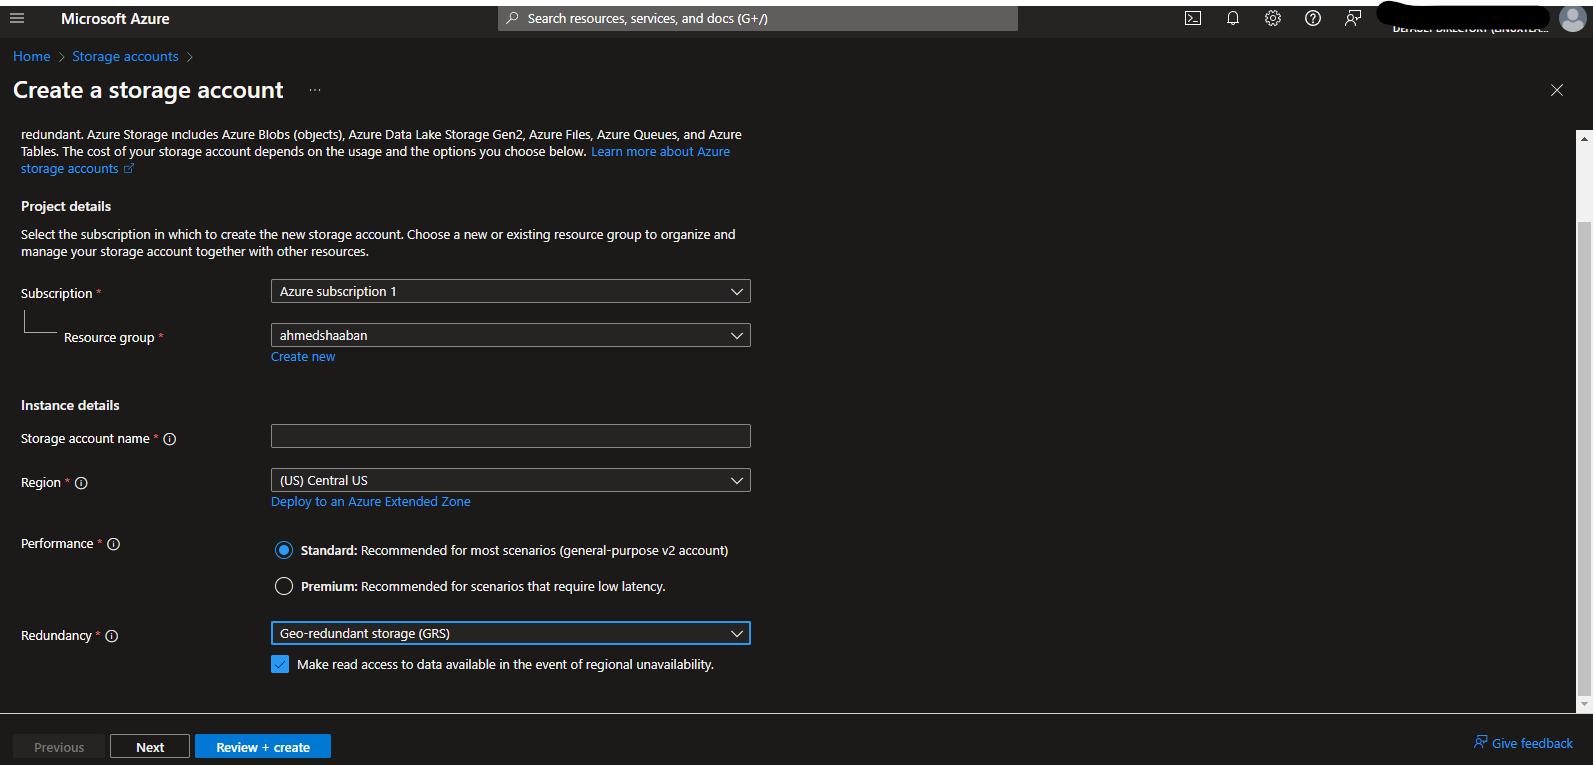
- Choose a subscription and a resource group to create the storage account under. You must name your storage account and select a region for it. Make sure that standard performance is selected for performance. As for redundancy, you can leave the default option for geo-redundant storage or downgrade to locally redundant storage.
- The remaining configurations can be left with their default values, so click “Review + Create” and then create the account. The account will be deployed successfully in a couple of minutes.
- When the storage account is deployed, click the “Go to Resource” link. You will be redirected to the storage account overview page. On the side panel, search for “Containers” under “Data Storage” and click it.
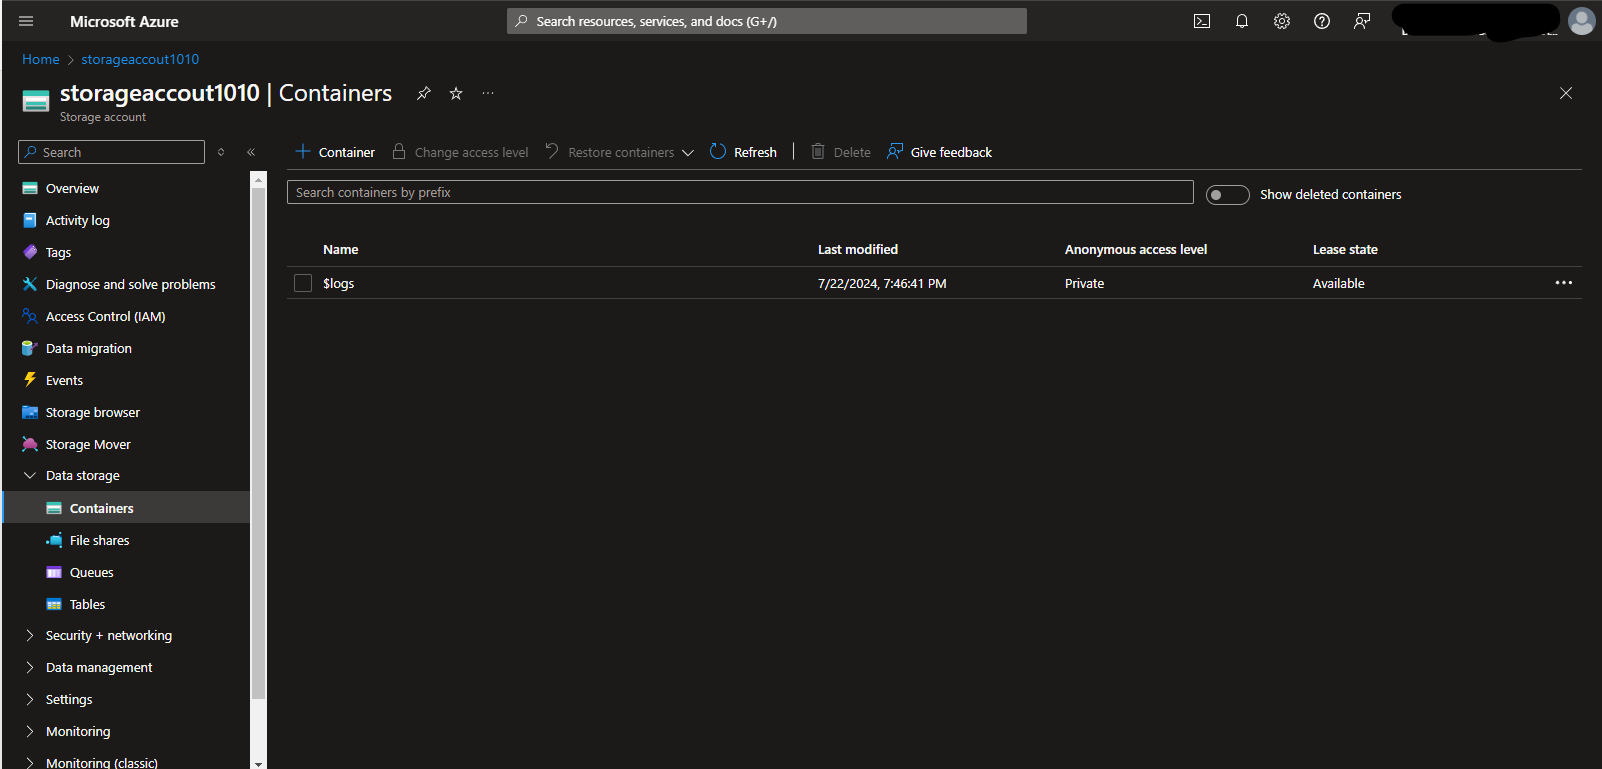
- Click “+ Container” to create a new container. Let’s name our source container simply “source-container.” Create the container without changing any of the default values. You also need to create another container for our destination and call it a “destination-container.”
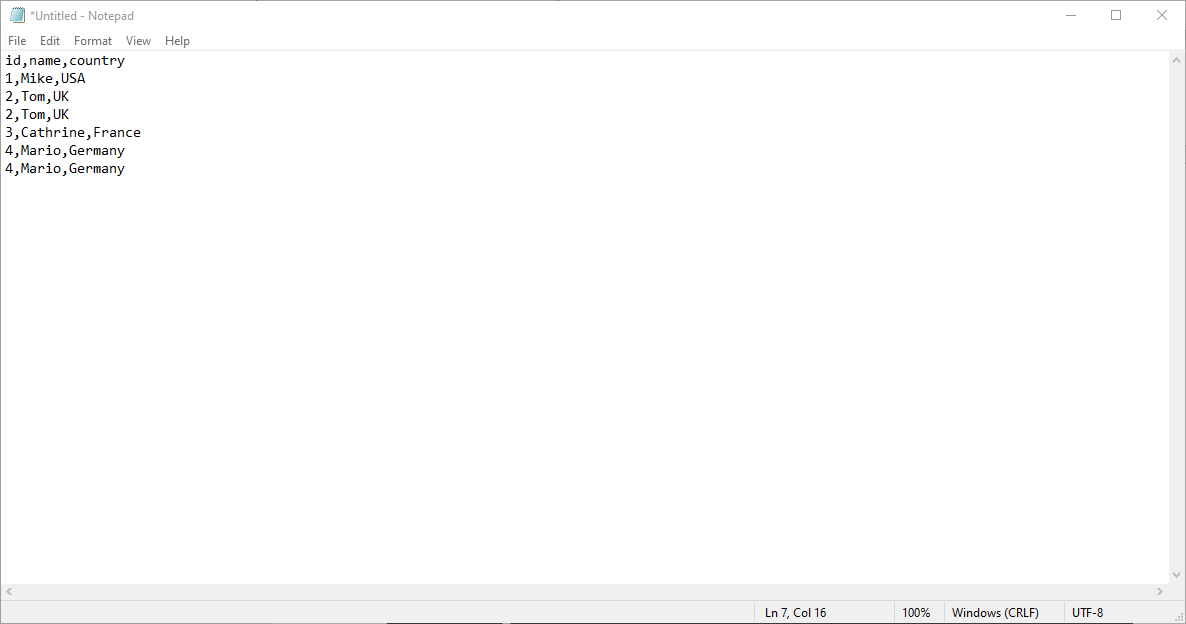
- Create a simple CSV file on your computer, as illustrated below. Upload the file onto the source container under a folder named “files”. You can go to the file path in the Azure container and click the file to edit it.
2. Create a Linked Service and a Dataset.
- Open your ADF instance and launch the studio. In the side panel, select “Manage” and then “Linked Service.” Click “+ New” to create a new linked service, search for Azure Blob Storage, and select it.
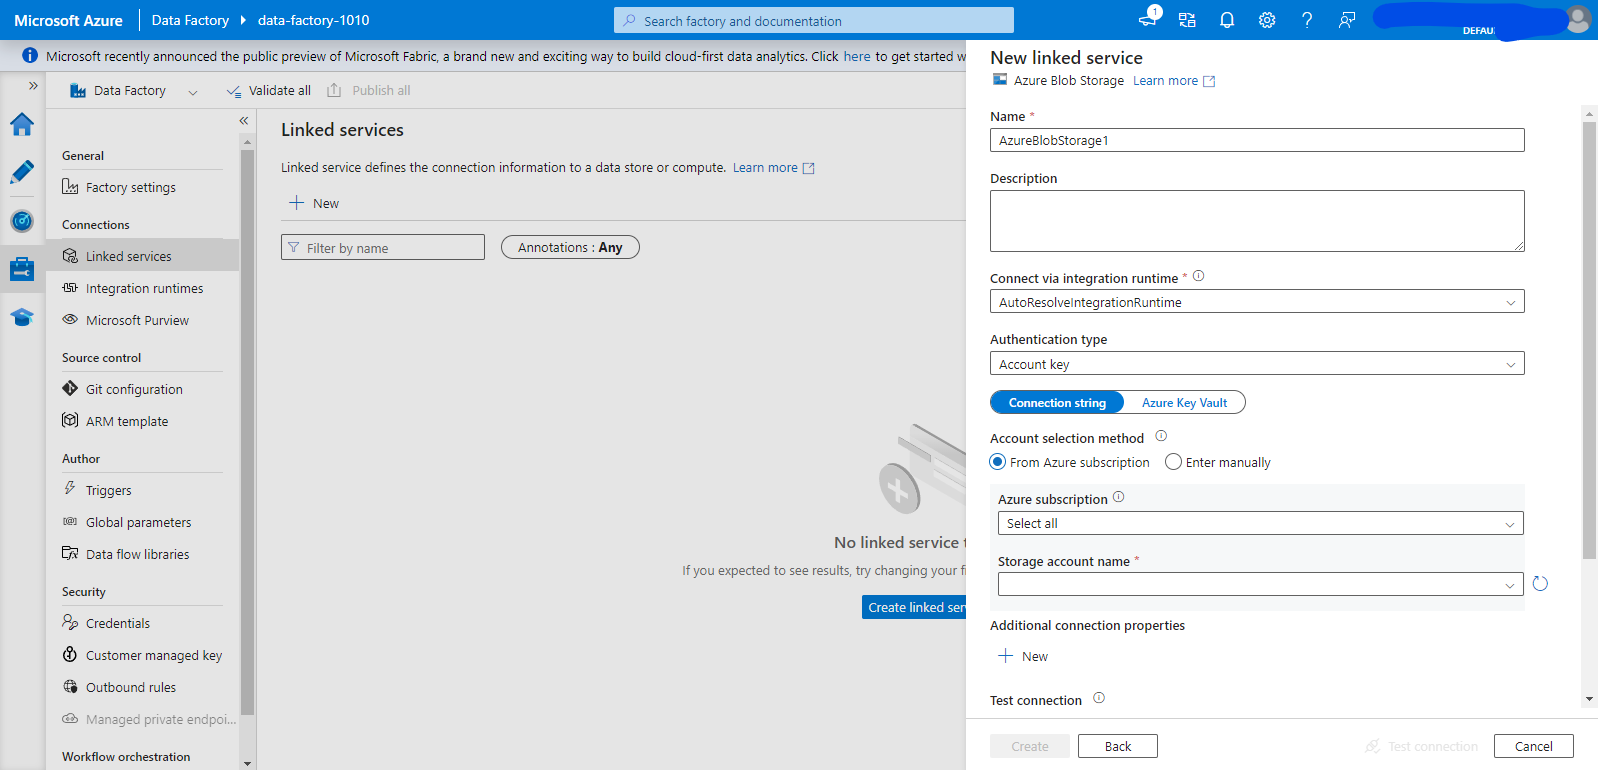
- Name your linked service a suitable name. Make sure to select the Azure subscription and storage account name that you created earlier. This linked service will be used to create both the source and target dataset, so we will not specify which blob to connect to here.
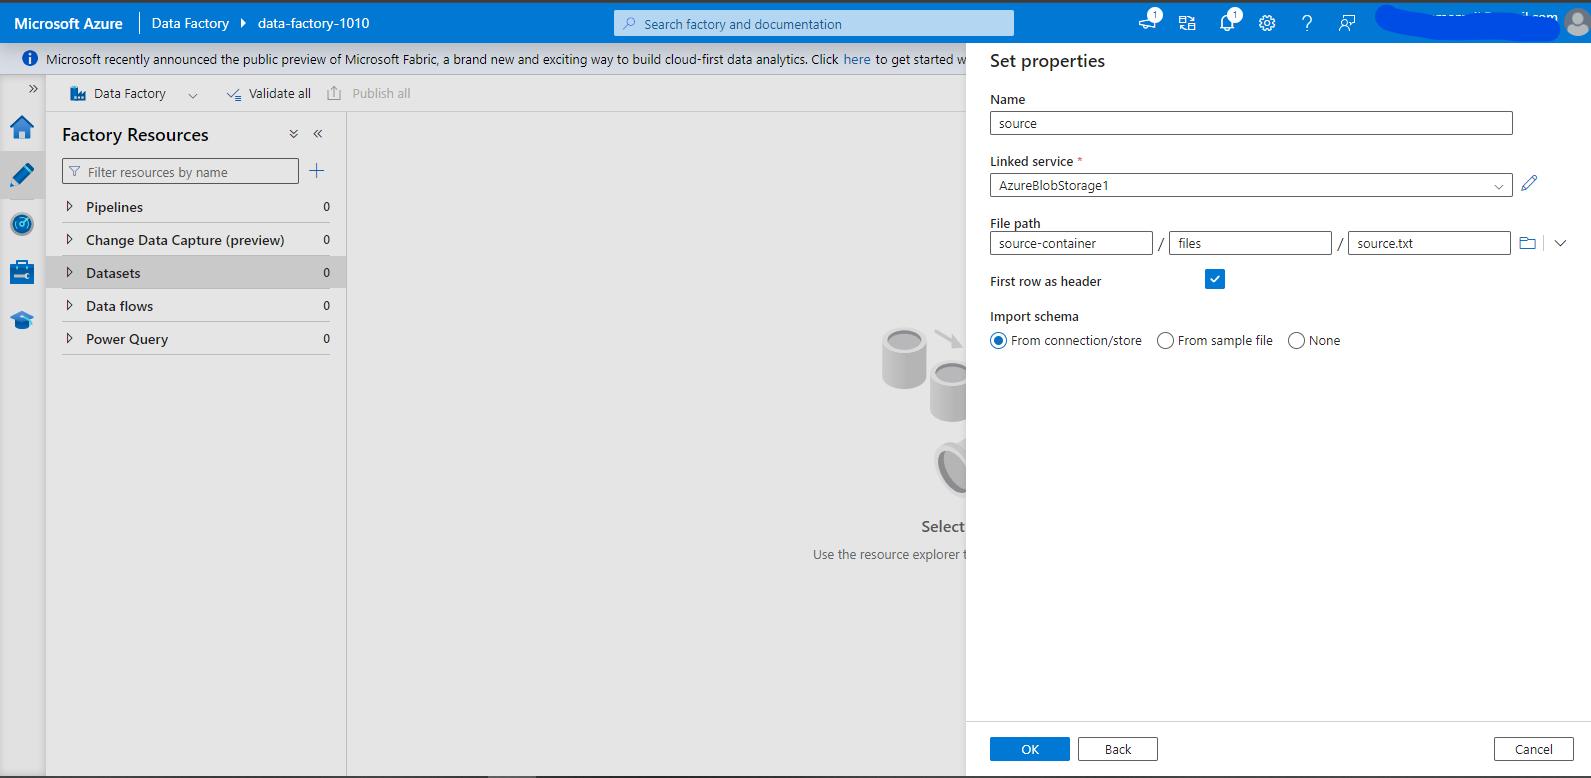
- Move to the “Author” page from the side panel. Expand the dataset section, and from the three-dot menu on its side, select “New Dataset.”
- Search for Azure Blob Storage.
- In the next menu, select “DelimitedText.” Name your dataset source and select the linked service. You then need to specify the file path. You can use the browse button to browse your storage account and choose the source.txt file in the source container.
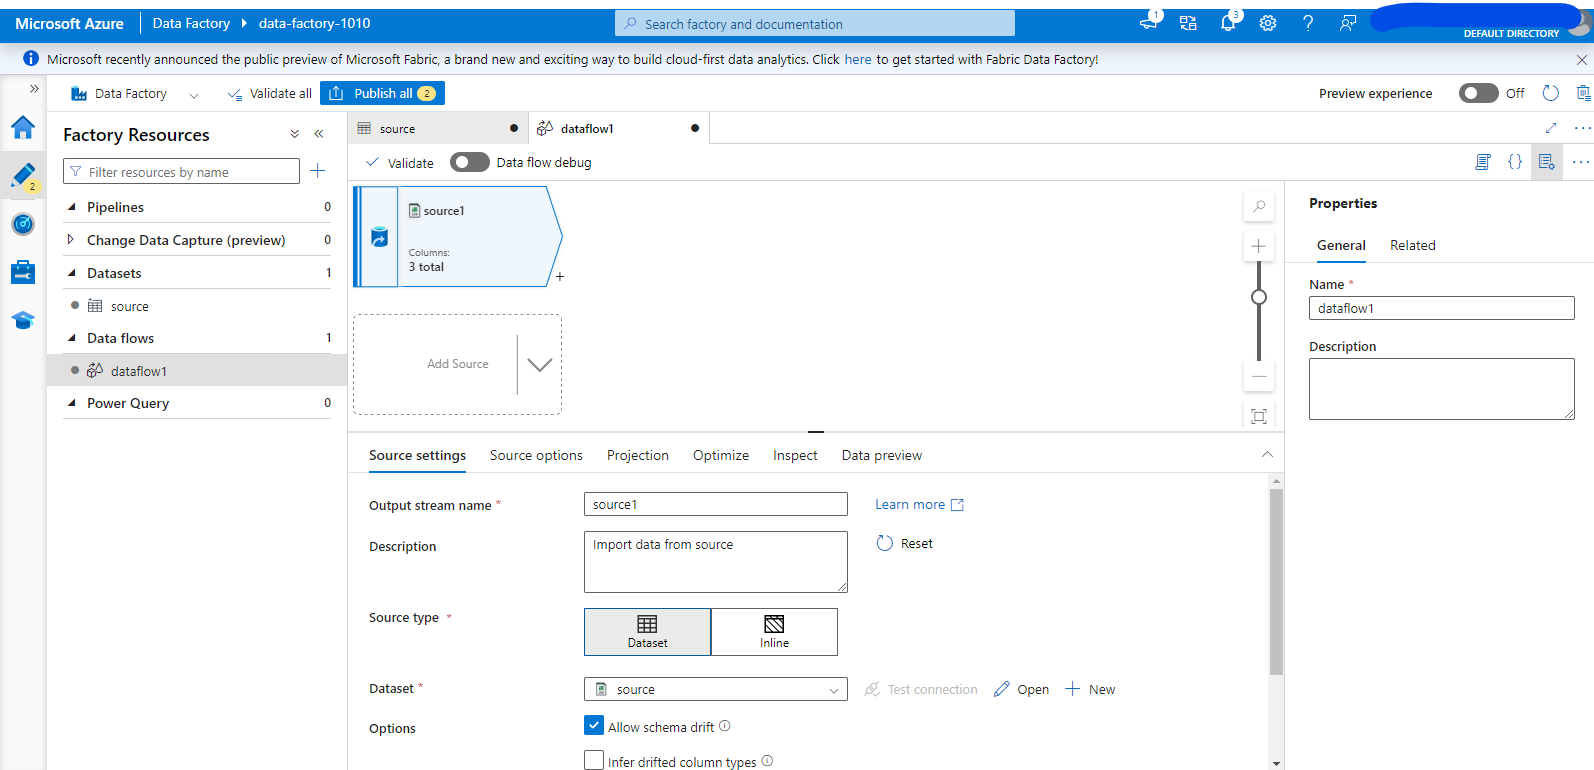
3. Create a Data Flow and a Pipeline.
- Next to the “Data Flows” section header, click the three-dot menu and select “New Data Flow.” Click “Add Source” on the canvas. Give your source a suitable name and select the source type as “Dataset.” Then, select the source dataset that you created earlier from the drop menu.
- One way to remove duplicates is to have a window with all the columns that have duplicates, use the row_number() function as a ranking function, and then remove all the rows whose rank does not equal 1.
- To do so, click the “+” sign next to your source and choose the window function.
- Under the “Over” tab, create an entry for each of our dataset’s three columns.
- Under the “Sort” tab, choose any of the columns and any sorting order as order does not matter to us in this use case.
- Move over to the “Window Columns”. Create a column named “rank” and for the expression simply type “rowNumber()”.
- Under the “Optimize” tab, make sure that you choose “Single Partition” as the partitioning option.
- Create a filter function after the window function. You should specify the “Filter on Expression” as “rank == 1” to keep only one record per window.
- Click then the “+” sign next to the filter function and select “Sink” to create a sink for your flow.
- Choose “Inline” as the sink type to allow the sink to read the dataset schema from the earlier function in the flow. For the inline dataset type, choose “DelimitedText”, and then select the linked service that we created from the drop-down menu.
- Move to the “Settings” tab in the sink’s configurations. Write down the folder path where you will save the file.
- Scroll down to the file name options and select “Output to Single File” as our data size is very small so this will not cause a performance issue.
- Write the file name in the text box next to the “output to single file” label.

- Click the three dots menu in the pipeline section and create a new pipeline.
- Search for the “Data Flow” activity under the “Move and Transform” section and drag it to the canvas.
- Select the data flow we created earlier from the drop-down menu and keep the default values for all the other configurations. We have now completed our development process. Make sure to publish all the changes before running the pipeline.
4. Run The Pipeline and Check The Output.
- To run our pipeline immediately, click “Add Trigger” and choose “Trigger Now” then click “Ok”. This should take around 5 minutes. To follow the progress of executing the pipeline, go to the “Monitor” page.
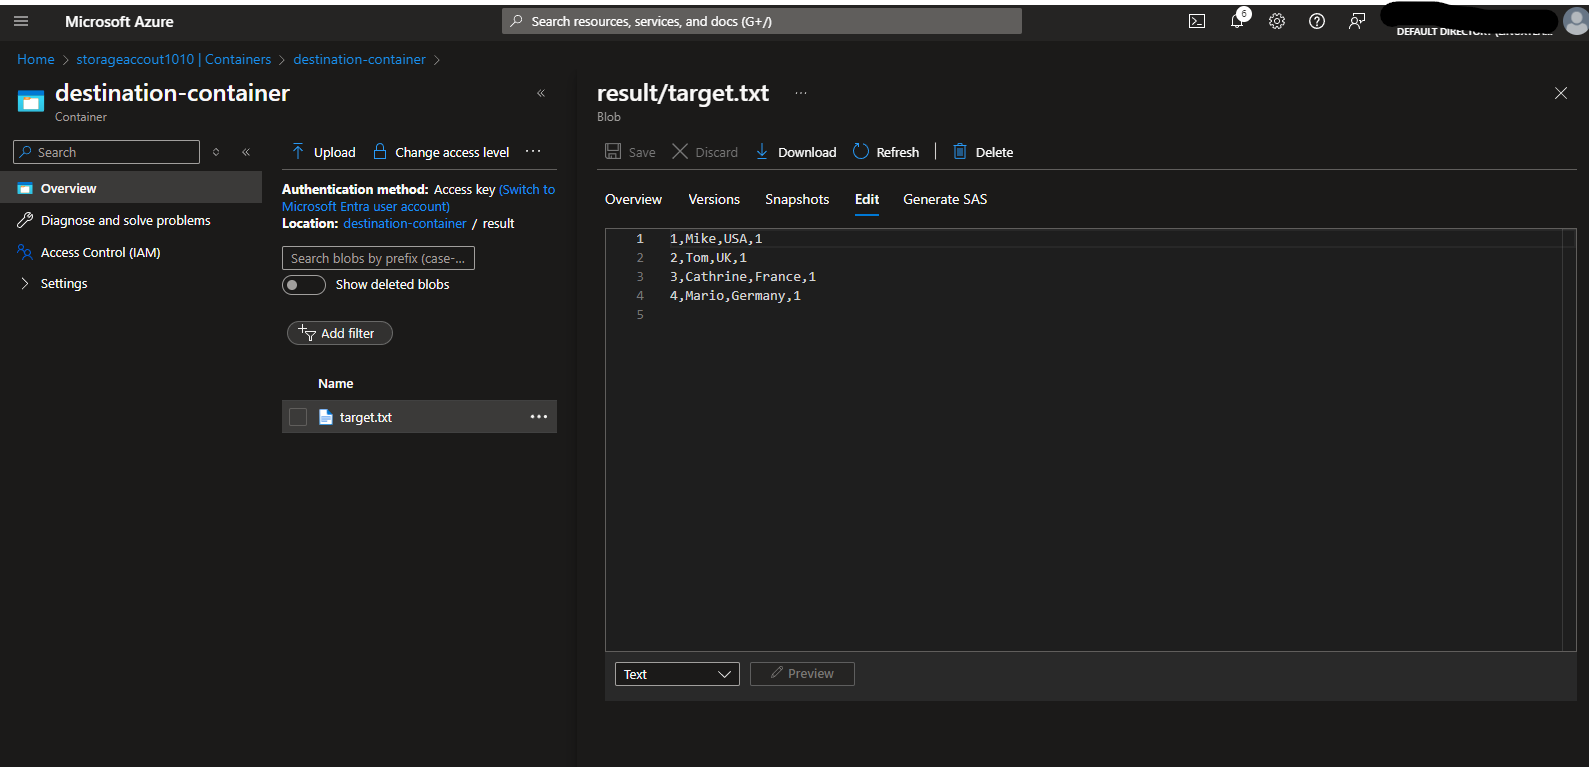
- Once the pipeline execution is successful, Check the output file in the destination container.
Use Cases of Azure Data Factory
Azure Data Factory allows users the flexibility to implement different solutions for different ETL challenges. Some of the most popular use cases for ADF are:
- Data migration projects. Whether migrating from on-prem to cloud or from cloud to cloud. Azure Data Factory can help since it supports multiple sources and destinations.
- Data integration projects. Azure Data Factory’s data flows have many functions and are executed using Apache Spark ETL. This allows ADF to handle large amounts of data with optimal performance.
- Using pre-defined data integration Logic. Azure Data Factory can connect to multiple services, which allows ADF to use jobs in those services through activities in its pipelines.
- Orchestrating multiple jobs in different services. Since Azure Data Factory can integrate with many other services, it can be used as an orchestrating tool.
Azure Data Factory Best Practices
While working with Azure Data Factory, there are some ETL best practices that, if followed, will provide improved performance and easier maintenance:
- Try to utilize the same pipeline for multiple tables/objects. Creating a separate pipeline per object will result in many pipelines that can not be maintained easily. You can use parameters to generalize your pipelines to interact with multiple objects.
- Use parallel executions as much as possible. Ensure that all functions in your data flow use an appropriate number of partitions. Also, use parallel flows in your pipelines to have multiple activities run simultaneously.
- For better performance, load your data incrementally using ADF. You can also use options other than batching, such as streaming and changing data capture.
- Use debugging. Debugging can be useful in validating your pipeline before publishing it.
Azure Data Factory Limitations
- Limited Data Transformation Capabilities: While ADF offers basic data transformation functionalities, it may fall short for complex data manipulation or cleansing tasks.
- Dependency on Integration Runtimes: ADF relies on integration runtimes (self-hosted or managed) for executing activities. This can introduce complexities and limitations in certain scenarios.
- Cost Considerations: Depending on the scale and complexity of your data integration workload, ADF costs can escalate. It’s essential to carefully evaluate pricing models and resource consumption.
- Performance Bottlenecks: For extremely large datasets or high-throughput scenarios, ADF might encounter performance limitations.
- Complex Workflow Limitations: While ADF can handle basic ETL workflows, complex orchestration with multiple dependencies and branching logic can be challenging.
- Limited Support for Non-Azure Services: While ADF offers a wide range of connectors, integration with non-Azure services might have limitations or require additional configurations.
- Maximum Number of Pipelines: There’s a limit on the number of pipelines you can create within a data factory.
- Concurrent Pipeline Runs: The number of pipelines that can run concurrently is restricted.
Why to Choose Hevo Data over Azure Data Factory
- Hevo’s user-friendly interface and robust ETL automation capabilities address Azure Data Factory’s limitations in complex data transformations and management. By offering a no-code ELT approach, Hevo simplifies the data integration process, reducing the need for extensive coding and configuration.
- Hevo’s flexible data replication options surpass ADF’s restrictions by allowing granular control over data ingestion, including object-level selection and historical data management. Additionally, Hevo’s automatic data deduplication ensures data accuracy and consistency, addressing potential issues with ADF’s data handling.
- Hevo’s focus on data quality and observability differentiates it from ADF. Features like in-flight data formatting, smart assist, and detailed monitoring provide users with greater control and visibility over their data pipelines.
- Hevo’s flexible pricing model offers a more predictable cost structure compared to ADF’s consumption-based pricing, which can be challenging to estimate.
Learn More:
- Airbyte vs Azure Data Factory.
- Top Azure Data Factory alternatives
- Apache NiFi vs Azure Data Factory
- Matillion vs Azure Data Factory
- Talend vs Azure Data Factory
- Fivetran vs Azure Data Factory
Conclusion
Azure Data Factory provides a friendly code-free solution for data integration and transformation. It is an excellent choice if you already use SSIS or other Microsoft Azure services to store and transform your data. ADF enables you to develop, deploy, and monitor your pipelines. Here are a few Azure ETL tools that are popular among data engineers for building scalable, cloud-native data pipelines:
It also has CI/CD which helps teams collaborate in the development process. And with connectors to every major tool and SaaS, Azure Data Factory is considered a very strong option for any cloud data stack.
Book a personalized demo with Hevo to understand how you can transform, automate, and simplify your data pipelines, or sign up for a 14-day free trial and see for yourself.
Frequently Asked Questions
1. What is the difference between Azure Data Factory and Synapse for ETL?
Both ADF and Synapse can be used for ETL. However, Synapse specializes in analytical queries, while ADF is more suitable for data movement and simple transformations.
2. What is the difference between Azure Data Factory and SSIS?
ADF is more general than SSIS as it can use existing SSIS packages. In addition to SSIS, ADF can also use Databricks notebooks, HDInsight jobs, and Azure functions.
3. What kind of tool is Azure Data Factory?
ADF can be used as a data integration tool because it integrates multiple sources and services, as well as a data transformation tool since you can transform the data using ADF data flows.
Share it with your connections.
-
 Share To LinkedIn
-
 Share To Facebook
-
 Share To X
-
 Copy Link


