Key Takeaways
Import Excel into PostgreSQL five simple ways:
- Method 1: Hevo – Best for non-technical teams or those who want to automate the process without writing code. Hevo handles schema mapping, scheduling, and transformations out of the box.
- Method 2: ODBC Driver – Useful if you’re working inside Excel and want to pull PostgreSQL data directly using “Get Data > From ODBC.” Requires driver installation and works well for power Excel users.
- Method 3: CSV Export/Import – A universal method where you save Excel as CSV and import it using tools or scripts. Ideal for one-time or bulk imports with control over structure.
- Method 4: pgAdmin – Suitable for developers or DBAs comfortable with PostgreSQL tools. Offers a GUI to import CSVs directly into database tables.
- Method 5: Microsoft Query – Helps Excel users pull live data from PostgreSQL into Excel sheets. Useful for reporting and analysis workflows within Excel.
There are a variety of methods to import Excel to PostgreSQL; some are simple, while others are more complicated, depending on the sort of data you receive and the format it is in.
In this article, you will discover five effective approaches for establishing a connection and seamlessly migrating your data from Excel to PostgreSQL.
You will learn how to use the Hevo method, ODBC drivers, integrate Excel and PostgreSQL via CSV files, use a powerful tool like pgAdmin, and use Microsoft Query to move data from Excel to PostgreSQL easily.
Table of Contents
Method 1: Using Hevo
Step 1. Create a New Pipeline
- Log in to Hevo.
- Click “+ Create Pipeline”.
- Choose File Storage as the source.
Step 2. Choose Your Excel File Source
Hevo supports:
- Amazon S3
- Google Drive
- Dropbox
- Box
- OneDrive
- Or manual file upload (in some plans)
Select your source → Authenticate → Select your Excel file(s).

Step 3. Configure File Format
- File type: Excel
- Choose the sheet name and whether the first row contains headers.
- Define how often to sync: one-time import or scheduled.
- Hevo will auto-detect data types, or you can manually review them.
Step 4. Set PostgreSQL as Destination
- Add a new destination → Choose PostgreSQL.
- Enter connection details:
- Hostname
- Port (usually 5432)
- Database name
- Username and password
- Test and save.

Step 5. Mapping & Transformation (Optional)
- Review the column mapping.
- Apply transformations if needed using Hevo’s Visual Flow or Python-based logic.
- Hevo automatically creates tables if they don’t exist in PostgreSQL.
Step 6. Activate the Pipeline
- Monitor the run from your dashboard.
- Start the pipeline.

Method 2: Using ODBC Drivers to Import Excel to PostgreSQL
Get & Transform (Power Query) can be used to set up an Excel PostgreSQL connection using ODBC. This approach presupposes you’ve installed a PostgreSQL ODBC Driver.
Step 1: Install ODBC Drivers for PostgreSQL
- The first step in Excel to PostgreSQL data transfer is to install the “ODBC Driver.” The PostgreSQL ODBC 64-bit driver is available for download. On the machine where the Secure Agent is installed, install the PostgreSQL ODBC driver.
Step 2: Configure the Postgres ODBC Driver in Excel
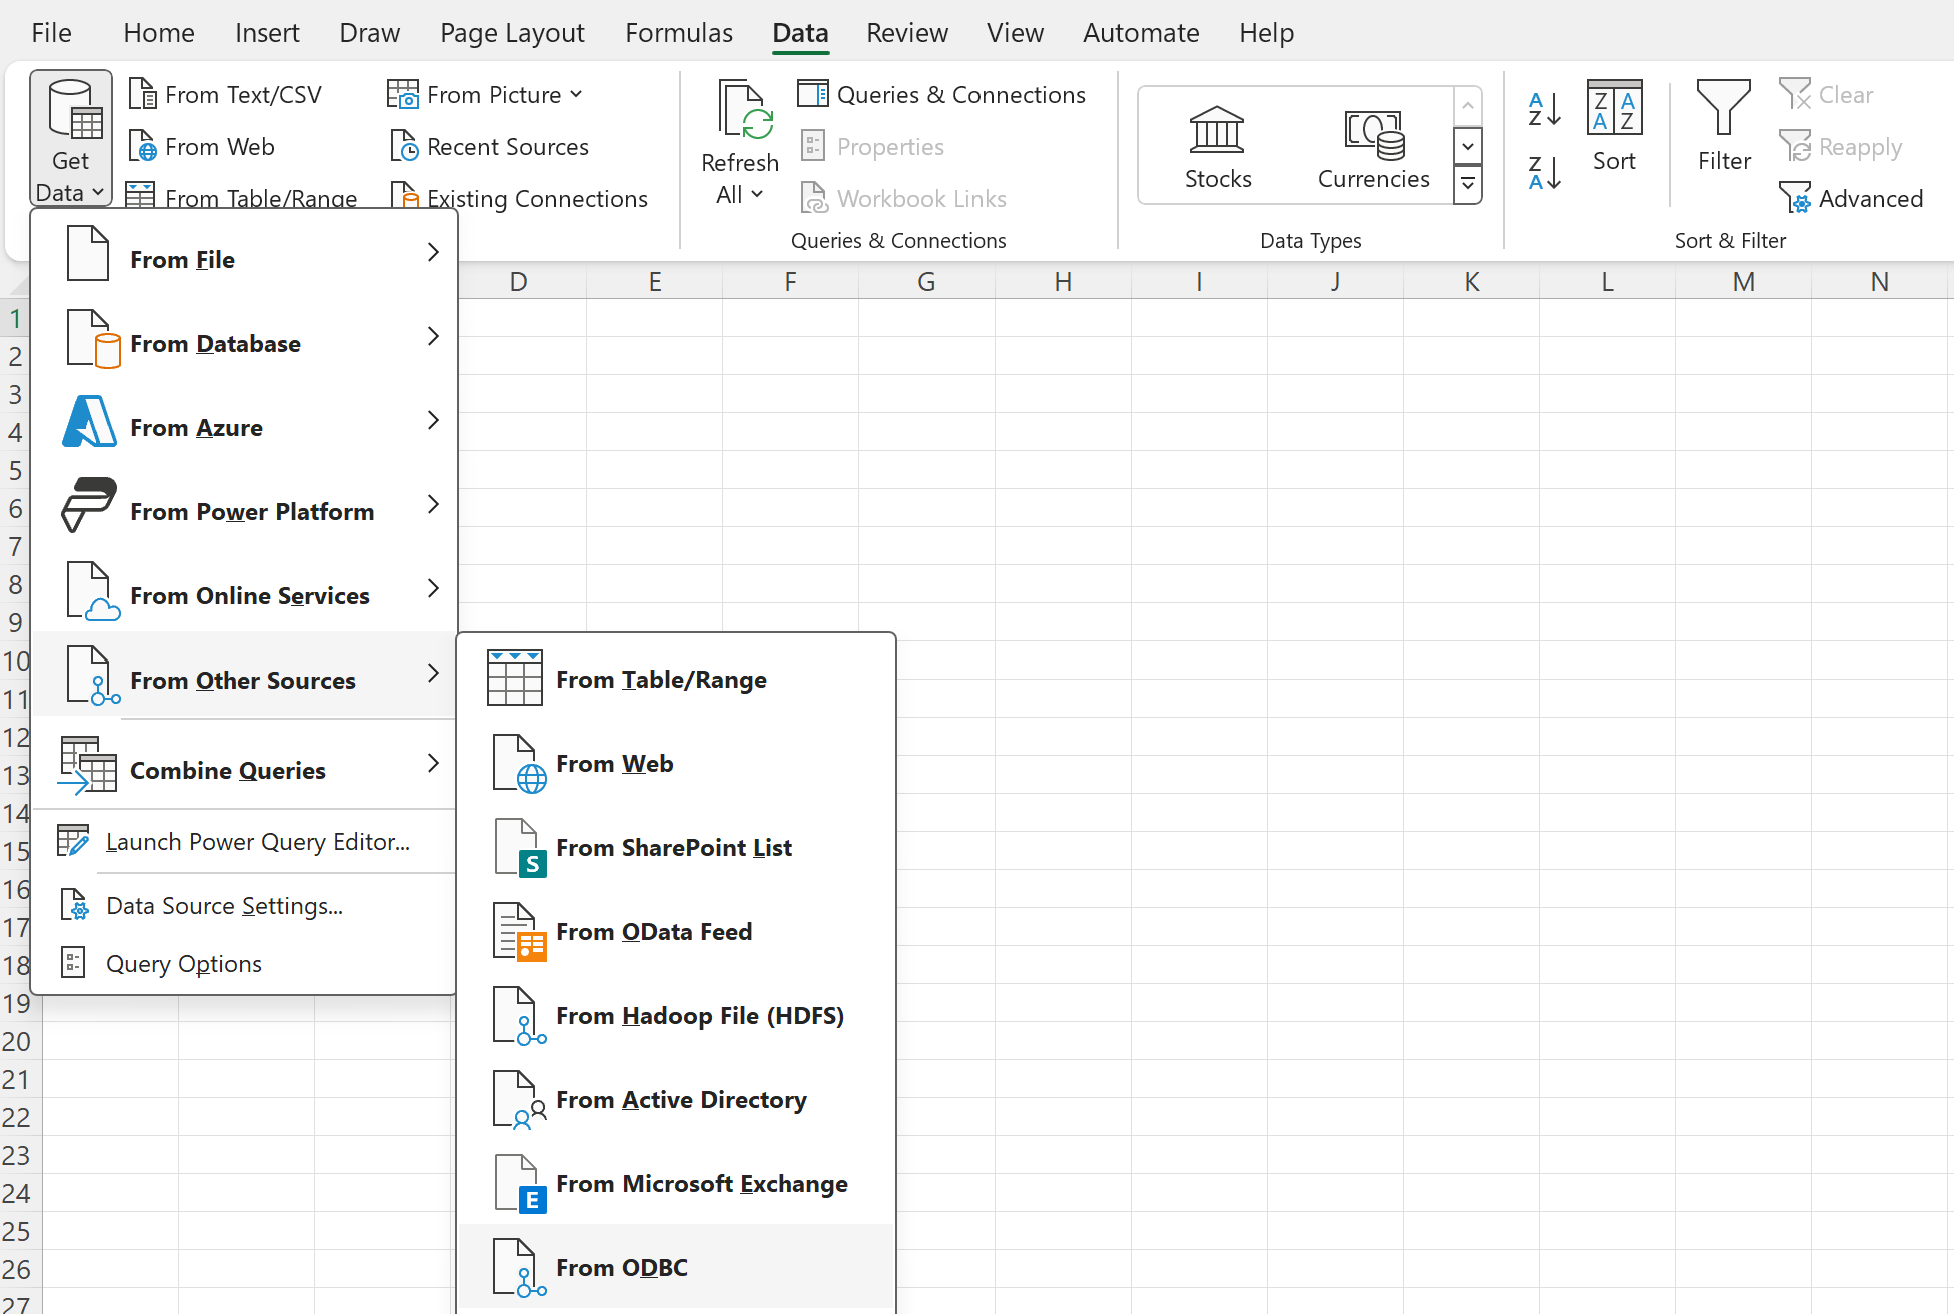
- Expand the “Get Data” drop-down box after clicking “Data” in Excel. Select “From Other Sources > From ODBC” from the drop-down menu.
Step 3: Authorize Connection With PostgreSQL
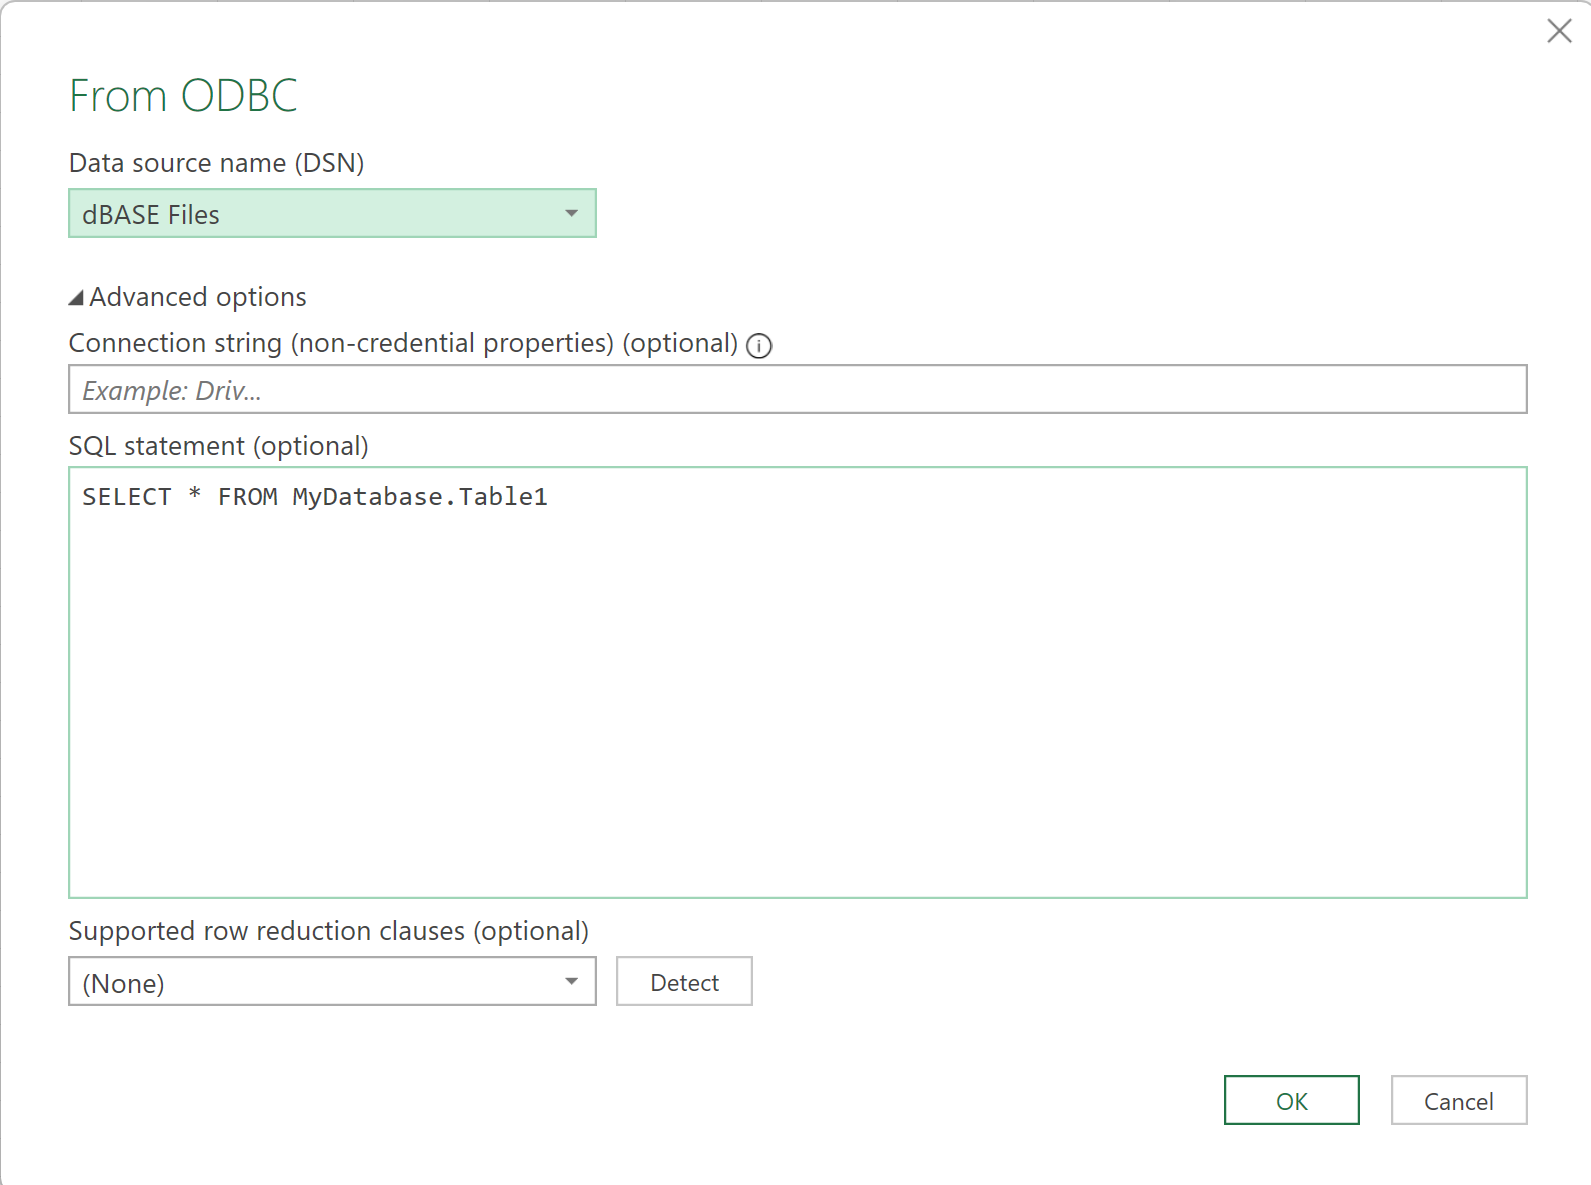
- Choose your data source name in the “From ODBC dialogue (DSN).” You can expand the “Advanced Options” dialogue box and input the connection string for your data source if you haven’t yet established your ODBC Driver (without credentials, which are defined in the credentials dialogue box in the next step).
- You can also enter a SQL query that will be performed immediately after connecting to the data source. Click the “OK” button.
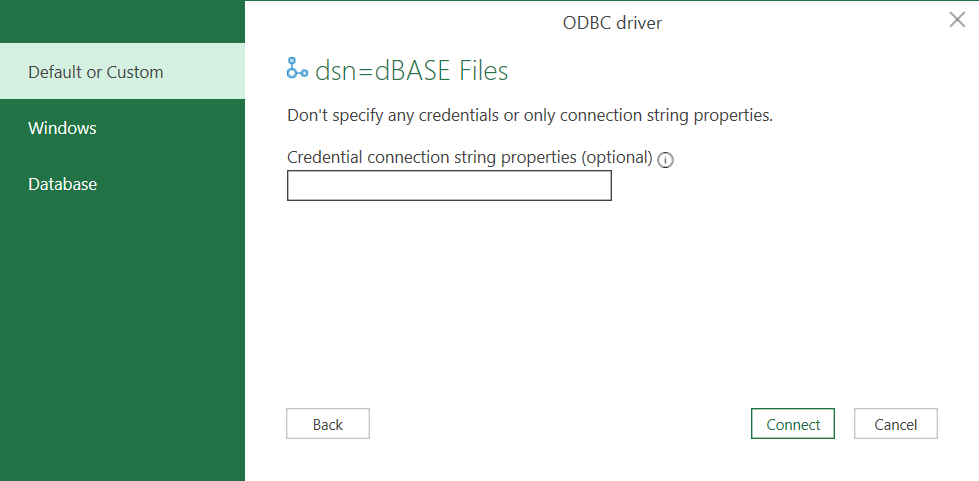
- Select the database and input your credentials in the dialog box, then click “Connect” if you’re using a database “Username” or “Password”. Select “Default” or “Custom” and connect if your database is not password-protected or if you’ve previously entered your credentials in the ODBC Data Source settings.
Step 4: Load Data in Microsoft Excel
- Select the table from which you wish to retrieve data in the pop-up box and click “Load.”
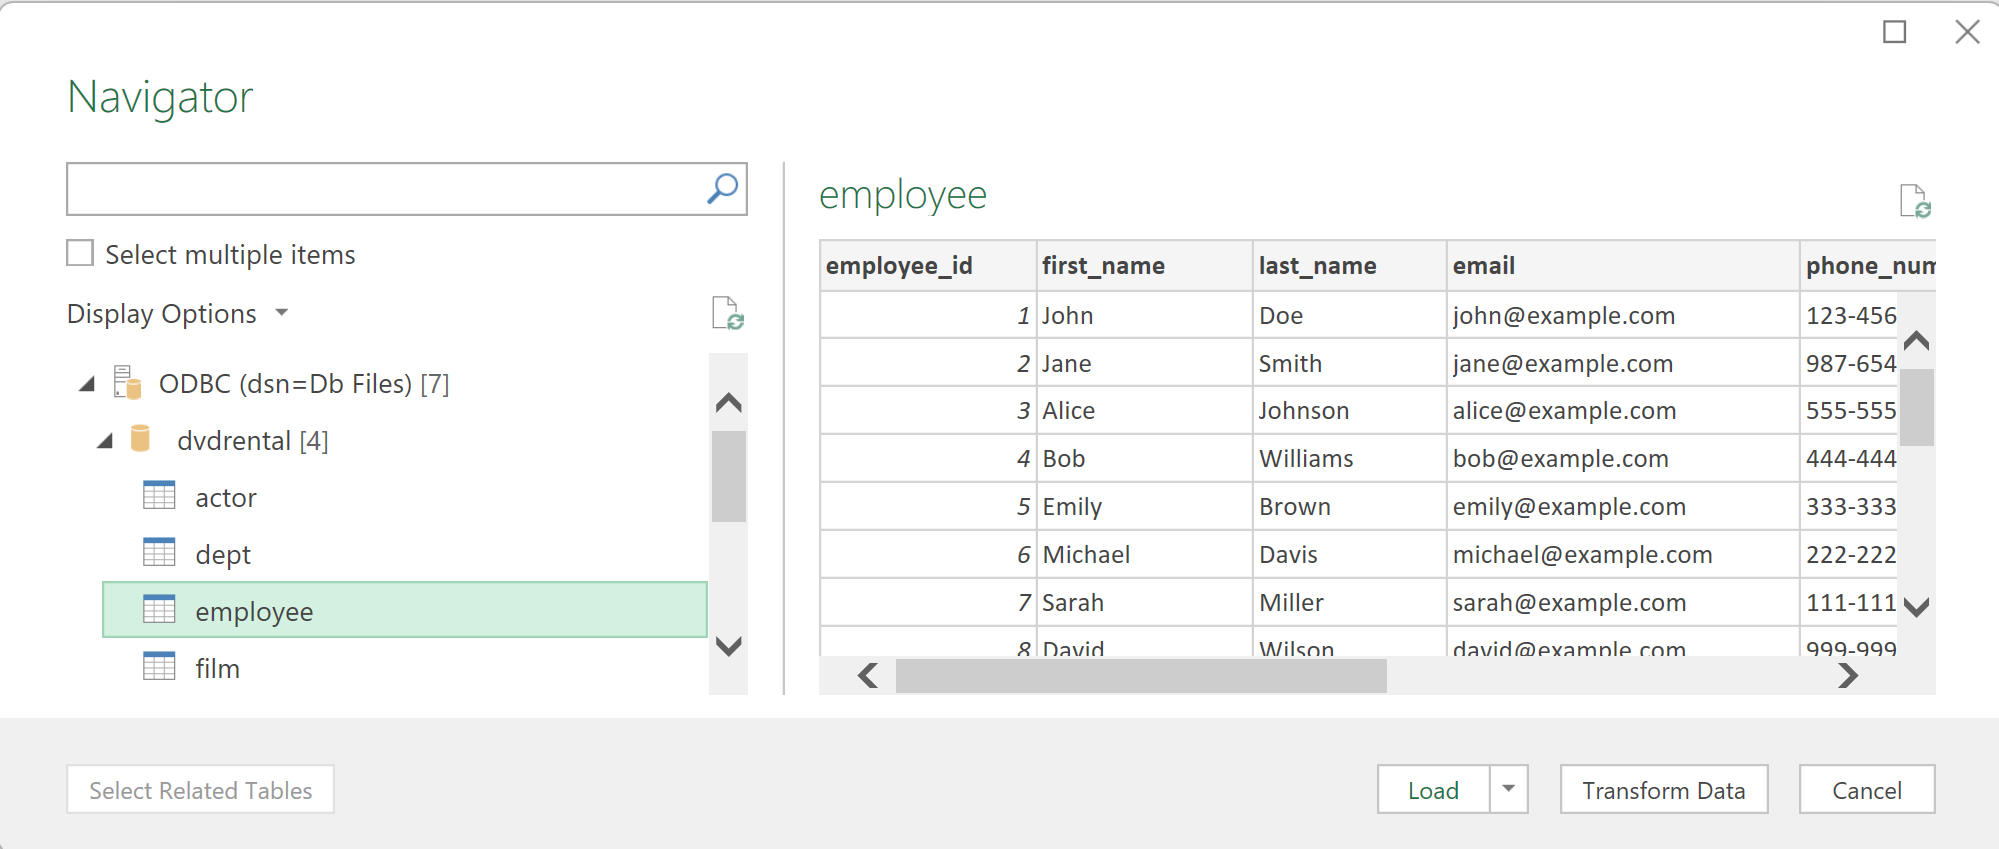
- The table’s data will be displayed in an Excel spreadsheet, where you can interact with it further.
- You have successfully completed the data transfer via ODBC Driver.
Learn more about – How to import Excel into MySQL and import Excel into Bigquery.
Method 3: Integrating Excel and PostgreSQL via CSV Files
Step 1: Convert Excel to PostgreSQL via CSV Files
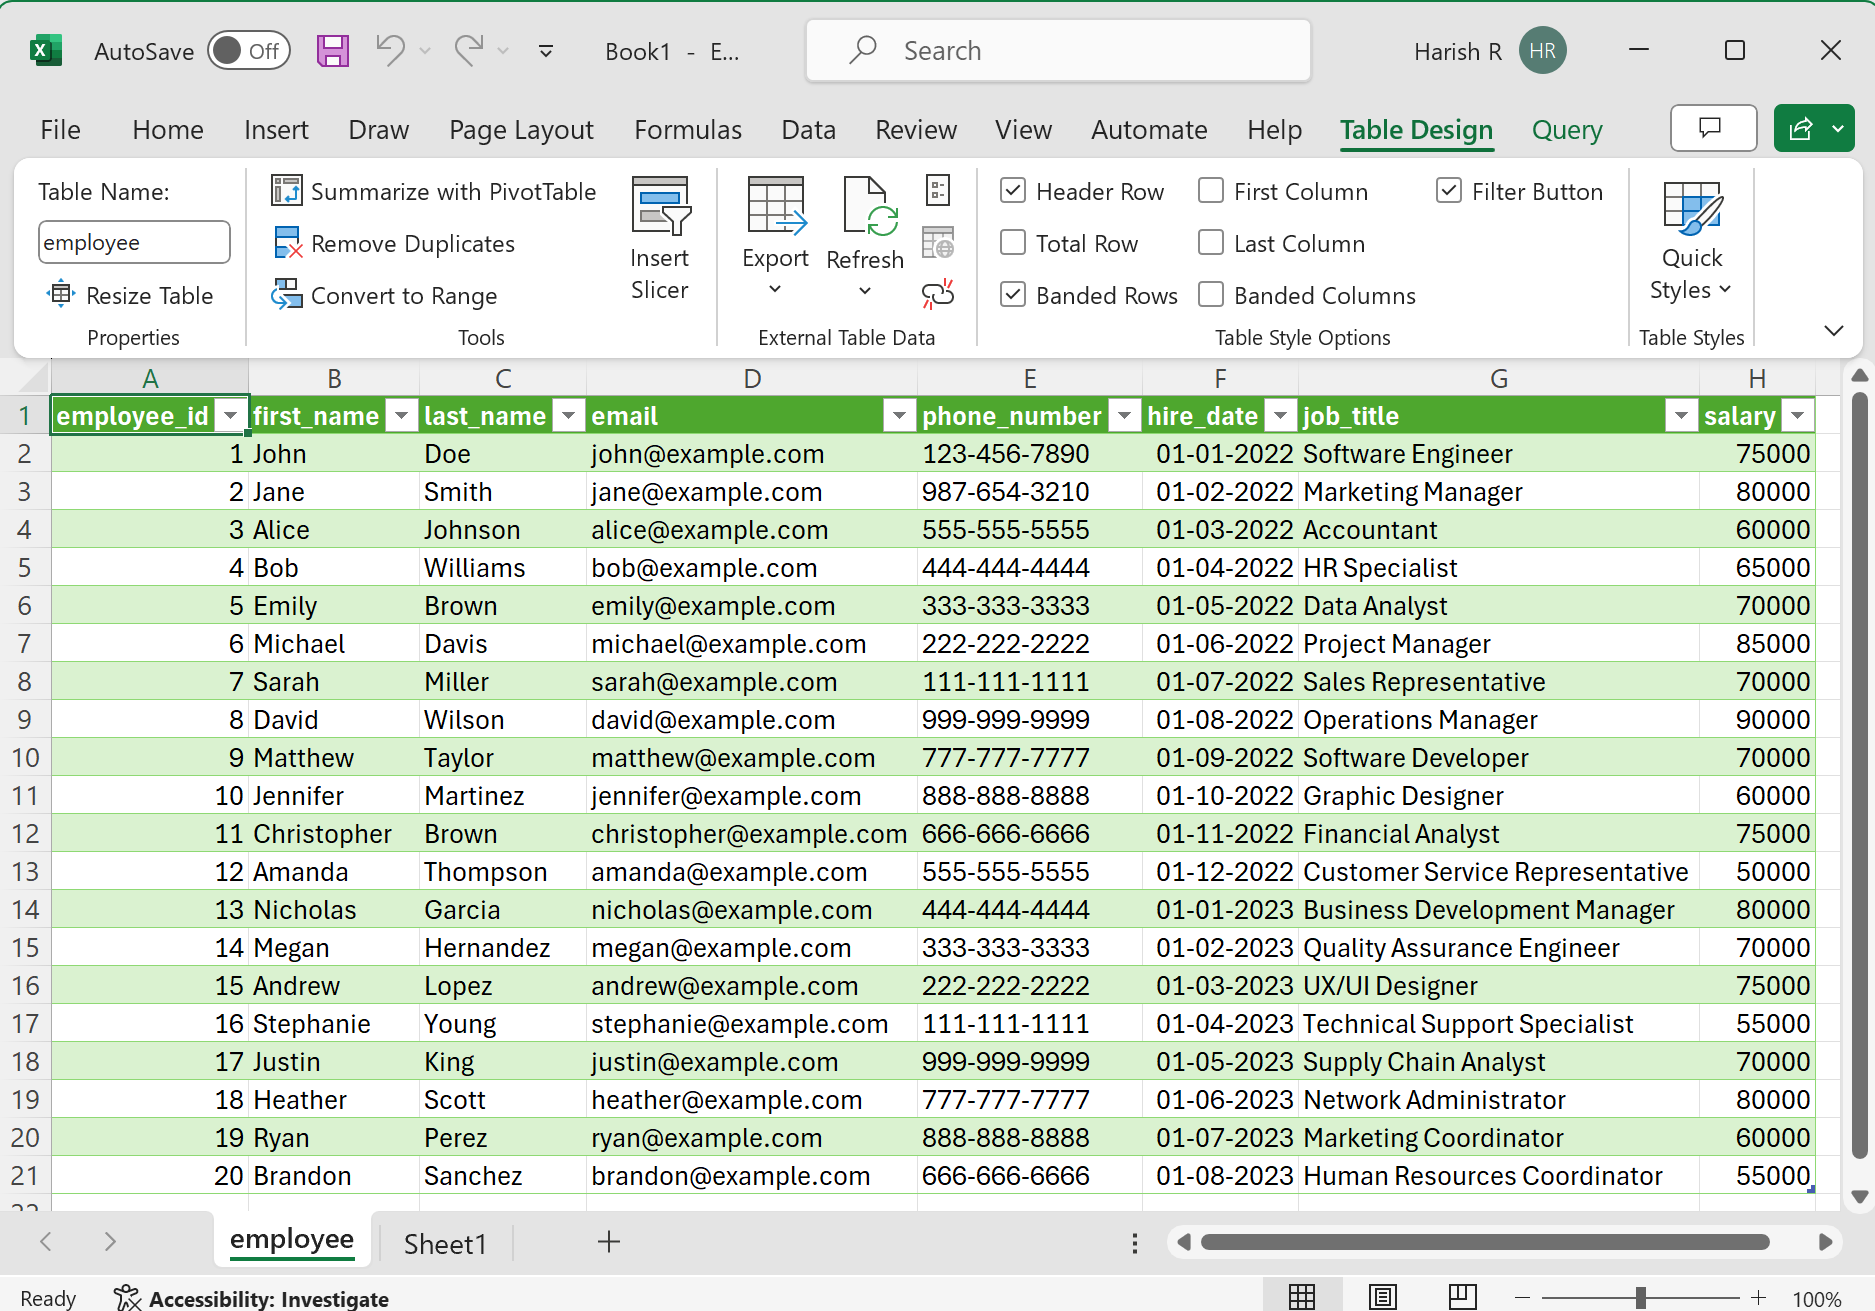
- The first step in the CSV method in Excel to PostgreSQL data transfer is to use “Excel File Conversion.” Open your file in Microsoft Excel if the file extension is
xlsorxlsx. - This will need to be converted to a “CSV file,” which is a simple process. Simply “Save As” and modify the “Save as type:” to
CSV (*.csv)before clicking “Save.” There is no need to change the file name to.csvbecause it will change automatically.
Step 2: CSV File Connection
- Click “Create” and then “Connection” after right-clicking your database connection (or anyplace if your connections are empty). On the left, make sure the “All tab” is chosen, then scroll down to “CSV.” Now click “Next.”
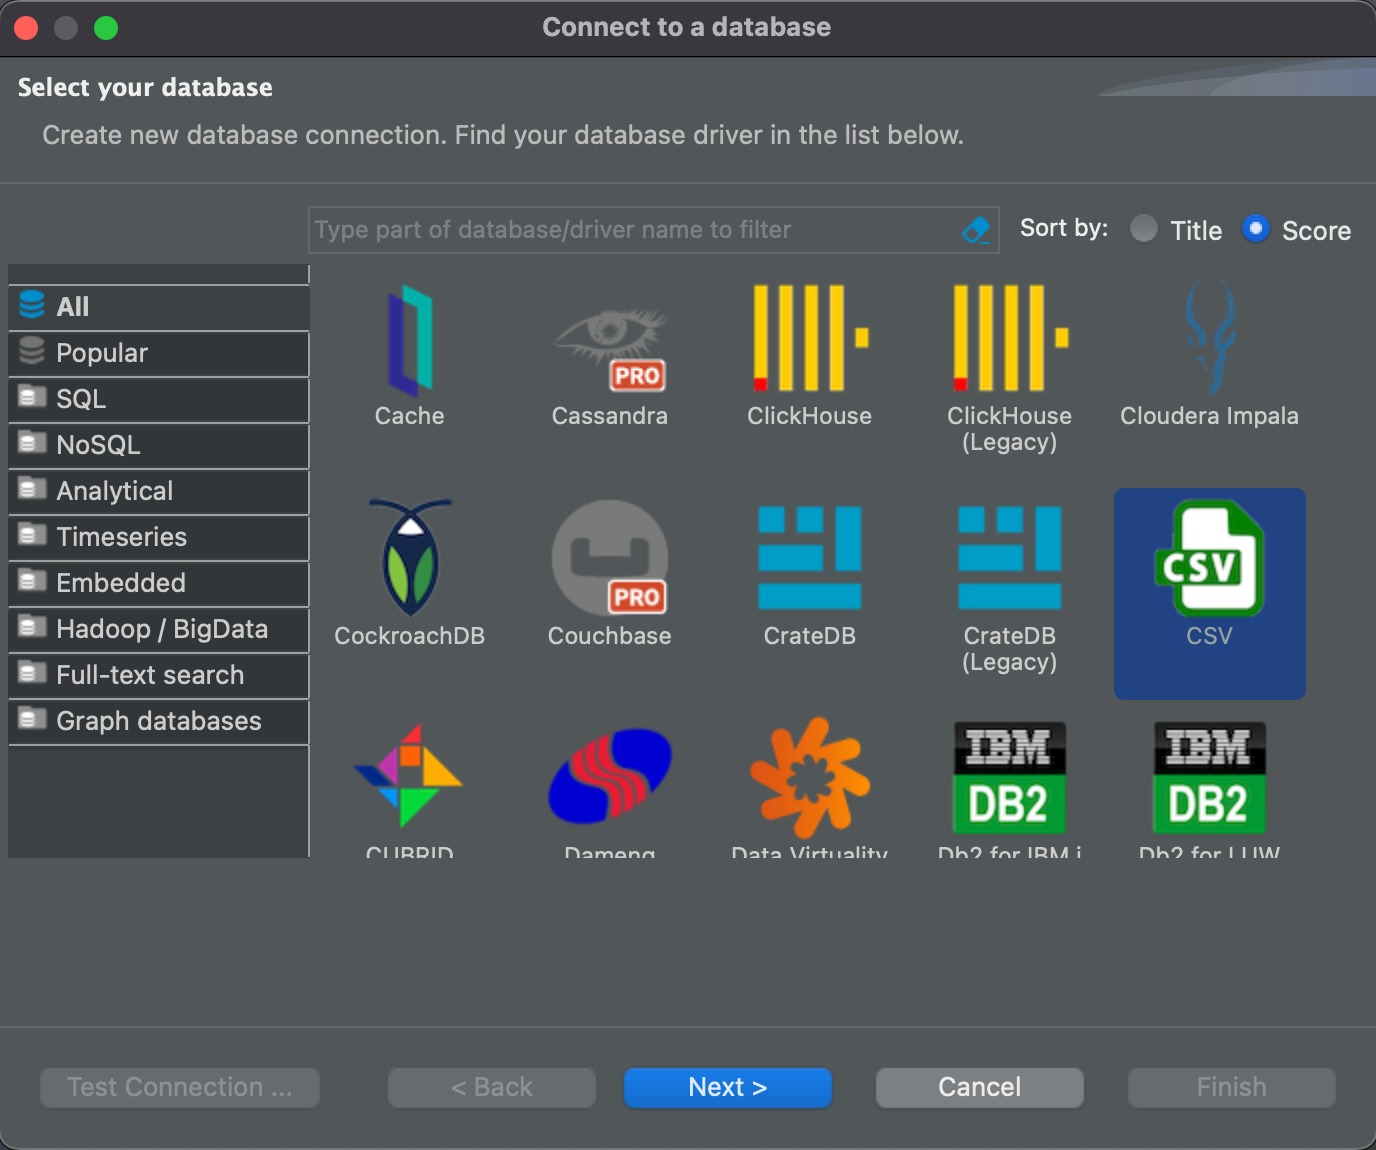
- Select the folder where you saved your CSV file from Microsoft Excel by clicking “Browse.” You’re choosing a folder rather than a file. The connection will load all CSV files in that folder. Finish by clicking “Finish.”
- You should now notice a new connection, which is configured similarly to a standard connection. Each of the CSV files in your folder will be organized into a table with columns.
Step 3: Data Import
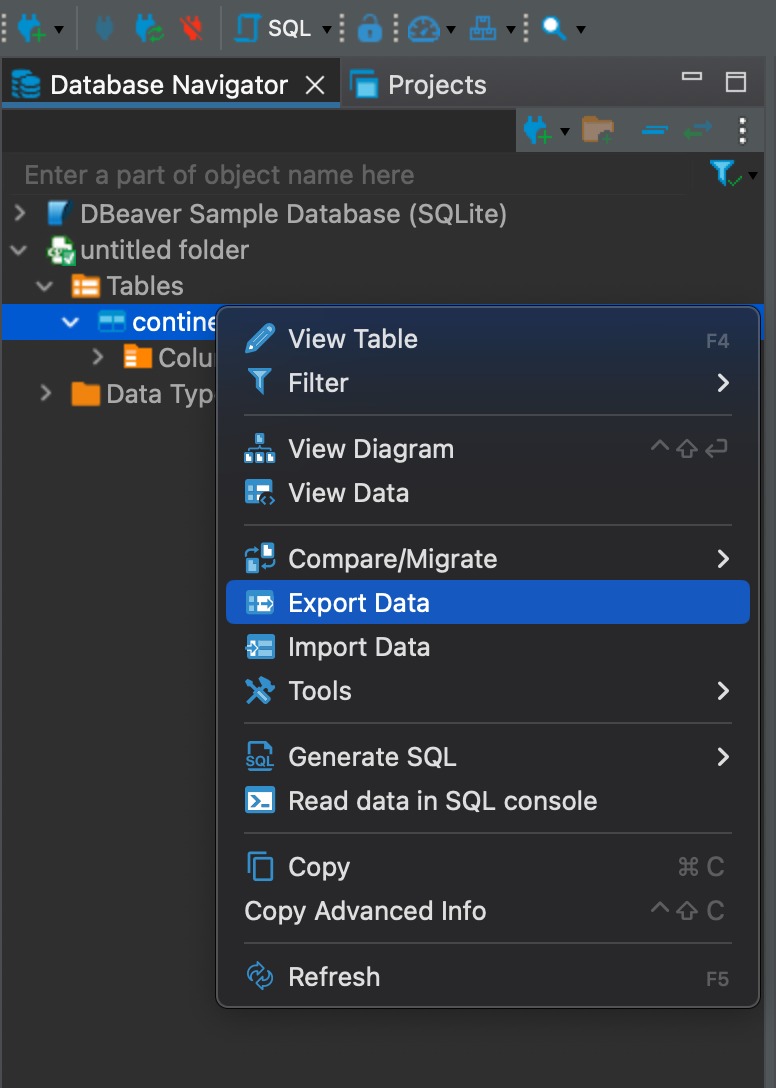
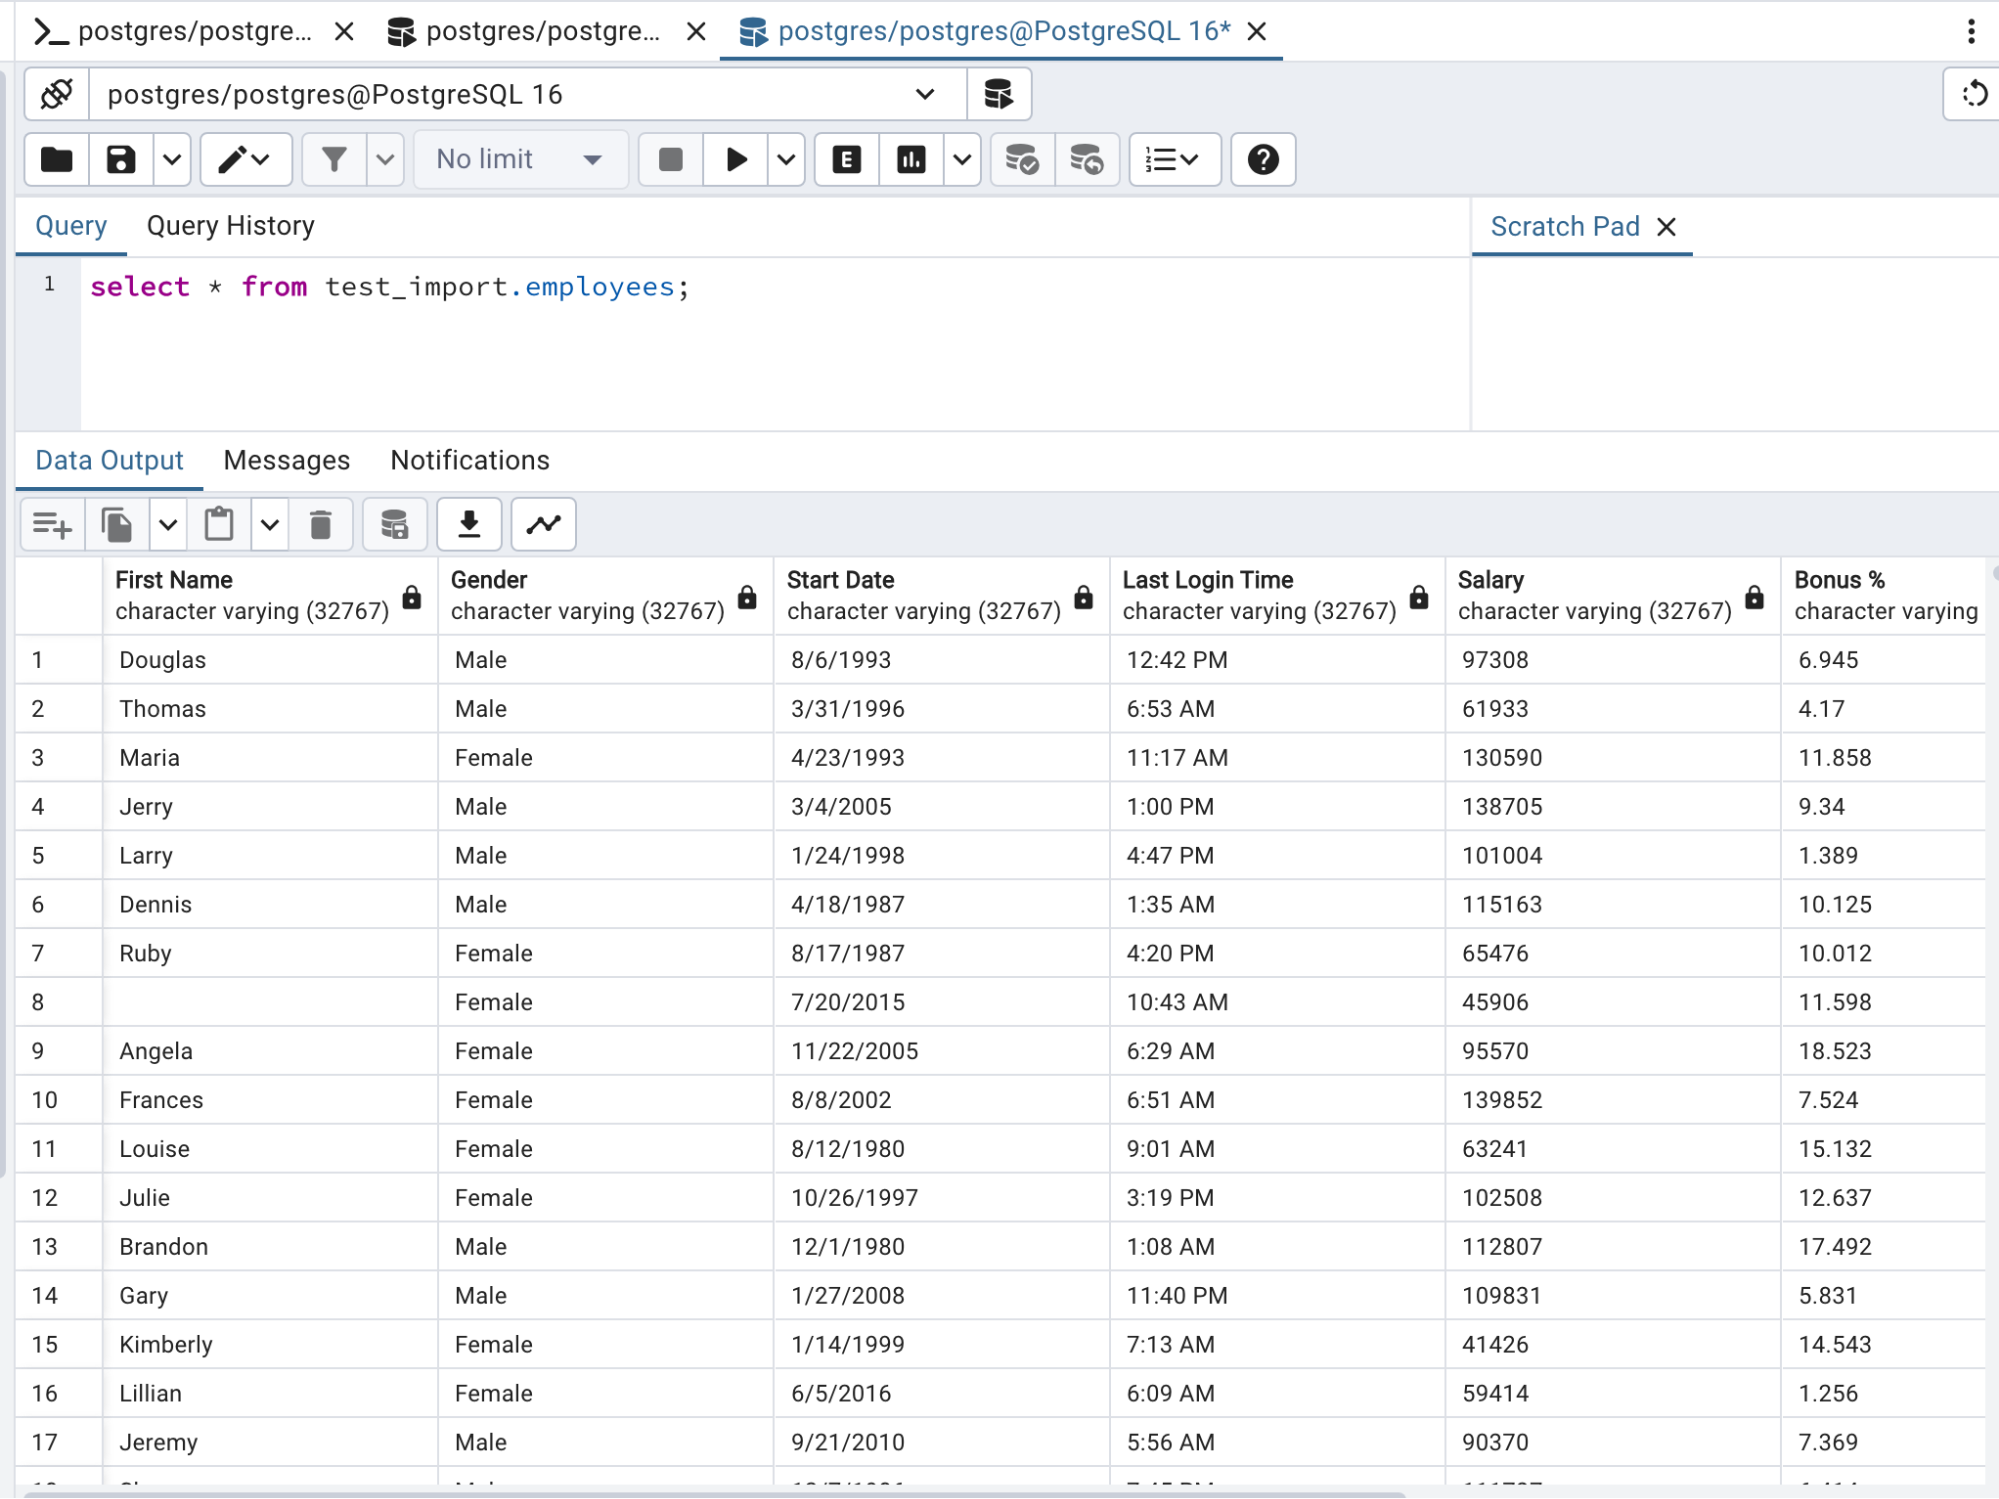
- Data Import is the last step in the process to connect Excel to PostgreSQL data transfer. After you’ve established the Excel connection to PostgreSQL, you may query the data using SQL syntax, just like any other table. Now, you can easily import Excel into PostgreSQL using this CSV file.. Select “Export Data” from the context menu of the table you want to import into PostgreSQL.
- Click “Next” after selecting the database. Change the target container to the schema in PostgreSQL where your table resides. Click “OK.”
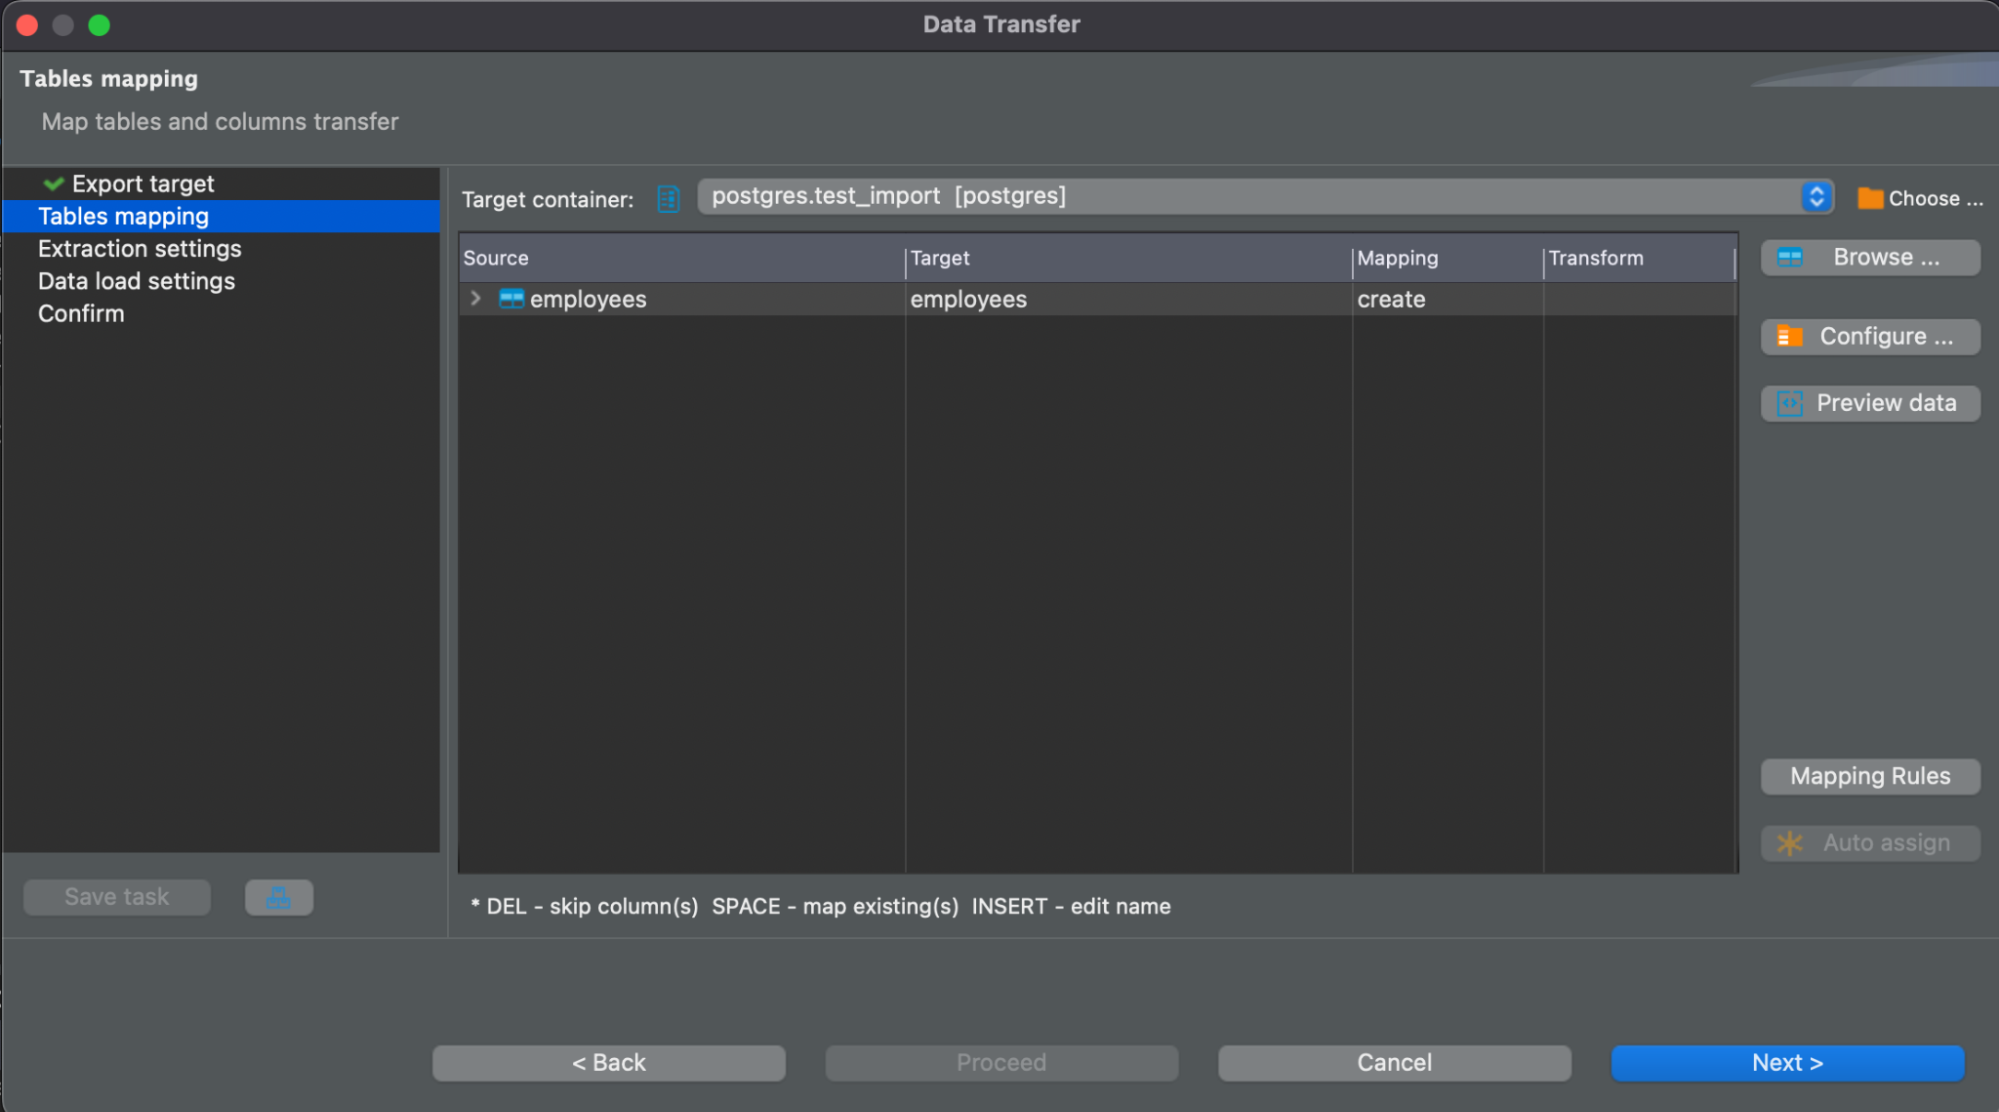
- Choose the target (table) for the data to be imported. Set the target column for each data column by clicking “Columns.” This will map automatically if you have headers in your data that match the table columns. Click “OK” then “Next.”

- Set the connection and “Data Load” options. Remove the option for truncating the target table if you only want to add data to the table rather than rewriting it. Select “Next.” After you’ve double-checked that the source and target are correct, click “Start” to begin the PostgreSQL Excel import.
- The data from your PostgreSQL table is now available for selection.
- You have completed the data transfer via CSV files.
Method 4: Transfer data from Excel to a PostgreSQL Database Using pgAdmin
Step 1: Save as CSV
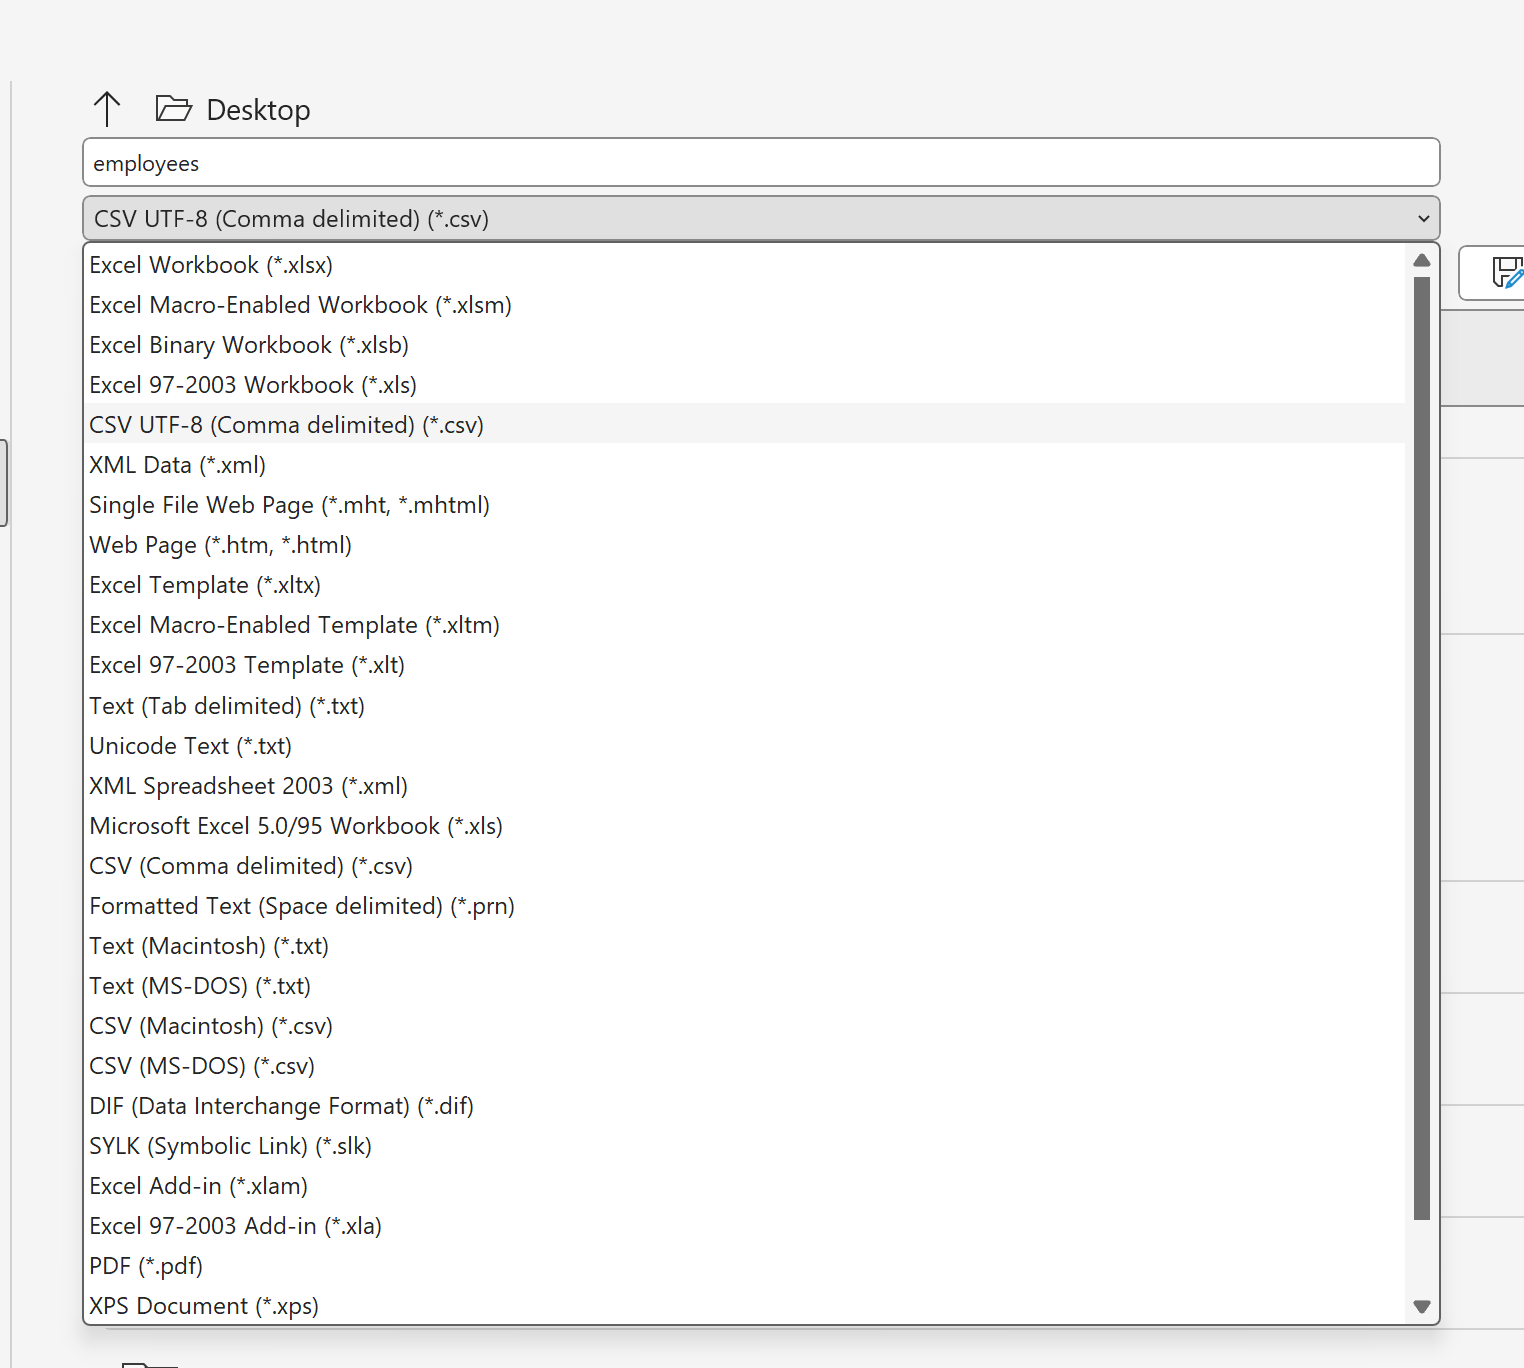
- Convert your Excel spreadsheet into a CSV file. To do this, click on “File,” then save as. In the drop-down bar that appears, pick “CSV (Comma delimited),” and then hit “Save.”
Step 2: Create an empty table in pgAdmin
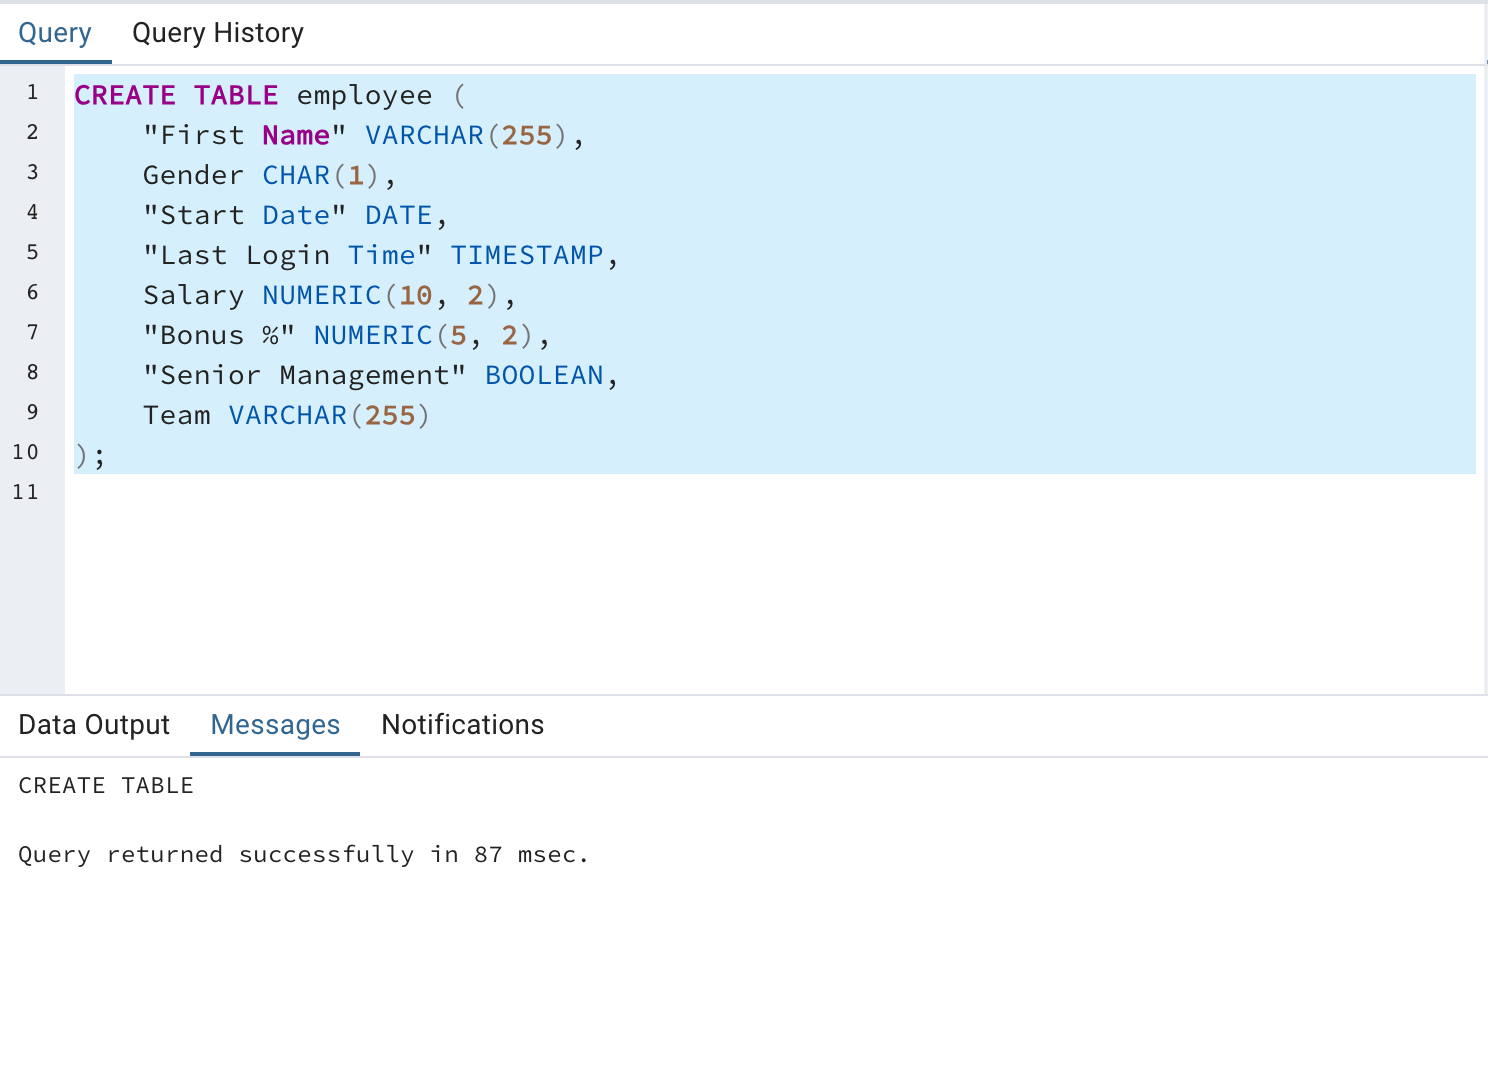
- Create an empty table in PostgreSQL with identical column names, data types, and column constraints as your Excel sheet’s columns.
Step 3: Use “Import/Export”
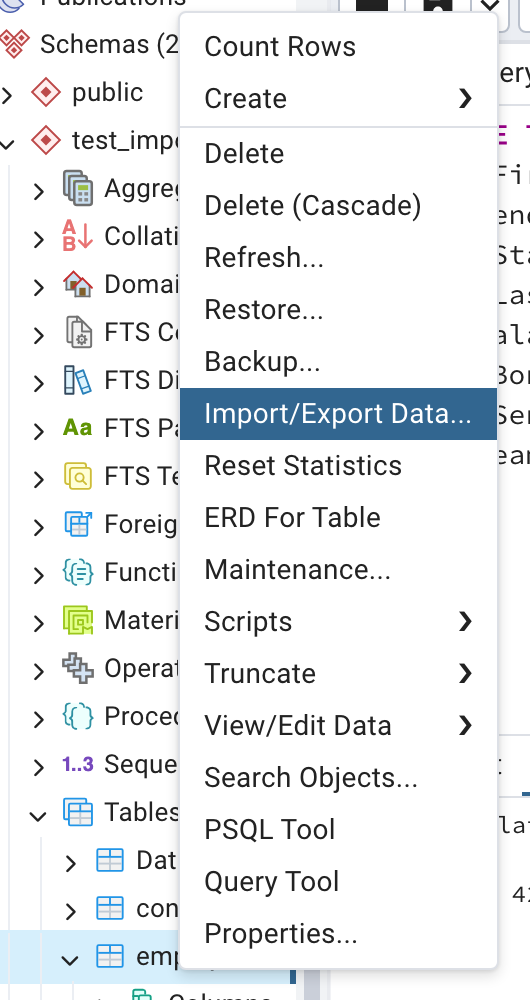
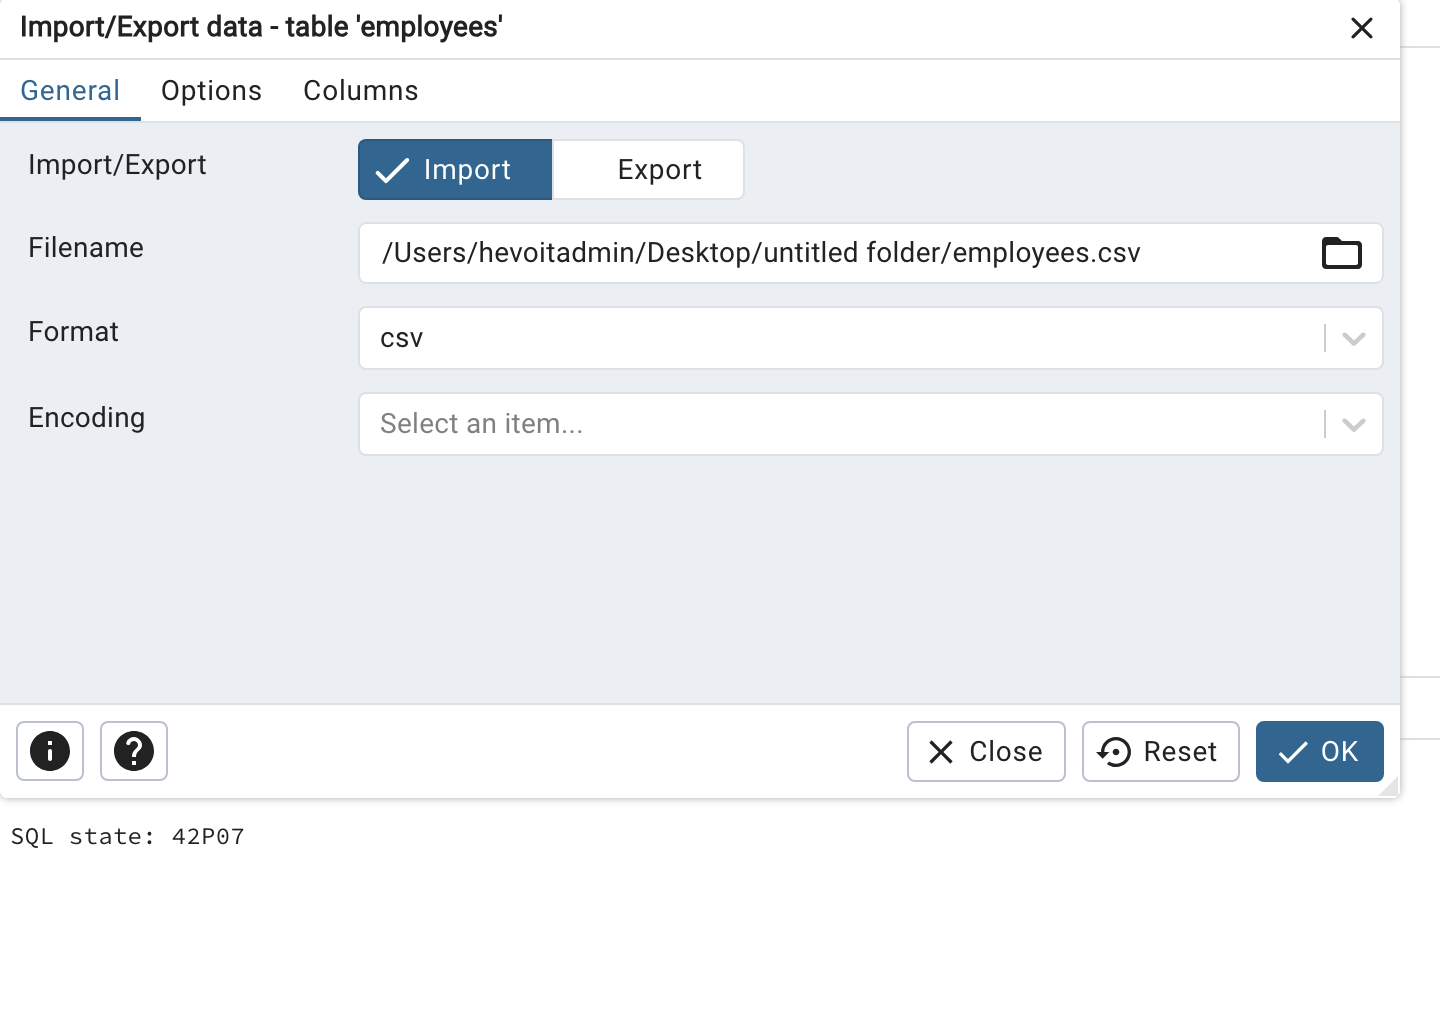
- In PostgreSQL, right-click on the newly formed table; a selection of choices will display; select the “import/export” option.
- At this stage, a dropdown menu displays. Here’s how to use the dropdown box:
- Choose the “Import” option.
- On the file name tab, pick your excel sheet from your PC by clicking the select file “(…)” button.
- Choose “yes” for the header choice.
- Choose the “comma (,) delimiter” as the delimiter choice.
- Click “OK.”
Step 4: Point to your CSV
- If all rules are followed correctly, an import task is produced. A process observer appears to assist you in keeping track of what’s going on.
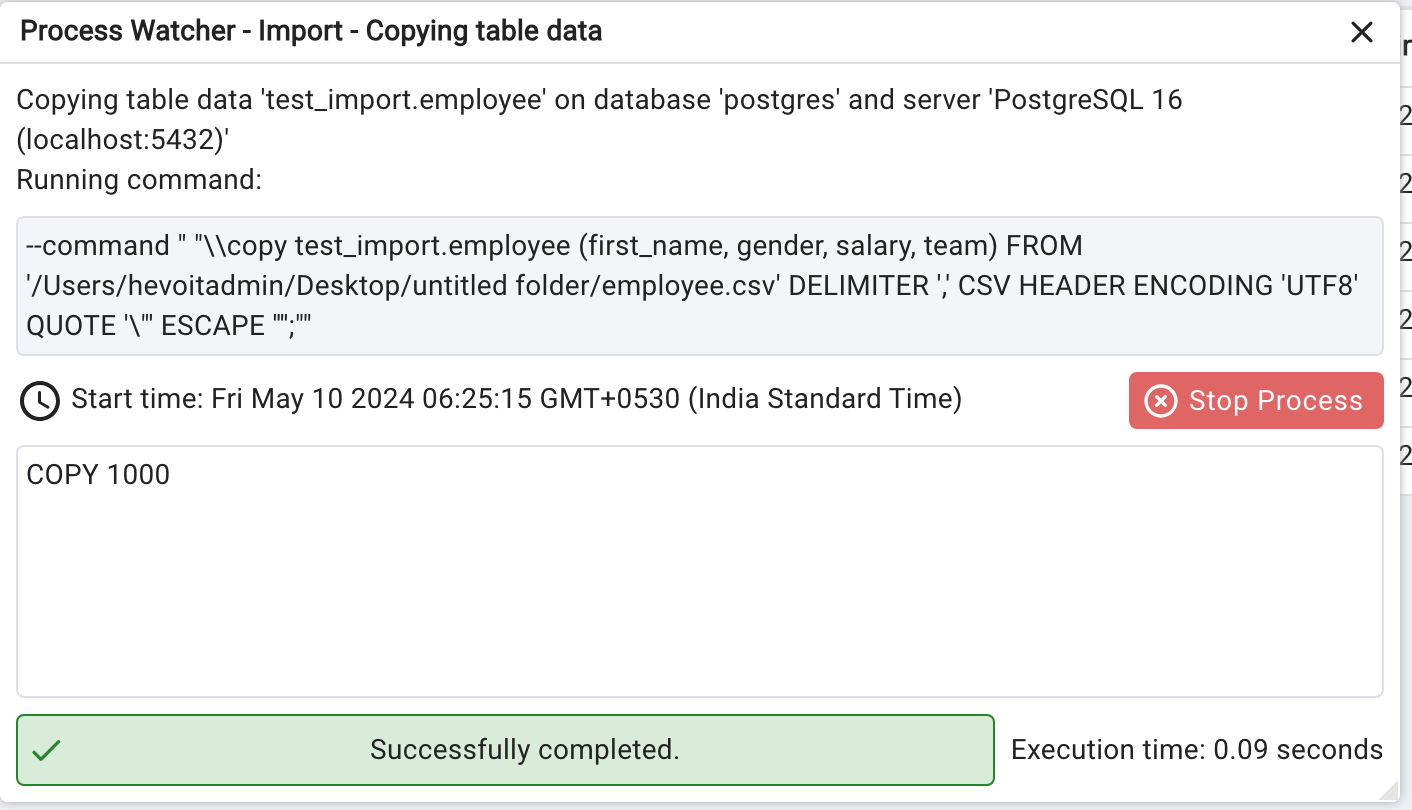
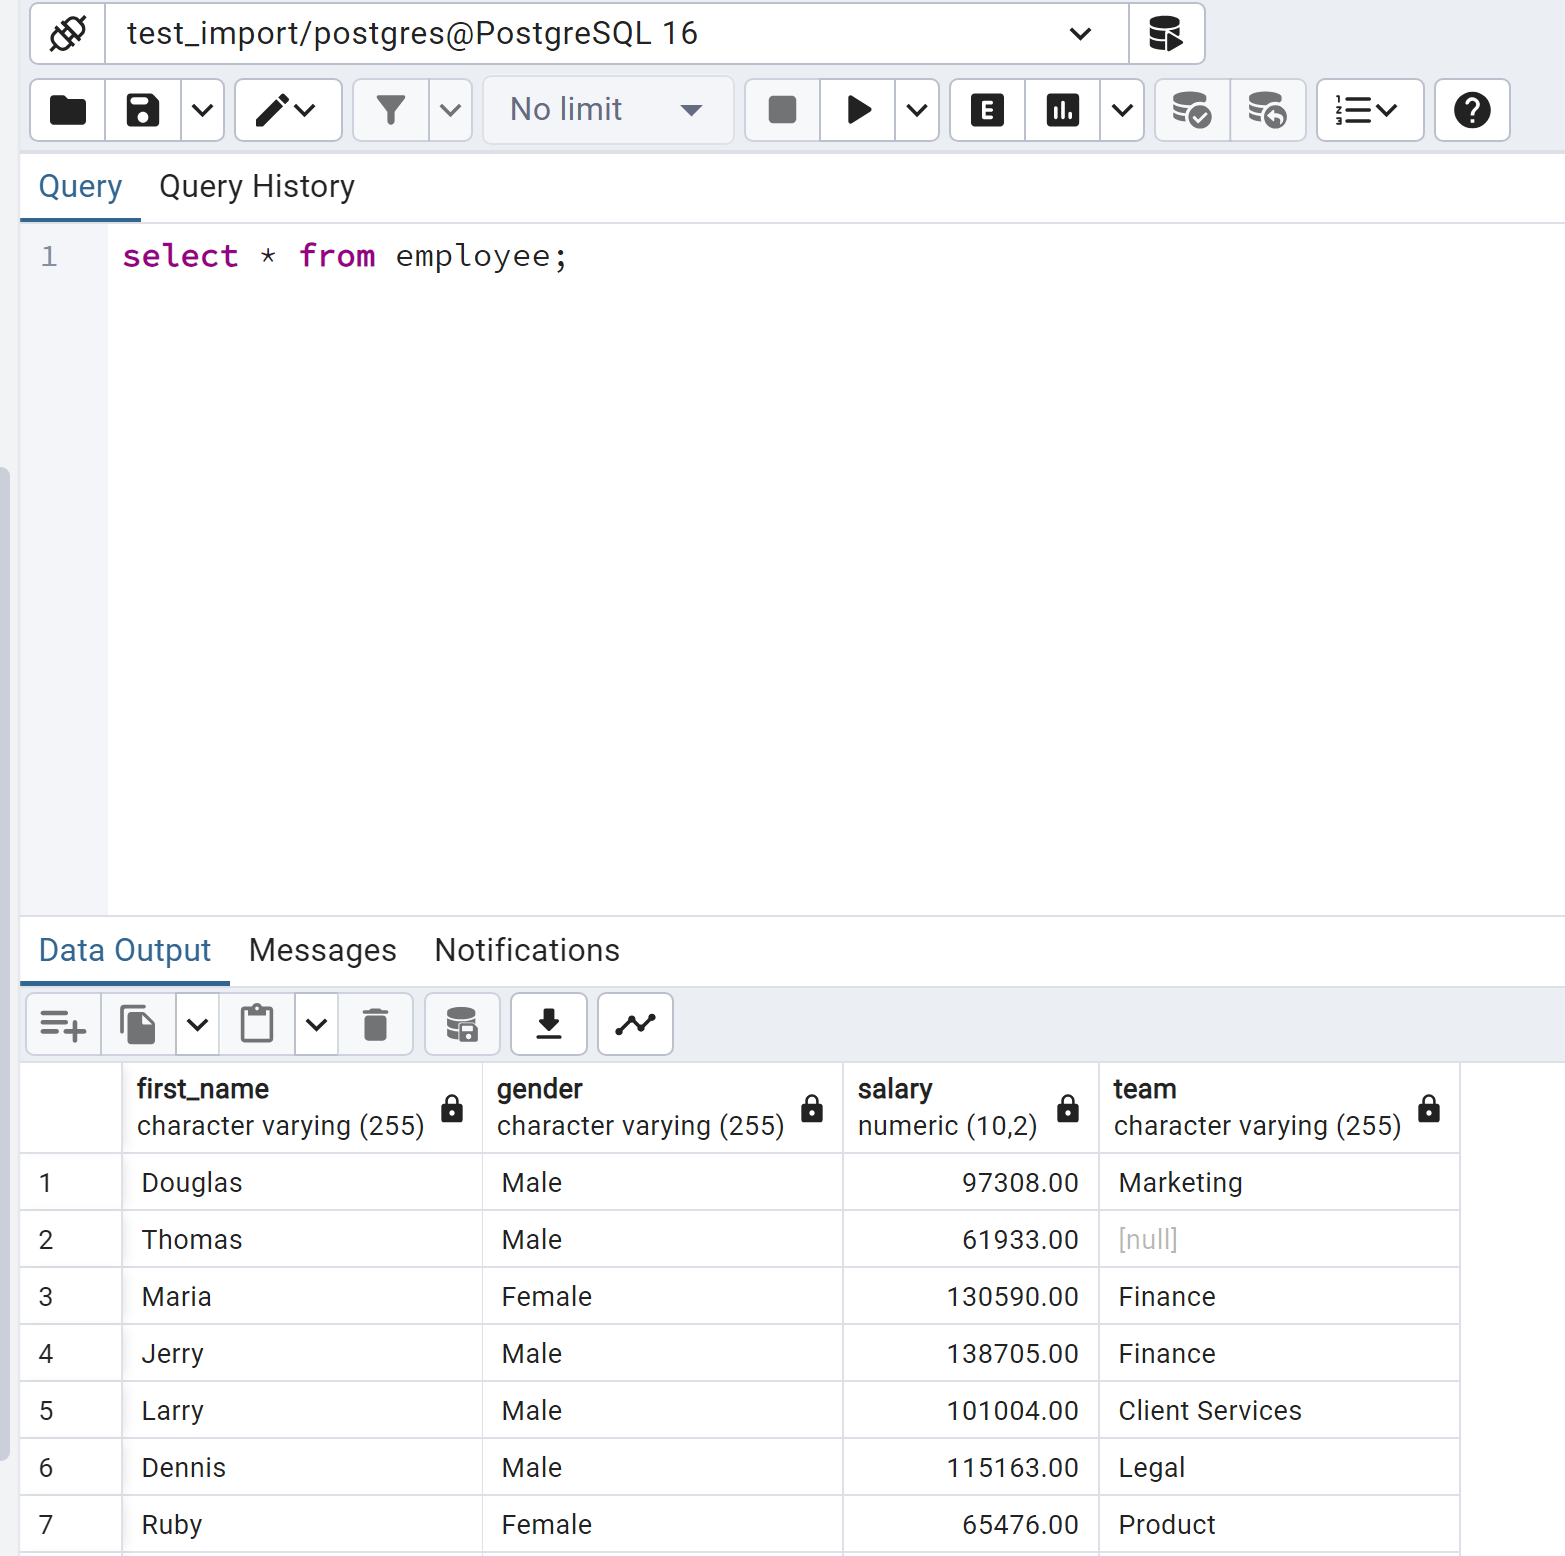
- You’ve successfully loaded the table into your relational database management system.
Method 5: Move Data From PostgreSQL Database to Excel Using Microsoft Query
Step 1:
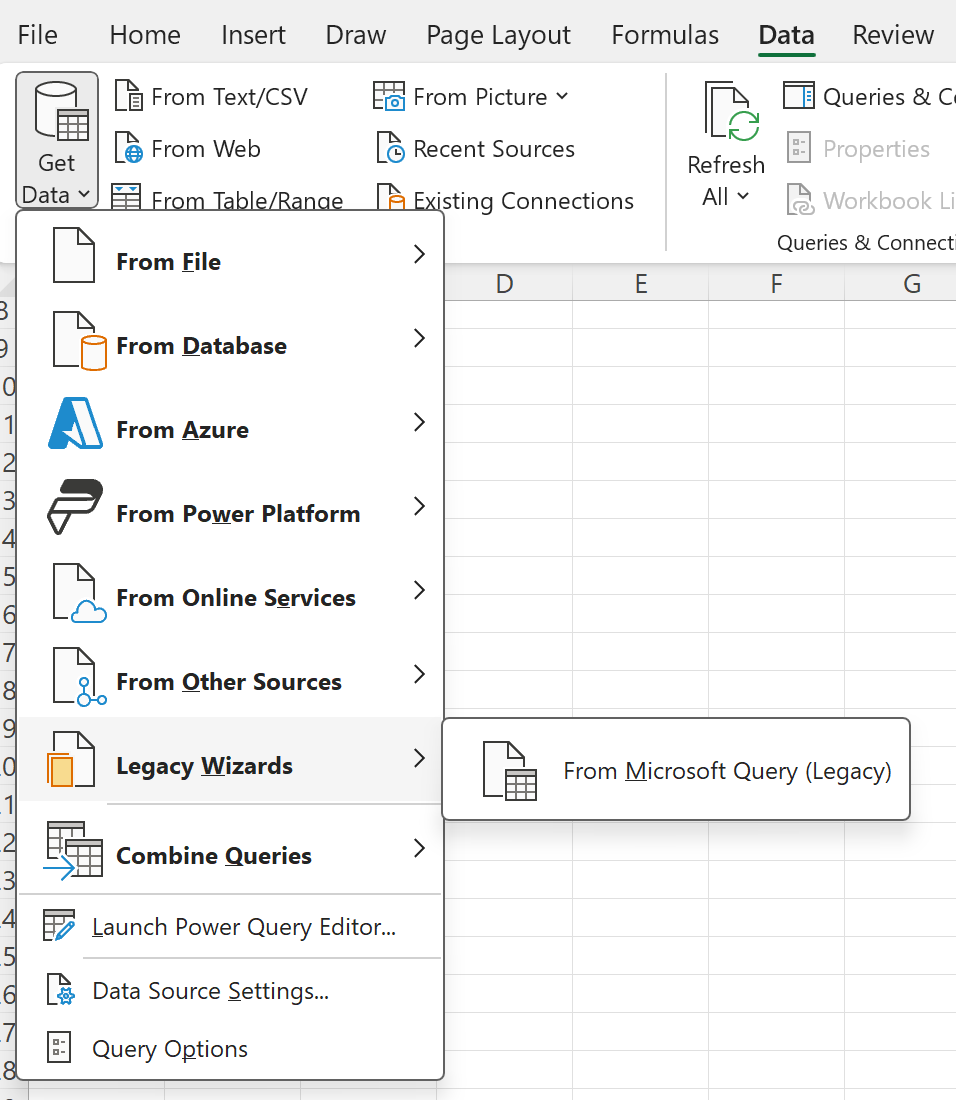
- Begin by opening the Excel sheet where you intend to import data from PostgreSQL. To do this, go to the “Data” tab, then select “Get Data,” followed by “From Other Sources,” and finally choose “From Microsoft Query.”
Step 2:
- In the next window, select the desired data source and make sure to enable the option that says, “Use the Query Wizard to create/edit queries.” Confirm your selection by clicking “OK.”
Step 3:
- Next, you’ll need to specify the database connection details. This includes providing the database name, username, and password. Once entered, click the “OK” button to proceed.
Step 4:
- In this step, you can select the specific tables you want to import into Excel. Additionally, you have the option to apply filters or sort data in rows and columns as needed. To add the selected tables, click the “Add” button.
With these steps completed, you will see that your PostgreSQL data has been successfully loaded into an Excel sheet.
Furthermore, you have the option to utilize other features in the “Get Data” tab, such as the Data Connection Wizard, Power Pivot, and Query Wizard, to export query results from your PostgreSQL database to Excel.
- Power Pivot: This Excel add-in empowers you to import data from external sources, including PostgreSQL databases. While importing, you can apply data filters or rename columns. After the import, Power Pivot efficiently organizes the tables on separate sheets in Excel. Moreover, you can utilize the Data Analysis Expression language within Power Pivot to create advanced formulas, allowing you to craft custom data models.
- Query Wizard: The Query Wizard serves as a valuable tool to create and modify queries for accessing your database’s stored data.
Conclusion
This article teaches you about Excel to PostgreSQL. It provides in-depth knowledge about the concepts behind every step to help you understand and implement them efficiently. PostgreSQL is a great tool for storing your business data. However, at times, you need to transfer this data from multiple sources to your PostgreSQL account for further analysis.
If you want to transfer data into your desired database/destination like PostgreSQL, then Hevo Data is the right choice!
Hevo Data is a no-code data pipeline solution that can help you import data from a vast sea of sources like Google Sheets to your desired destination such as PostgreSQL, data warehouses, or BI tools.
Try Hevo and see the magic for yourself. Sign up for a free 14-day trial to streamline your data integration process. You may examine Hevo’s pricing plans and decide on the best plan for your business needs.
Frequently Asked Questions
1. Can Excel connect to PostgreSQL?
Yes, You can connect Excel to PostgreSQL. We have discussed methods below in this blog:
Method 1: Hevo
Method 2: ODBC Driver
Method 3: CSV Export/Import
Method 4: pgAdmin
Method 5: Microsoft Query
2. How do I run a Postgres query in Excel?
Follow the given steps to run a Postgres query in Excel:
1. Open the Data tab in Excel and choose Get Data -> From Other Sources -> From Microsoft Query.
2. Choose the PostgreSQL DSN. Select the option to use Query Wizard to create/edit queries.
3. In the Query Wizard, expand the node for the table you would like to import into your spreadsheet. Select the columns you want to import and click the arrow to add them to your query.
3. Can Postgres read an Excel file?
Postgres itself can’t read an Excel file, but you can convert it into a CSV file format supported by Postgres.
You can import the CSV into Postgres and load it as a table so you can access and query its data.
4. How do I extract data from PostgreSQL and convert it to Excel?
You can Postgres Export to CSV in 3 ways:
Method 1: Postgres Export to CSV using the COPY Command
Method 2: Postgres Export to CSV using the \Copy Command
Method 3: Postgres Export to CSV using the pg_dump
5. Can you add Excel CSV data in PostgreSQL?
Yes, You can import the CSV into Postgres and load it as a table so you can access and query its data.
Share it with your connections.
-
 Share To LinkedIn
-
 Share To Facebook
-
 Share To X
-
 Copy Link