


 Key Takeaways
Follow the steps below to set up Gmail webhook integration via Cloud Pub/Sub:
Step 1: Create a Pub/Sub Topic: Define a topic in your Google Cloud project to receive Gmail notifications.
Step 2: Set Up a Subscription: Configure a subscription (either push or pull) so your application can receive those notifications.
Step 3: Grant Gmail Publish Rights: Allow the Gmail service account to publish messages to your topic through IAM permissions.
Step 4: Configure Gmail to Send Notifications: Use the Gmail API to point your account at the Pub/Sub topic and specify which labels (like “INBOX”) trigger updates; renew this configuration at least weekly to keep notifications active.
E-mail is a revolutionary way to communicate with people! It has had a huge impact on society through how humans communicate. Gmail is a free E-Mail service provided by Google that gives you various features like Automatic E-Mail Filtering, Smart Reply, E-Mail Nudges, etc. Although Gmail works perfectly, it is usually recommended to have Gmail Webhook Integration for your account. Gmail Webhook Integration enhances the features of Gmail and gives you the ability to Push Notifications for a specific event(s).
This article will introduce you to Gmail Webhooks Integration. It will also provide you with a comprehensive guide that will help you integrate Gmail API Webhook manually.
Table of Contents
Prerequisites
Given below are the prerequisites for setting up Gmail Webhooks Integration:
- A Gmail account.
- Complete the Cloud Pub/Sub prerequisites. Cloud Pub/Sub API is the Gmail API that delivers Push Notifications.
- Set up a Cloud Pub/Sub client.
Seamlessly set up webhooks from your source to the desired destination. Hevo elevates your data migration game with its no-code platform. Ensure seamless data migration using features like:
- Seamless integration with your desired data warehouse, such as BigQuery or Redshift.
- Transform and map data easily with drag-and-drop features.
- Real-time data migration to leverage AI/ML features of BigQuery and Synapse.
Still not sure? See how Postman, the world’s leading API platform, used Hevo to save 30-40 hours of developer efforts monthly and found a one-stop solution for all its data integration needs.
Get Started with Hevo for FreeIntroduction to Gmail

Gmail, in simple terms, is an E-Mail service provided by Google for free of cost. With Gmail, you can send and receive E-Mails, and perform other basic E-Mail related tasks like creating an address book, blocking spam, etc. It is one of the most popular and widely used online E-Mail services in the world.
Key Features of Gmail
Following are some of the key features of Gmail:
- It is possible to get your Gmail address even if you don’t have a Google Account. For example, you can sign in to Gmail using your Yahoo, Hotmail, or any other E-Mail address.
- Gmail gives you 1 GB of free storage space which you can use for sending and receiving E-Mails.
- Gmail connects to Google Sites which gives you privacy-conscious options for keeping your E-Mails.
- You have the option of using POP3 or IMAP4 protocol in Gmail. POP3 is available when you are connected to the Internet, but IMAP4 is available when you are not connected to the Internet.
- You can click on the “Forward” button in your E-Mail to send it to another folder, create a new message in regards to an existing message or an attachment.
Introduction to Webhooks

Webhooks, in simple terms, are one of the ways that applications use to interact with each other. They send automated notifications (in real-time) whenever a given event occurs. Webhooks are now a standard feature used by many different services, such as Gmail, GitHub, Slack, etc.
Suppose you have an application that tracks when a person checks into your restaurant. Now, that you have such an application, you want to trigger a specific event when someone enters or leaves your restaurant. With Webhooks, you get a notification when someone checks in or out of your restaurant. You can this to your advantage and set your application to trigger a particular event when that happens. Given below is a stripped-down view of Webhooks in action.
Also, you can take a look at Webhooks in detail to understand how webhooks work.
Steps to Set Up Gmail Webhook Integration
Now that you have a basic understanding of Webhooks and how they work, it is time for Gmail Webhook Integration and using it to your advantage. Gmail already has pre-installed Webhooks that usually provide you with Server Push Notifications. You can use Gmail Webhook Integration to overwatch the changes happening to your Gmail mailboxes.
Gmail Webhook Integration improves the performance of Gmail, eliminates the extra network, computes costs associated with polling resources, and determines the changes occurring in your Gmail account. Follow the steps below to set up Gmail Webhook Integration for your business:
- Step 1: Create the Topic
- Step 2: Set Up a Subscription to the Topic
- Step 3: Grant Gmail Privileges to your Topic
- Step 4: Configure Gmail Account to Send Notifications


Step 1: Create the Topic
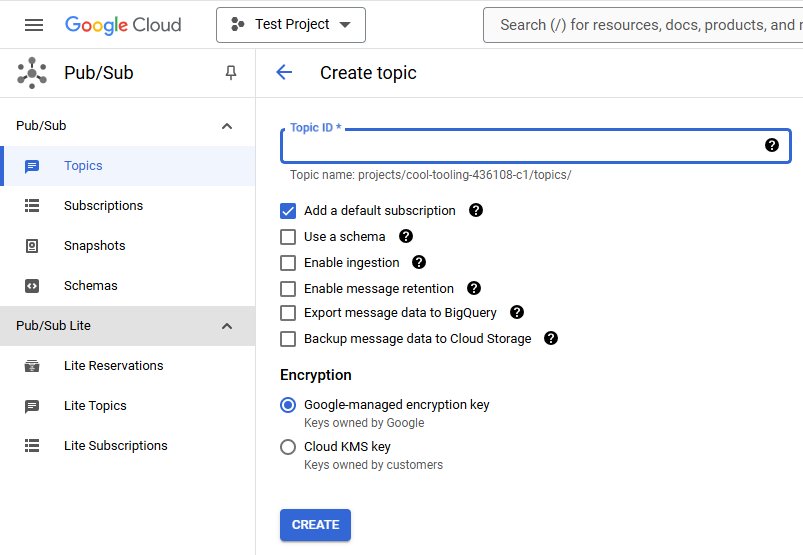
Using your Cloud Pub/Sub client that you must have created as a prerequisite, create the topic that you want Gmail Webhook should send notifications to. There is no restriction on the topic name. You can have any topic name under your project. For instance, projects/myprojects/mytopic/*, where “myproject” is the Project ID.
NOTE: It is highly recommended to use a single topic for all your Gmail Webhook Push Notifications because Cloud Pub/Sub has a quota limit on the number of topics.
Step 2: Set Up a Subscription to the Topic
In this step, you need to set up a subscription to the topic you created in the last step. Get a detailed overview of setting up a subscription to the topic created. This is a necessary step because this is how your application will receive notifications for all future updates.
NOTE: Configure the subscription type to either of the following 2 options:
- Webhook Push (i.e. HTTP POST Callback)
- Webhook Pull (i.e. initiated by your application)
Step 3: Grant Gmail Privileges to your Topic
Cloud Pub/Sub requires Gmail privileges to publish notifications to your topic. More specifically, you need to grant Gmail Publish privileges to gmail-api-push@system.gserviceaccount.com. You can achieve this by using the Cloud Pub/Sub Developer Console following the Resource-Level Access Control Instructions.
There are 3 options while granting access to Gmail privileges:
- Access on a per-topic or per-subscription basis.
- Access with limited abilities. For instance, only publish messages to a topic, only consume messages, etc.
- Access to all Cloud Pub/Sub resources within a project.
Step 4: Configure Gmail Account to Send Notifications
Once you are done with the above steps, you need to configure your Gmail account to send notifications to your Cloud Pub/Sub topic. This can be done using the Gmail API Client to call watch() function. Given below is the sample code that you can use to configure your Gmail account to send notifications:
POST "https://www.googleapis.com/gmail/v1/users/personal/sample_code"
Content-type: application/json
{
  topicName: "projects/myproject/topics/mytopic",
  labelIds: ["INBOX"],
}
If the above code executes successfully, you will receive a response like this:
{
  historyId: 1234567890
  expiration: 1431990098200
}
NOTE: All the changes after the “historyId” that you will receive as a response, will be hereafter notified to you. Furthermore, it is very important to re-call watch() function at least every 7 days. Otherwise, you will stop receiving updates.
That’s it! You can successfully set up Gmail Webhook Integration and can effectively use it as a part of your business.
Check out how you can set up Google Forms Webhooks Integration to work seamlessly with your Forms data.
Benefits of Setting Up Gmail Webhooks
- Instant Notifications: Get real-time updates on important emails without needing to check manually.
- Automated Workflows: Trigger actions like data entry, follow-ups, or notifications based on incoming emails.
- Improved Efficiency: Save time and reduce errors by automating repetitive email-related tasks.
- Seamless Integration: Connect Gmail directly with other apps to streamline processes and keep data in sync.
- Enhanced Tracking: Monitor and respond to emails more effectively with automated tracking and logging features.
Also, you can take a look at how you can set up Jira Webhooks to manage your issues on Jira easily.
Conclusion
The article introduced you to Gmail Webhook Integration and also provided you with a comprehensive step-by-step guide to integrate Gmail trigger Webhook manually. With the complexity involved in Manual Integration, businesses are leaning towards Automated Integration. It is hassle-free, easy to operate, and does not require any technical background. In such a case Hevo Data is the right choice for you!
Sign up for a 14-day free trial and simplify your data integration process. Check out the pricing details to understand which plan fulfills all your business needs.
Frequently Asked Questions
Q1) How do I add a webhook in Gmail?
Use Hevo or the Gmail API to add webhooks. Create a Pub/Sub topic, set permissions, and configure Gmail to send notifications.
Q2) Is the Gmail API free?
Yes, the Gmail API is free for basic use, but usage limits apply, especially for high request volumes.
Q3) Can Gmail send push notifications?
Yes, Gmail can send push notifications via the Gmail API, allowing real-time updates for new messages.
Share it with your connections.
-
 Share To LinkedIn
-
 Share To Facebook
-
 Share To X
-
 Copy Link


