


Easily move your data from Marketo To Snowflake to enhance your analytics capabilities. With Hevo’s intuitive pipeline setup, data flows in real-time—check out our 1-minute demo below to see the seamless integration in action!
Marketo is a marketing automation platform that B2B and B2C businesses use to manage and deliver multi-channel campaigns and programs that are tailored to prospects and customers. With Marketo, businesses can organize their unfiltered user data to develop targeted campaigns and programs for a variety of marketing activities, from lead generation to marketing ROI analysis, across a variety of channels.
Snowflake’s Data Cloud is built on a cutting-edge data platform that is delivered as Software-as-a-Service (SaaS). Snowflake provides Data Storage, Processing, and Analytic Solutions that are faster, easier to use, and more flexible than traditional options.
This article explains how to Connect Marketo to Snowflake using various methods. It also gives an overview of Snowflake and Marketo.
Table of Contents
What is Marketo?

Developed in 2006, Adobe Marketo is a very popular Software-as-a-Service(SaaS) based marketing automation software.
Adobe has developed Marketo to help businesses automate and measure marketing engagement tasks and workflows.
Marketo monitors automation tasks like email marketing, lead management, revenue attribution, account-based marketing, customer-based marketing, and more.
Know how to migrate data from Marketo to MySQL.
Key Features of Marketo
- Engagement Engine: With the engagement engine, Marketo allows businesses to conduct research and gain meaningful insights into customer data.
- Account-Based Marketing: This feature in Marketo allows businesses to develop an intelligent list of characters that characterize the personas they want to target.
- Lead Nurturing: Marketo helps businesses segment their leads based on marketing personas, target industries, or interactions taking place. =
What is Snowflake?
Snowflake is a cloud-based data warehousing platform that enables businesses to store, process, and analyze large amounts of data efficiently. It’s known for its scalability, flexibility, and ability to handle diverse workloads across multiple cloud environments without requiring extensive infrastructure management.
Unlock the power of informed decisions with our Snowflake cost estimation tool.
Key Features Of Snowflake
- Concurrency Handling: Handles multiple queries at the same time without performance degradation.
- Scalability: Instantly scale computing and storage independently based on workload demands.
- Multi-Cloud Support: Operates across major cloud providers (AWS, Azure, Google Cloud).
- Data Sharing: Allows secure, real-time data sharing across organizations without moving data.
Method 1: Using Hevo to Set Up Marketo to Snowflake
Hevo accelerates the migration of Marketo with Snowflake by automating data workflows and minimizing manual setup. This solution ensures smooth and reliable data transfer, enabling marketers to gain actionable insights from their campaigns in Snowflake without complex configurations.
Method 2: Using Custom Code to Move Data from Marketo to Snowflake
Custom code for transferring data from Marketo to Snowflake offers tailored integration but demands thorough programming skills and regular updates, which can be difficult to manage.
Method 1: Using Hevo to Set Up Marketo to Snowflake
Hevo provides an Automated No-code Data Pipeline that helps you move your Marketo to Snowflake. Hevo is fully-managed and completely automates the process of not only loading data from your 150+ data sources(including 40+ free sources)but also enriching the data and transforming it into an analysis-ready form without having to write a single line of code. Its fault-tolerant architecture ensures that the data is handled securely and consistently with zero data loss.
Using Hevo, you can connect Marketo to Snowflake in the following 2 steps:
Step 1: Configure Marketo as the Source
- Step 1.1: Select Marketo on the Select Source Type page.
- Step 1.2: Enter the following information on the Configure your Marketo Source page:
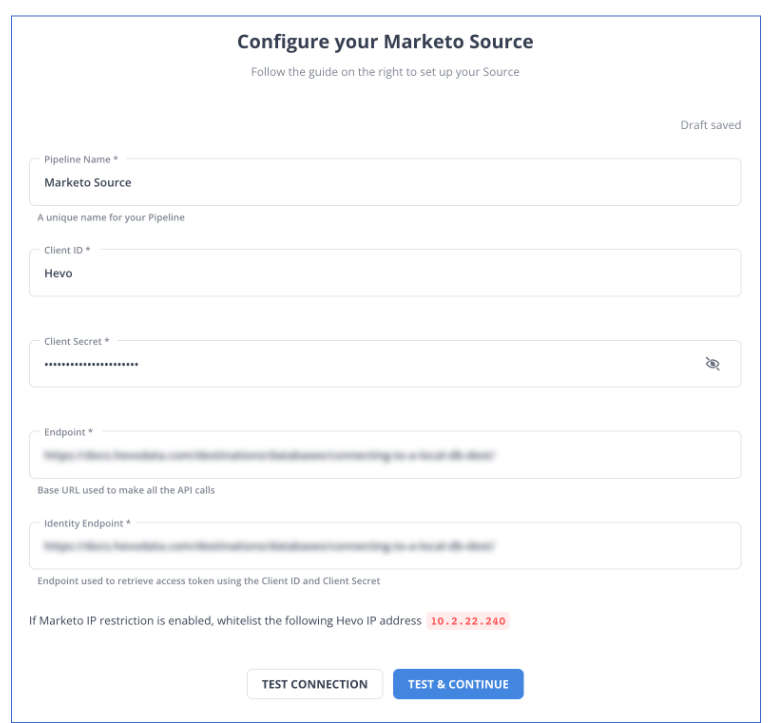
- Step 1.3: Simply press TEST & CONTINUE.
Step 2: To set up Snowflake as a destination
- Step 2.1: Select Snowflake from the Add Destination page.
- Step 2.2: Set the following parameters on the Configure your Snowflake Destination page:

- Step 2.3: Click Test Connection to test connectivity with the Snowflake warehouse.
- Step 2.4: Once the test is successful, click SAVE DESTINATION.
Method 2: Using Custom Code to Move Data from Marketo to Snowflake
You use an indirect method to connect Marketo to Snowflake. First, you connect Marketo to Redshift and move data from Redshift to Snowflake.
Step 1: Connecting Marketo to Redshift
1. Create an Access Token for the Marketo API
- Log in to your Marketo account and navigate to the Admin page.
- Expand the Access API section.
- Select Read-only Lead or any other access control option based on your requirements.
- Create an API-only user and associate it with the previously created API role.
- Click Invite to finalize user creation.
2. Extract Lead Data using Marketo API
- Use the Access Token to extract lead details from Marketo in JSON format.
- Make an API call as shown below:
https://api.sendgrid.com/api/bounces.get.json?api_user=your_sendgrid_username&api_key=your_sendgrid_password&date=13. Transform JSON Data to CSV
- Convert the JSON output to CSV format using available tools.
- Save the CSV data in a file on your local system.
4. Load CSV Data to Redshift
- Load the data exported from Marketo into Redshift using the AWS Management Console and Amazon S3.
Step 2: Moving Data from Redshift to Snowflake
1. Database Objects Migration
- Begin with migrating database objects, which include schema, table structures, and views.
- Keep the object structure unchanged during migration to avoid issues.
- Create the same structure in Snowflake as in Redshift.
2. Data Migration
- Alternatively, a data replication tool that supports Snowflake can be used as a target to load raw data.
- Identify historical datasets for each table. Given the high data volume, it’s crucial to plan this step.
- Create separate batches for each table based on filters (e.g., transaction date).
- Use the UNLOAD command in Redshift to unload data into S3 and the COPY command in Snowflake to load data from S3 into Snowflake tables.

Best Practices for Migrating Code and Data
Migrating Code to Snowflake
- In theory, Redshift and Snowflake both support ANSI-SQL, but they use different formats for various items, such as the lack of DISTKEY, SORTKEY, and ENCODE concepts in Snowflake.
- There are many other examples of using functions, but one of the key distinctions between date functions is that Redshift’s GETDATE() and Snowflake’s CURRENT TIMESTAMP() are both date functions.
- While JSON, AVRO, and PARQUET are semi-structured data types that can be supported by Snowflake’s “VARIANT” datatype, they cannot be directly stored in Redshift.
- To match the JSON field names in Redshift, the target table must be created by examining the JSON source data. Without a set structure, we cannot import it directly. Only the first-level elements can be parsed into the target table by the COPY functions.
- As a result, the multi-level elements are loaded into a single column and treated as strings. Redshift provides JSON SQL functions that must be used to further parse the intricate, multi-level data structures or arrays of JSON files. When migrating code, one must be extremely cautious and convert the code to supported SQL syntax.
Data Comparison between Redshift & Snowflake
- The final step in any migration project is to compare the data sets from the legacy and newly migrated platforms to make sure that everything was successfully migrated and that the output was accurate for the business.
- Given that you are moving from Redshift to Snowflake in this scenario, you must contrast the outcomes from the two systems. Data comparison between Redshift and Snowflake manually is a time-consuming and difficult task.
- Therefore, you created a custom Python script solution to connect to each DB, ran some crucial checks against both DBs (Redshift as the source and Snowflake as the target), and compared the results.
- Some crucial checks include Record Counts, Data Type Comparisons, Metrics Comparisons in Fact Tables, DB Object Counts, Duplicate Checks, etc. A daily CRON job can be scheduled or automated to execute this solution.
Why Integrate Marketo to Snowflake?
- Marketo to Snowflake unifies its fragmented data inside the Data Cloud so that it can be easily discovered, shared securely, and used for a variety of analytic workloads.
- Marketo offers marketing automation software that enables marketers to become experts in both the art and science of digital marketing to engage clients and prospects.
- Snowflake offers the Data Cloud, a global network with nearly limitless scale, concurrency, and performance that enables the data mobilization of thousands of organizations.
- Integrating Marketo to Snowflake simplifies data problems. For advanced marketing analytics, multi-touch attribution, and other features, centralize your Marketo to Snowflake.
Conclusion
This article discusses the different methods to Connect Marketo to Snowflake extensively. In addition to that, it also describes Marketo and Snowflake briefly.
Discover how syncing Marketo with BigQuery can optimize your data workflows. Find practical tips for a seamless connection and improved data management. Hevo offers a No-code Data Pipeline that can automate your data transfer process, hence allowing you to focus on other aspects of your business like Analytics, Marketing, Customer Management, etc.
This platform allows you to transfer data from 150+ sources (including 60+ Free Sources), such as Marketo, and Cloud-based Data Warehouses like Snowflake, Google BigQuery, etc. It will provide you with a hassle-free experience and make your work life much easier.
Want to take Hevo for a spin? Sign Up for a 14-day free trial and experience the feature-rich Hevo suite firsthand. You can also have a look at the unbeatable pricing that will help you choose the right plan for your business needs.
FAQ
How do I connect Marketo to Snowflake?
To connect Marketo to Snowflake, use a data integration tool like Fivetran or Hevo to automate the data transfer from Marketo to Snowflake.
How do I migrate to Snowflake?
To migrate to Snowflake, assess your existing data and schema, use tools like Snowflake’s Data Transfer Service or ETL tools (e.g., Fivetran, Talend) to move the data, and validate the migration.
How do I get my data into Snowflake?
To get your data into Snowflake, use the COPY INTO command from AWS S3, Google Cloud Storage, or Azure Blob Storage, or use data integration tools to load and transform data from various sources directly into Snowflake.

Share it with your connections.
-
 Share To X
-
 Share To LinkedIn
-
 Share To Facebook
-
 Copy Link


