Power BI integration with QuickBooks can significantly elevate your business intelligence capabilities, allowing you to visualize and analyze your financial data more efficiently.
Power BI, a powerful data visualization tool from Microsoft, helps you create interactive dashboards and reports, while QuickBooks, an accounting software, manages your financial transactions and accounting operations. By integrating these two platforms, you can deliver an insightful financial report.
In this blog, I will walk you through three simple steps required for seamless Quickbooks Power BI integration. Whether you’re a small business owner, a financial analyst, or a data enthusiast, this guide on QuickBooks to Power BI will help you learn about tools to optimize your financial data analysis.
Table of Contents
Introduction to QuickBooks
QuickBooks is a popular accounting software that was developed by the leading financial software developer, Intuit. It is used to manage business finances primarily by small and mid-sized businesses. QuickBooks allows users to manage Sales and expenses, file taxes, generate reports as per their requirement, etc. In addition, the accountancy software offers numerous in-built reports that can easily be customized and gives businesses the ability to take complete control of their finances. QuickBooks is used by businesses to perform the following operations:
- Track income and expenses.
- Keep track of daily transactions.
- Generate reports for planning.
- Prepare billings.
- Manage payroll.
More information about QuickBooks can be found on the official website.
Skip manual command writing- Hevo’s no-code platform streamlines Quickbook data migration. Easily migrate various data types, use 150+ connectors, and enjoy auto-mapping for schema alignment. Hevo helps you ensure that:
- Your analytics and project management tools are always up-to-date and accurate.
- You get real-time notifications.
- Rely on Live Support with a 24/5 chat featuring real engineers, not bots!
Join over 2,000 data professionals, including Thoughtspot and WellBefore, who rate Hevo 4.3/5 on G2.
Get Started with Hevo for FreeUnderstanding the Key Features of QuickBooks
The key features of QuickBooks are as follows:
- Cloud Accounting: QuickBooks allows users to access their accounts, manage their business anywhere on their mobile, computer, or tablet.
- Invoicing: Users can create custom and professional invoices, sales receipts, and estimates seamlessly within minutes using QuickBooks.
- Cash Flow Management: QuickBooks houses functionality that allows businesses to save bills from vendors and schedule recurring payments for when they are due.
- Accounting Reports: Embedded Analytics to instantly understand how your business is performing with customizable dashboards and reports.
- Online Banking: With the QuickBooks Online Software banking integration feature, statements and transactions will automatically be updated.
Also, take a look at more features and details of QuickBooks to get a better understanding of how QuickBooks functions.
What is Power BI?
Power BI is a suite of software services, applications, and connections that work together to turn disparate data from different data sources into coherent, visually immersive, and interactive insights.
It doesn’t matter whether your data resides as an Excel spreadsheet or a mixture of cloud-based and on-premises hybrid data warehouses. Power BI lets you quickly access your data sources, find what’s important, and share through visualizations.
You can check out Power BI in detail, along with its features, to get a better understanding of how the platform works.
Prerequisites
- A QuickBooks Online Account.
- Access to the QuickBooks Online connector that uses the QuickBooks ODBC Driver.
- Working knowledge of Power BI.
- Working knowledge of Databases and Data Warehouses.
Methods to Set up QuickBooks Power BI Integration
Now that you have a basic understanding of QuickBooks and Power BI, let’s discuss how you can perform QuickBooks Online Data Analysis with Power BI. There are 2 methods you can use to set up QuickBooks Power BI Integration to analyze QuickBooks Online data with Power BI:
- Method 1: Manual QuickBooks Power BI Integration
- Method 2: Using Hevo Data to Set Up QuickBooks Power BI Integration
- Method 3: Using Excel
Method 1: Manual QuickBooks Power BI Integration
In this method, you use the QuickBooks Power BI Online Connector to connect your QuickBooks Online account so that you can view, analyze and report your company data on Power BI. The QuickBooks Online Connector leverages the QuickBooks ODBC Driver, which is shipped along with Power BI Desktop.
To do this, you need to have a QuickBooks Online account, username, and password. Your account must also support the Import functionality. Once you have done all this, you can follow the steps given below:
- Step 1.1: Connect to your QuickBooks Online Account
- Step 1.2: Sign in to your QuickBooks Online Account
- Step 1.3: Choose your Company to set up Power BI
- Step 1.4: Connect your QuickBooks Online Account and Power BI
- Step 1.5: Select the Tables you want to Load or Transform on Power BI
Step 1.1: Connect to your QuickBooks Online Account
To connect with QuickBooks Online, go to the Get Data Dialog Box and search for QuickBooks in the Search box, and select QuickBooks Online (Beta) from the product-specific data connector list and click on Connect. This is shown below.
Select Continue in the Preview Connector message.
Step 1.2: Sign in to your QuickBooks Online Account
Select the Sign In option to log in to your QuickBooks Account and enter your QuickBooks credentials. In some cases, you will need to perform 2FA (2 Factor Authentication) as well. This is shown below.
Step 1.3: Choose your Company to set up Power BI
Select your company in the next dialog box and click on Next as shown below.
Step 1.4: Connect your QuickBooks Online Account and Power BI
Once you have successfully signed in, click on Connect to connect your QuickBooks account with Power BI as shown below.
Step 1.5: Select the Tables you want to Load or Transform on Power BI
Once you have successfully established a connection with Power BI, navigate to the Navigator Dialog Box and select the QuickBooks Tables you want to load or transform as shown below.
That’s it! You have successfully set up QuickBooks Power BI Integration using the manual method!
Limitations of Manual QuickBooks Power BI Connector
- You must have a QuickBooks Online account to use this method.
- You cannot use this method if your company is not listed on the QuickBooks Company page.
- In case your QuickBooks Online account does not have an Import capability, you cannot use this method.
To overcome these limitations and integrate QuickBooks Online and Power BI quickly and efficiently, you can use Hevo’s No-code Data Pipelines. Check out the next method to understand how Hevo can help you integrate them within minutes.
Method 2: Using Hevo Data to Set Up QuickBooks Power BI Integration
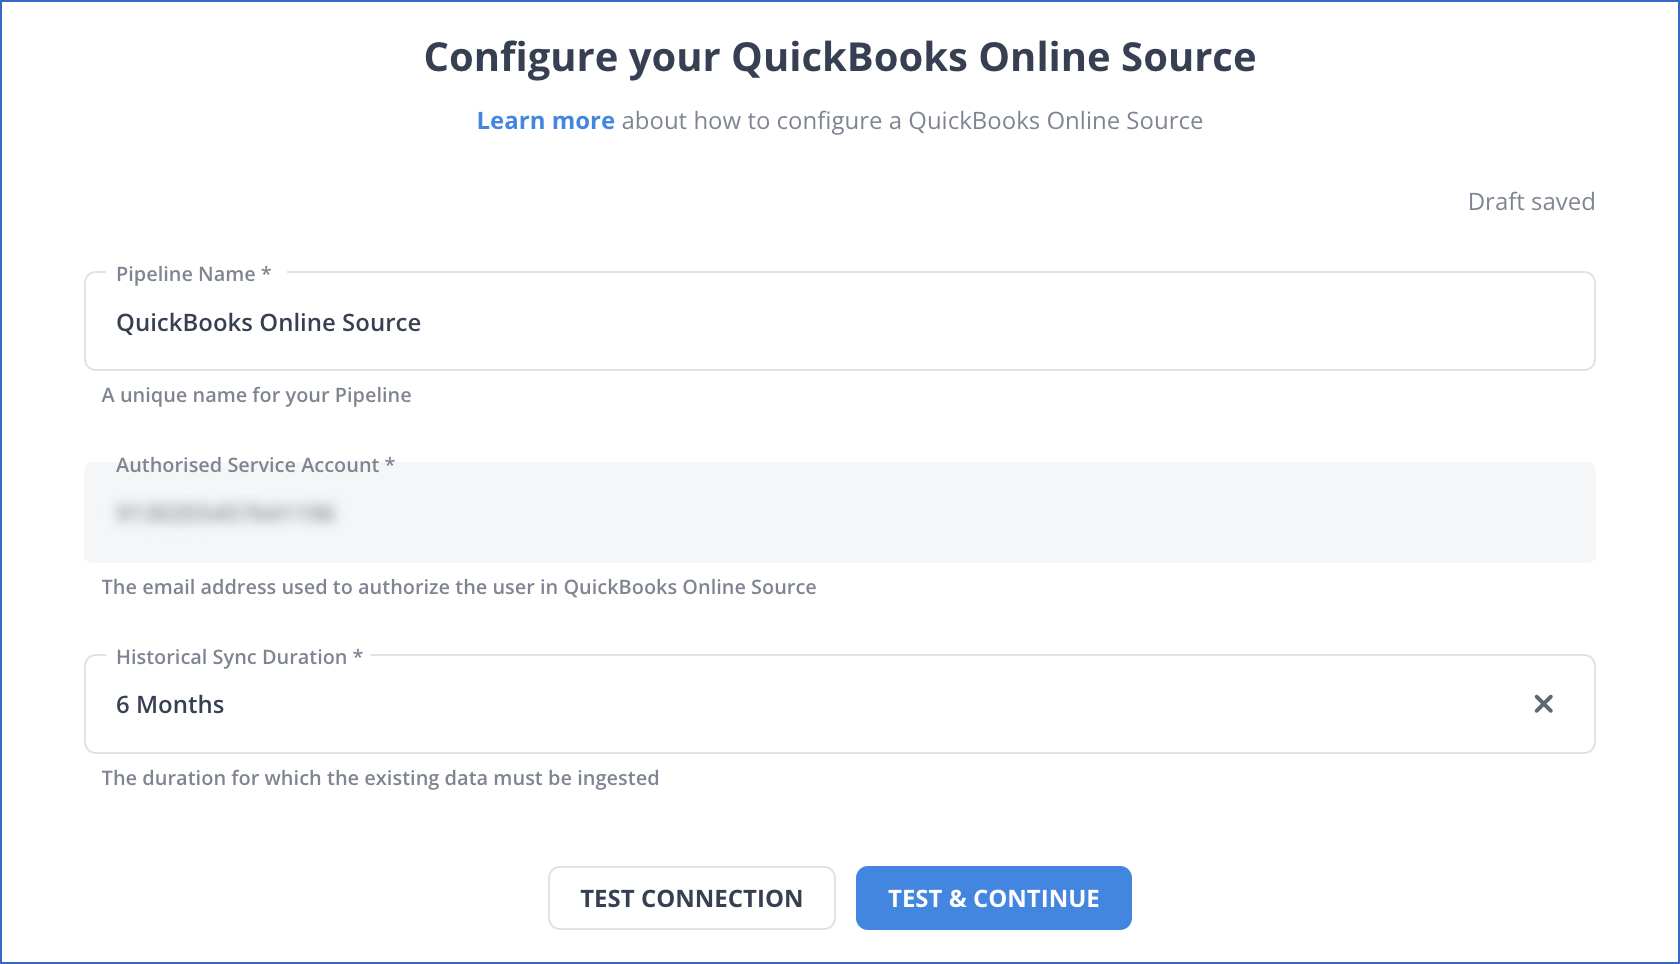
Step 2.1: Configure QuickBooks as Your Source

That’s it! You can now choose your desired destination provided by Hevo to integrate your QuickBooks data for analysis and data visualization.
Hevo focuses on three simple steps to set up QuickBooks Power BI Integration:
- Extract: Connect Hevo with QuickBooks Online and various other data sources by simply logging in with your credentials and extract information seamlessly.
- Integrate: Consolidate your data from several sources in Hevo’s Managed Data Warehouse Platform and automatically transform it into an analysis-ready form.
- Visualize: Connect Hevo with your desired BI tool and easily visualize your data to gain better insights.
Method 3: Using Excel
The steps involved are:
- The first step is to head on to on the top right corner of the report and select Export -> Export to Excel. Keep in mind the location where the exported file is saved.
- In the next step, open the Power BI Desktop, click Get Data, and open ‘your file name” exported from QuickBooks-> select Excel from the options given.
- Find your file from the list provided. Once you click on that, your exported file sets up a connection with Power BI.
- As given in the screenshot above, the data from the Excel file shows up. You can use a Power Query tool in Excel for preparing your data. Once its done, next step is to load to Power BI.
- QuickBooks interface connector when using the QuickBooks interface.
- Select Get Data on Power BI desktop. Choose QuickBooks Online (Beta), select Connect. Next, you will need to “Sign in” to QuickBooks Online.
- Using Navigator, you can select the tables you want to load. Select Load.
After this, you can go back to the Visualization view. Then, choose the Relationship view. A relationship will be formed by default by detecting like fields in each table.
What you can achieve by Integrating QuickBooks and Power BI
Benefits
- Real-time Financial Insights: Combining QuickBooks with Power BI lets you see your financial data in real time, helping you make faster, data-driven decisions.
- Enhanced Reporting: Power BI’s interactive dashboards and custom reports bring QuickBooks data to life, allowing for more detailed and visually appealing financial reports.
- Data Consolidation: Easily merge QuickBooks data with other business sources to get a comprehensive view of your company’s finances and performance.
- Improved Forecasting: Use Power BI’s analytics tools to forecast trends based on QuickBooks data, helping you plan and allocate resources effectively.
Use Cases
- Budget vs. Actuals Analysis: Compare budgeted amounts to actual spending, helping teams stay on track and identify any cost overruns early.
- Expense Tracking: Set up dashboards that break down expenses by category, team, or project, giving clear insights into spending patterns.
- Sales Analysis: Track sales trends, revenue, and profit margins from QuickBooks in Power BI, helping you identify top-performing products and sales regions.
- Cash Flow Monitoring: Use real-time dashboards to monitor cash inflows and outflows, ensuring healthy cash flow for day-to-day operations.
PowerBI and QuickBooks Online: Business Made Simple
QuickBooks Online has become a popular cloud-based accounting service.
With Power BI content pack for QuickBooks Online, you can easily visualize your financial data and uncover new insights into cash flow, profitability, and customers.
Companies in the financial services industry use Power BI today to track the latest balance sheet and profit and loss data and gain insights into delivering the best service to their customers. Power BI helps gather rich and detailed operations data to obtain a complete view of customer behavior, all within a single tool. Staff can combine account activity data with data from customer satisfaction surveys, wait times, and more to understand and improve the customer experience. The reporting data is refreshed each night so staff can see an up-to-date view of the previous day, week, month, or year.
You can explore more on Quickbooks and also take a look at the top 10 Best Power BI Dashboard Examples to get a better understanding of how both platforms work.
Conclusion
- This article gave you a step-by-step guide on setting up QuickBooks Power BI Integration. It also gave you an overview of both QuickBooks Online and Power BI along with their features.
- In addition, QuickBooks Online Data Analysis with Power BI will help your company to generate insights that will aid in your business growth. Because, you can make use of Power BI’s features to analyze and report better.
Overall, QuickBooks Power BI Integration can be set up using either the manual method or by using Hevo, but if time and ease of use are a parameter for you, using automated data platforms like Hevo help you to set up QuickBooks Power BI Integration seamlessly! Sign Up or a 14-day free trial
FAQ on QuickBooks Power BI
1. Does Quickbooks Online have a custom connector available for Microsoft Power Automate?
Yes, QuickBooks Online has a custom connector available for Microsoft Power Automate.
2. How to integrate with QuickBooks API
Step 1: Sign up for a QuickBooks Developer Account
Step 2: Create an App
Step 3: Obtain API Keys
Step 4: Set Up OAuth 2.0 Authentication
Step 5: Make API Requests
Step 6: Handle Token Expiry
3. Can Power BI reports be automated?
Yes, Power BI reports can be automated in several ways, for example, data refresh, report distribution, and triggering actions based on report insights.
4. Can you use QuickBooks as an ERP?
No, QuickBooks cannot be used as an ERP. QuickBooks is primarily an accounting software. However, for small to medium-sized businesses, QuickBooks can be used as an ERP tool by integrating it with other software like inventory management, CRM, or project management tools.


