


Are you facing difficulties with your daily Zendesk data exports? Do you find it grueling to perform all the work? Well, look no further! This article will answer all your queries & relieve you of the stress of finding a truly efficient solution. Follow our easy step-by-step solution to help you master the Zendesk Export and easily export your data in various formats.
It will help you take charge in a hassle-free way without compromising efficiency. This blog aims to make the data export process as smooth as possible. After a thorough review of the content, you will be able to conduct a successful data export to a data warehouse or any other destination of your choice, enabling fruitful analysis.
This will further help you build a customized ETL pipeline tailored to your organization’s needs. Through this article, you will gain a deep understanding of the tools and techniques mentioned, and thus, it will help you hone your skills further.
Table of Contents
What is Zendesk?

Zendesk is one of the most popularly used customer-service tools, available as a cloud-based Software as a Service (SaaS) application. With Zendesk’s all-in-one suite, which contains a ticketing system, analytics and reporting modules, a sales-based CRM, call-center offerings, and a lot more, you can easily track a customer’s entire journey in absolute depth.
Zendesk provides robust integration support with a variety of applications such as social media channels, marketing automation software, business intelligence tools, etc., making it the ideal solution to facilitate communication between the customers and the organization.
With a competitive subscription-based pricing model, it allows users to either subscribe to a monthly or an annual plan, modifiable as per data needs and team size. It is the go-to solution not only for startups but even for big organizations.
Prerequisites
- Working knowledge of Zendesk.
- A general idea of CSV, JSON file structure.
- A general idea of using APIs.
- A general idea of Python and its libraries.
- Zendesk installed at the host workstation.
Methods to Export Data From Zendesk
Zendesk provides multiple ways to access and export the data in various formats such as JSON, CSV, XML, etc. To export data, users can make use of the RESTful APIs provided by Zendesk. It is easily accessible through its APIs and allows users to access and export large data sets with the help of custom Python or Perl-based scripts.
For the users that have a professional or enterprise Zendesk subscription, they can directly use the export option from the toolbar and export their dashboards in various formats.
You can use the following methods to export your Zendesk data in your desired format:
- Method 1: Best Way to Export Zendesk Data: Using Hevo
- Method 2: Performing a Zendesk Export Using the In-Built Export Option
- Method 3: Exporting Data from Zendesk Sell
Method 1: Best Way to Export Zendesk Data: Using Hevo
Hevo is the simplest and fastest way to migrate your Zendesk data.
Step 1: Log in to your Hevo account.
Step 2: Click on ‘Create Pipeline’ button.
Step 3: Select Zendesk and configure it as source.
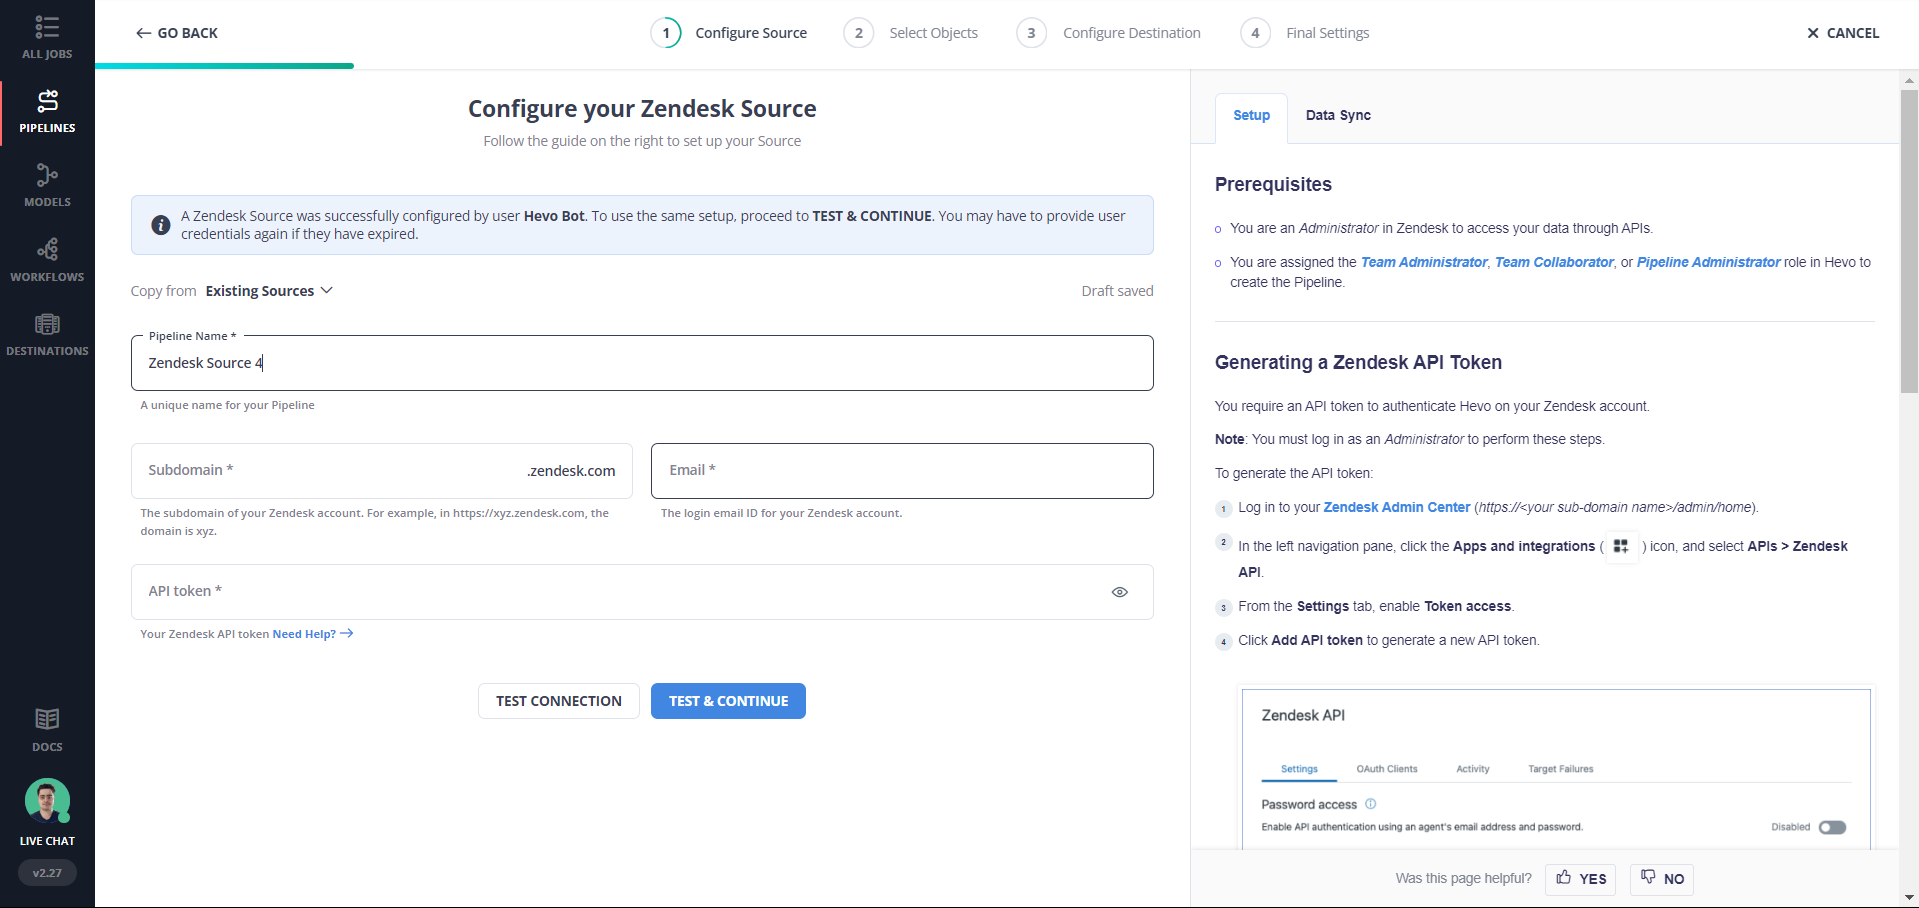
Step 4: Configure a destination of your choice and you are done!
Method 2: Performing a Zendesk Export Using the In-Built Export Option
The in-built export option is available only to users who have a higher subscription plan, that is, the Professional or Enterprise plan. Using this option requires having permission to view, edit, and export data. The administrators or enterprise agents usually have this access.
There are a few things to keep in mind before exporting data from Zendesk using the built-in export option.
- You must be an admin to export tickets, including ticket data
- JSON and CSV exports are unavailable in sandbox accounts
- You can’t run multiple exports for the same data type simultaneously, such as users, organizations, and tickets
- The export process can take several minutes to hours, depending on your account’s ticket activity and the requested date range

This method can be implemented with the following steps:
Step 1: Enabling the Data Export Option
Zendesk keeps the data export option disabled by default to keep the data safe. To get the service activated, you can call or reach out to Zendesk customer service. Ensure that you’re using a professional or enterprise subscription.
Once the data export option is enabled, administrators can now export data using the email id of their domain. By default, the domain is set to the account owners email id however, you can modify the domain as follows:
- Select the admin option from the sidebar on the left and go to manage and then choose the reports option.
- Replace the domain in the approved email domain option.
- Click on save.

This is how you can enable the export option and modify your domain to set up the Zendesk Export process.
Step 2: Exporting Data in Your Desired Format
Once you’ve enabled the data export option, you can export your Zendesk data into the desired format of your choice, such as JSON, CSV, etc. Various formats in which you can export your data are:
Full JSON: Zendesk allows you to export most of your data in the form of JSON objects. You can export your tickets, information about your organization, users, and a lot more. JSON files usually have a system-generated timestamp associated with them, which represents the time of the most recent data update.
CSV: Zendesk exports tickets in the CSV format. Data exported in CSV doesn’t contain information about the deleted tickets, comments, or information related to it.
Full XML: The files that are exported in an XML format contain the following fields:
Accounts: This contains the settings for your account.
Entries: This gives information about the newly added data in your forums, including comments.
Forums: This gives information about your forums.
Groups: This gives information about various groups in your account.
Organizations: This gives information about your organization in depth.
Tickets: This gives information about your tickets, comments, etc.
Users: It displays a list of users such as end-users, agents, etc.
Use the following steps to export your data:
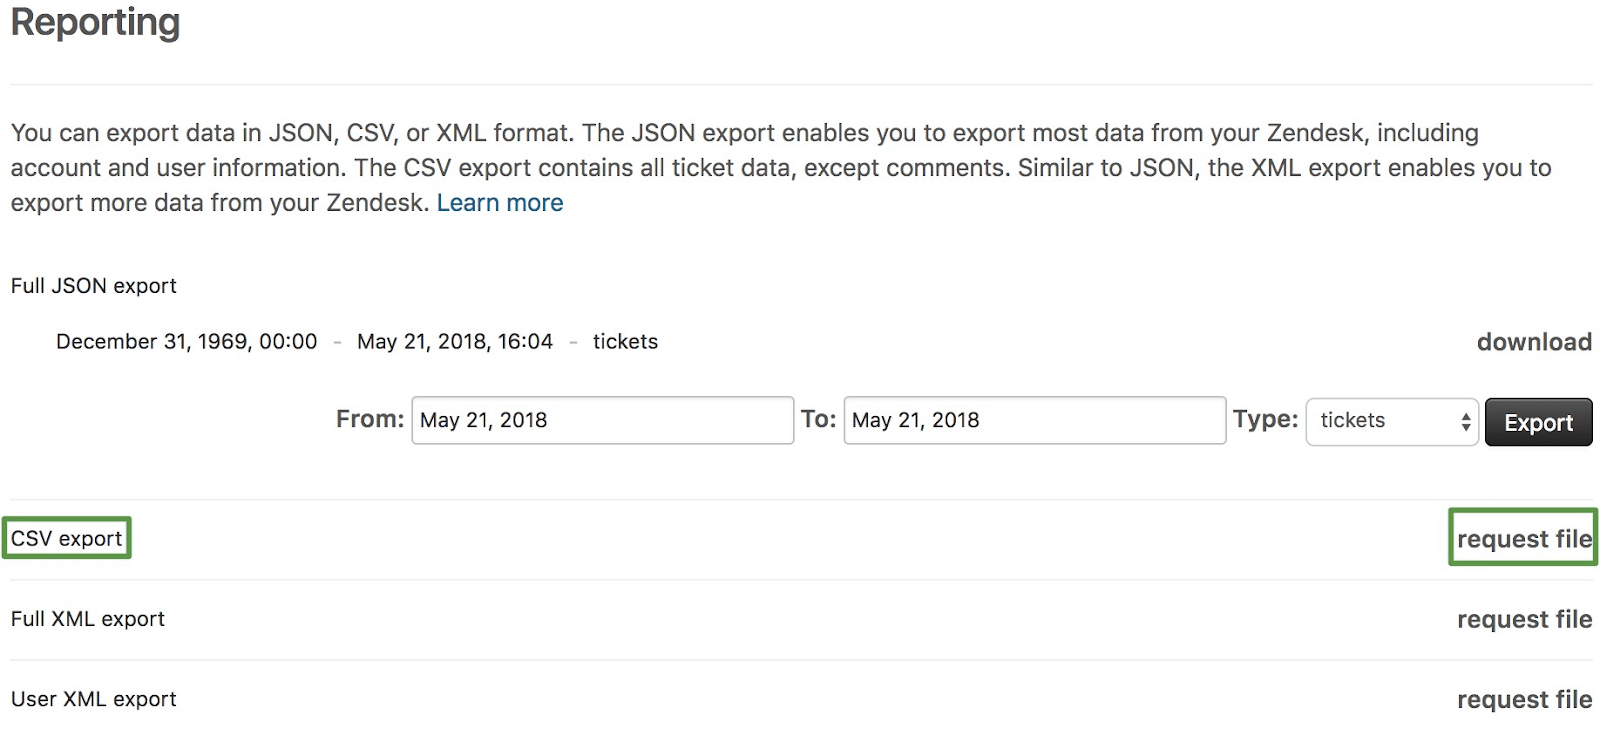
Select the admin option from the sidebar on the left, go to manage, and then choose the reports option. Click on the export option. A new dialogue box will now open up where you need to select the type in which you want to export the data.
Carefully select the desired type and fill in the necessary details as follows:
JSON: Enter the type of data that you want to export, along with a date range from which you want to extract the data.
This will export the data in the following format:
{"ticket":{"id":....}}
{"ticket":{"id":....}}
{"ticket":{"id":....}}
CSV or XML: To export your data in CSV or XML format, click on the request file option.
The Zendesk Export mechanism immediately starts exporting data in the background and provides it to the user in the form of a zip file, sent to their email. You can then download the data from the link up to 3 days.
This is how you can export your data using the built-in Zendesk Export option.
Limitations of this Method
- The Zendesk in-built export option is only available to users who can pay for the higher subscriptions, such as the Professional or Enterprise. This can be challenging for small organizations that don’t want to invest a large sum of money.
- Users need to contact customer service even to enable the data export option.
- Only administrators and enterprise agents can access data for their domain.
Method 3: Exporting Data from Zendesk Sell
With Zendesk Sell, you can easily export data about your contacts, leads, important documents, tasks, etc., without worrying about your subscription plan.
Zendesk only allows admins to export data by default. However, you can easily grant permission to all users to export data whenever required.
You can use the following steps to enable data export and grant permission:
- Select the settings icon and click on data. Once you’ve clicked on data, select the export option.
- To enable the smart list export, click on all users from the drop-down list.
- Save your settings.
This will allow every user, not just the admins, to export data from Zendesk.
You can now start exporting your data from Zendesk. Click on settings, and then select data. Now select the export option. A new window will now open up, from which you can export your entire Sell account data with just a click.

Click on Export. The Zendesk Export option will now start exporting data in the background. Once the process is done, you will receive an email from which you can download the data as a zip file. This contains all your data in CSV format.
You can access the download link from your email only for 24 hours. This is done by Zendesk to keep the data safe.
This is how you can perform a Zendesk Export while working with Zendesk Sell.

Use Cases of Exporting Zendesk Data
- Customer support performance analysis: Export ticket data to evaluate agent performance, response times, and customer satisfaction.
- Custom reporting: Generate tailored reports by analyzing Zendesk data in external tools (like Excel, Power BI, or Tableau) to track key metrics.
- Trend analysis: Analyze historical ticket data to identify customer service trends, recurring issues, and peak support times.
- Data backup: Regularly export data to create backups for compliance, audit, or disaster recovery purposes.
- Customer feedback analysis: Export satisfaction ratings and comments to identify areas of improvement in customer service.
Conclusion
This article introduces you to the various methods that can be used to set up Zendesk Export. It also provides in-depth knowledge about the concepts behind every step to help you understand and implement them efficiently. These methods, however, can be challenging especially for a beginner & this is where Hevo saves the day.
Hevo Data, a No-code Data Pipeline helps you transfer data from a source of your choice in a fully automated and secure manner without having to write the code repeatedly. Hevo with its strong integration, allows you to not only export & load data but also transform & enrich your data & make it analysis-ready in a jiffy.
You can now load Zendesk data to any Data Warehouse such as Redshift, BigQuery, Snowflake, or a destination of your choice without writing code in just a few minutes for free with Hevo.
Frequently Asked Questions
1. How do I enable data export in Zendesk?
To enable data export in Zendesk, you need to be an admin with export permissions. Go to Admin Center > Account Settings > Data Export and select the export format (CSV or JSON) to export ticket and user data.
2. Can you export customers from Zendesk?
To export custom fields from Zendesk, you can use the Zendesk API or generate a CSV export. You can also create a report in Explore and export the results that include ticket fields.
3. How do I export fields from Zendesk?
Yes, you can export customer data from Zendesk. Go to Admin Center > Manage > People and select the users or organizations you want to export, or use the API to export customer data in bulk.
Share it with your connections.
-
 Share To LinkedIn
-
 Share To Facebook
-
 Share To X
-
 Copy Link


