


Google BigQuery is a cloud-based enterprise Data Warehouse that allows users to run SQL queries quickly and analyze large datasets interactively. BigQuery is a read-only data processing engine based on Google’s Dremel Technology.
Zendesk makes it possible for customer interactions from messaging, phone, chat, email, social media, and any other channel you can think of to all come together in one place.
This article talks about how to Connect BigQuery to Zendesk in a few simple steps. In addition to that, it also describes Zendesk and BigQuery briefly.
Table of Contents
What is Google BigQuery?

Developed by Google and launched on May 19, 2010, Google BigQuery is a Data Warehouse as a Service (DWaaS) with zero infrastructure management from the user’s end. It enables scalable analysis of petabytes of data. Google provides a complete package to its users with big data loading features on Google Cloud Storage and connectivity with various Google apps like Apps Script.
Key Features of Google BigQuery
- BigQuery is a serverless, multi-cloud data warehouse with zero infrastructure management.
- Query languages like SQL allow users to query data through BigQuery.
- BigQuery can analyze Big Data across multiple cloud platforms with BigQuery Omni.
- BigQuery offers built-in Machine Learning and Artificial Intelligence capabilities.
- Real-time analytics is possible with BigQuery. It integrates real-time data quickly and efficiently and makes analysis available for business.
- Data Visualization is available in a variety of graphic formats.
- BigQuery provides information about location and mapping using BigQuery Geographic Information Systems (GIS).
With over 150+ sources (60+ free), load your data into your destination with Hevo’s no-code, automated pipeline. Just drag and drop to transform your data with real-time migration and a seamless experience.
Why Choose Hevo?
- High fault tolerance so you can be assured of your data quality
- Load historical data and capture data changes automatically without worrying about doing it manually.
Find out why leading FinTech firms like Ebury chose Hevo for its reliability. Discover how Hevo will save time for your organization with a 14-day free trial.
Get Started with Hevo for FreeRead about connecting Zendesk to BigQuery to perform a comprehensive analysis of your data.
What is Zendesk?

Zendesk is a cloud-based help desk management system with customizable tools to create online communities, knowledge bases, and customer service portals. The solution provides live chat capabilities and integration with programs like Salesforce and Google Analytics. Many different vertical markets, from small to large, use Zendesk, including technology, government, media, and retail.
Key Features of Zendesk
Some of the Key Features of Zendesk CRM Software are as follows:
- Internal Desk Help: Internal Help Desk Software from Zendesk helps you quickly manage employee interactions and respond to queries and support requests.
- Knowledge Base: Zendesk’s Knowledge Base has many valuable articles addressing frequently asked topics that can also be translated into other languages.
- Analytics and Reporting: There is an Analytics tracking system and Reporting module that analyzes data on Agent Performance, Tickets, and Customer Satisfaction in real-time.
- Triggers: Zendesk comes with pre-configured triggers that users may use or change, as well as the ability to construct unique custom triggers from scratch.
- Agent Collision Detection: This option allows businesses to check whether any other agents are looking at the same ticket simultaneously.
Benefits of Connecting BigQuery to Zendesk
Operating a high-touch customer support model with current knowledge of user actions is made easier by connecting BigQuery to Zendesk. To enhance user attributes, it also syncs high-quality, modeled data from your warehouse. Data for customers and organizations are always in sync and up-to-date thanks to this integration.
How to Connect BigQuery to Zendesk Manually?
There are two steps to do this:
PART 1: BigQuery to CSV
You can connect BigQuery to CSV using different methods. They are:
- Using Cloud Console
- Using bq Extract Command
- Using Extract Job via Client Libraries(APIs)
1) Using Cloud Console
This is the easiest way to Export BigQuery Table to CSV as it does not require any technical knowledge. Follow the simple steps below to effortlessly Export BigQuery Table to CSV:
- Step 1: Go to the Google Cloud Console in BigQuery.
- Step 2: Navigate to the Explorer panel and select the desired table from your project.
- Step 3: From the details panel, click on the Export option and select Export to Cloud Storage.
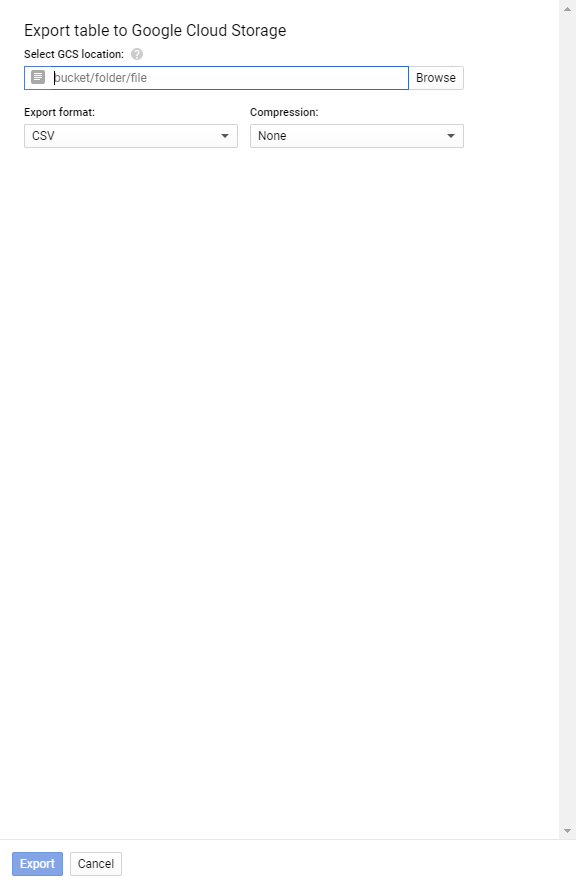
- Step 4: An Export table to Google Cloud Storage dialog box will pop on your screen. Select the desired destination bucket, folder, or file for your Table Data to be stored as CSV.
- Step 5: From the Drop Menu in Export Format, select CSV. Also, Select None for no Compression or GZIP compression which is supported by CSV.
- Step 6: Click on the Export button to complete the Export BigQuery Table to CSV process.
2) Using bq Extract Command
Using the bq command-line tool, you can easily Export Bigquery Table to CSV by following the sample code given below:
bq --location=location extract
--destination_format format
--compression compression_type
--field_delimiter delimiter
--print_header=boolean
project_id:dataset.table
gs://bucket/filename.ext
The above code snippet has the following parameters:
- Location: The location of your BigQuery data. For example, if you are in the USA, the location is ’US.’
- Destination Format: The format of the file you need in Google Cloud Storage(GCS).
- Compression Type: The specific compression type supported by the file format.
- Delimiter: For CSV, the tab is used to indicate the boundary between columns.
- Boolean: The default value is true allowing header rows to be printed to the exported data.
- Project_ID, Dataset, Table: Details of the table you are exporting your data from.
- Bucket, Filename.ext: The storage location of your file in GCS and filename with the desired format.
Given below is an example for exporting maindataset.mytable in CSV filename onefile.csv with GZIP compression in a GCS bucket named bucket-one.
bq extract
--compression GZIP
'maindataset.mytable'
gs:// bucket-one/onefile.csv
3) Using Extract Job via Client Libraries (APIs)
It is also possible to Export BigQuery Table to CSV format using various programming environments such as C#, Go, Java, Node.js, PHP, Python, and Ruby. To begin, you need to install the Client Libraries and then start writing queries. For instance, you can use the following sample code in Python to Export BigQuery Table to CSV:
from google.cloud import bigquery
client = bigquery.Client()
bucket_name = 'bucket-one'
project = "project-one"
dataset_id = "one"
table_id = "onefile"

destination_uri = "gs://{}/{}".format(bucket_name, "onefile.csv")
dataset_ref = bigquery.DatasetReference(project, dataset_id)
table_ref = dataset_ref.table(table_id)

extract_job = client.extract_table(
    table_ref,
    destination_uri,
    # Location must match that of the source table.
    location="US",
)  # API request
extract_job.result()  # Waits for job to complete.

print(
    "Exported {}:{}.{} to {}".format(project, dataset_id, table_id, destination_uri)
)
PART 2: CSV to Zendesk
To migrate CSV to Zendesk follow the following steps:
- Your data must first be organized into the subsequent CSV files:
- CSV file with tickets;
- CSV file with ticket comments;
- CSV file with Knowledge Base
- Please keep in mind the following specifications as you prepare your files:
- Each file shouldn’t be larger than 1GB.
- There must be a heading row in every file.
- The delimiter should be a comma.
- Give each attachment a publicly accessible URL so that it can be imported. Use commas to divide multiple attachments before migrating them.
- If your data spans multiple lines, use double-quote marks (“) in your CSV file. For instance, tags, attachments, and descriptions
- Heading row content must be written in English. Your planned import of data may be in any language.
- The first letter in a header must be capitalized.
STEP 1 – Prepare the Tickets.csv File
There should be a heading row with the following columns in the file containing the tickets:
| TicketId (required) | AgentName (required) |
| Subject (required) | ContactName (required) |
| Tags (optional) | ContactEmail (required) |
| DepartmentName (optional) | ContactPhone (optional) |
| Description (required) | CompanyName (optional) |
| Type (required) | CreatedTime (required) |
| Status (required) | UpdatedTime (required) |
| Priority (required) | ClosedTime (optional) |
| AgentEmail (required) | Attachments (optional) |
NOTE: For CreatedTime, UpdatedTime and ClosedTime use YYYY-MM-DD HH:MM:SS time format.
STEP 2 – Importing Custom Fields
By including a tag in the column header, you can migrate custom fields. The tags you should use are as follows:
- _select – dropdown, e.g., product_select;
- _date – time, e.g., due_date;
- _integer – number, e.g., TicketInternal_integer.
The _textArea tag can be used to migrate different kinds of custom fields.
STEP 3 – Importing Ticket Comments
You must include your ticket comments in a separate file that has the following headers to import them with your tickets:
- CommentId – optional;
- TicketId – required;
- AuthorEmail – required;
- Public – required (use 0 for private and 1 for public comments);
- Body – required;
- CreatedTime – required. Use YYYY-MM-DD HH:MM:SS time format;
- Attachments – optional.
If a ticket has multiple comments, group them as follows:

STEP 4 – Import Files to Zendesk
When your files are prepared, visit the Help Desk Migration website to start the import process.
Follow the steps below:
- Step 4.1: Choose the CSV data source and add your files. The following choices are available to you:
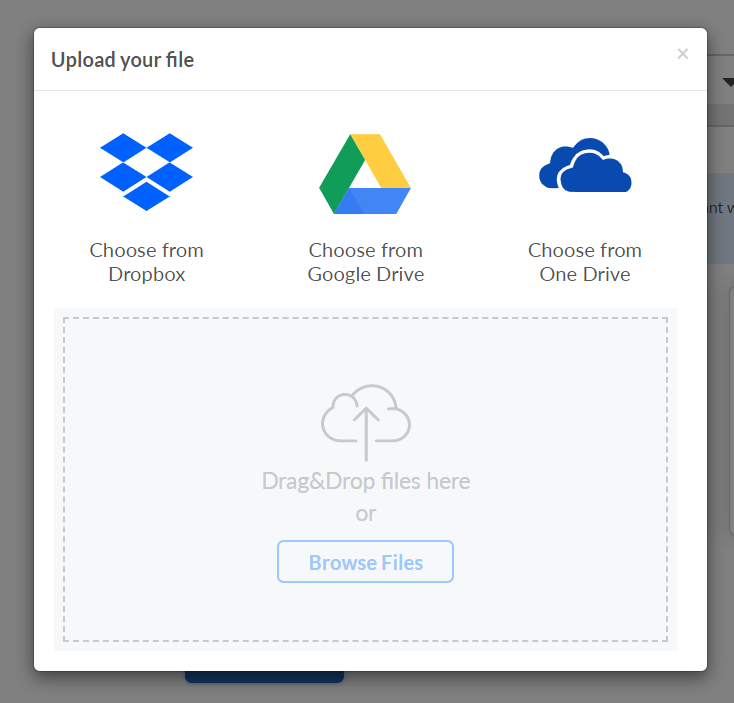
Use our sample to pass the source step if importing knowledge base articles is not necessary. Simply skip the Knowledge Base objects later when choosing which data to migrate.
- Step 4.2: Enter the URL for the Zendesk account for your company after selecting Zendesk as the target platform.
- Step 4.3: Map ticket fields and choose which records you want to migrate.
- Step 4.4: Start the Free Demo Migration to see if the data migrated successfully and to receive a quote. Review the outcomes of your migration using this guide as a reference.
- Step 4.5: Complete your data transfer if you are happy with the results.
- Step 4.6: Close the tab and carry on with your day after beginning the migration of all records. Once the import is finished, it is emailed to you.
- Step 4.7: However, kindly refrain from merging, editing, or deleting any of the imported data. You might alter data in this way and make irreversible changes. Wait until the migration is finished before working safely with your data.

Conclusion
- BigQuery is a cloud-based Data Warehouse that allows users to run SQL queries and analyze large datasets
- Zendesk is a cloud-based help desk management system with customizable tools.
- To manually connect BigQuery with Zendesk:
- Connect BigQuery to CSV
- Connect CSV to Zendesk
Hevo is the only real-time ELT No-code Data Pipeline platform that cost-effectively automates data pipelines that are flexible to your needs. With integration with 150+ Data Sources (40+ free sources), we help you not only export data from sources & load data to the destinations but also transform & enrich your data, & make it analysis-ready.
Want to take Hevo for a spin?
Take up the 14-day free trial and experience the feature-rich Hevo suite first hand. You can also have a look at the unbeatable pricing that will help you choose the right plan for your business needs.
FAQs
1) How do I connect Zendesk to BigQuery?
There are two ways to connect Zendesk to BigQuery: manually or with an automated data pipeline (recommended) like Hevo, which can connect Zendesk to BigQuery in minutes.
2) How to push data into Zendesk?
Data can be pushed to Zendesk Support by making POST requests to a Zendesk API push endpoint. This can be done by referring to Push | Zendesk Developer Docs.
3) How do I import data into Zendesk?
Click Settings>Data>Import>Import your data in the Sell sidebar. You can also map to custom fields that have already been created or add a new field if necessary.

Share it with your connections.
-
 Share To X
-
 Share To LinkedIn
-
 Share To Facebook
-
 Copy Link


