Your organization stores its transactional workloads in the Azure SQL Databases to maintain data integrity and consistency during database operations. However, the Azure SQL database would not be suitable if your organization relies on advanced analytics, machine learning, and handling large volumes of semi-structured and unstructured data. In addition, the Azure SQL Database does not support distributed transactions, database mirroring, and failover clustering.
Since the Azure SQL Database has many limitations, it would be a good choice to migrate from it to a modern analytical platform like Databricks. The Azure SQL to Databricks migration offers a cloud-based unified analytics engine that allows you to handle data processing at scale using Apache Spark. With this interactive workspace, you can analyze data using Python, R, Scala, and SQL and easily share your findings with others.
Let’s look at the process for migrating from Azure SQL Database to Databricks.
Table of Contents
Why Migrate to Databricks?
Here are a few reasons to move data from Azure SQL Database to Databricks:
- Delta Lake: An open-format storage layer that combines all the data types for transactional, analytical, and AI applications in one place. So, it allows you to translate data across multiple data formats automatically.
- Databricks SQL Service: You can process BI and SQL workloads on the data lake using a dedicated SQL-native workspace and built-in connectors for BI tools. Since Databricks SQL is a separate environment, you can query the data lakes within the Databricks platform directly without affecting the data science tools.
Use Hevo’s no-code data pipeline platform, which can help you automate, simplify, and enrich your data replication process in a few clicks. You can extract and load data from 150+ Data Sources, including Azure MySQL straight into your Data Warehouse, such as Databricks or any Database.
Why Hevo?
- Incremental Data Load: Hevo allows the transfer of data that has been modified in real time. This ensures efficient utilization of bandwidth on both ends.
- Live Support: Our team is available round the clock to extend exceptional support to our customers through Chat, Email, and Support Calls.
- Automapping: Hevo provides you with an automapping feature to automatically map your schema.
Explore Hevo’s features and discover why it is rated 4.3 on G2 and 4.7 on Software Advice for its seamless data integration. Try out the 14-day free trial today to experience hassle-free data integration.
Get Started with Hevo for FreeAzure SQL: A Brief Overview
Azure SQL Database is a relational database platform-as-a-service built on the Microsoft SQL Server engine in the Azure cloud. It is part of the secure and intelligent Azure SQL family, including Azure SQL Managed Instance and SQL Server on Azure Virtual Machines (VM).
With the Azure SQL Database, you can build a high-performance data storage layer for modern cloud applications in Azure to process both relational and non-relational data. You can automatically scale up or down your compute resources according to your needs using the Hyperscale service tier.
Additionally, Azure SQL Database offers advanced query processing capabilities, such as intelligent query processing and high-performance in-memory technologies.
Databricks: A Brief Overview
Databricks is an Apache Spark-based data intelligence and analytics platform. This serverless data warehouse is built on a lakehouse architecture, allowing you to execute all your analytical workloads at scale.
Integrating with Mosaic AI, Databricks helps you build, scale, and deploy generative Artificial Intelligence (AI) and machine learning (ML) models. Using Delta Sharing with Unity Catalog feature in Databricks, you can govern your shared structured and unstructured data, AI and ML models, dashboards, and flat files across multiple cloud platforms.
With Databricks’ automated cluster scaling, you can cost-effectively utilize computing resources to execute multiple tasks within a job. Automated monitoring allows you to scan the workloads to identify anomalies, track resource usage, and ensure applications function correctly.
Learn about the differences between Microsoft Fabric and Databricks to better understand which platform suits your data migration strategy
Methods for Data Migration from Azure SQL to Databricks
To transfer your data from Azure SQL Database to Databricks, you can employ Hevo Data or a manual CSV Export/Import method.
Method 1: How to Connect Azure SQL to Databricks Using CSV Export/Import Method
In this migration, you must initially export the data from the Azure SQL Database as a CSV file using Microsoft Command-Line utilities such as bcp, Invoke-Sqlcmd, or Export-Csv. Then, download the CSV file data from the Azure Portal and load it into Databricks using add data UI.
Step 1: Export Data From Azure SQL Database As a CSV File
Before you begin, ensure the following prerequisites are ready:
- An active Microsoft Azure account.
- Access to Azure Cloud Shell.
- Access your Azure SQL Database from Azure Portal or create one via Azure Cloud Shell.
- Obtain the Azure SQL database’s server name, database name, username, and password.
You can use any of the following ways to extract data from the Azure SQL database as a CSV file:
- Using BCP Utility
- Log into the Azure Portal with your Azure credentials.
- Click the Cloud Shell icon from the top-right corner of the Azure Portal.
- Choose the Bash environment.
- Run the following command to export data from Azure SQL as a CSV file:
bcp <schema>.<object_name> out. /data/filename.csv -t “,” -w -S <AzureSQLServer_name>.database.windows.net -U <username> -d <database>You can replace the placeholders with your actual information.
- Using Invoke-Sqlcmd and Export-CSV Utility
- Log into the Azure Portal.
- Click the Cloud Shell icon from the top navigation of the Azure Portal.
- Choose the Powershell environment.
- Execute the following command to export data from Azure SQL as a CSV file:
Invoke-Sqlcmd -Query "SELECT * FROM <schema>.<object_name>" -ServerInstance "<AzureSQLServer-name>.database.windows.net" -d <database_name> -u <username> -p <password>" -IgnoreProviderContext | Export-Csv -path ./data/filename.csv -Delimiter "," -Encoding UTF8You can replace the placeholders with your actual database information.
Step 2: Prepare Your CSV File to Import
Before importing your CSV file into Databricks, you must ensure your data is clean, consistent, and formatted correctly. For preprocessing your CSV file, perform the following things:
- Remove invalid or irrelevant data, like empty rows or columns, to clean and format your CSV file.
- Check all rows contain the same number of attributes.
- Verify that all the values in a column properly align with their corresponding columns. For example, if a column should contain numeric values, then check that it contains only numbers, not strings or dates.
For more information about how Databricks helps you format your CSV file, read the format options in Databricks.
Step 3: Import CSV File Data to Databricks Using Add Data UI
Before you start, verify the following prerequisites are in place:
Here are the steps to load data into Databricks using add data UI:
- To access the UI, Click the New > Add Data in the sidebar of your Databrick workspace.
- Choose Create or modify table to load CSV file into Delta Lake tables.
- Import your file by clicking on the file browser button, or you can simply drag and drop your files into the Delta tables.
Thus, your Databricks workspace will have a new Delta table containing your CSV file exported from your Azure SQL Database.
Limitations of Azure SQL to Databricks Migration Using CSV Export/Import Method
- Limited Data Volume: The CSV Export/Import method suits smaller datasets. When working with large data volumes, CSV files can lead to performance issues during data migration and processing.
- High Complexity: You must write custom code to connect with the Azure SQL database and export the data into CSV format. Manual interventions are required to prepare your CSV file before uploading it into Databricks.
Method 2: How to Integrate Azure SQL to Databricks Using Hevo Data
Hevo Data is a no-code, real-time ELT platform that helps you cost-effectively automate data pipelines that are flexible to your preferences. With the integration of 150+ data sources, Hevo Data allows you to extract and load data and transform it to conduct in-depth analysis.
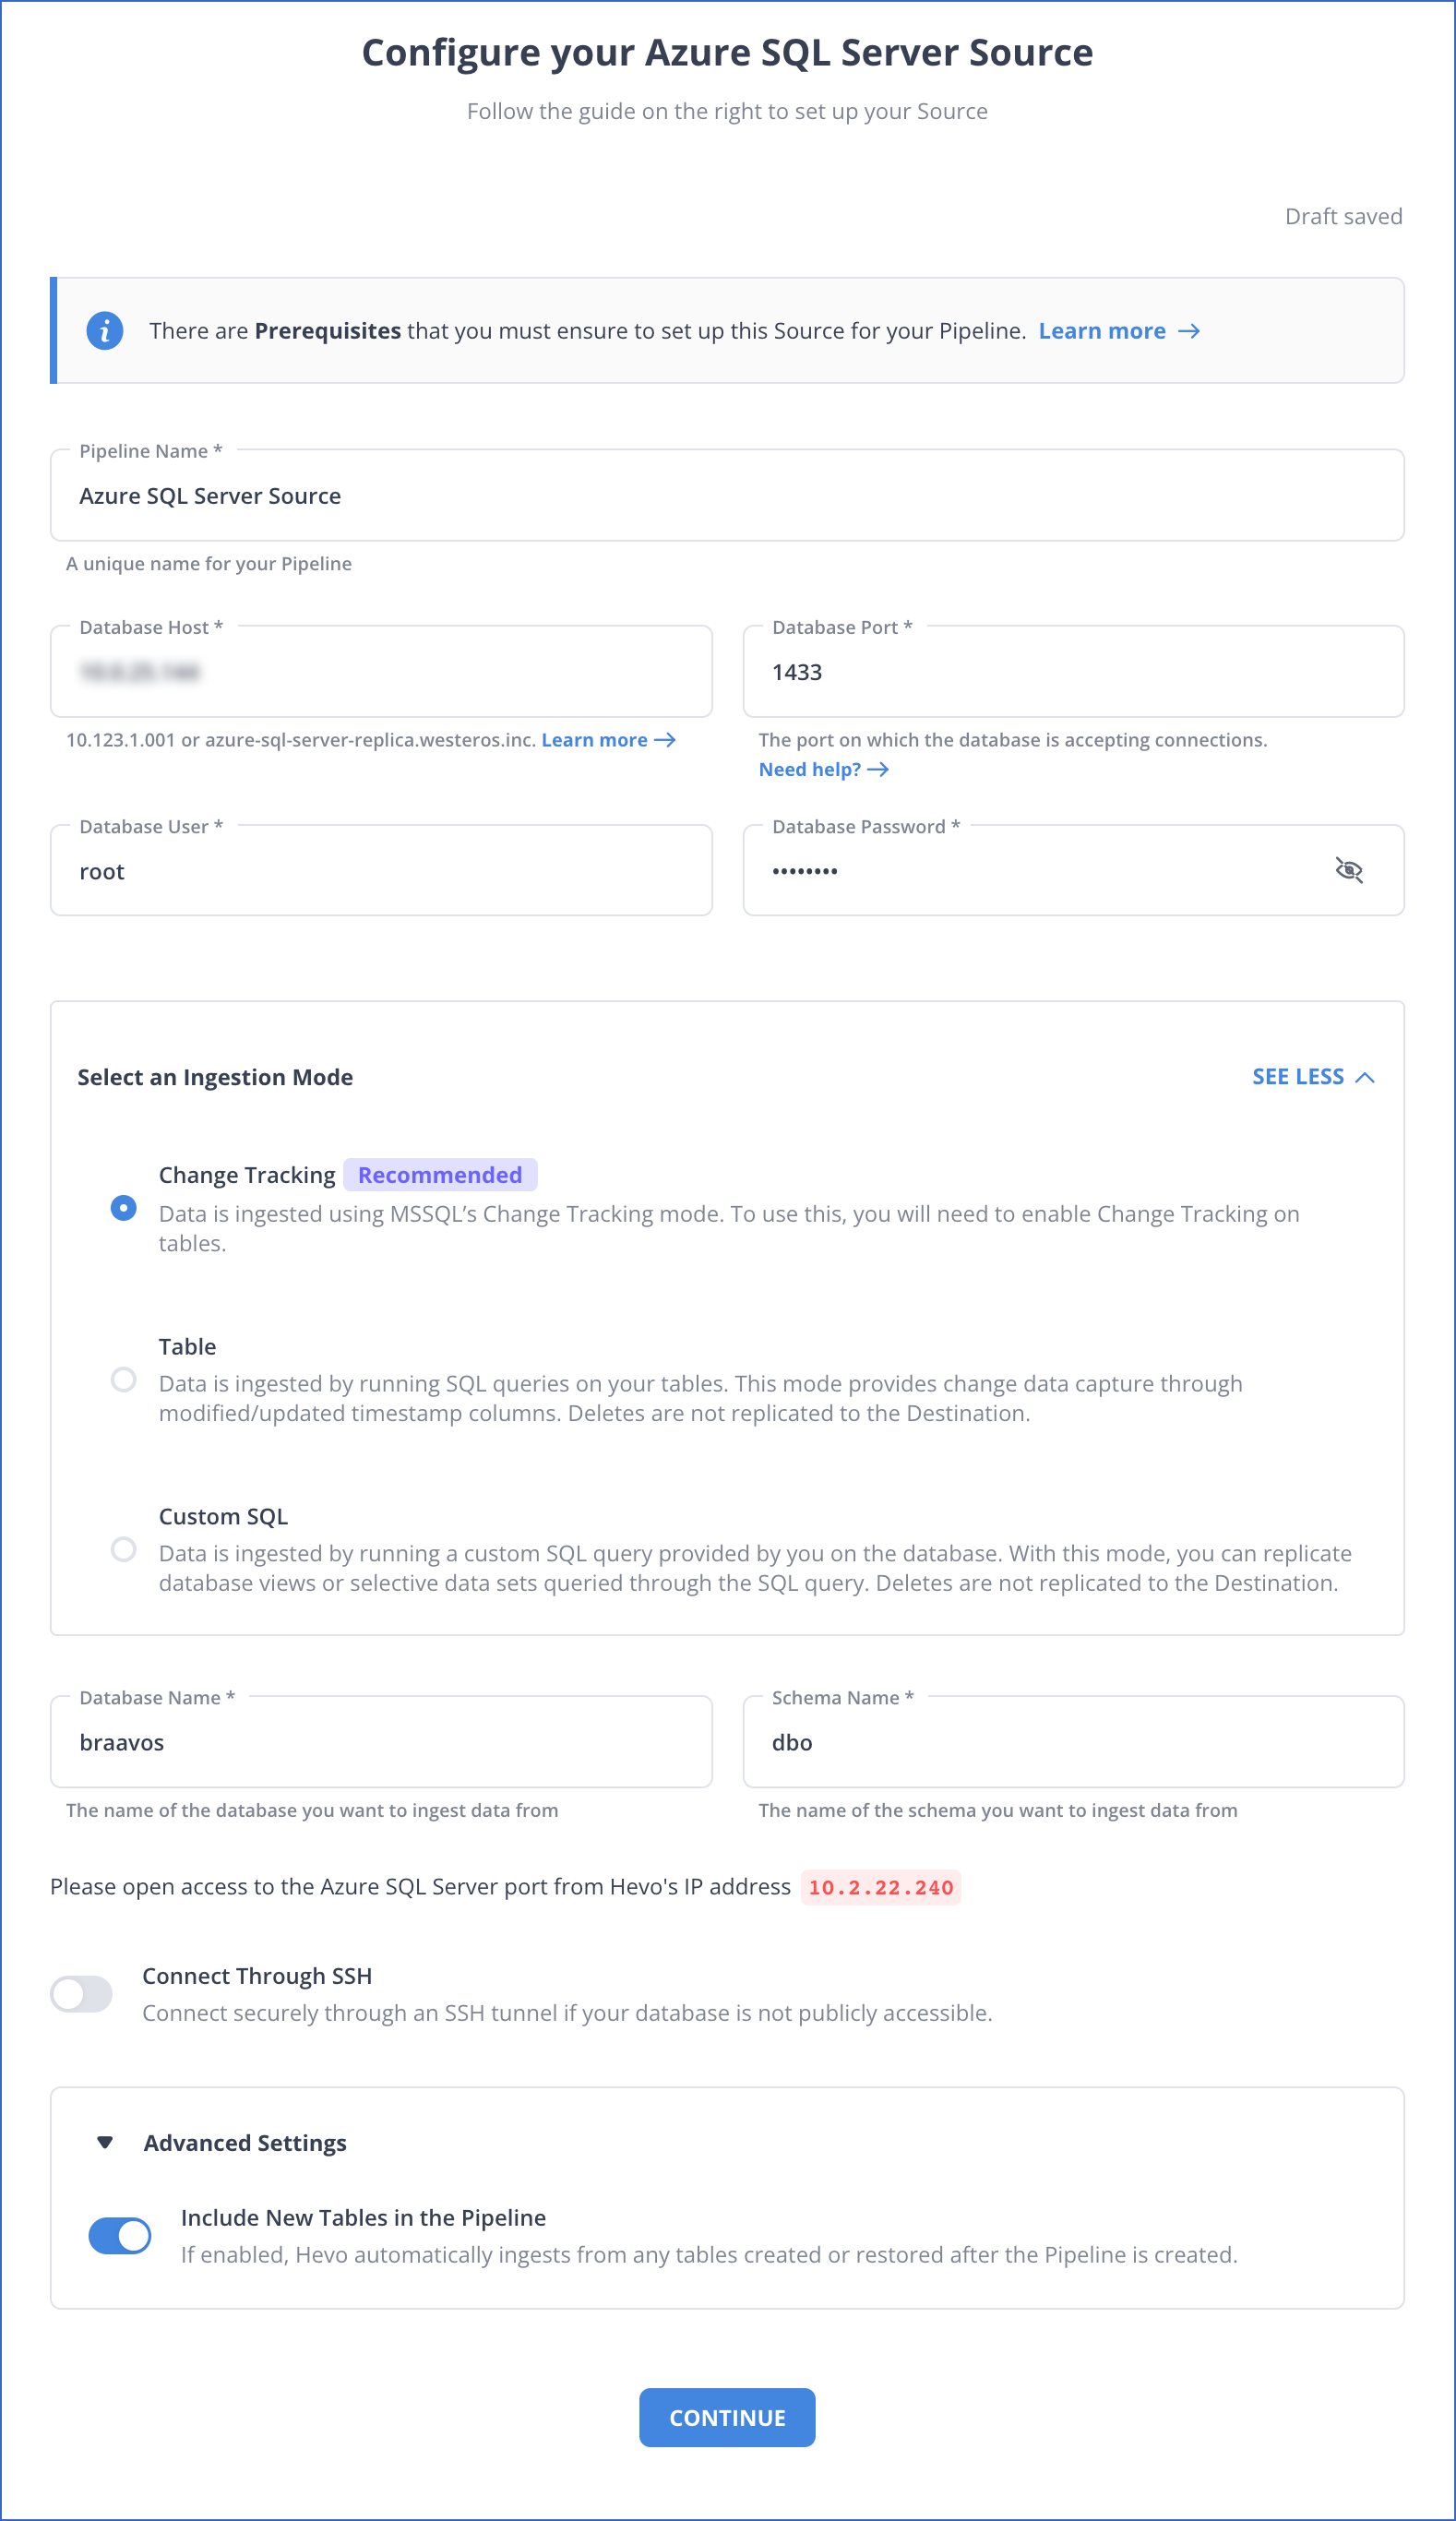
Step 1: Set Up Azure SQL as Your Source
Check the following prerequisites are ready before you start the setup:
- Microsoft SQL Server version is 2008 or higher.
- Whitelist Hevo’s IP addresses.
- Grant SELECT, ALTER DATABASE, and VIEW CHANGE TRACKING permissions to the database user.
- Enable Change Tracking mechanism.
- Obtain the Azure SQL Server database’s hostname and port number.
- You must assigned a Pipeline Administrator, Team Administrator, or Team Collaborator role in Hevo.

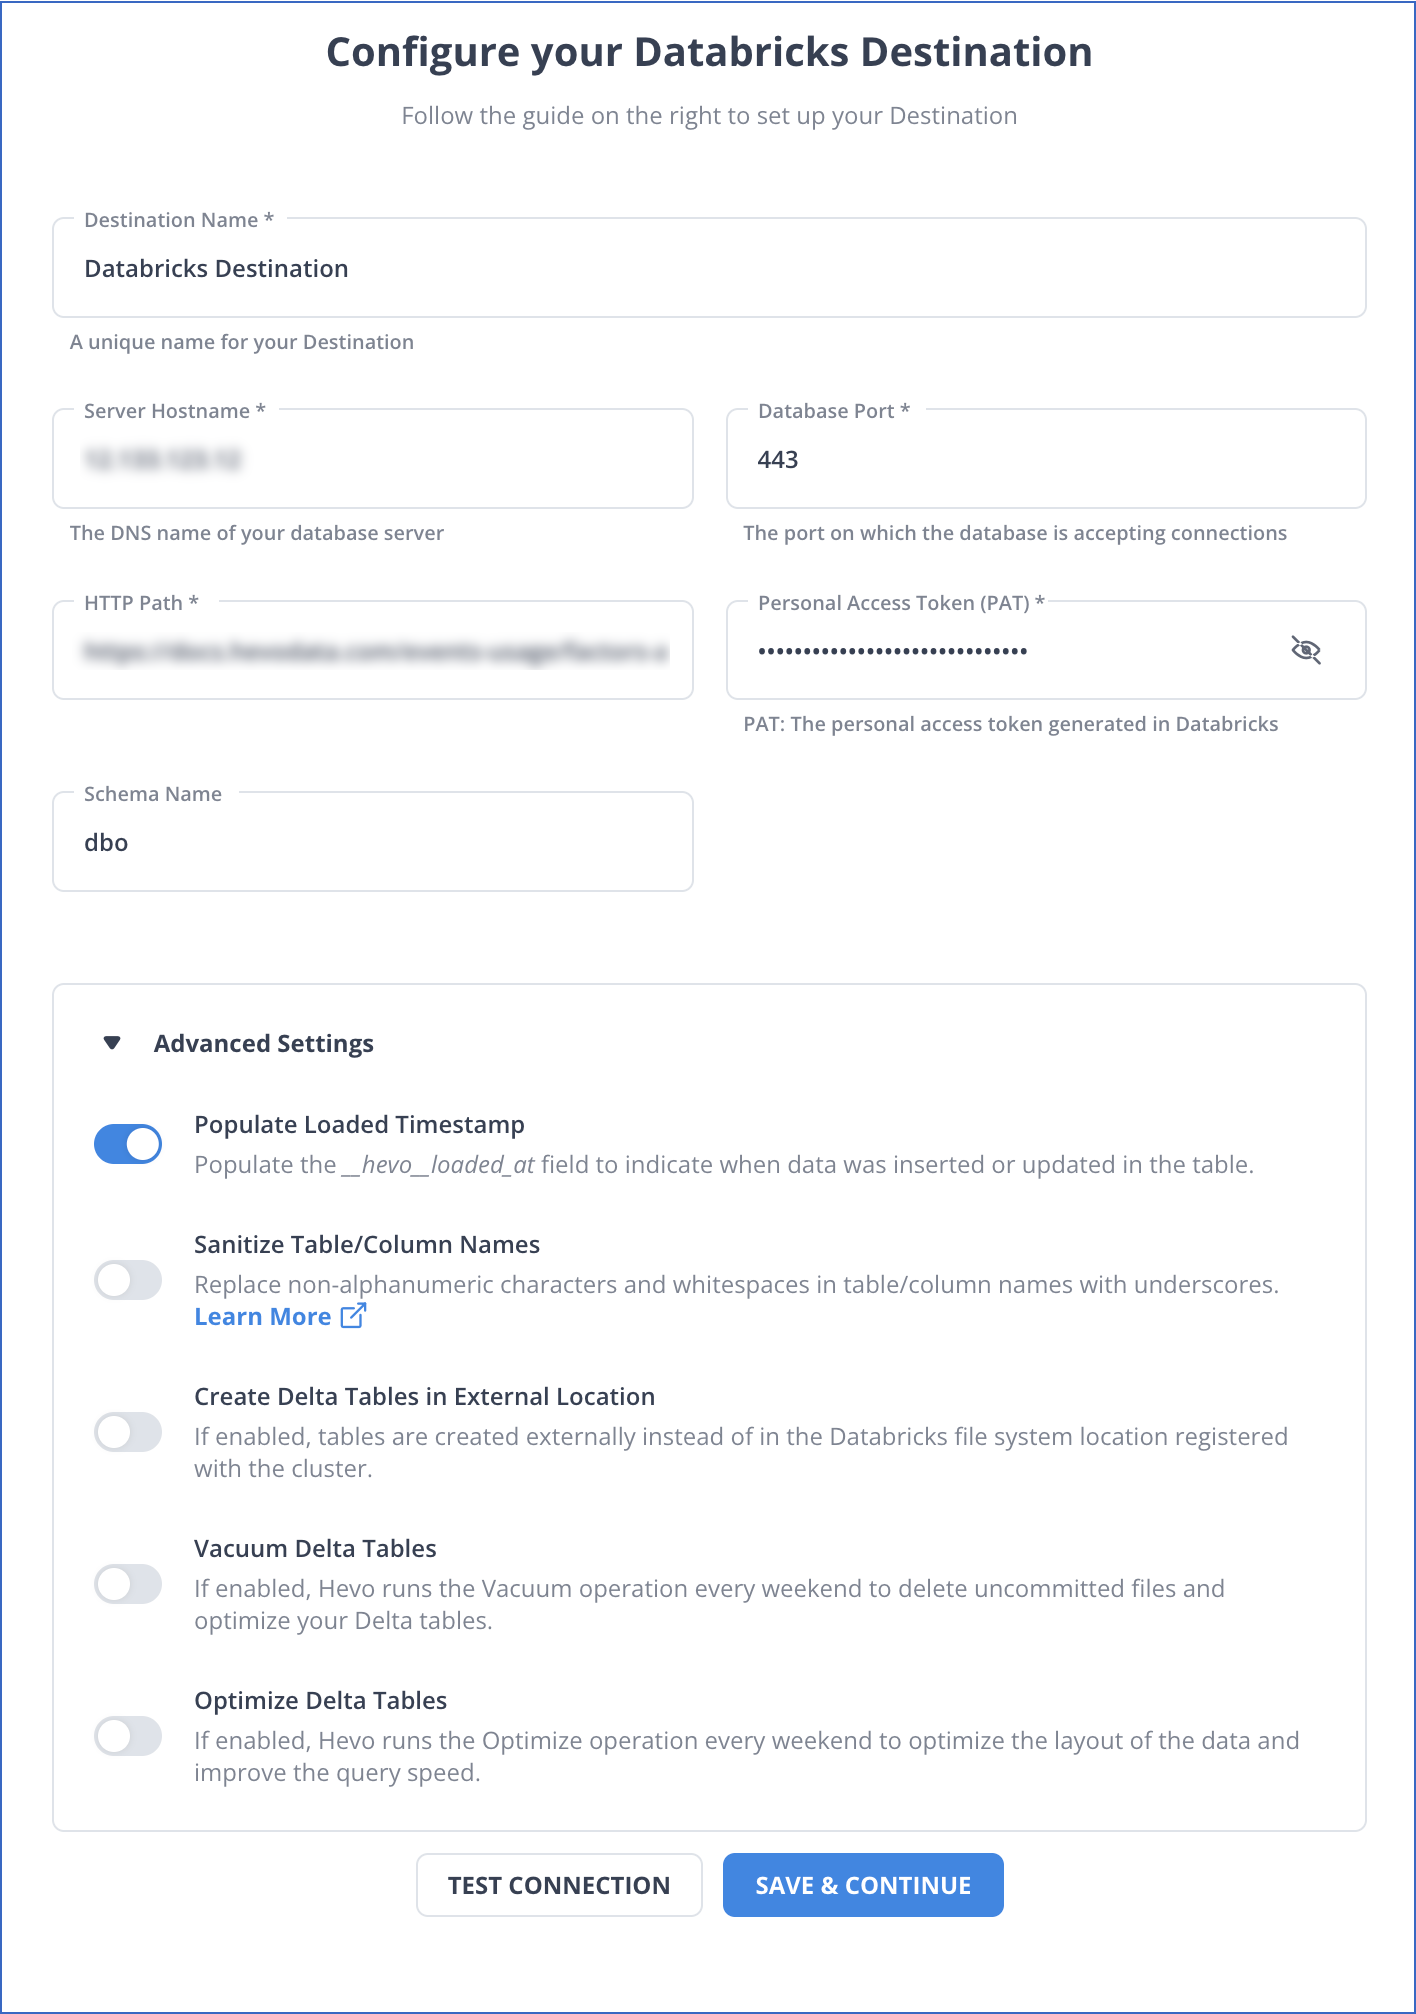
Step 2: Set Up Databricks as Your Destination
Hevo Data provides the following two options to configure Databricks as the destination:
- The Databricks Partner Connect (Hevo Data’s recommended method)
- The Databricks Credentials
Before you begin, verify that the following prerequisites are in place:
- Access to a cloud service account on AWS, Azure, or Google Cloud Platform.
- Access to Databricks workspace in your cloud service account or set up a new one.
- Databricks workspace must allow connections from your region’s Hevo IP addresses only if IP access lists are enabled in your cloud service account.
- Obtain Databricks workspace’s URL in the form of https://<deployment name>.cloud.databricks.com.
- You must have a Team Collaborator or an administrator role, excluding the Billing Administrator role in Hevo.

Use Cases of Azure SQL Databricks Migration
- Hugging Face Transformers: An open-source tool that offers APIs and libraries to integrate existing pre-trained machine-learning models into your workflow. You can then tune it to improve the workflow performance.
- Legacy Dashboards: The Databricks UI has an advanced SQL editor that allows you to generate a legacy dashboard. It combines visualizations and text boxes to derive valuable insights from your data.
You can also learn more about:
- AWS RDS MSSQL to Databricks
- Amazon S3 to Databricks
- MongoDB to Databricks
- Azure SQL to Snowflake
- Azure SQL to BigQuery
Conclusion
Choosing the right method for Azure SQL to Databricks migration depends on your business requirements, technical expertise, and dataset size.
In this article, you have explored two efficient methods for migrating data from Azure SQL to Databricks. When using CSV Export/Import, multiple steps are required, which can be time-consuming and difficult to implement if the datasets are large.
Alternatively, you can utilize Hevo Data, which allows you to automate a data pipeline between Azure SQL and Databricks in minutes. This will update your tables in Databricks in real-time without manual intervention. Explore the process to integrate Azure PostgreSQL with Databricks for optimized data management and analysis.
Try a 14-day free trial and experience the feature-rich Hevo suite firsthand. Also, check out our unbeatable pricing to choose the best plan for your organization.
Frequently Asked Questions (FAQs)
1. I am running an SQLAlchemy script to connect to the Azure SQL database. Whenever the cluster starts, I must manually add the Azure Databricks cluster’s IP address to the Azure SQL database firewall. How can I automate this?
You can use one of the following methods:
-Allow the option “Azure services and resources to access this server”.
-Link the Databricks cluster to a virtual network and whitelist it in the Azure SQL database. Read how to deploy Azure Databricks in your Azure virtual network.
2. Is Databricks ETL or ELT?
Databricks supports ETL and ELT workflows. Its flexible architecture combined with powerful processing capabilities makes it really suitable to transform data either before or after loading it into a target system.
3. Is Azure SQL the same as SQL Server?
Azure SQL is the complete managed version by Microsoft of SQL Server, fully implemented on the cloud. It is optimized for scalability and maintenance in the cloud, offering rather similar features.


