


 Key Takeaways
- Webhooks deliver real-time event data via HTTP POST requests. Without a reliable receiver and database writer in place, that data is lost the moment the request fires.
- There are three practical methods to integrate Webhook to MySQL: Hevo Data (no-code, production-ready), Python Flask (custom, full control), and Google Sheets (low-volume middleware).
- Hevo is the fastest path to a production pipeline, with automated schema mapping, fault-tolerant delivery, and a setup time of under five minutes.
- The Python Flask method gives you full control over parsing and transformation logic but requires you to handle error handling, retries, and deployment yourself.
- Google Sheets as middleware works for low-volume or exploratory use cases but hits hard limits at scale and has no retry or alerting capability.
- Manual methods carry real operational risk: no built-in error handling, potential security vulnerabilities if payload signatures are not verified, and growing maintenance overhead as payload schemas evolve.
Webhooks have become a standard way for applications to send real-time data updates. Whether you are capturing events from payment gateways, CRMs, or SaaS tools, the next challenge is storing that data reliably in a database like MySQL.
According to Postman’s State of the API report, over 70 percent of developers now rely on APIs and webhooks for real-time integrations, making webhook pipelines a core part of modern data workflows.
“Webhooks are essentially user-defined callbacks made with HTTP POST. To support webhooks, you allow the user to specify a URL where your application will post to and on what events. Now your application is pushing data out wherever your users want.”
– Jeff Lindsay, the developer who coined the term “webhook”.
However, moving webhook data into MySQL is not always straightforward. Most setups either require custom code to receive and parse payloads or rely on fragile middleware that breaks when the source schema changes. Neither approach is sustainable at scale.
This post focuses on three practical ways to integrate Webhook to MySQL, ranging from custom scripts to fully managed no-code pipelines.
Hevo handles ingestion, schema mapping, and retries automatically. Your pipeline stays live even when you are not monitoring it.
- Set up in 5 minutes. No code required
- Auto-heals when sources change or fail
- Complete visibility into every event that flows through
Used by 2,000+ data teams. Rated 4./5 on G2.
Try Hevo for FreeTable of Contents
Prerequisites for Webhook to MySQL Integration
Before you begin, make sure you have the following in place:
| Requirement | Description |
| Webhook Source | An application that can send webhook events such as Stripe, GitHub, or Shopify |
| MySQL Database | A running MySQL instance (local, cloud, or containerized) |
| Endpoint Server | A server or service to receive webhook requests (for manual methods) |
| API Knowledge | Basic understanding of HTTP methods, JSON payloads, and REST APIs |
| Data Handling Logic | Ability to parse, validate, and insert incoming data into MySQL |
| Security Setup | HTTPS endpoint and authentication mechanism (tokens, signatures) |
Why These Prerequisites Matter
Skipping these basics often leads to unreliable pipelines. A report by Gartner highlights that poor data integration practices are one of the leading causes of analytics failure in organizations.
Methods to Connect Webhook to MySQL
There are multiple ways to integrate webhook data into MySQL, depending on your technical expertise, scalability needs, and time constraints. Broadly, you can choose between custom-coded solutions, middleware tools, or fully managed no-code platforms.
There are three approaches that represent each of these categories:
Method 1: No-code integration using Hevo Data
Method 2: Custom Webhook integration using Python and Flask
Method 3: Webhook to MySQL via Google Sheets (indirect method)
Here is a quick comparison to help you choose the right approach:
| Method 1: Hevo Data | Method 2: Python + Flask | Method 3: Google Sheets | |
| Technical skill required | None | Intermediate Python | Basic scripting |
| Setup time | Under 5 minutes | 30 to 60 minutes | 20 to 40 minutes |
| Best for | Teams that need a production-ready pipeline fast | Developers who want full control | Low-volume or one-off syncs |
| Scalability | High (auto-scales with Hevo) | Medium (depends on server) | Low (Sheets row limits apply) |
| Error handling | Automated, with alerts | Manual, custom-coded | Minimal |
| Cost | Free trial, paid plans from $239/month | Infrastructure cost only | Free |
| Maintenance overhead | Near zero | High | Medium |
According to the Stack Overflow Developer Survey 2024, over 60% of developers prefer using pre-built tools over writing integrations from scratch when speed and reliability are critical.If your warehouse of choice is Redshift, this MySQL to Redshift guide covers the same migration pattern end to end.
Method 1: No-Code Integration Using Hevo Data

Hevo provides an Automated No-code Data Pipeline that helps you move yourdata from Webhook to MySQL swiftly. Hevo is fully-managed and completely automates the process of not only loading data from your desired source but also enriching the data and transforming it into an analysis-ready form without having to write a single line of code. Its fault-tolerant architecture ensures that the data is handled in a secure, consistent manner with zero data loss.
Get Started with Hevo for FreeYou just need to follow a simple 3 step process to connect Webhook to MySQL using Hevo:
Step 1: Configure the Source
- Login to your Hevo account using the appropriate credentials.
- Navigate to the Asset Palette and click on the Pipelines option.
- Click on the +Create button to create a new pipeline and search for Webhook.
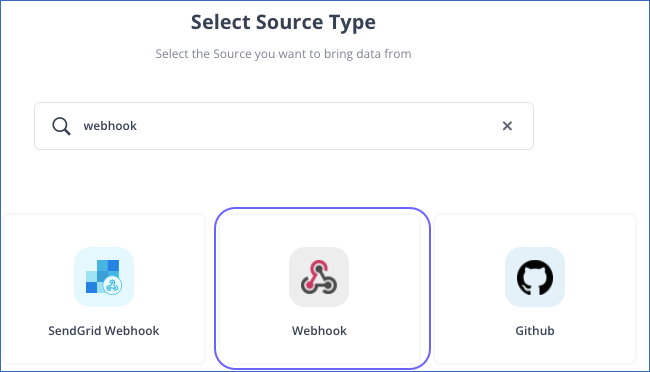
- In the Configure your Webhook Source page, specify the JSON path to the root of the event name and fields present in your payload. Once done, click on the Continue button to move forward. You can learn more about configuring your Webhook source by checking out our documentation here.
Step 2: Configure the Destination
- In the Select Destination Type page, select your destination. Here, we are selecting MySQL.
- In the Configure your MySQL Destination page, specify the MySQL settings to configure your destination.
- Once you have entered all the configuration details, click on Save & Continue.
- In the Destination Table Prefix field, provide a prefix if you want to modify the Destination table or partition name, else, you can leave the field blank.
- Now, click on Continue to proceed further.
- A Webhook URL will be generated along with the sample payload.
Step 3: Set up Webhook
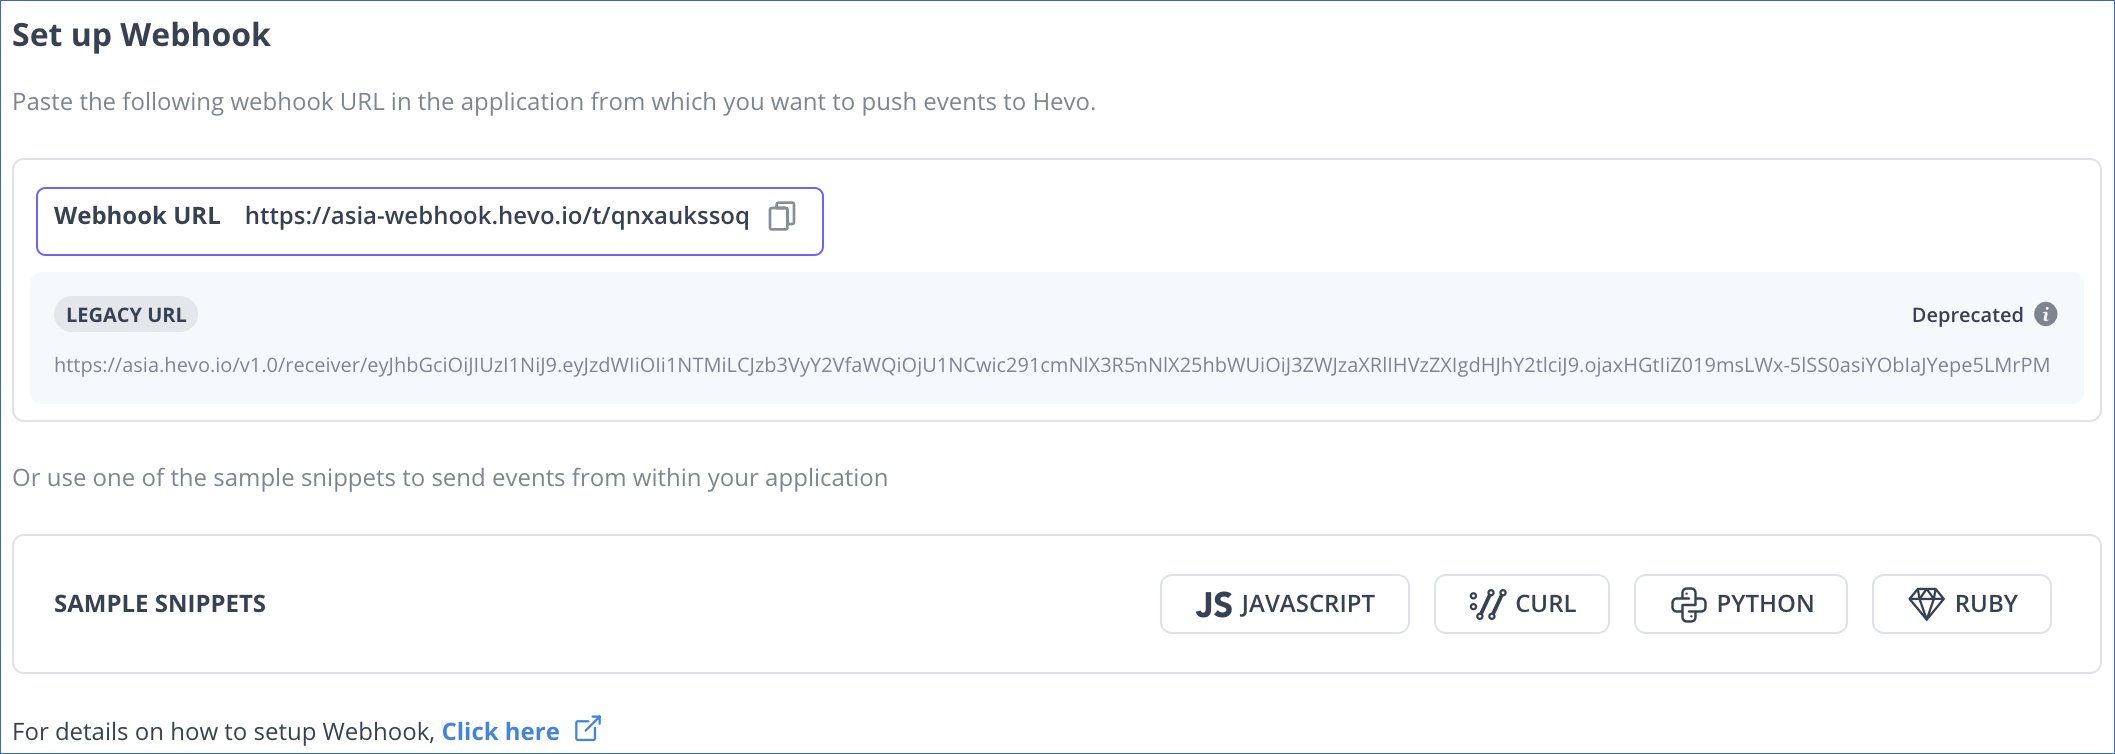
- Copy and paste the generated Webhook URL in Step 2 above, in the application from which you want to push events to Hevo. You can use the sample snippets to check the Webhook URL connectivity to Hevo.
- Optionally, as part of the final settings, you can configure Transformations to cleanse or enrich the Source data in any way. You can also use the Schema Mapper to view and edit the Source to Destination field mapping.
Using the above-mentioned three steps, you can easily connect Webhook to MySQL using Hevo without any hassle!
Here are more reasons to try Hevo:
- Smooth Schema Management: Hevo takes away the tedious task of schema management & automatically detects the schema of incoming data and maps it to your schema in the desired Data Warehouse.
- Monitoring and Observability: Monitor pipeline health with intuitive dashboards that reveal every stat of pipeline and data flow. Bring real-time visibility into your ELT with Alerts and Activity Logs
- Stay in Total Control: When automation isn’t enough, Hevo offers flexibility – data ingestion modes, ingestion, and load frequency, JSON parsing, destination workbench, custom schema management, and much more – for you to have total control.
- Exceptional Data Transformations: Best-in-class & Native Support for Complex Data Transformation at fingertips. Code & No-code Fexibilty designed for everyone.
Pros
- No coding required
- Built-in retries, monitoring, and schema management
- Scales easily for high event volumes
Cons
- Subscription-based pricing
- Less low-level control compared to custom scripts
Real-world success story: See how Airmeet improved analytics efficiency and increased organic traffic by 30–40% with reliable data integration through Hevo Data.
Hevo supports any webhook-enabled source out of the box. If your team also pipes ecommerce data into MySQL, see how WooCommerce MySQL integration works on the same platform.
To experience Hevo in action, sign up for Hevo’s 14-day free trial.
Method 2: Custom Webhook Integration Using Python and Flask
This method involves building your own webhook listener using Python and a lightweight web framework.
Before writing any code, confirm your MySQL instance is reachable. If you are running MySQL in a container, the Docker MySQL guide covers the connection configuration you will need first.
Step 1: Set Up Flask Server
| from flask import Flask, requestapp = Flask(__name__) @app.route(‘/webhook’, methods=[‘POST’])def webhook(): data = request.json print(data) return ‘OK’, 200 if __name__ == ‘__main__’: app.run(port=5000) |
Step 2: Connect to MySQL
| import mysql.connector conn = mysql.connector.connect( host=”localhost”, user=”root”, password=”password”, database=”webhook_db”)cursor = conn.cursor() |
Once webhook events are landing in MySQL, you will likely need to combine them with other tables for reporting. The MySQL join guide covers the syntax and patterns for doing that efficiently.
Step 3: Insert Data into MySQL
| @app.route(‘/webhook’, methods=[‘POST’])def webhook(): data = request.json query = “INSERT INTO events (name, value) VALUES (%s, %s)” values = (data[‘name’], data[‘value’]) cursor.execute(query, values) conn.commit() return ‘Inserted’, 200 |
Limitations of this approach:
- You are responsible for error handling, retries, and dead-letter logic if the insert fails
- No built-in schema evolution: if the webhook source adds new fields, you update the parser and table manually
- Scaling beyond a single server requires additional infrastructure work
Teams that outgrow MySQL as an analytical store often move to a warehouse. If that is on your roadmap, see the MySQL to BigQuery migration guide for what that transition looks like with Hevo.
Method 3: Using Google Sheets to Connect Webhook to MySQL
This method uses Google Sheets as an intermediary layer. Your webhook source sends data to a Google Apps Script web app, which writes it to a Google Sheet. You then export or sync that data into MySQL.
Step 1: Deploy Your Google Sheet as a Web App
- Open a new Google Sheet.
- Click Tools > Script Editor to open an Apps Script project.
- Give the project a name at the top.
- Click Deploy > New Deployment.
- Under type, select Web App.
Step 2: Start with a Google Sheet and deploy it as a Web App
You can launch your app whenever you like during the process. In this stage, the Sheet becomes a web application, and the webhook uses the provided URL.
Click Tools > Script Editor after launching your Google Sheet.
A new Apps Script project is now open. At the top, give it a name.
You may install it, which will supply your endpoint URL even before you write any code.
To do so, choose Deploy > New Deployment

For type, choose Web App:

Name it whatever you want, but for Who has access, set it to “Anyone” so that your webhook service can find it:

The next screen shows the Web App URL. Copy this.

Step 3: The Google App Script functions
A webhook sends a GET request with your URL as its initial action. Before sending any data, it expects a “202 Accepted” response from your app.
That answer may be obtained with a straightforward doGet(e) function that takes advantage of the HTML Service(link is external) of Apps Script.
function doGet(e) {
// let the service know that you received their webhook's GET request
// the string in quotes can be anything you want
  return HtmlService.createHtmlOutput("request received");
}
Then, a doPost(e) function reads the webhook data (often called a payload). In this case, data from the webhook is written to a new line in a specific spreadsheet. This is just one of many things you can do with webhook data.
function doPost(e) {
  // identify the spreadsheets where data gets added
  const ss = SpreadsheetApp.getActiveSpreadsheet();
  const subscribeSheet = ss.getSheetByName('Subscribe');
  const unsubscribeSheet = ss.getSheetByName('Unsubscribe');

  // arrays are used to add data to a Google Sheet row
  const subscribeArray = [];
  const unsubscribeArray = [];

  // convert the event data to a JSON object
  const params = JSON.parse(e.postData.contents);

  // assign variables to the event data
  const emailAddress = params.data.email;
  const emailType = params.data.email_type;
  const listID = params.data.list_id;
  const actDate = params.fired_at;
  const hookType = params.type;

 // add subcribe data to the Subscribe sheet
  if(hookType == "subscribe"){
    subscribeArray.push(actDate,emailAddress,emailType,listID);
    subscribeSheet.appendRow(subscribeArray);
  }

 // add unsubcribe data to the Unsubscribe sheet
  if(hookType == "unsubscribe"){
    const action = params.data.action;
    const reason = params.data.reason;
    unsubscribeArray.push(actDate,emailAddress,emailType,listID,action,reason );
    unsubscribeSheet.appendRow(unsubscribeArray);
  }
}
Limitations of Connecting Webhook to MySQL Database Manually
Connecting webhook to MySQL database manually can have several limitations, including:
- Security vulnerabilities: Manually setting up the connection between webhooks and a MySQL database might involve security hazards. Improper implementation may expose confidential information or grant unapproved access to the database.
- Lack of error handling: Manual setups often lack robust error-handling mechanisms. This implies that problems with data consistency or connectivity could not be resolved efficiently or automatically, which might result in difficulties with data integrity or interrupt webhook operation.
- Maintenance overhead: Manual configuration requires ongoing maintenance and monitoring. Handling the webhook connections by hand might get tedious as your application expands or changes, and it could take more work to maintain data stability and consistency.
- Scalability issues: It can be difficult to scale a manual webhook-to-database configuration. Managing the connections manually may become laborious and challenging to scale effectively as the number of webhooks and database usage rise.
- Limited flexibility: Manual configurations are frequently rigid, which makes it harder to modify them to meet changing needs or integrate them with other systems. Reconfiguring and making considerable alterations may be necessary to enhance or modify the functions.
Additional Resources on Webhook to MYSQL
- Explore more on Python Webhook
- Read more on Webhooks testing
- Methods to Connect Webhooks to PostgreSQL
- Google Analytics to MySQL ETL
Conclusion
This article taught you how to connect Webhook to MySQL in a seamless manner.
- It also provided in-depth knowledge about the concepts behind every step to help you understand and implement them efficiently.
- However, migrating complex data from a diverse set of data sources like Webhooks, CRMs, Project management Tools, Streaming Services, and Marketing Platforms to MySQL can seem to be quite challenging.
FAQ on Webhook to MySQL
How to connect webhook to database?
You can connect webhook to MySQL database using the following methods:
Method 1: Using Google Sheets to Connect Webhook to MySQL
Method 2: Using Hevo’s No Code Data Pipeline SaaS Tool to connect Webhooks to MySQL
Method 3: Using Google Scripts to Set Up Google Sheets to MySQL Integration
How to connect API to MySQL database?
You can use automated platforms like Hevo to connect REST APIs to MySQL databases.
How to connect to the MySQL database from the host?
To connect to MySQL database from a host, you can do the following steps:
Install MySQL client.
Use connection details in cmd to connect.
Enter the password, and you are done!
Can webhooks send data?
Yes, webhooks let you pass data to and return data from almost any public API on the Internet.
What is a Webhook?
A webhook is an HTTP POST request that one application sends to another the moment a specific event occurs. Unlike APIs where you poll for data, webhooks push data to you automatically. No polling, no delay.
Hevo’s webhook source works with any application that sends HTTP POST requests, including Stripe, Shopify, and GitHub. For a source-specific walkthrough, see the GitLab webhook setup guide.
What is MySQL?
MySQL is an open-source relational database management system. It stores data in structured tables and is one of the most widely used databases for web applications, analytics pipelines, and reporting workflows.
Share it with your connections.
-
 Share To LinkedIn
-
 Share To Facebook
-
 Share To X
-
 Copy Link


