

Your organization might store sensitive data such as identification numbers, date of birth, or account numbers in Snowflake data warehouse tables. To ensure this information is accessible only to authorized people with appropriate roles, Snowflake supports column-level security through dynamic data masking policies.
With the Snowflake data masking feature, sensitive columns within tables or views remain hidden while the underlying database remains unchanged. It helps you control how much sensitive data can be revealed to different users based on their roles.
If you are querying a Snowflake table with the highest privileged role, you can view the sensitive data in plain text. With the least privileged role, you can see the same data in masked form.
This article highlights how the dynamic data masking feature is implemented in Snowflake with real-world examples. Explore its benefits, limitations, considerations, and best practices.
Table of Contents
What Is Snowflake Dynamic Data Masking?
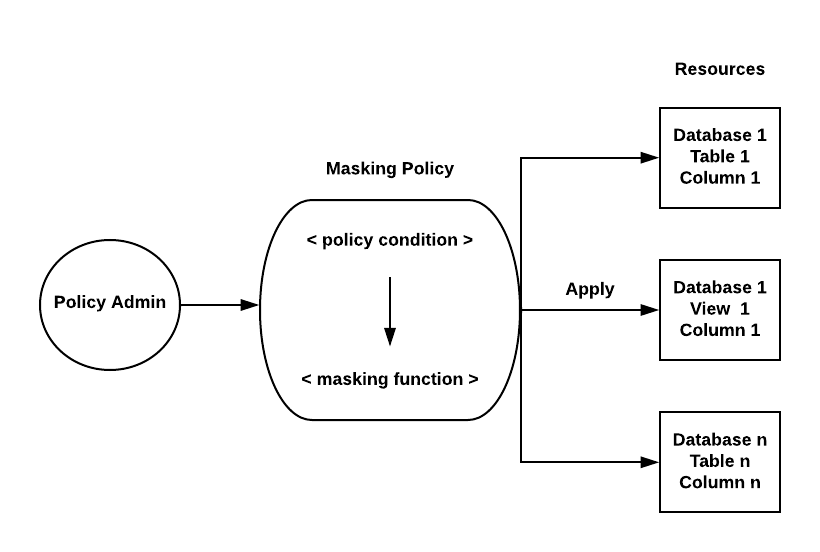
Data masking policies are schema-level objects that contain a single data type, one or more functions, and conditions. These policies define how your data should be masked when queried by users who do not have the necessary permission to view the original data.
You must define dynamic data masking policies to maintain database integrity and control data visibility in specific Snowflake tables or view columns.
How Do Masking Policies Help in Snowflake Data Masking?
As a policy administrator, you can apply masking policies to one or more columns in Snowflake tables or views. During query execution, when the condition and functions within a policy definition are met, users can view the data in unmasked, partially masked, or fully masked forms.
This policy-driven approach also allows you to restrict what the owner of a table or view with the OWNERSHIP privileged role can see.
Looking for an easy way to centralize all your data to Snowflake? Hevo Data, a No-Code Data Pipeline platform, helps to transfer data from 150+ Data sources to Snowflake.
Hevo completely automates the process of not only exporting data from your desired source but also transforming it into an analysis-ready form.
Why choose Hevo?
- Provides real-time sync for better insights.
- Get 24/7 live chat support.
- Provides an automapping feature to automatically map your schema.
Experience why Ebury chose Hevo over Stitch and Fivetran to build complex pipelines with ease and after factoring in the excellent customer service and reverse ETL functionality. Try a 14-day free trial to experience hassle-free data integration.
Get Started with Hevo for FreeHow Do You Configure and Use Snowflake Data Masking?
Here are the steps to set up and use the dynamic data masking policy:
Step 1: Create a Custom Policy Administrator Role And Grant Masking Policy Privileges
As a masking policy administrator, you must create a custom MASKING_ADMIN role. Then, grant the necessary privileges to define, manage, and apply data masking policies to selected columns.
Here’s how you can create a custom role:
use role useradmin;

CREATE ROLE MASKING_ADMIN;
The syntax for granting masking policy privileges to your custom MASKING_ADMIN role:
use role securityadmin;

GRANT CREATE MASKING POLICY on SCHEMA <database_name.schema_name> to ROLE MASKING_ADMIN;

GRANT APPLY MASKING POLICY on ACCOUNT to ROLE MASKING_ADMIN;
Step 2: Grant Custom Role to Your User Account
In this step, grant the role MASKING_ADMIN to your user account name. Here is the syntax:
GRANT ROLE MASKING_ADMIN TO USER <user_name>;Step 3: Create a Dynamic Data Masking Policy
You can create a masking policy and apply it to specific columns in the Snowflake tables using the masking_admin custom role. Here is the syntax:
CREATE [ OR REPLACE ] MASKING POLICY [ IF NOT EXISTS ] <masking_policy_name> AS

( <argument_name_to_mask> <argument_type_to_mask> [ , <argument_1> <argument_type_1> ... ] )

RETURNS <argument_type_to_mask> -> <body>

[ COMMENT = '<string_literal>' ]

[ EXEMPT_OTHER_POLICIES = { TRUE | FALSE } ]
Here is a sample SQL query to create a data masking policy on the column “SSN”:
CREATE OR REPLACE MASKING POLICY SSN_mask AS (val string) RETURNS string ->

  CASE

    WHEN CURRENT_ROLE() IN ('ANALYST') THEN val

    ELSE '*********'

  END;
This policy ensures that your team members provided with an ANALYST role can see the original data. The others can only view the fully masked data.
Snowflake also provides DDL commands for managing these dynamic data masking policies.
Step 4: Apply the Masking Policy to a Column in a Table or View
Run the following command to apply the masking policy to the SSN column from the above example:
ALTER TABLE IF EXISTS <table_name> MODIFY COLUMN SSN SET MASKING POLICY SSN_mask;Execute the following command to apply the masking policy to a column within a view (using the above example):
ALTER VIEW <view_name> MODIFY COLUMN SSN SET MASKING POLICY SSN_mask;Step 5: Query Data in Snowflake
Execute the following queries in Snowflake to use the dynamic data masking:
Query 1: If you have the ANALYST role, you can view data in the SSN column in plain text.
USE ROLE ANALYST;

SELECT SSN FROM <table_name>;
Query 2: If you have the PUBLIC role, you can view the SSN in full masked form.
USE ROLE PUBLIC;

SELECT SSN FROM <table_name>;
A Snowflake-native app to monitor Fivetran costs

Benefits of Dynamic Data Masking in Snowflake
Here are a few key benefits of using Snowflake data masking:
- Easy Change Management: Once a masking policy is written, a policy administrator can apply it to thousands of columns across multiple databases and schemas. You can update the policies without the need to reapply them to the columns. This flexibility allows for efficient change management and policy updates.
- Data Administration and Segregation of Duties (SoD): Only the policy administrator can decide which columns should be masked. Masking policies support SoD, ensuring that dedicated security officers can manage sensitive data. It also supports both centralized and decentralized administration models.
- Data Authorization and Governance: Masking policies enable contextual data access based on user roles. They support robust governance practices defined by a policy administrator, ensuring that only authorized users can access sensitive data. By enforcing these policies, the policy administrator prevents privileged users with ACCOUNTADMIN or SECURITYADMIN from viewing data unnecessarily.
- Data Sharing: Data can be easily masked before sharing, ensuring that sensitive information is protected when data is exchanged between different parties.
Snowflake Data Masking Example
This section provides a Snowflake data masking example to increase your understanding of the process.
Case 1: Normal Data Masking Policy
Consider a scenario where your organization’s call center agent queries the customer table to see the last four digits of a customer’s SSN to identify them uniquely. Similarly, the production support member in your organization must query the same table to troubleshoot issues without viewing sensitive data.
The following query can help implement a dynamic data masking policy to hide the SSN based on the user’s roles.
Once the policy is created, you must apply it to a table or view column using the Snowflake CREATE OR REPLACE TABLE or ALTER TABLE command.
Case 2: Multiple Data Masking Policy
You can create multiple data masking policies and apply them to different columns simultaneously. Continuing the above example of masking the SSN field in the customer table, you can extend it by creating additional masking policies for columns like first_name, last_name, or date of birth.
You can create and apply multiple policies to the specified columns by executing the following SQL code in Snowflake’s Snowsight or SnowSQL CLI:
Here is a query to create a masking policy to mask first name:
create or replace masking policy mydatabase.myschema.mask_firstname as (firstname_txt string) returns string ->

  case

    when current_role() in ('CALL_CNETER_AGENT') then 'xxxxxx'

    when current_role() in ('PROD_SUPP_MEMBER') then 'xxxxxx'

    else NULL

  end;
Use the following syntax to apply the mask_firstname masking policy to the customer.first_name column:
alter table if exists customer modify column first_name set masking policy mydatabase.myschema.mask_firstname;Create another masking policy to mask the last name using the following SQL code:
create or replace masking policy mydatabase.myschema.mask_lastname as (lastname_txt string) returns string ->

  case

    when current_role() in ('CALL_CNETER_AGENT') then lastname_txt

    when current_role() in ('PROD_SUPP_MEMBER') then 'xxxxxx'

    else NULL

  end;
Apply mask_lastname masking policy to the customer.last_name column using the following query:
alter table if exists mydatabase.myschema.customer modify column last_name set masking policy mydb.myschema.mask_lastname;Execute the following masking policy to mask the date of birth name:
create or replace masking policy mydatabase.myschema.mask_dob as (dob_text string) returns string ->

  case

    when current_role() in ('CALL_CNETER_AGENT') then regexp_replace(dob_text,substring(dob_txt,1,8),'xxxx-xx-')

    when current_role() in ('PROD_SUPP_MEMBER') then 'xxxx-xx-xx'

    else NULL

  end;
Apply the mask_dob masking policy to the customer.dob column using the following query:
alter table if exists mydatabase.myschema.customer modify column dob set masking policy mydb.myschema.mask_dob;Case 3: Conditional Data Masking Policy
Snowflake supports conditional masking policies for scenarios where data masking on a specific field relies on values from other columns and user roles. To enable this feature, you must pass additional input parameters along with the data type as arguments.
Consider a situation where your organization wants to publicly display the educational details of a customer dataset. Here, you may want to add an additional parameter, like visibility, as a boolean data type.
When the value of visibility is false, your call center agent or production support member can view the educational details. Otherwise, they can only see the masked information.
Once you have created and applied this policy using the ALTER TABLE statement, your team members can query the user table.
Limitations in Snowflake Data Masking
- In Snowflake data masking, policy definition does not allow for different data types in the input and output. For example, you cannot specify the input type as a time stamp and then return a string.
- Snowflake does not support future grants of privileges on data masking policies.
- Once Snowflake establishes a masking policy on a column within a materialized view, you cannot set masking policies on any other columns in the same view.
- With a CREATE EXTERNAL TABLE statement in Snowflake, you cannot apply the masking policy to the automatically generated VALUE column of the external table.
- You cannot drop a masking policy removing it from the applied column using an ALTER COLUMN statement.
Considerations When Using Snowflake Dynamic Data Masking
Here are a few points to be considered when using dynamic data masking in Snowflake:
1. Handling a Source and Target Columns
- With a masking policy on the source column, a role with access to unmasked data in the source can insert it into another column. Any role with adequate privileges on the table or view can see this unmasked data from the target column.
- If a role with access to masked data inserts values into the target column, the inserted values remain masked. Users with adequate privileges can view a combination of unmasked and masked values without a masking policy on the target.
2. Creating a Setup Script for a Snowflake Native App
The setup script includes SQL statements that execute when the CREATE APPLICATION command is running in any of the following situations:
- When a consumer installs or upgrades the Snowflake Native app.
- When a provider develops or updates an application object while testing an application package.
Assigning a masking policy to an object existing in the versioned schema inside the Snowflake Native app can cause errors when installing an application.
Best Practices for Using Data Masking Policies in Snowflake
The following are a few practical tips you must follow for applying masking policies to columns:
- Validate queries using columns with masking policies before granting access to tables and views.
- Identify other tables and views where data from the source column may appear.
- Audit dynamic data masking to retrieve the information about masking policies using the following two account usage views in Snowflake:
- POLICY_REFERENCES: List all the objects that have masking policies.
- MASKING POLICIES: List all the masking policies in your Snowflake account.
How Does Hevo Data Help You Simplify Data Masking in Snowflake?
Since your organizational data keeps growing, it is better to consolidate new data volumes in Snowflake through a data pipeline that supports near-real-time updates. To streamline this process, you can utilize Hevo Data to load the up-to-date data in your Snowflake data warehouse.
Hevo Data is a near-real-time ELT, no-code data pipeline platform that enables you to cost-effectively extract, load, and transform all your data into a destination of your choice.
Once transferred, you can focus entirely on analyzing and reporting the datasets, reducing the need to mask sensitive fields through custom transformations. Want to take Hevo for a spin? for a 14-day free trial and simplify your data integration process.
Here are some key features of Hevo that help in simplifying the data masking:
1. Data Transformation
Hevo Data offers drag-and-drop transformation blocks to clean and standardize your data before loading it into Snowflake. In Hevo Data, you can mask the sensitive field values based on the event type and the name and value of the event fields.
Here is a sample transformation:

In this example, the values of the email field are masked in all the ServiceFolder_fullsync where the name of the event field is a role, and its value equals user. After testing this transformation, you can see that the value of the email field is masked from the following output:
2. Automatic Schema Management
Hevo Data’s auto-mapping feature automatically identifies the structure of the source database and copies it to the target schema, reducing manual schema management. It feature supports data masking by consistently applying transformations to sensitive fields in the destination tables. Depending on your data replication requirements, you can utilize full or incremental mappings.
3. Incremental Data Load
Hevo Data allows near-real-time transfer of modified data, ensuring efficient bandwidth usage on both ends of the pipeline. It helps apply masking transformations only to the new or updated data instead of reapplying them to the entire dataset each time.

Conclusion
Snowflake Data Masking is a powerful feature that enables you to keep sensitive information private, preventing unauthorized access to the original content. This policy-based approach authorizes users within your organization based on their roles.
Hevo Data allows you to simplify Snowflake data masking by using custom transformations. Once the data is loaded, your organization’s team members or stakeholders can easily query large datasets in the Snowflake tables. Thus, this capability ensures effective data protection while maintaining operational integrity.
You can schedule a demo to take advantage of Hevo’s features. Also checkout our unbeatable pricing to choose the best plan for your organization.
Share your experience of Snowflake data masking in the comments section below!
Frequently Asked Questions (FAQs)
1. How does masking policy work on a shared database?
A provider must apply a masking policy to a shared table or view. The policy condition should include CURRENT_ROLE(), CURRENT_USER(), CURRENT_ACCOUNT(), or a secure user-defined function. Alternatively, you can write conditions to invoke the IS_DATBASE_ROLE_IN_SESSION() function and share the database role with the consumer account.
2. Can you get a list of objects or columns on which masking policies have been applied?
The following SQL statements would help you to get the list of objects or columns that have masking policies:
USE DATABASE <database_name>;
USE SCHEMA INFORMATION_SCHEMA;
SELECT * FROM <table_name>
(INFORMATION_SCHEMA.POLICY_REFERENCES(POLICY_NAME => ‘masking_policy_name’));
Share it with your connections.
-
 Share To LinkedIn
-
 Share To Facebook
-
 Share To X
-
 Copy Link


