


If you consider your data in Airtable absolutely vital to run your business, then you should create backups to protect your business. While Airtable maintains redundant backups on its data centers, there are many reasons you would need to store a copy of your data locally or in a cloud-based data store.
Whether it’s your client contacts, billing records, financial reports, inventory, or appointments, having a backup copy of your data outside of Airtable is always nice and reassuring. You can also connect Airtable to MySQL using different methods, such as scripts, APIs, connectors, or third-party apps.
In this post, we’ll look at how you can set up an Airtable MySQL Integration, the limitations of the method you will use to achieve this, and finally, you’ll be introduced to an easier alternative.
Table of Contents
What is Airtable?
Airtable is a cloud-based platform for creating and sharing relational databases. The user-friendly interface allows anyone to spin up a database in minutes. You can store, organize, and collaborate on information about anything—like employee directories, product inventories, and even apartment hunting in an Airtable dashboard. Learn about Airtable examples to get an overview of the platform.
What is MySQL?

MySQL is an open-source, Relational Database Management System that stores data in a structured format using rows and columns. It’s software that enables users to create, manage, and manipulate databases. Developed by MySQL AB, which is now owned by Oracle Corporation, MySQL is renowned for its reliability, scalability, and ease of use.
Tired of writing long lines of code for replicating your data to MySQL? Unlock the power of your data by effortlessly replicating it using Hevo’s no-code platform. Use Hevo for:
- Simple two-step method for replicating data to MySQL.
- Performing pre/post load transformations using drag-and-drop features.
- Real-time data sync to get analysis-ready data.
Try Hevo and join a growing community of 2000+ data professionals who rely on us for seamless and efficient migrations.
Get Started with Hevo for FreeMethods for Setting up Airtable MySQL Integration
There are various tools and methods available for Airtable to MySQL integration, including manual export-import procedures and automated scripts. In this section, you will learn about two different methods to set up an Airtable MySQL Integration:
Method 1: Using Hevo for Airtable MySQL Integration
Utilizing the REST API is an effective method of retrieving data from Airtable. Below are the steps to utilize the REST API as a source:
Step 1: Establish a Connection with REST API as the Source
To configure the REST API as a source in Hevo, follow these instructions:
- Choose REST API from the Select Source Type options.
- This action will bring up the Configure REST API Source page:

- Specify the source as the REST API from where data needs to be extracted. Provide the base URL or root path of the API.
- Choose the pagination method that the REST API supports for fetching the data – offset/limit, cursor, or page number based.
- Click on Finish Setup after configuring the above parameters.

Refer to Airtable REST API integration for more details on the above steps to correctly set up a REST API data source.
Step 2: Connect MySQL as Destination
- In the Add Destination page, select MySQL.
- In the Configure your MySQL Destination page, specify the following:

After integrating Airtable with MySQL, consider replicating your MySQL data to BigQuery for advanced analytics.
Method 2: Setting up Airtable MySQL Integration Manually
If you’d like to export your current Airtable records in MySQL, you can export data from Airtable as CSV files and then import these files in MySQL. The export to CSV function is a great way to backup your data outside of Airtable and into MySQL for BI analytics or just simply for offline access. To ensure data safety, consider migrating your MySQL database between servers for redundancy.
To do this:
Step 1: Export data from your Airtable base in CSV format
- In your Airtable base, select the view you want to export.
- Click the three-dot menu next to the view name.
- Click Download CSV.
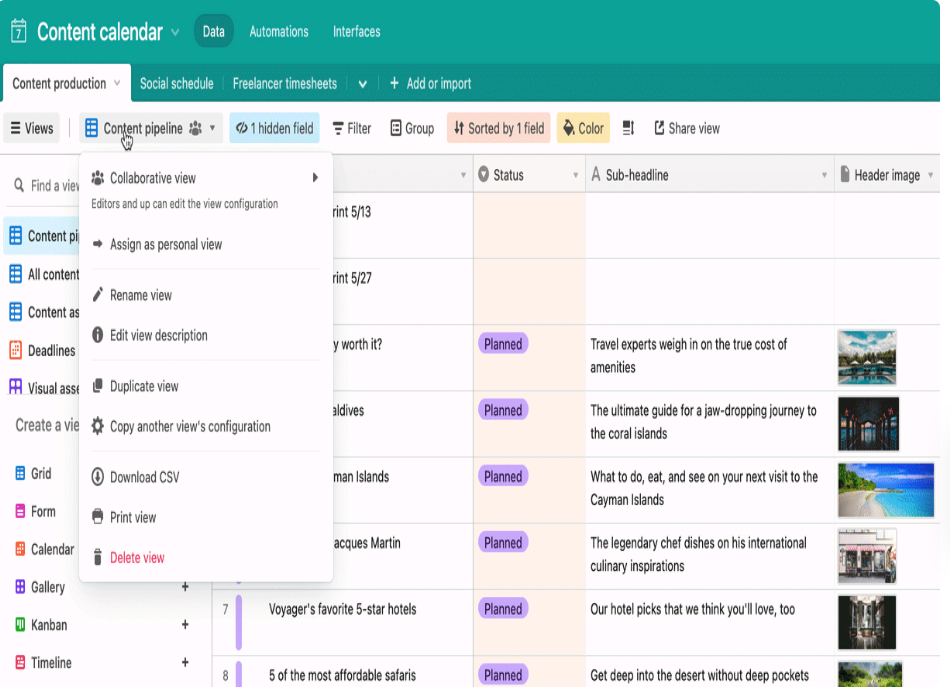
- A CSV file of your table view will automatically export to your files (the file will be located in your device’s default download location).
- Repeat the process for each table in your base.
Step 2: Import the CSV files in MySQL
Here is how you do this:
- Create a table in MySQL using the same schema as your CSV file. For example:
CREATE TABLE 'customers' (userId INT);
ALTER TABLE customers ADD COLUMN name VARCHAR(256);
ALTER TABLE customers ADD COLUMN email VARCHAR(256);
ALTER TABLE customers ADD COLUMN location VARCHAR(256);- Load data into your table
LOAD DATA LOCAL INFILE
'c:/temp/some-file.csv'
INTO TABLE your_awesome_table
FIELDS TERMINATED BY ','
ENCLOSED BY '"'
LINES TERMINATED BY 'n'
IGNORE 1 ROWS
(field_1,field_2 ,field_3);- Because we’re loading the file from a local directory, we are doing this:
LOAD DATA LOCAL INFILE- Since you will most likely export more than one field, MySQL will skip the last field. That’s why we’ve explicitly referenced all fields.
LINES TERMINATED BY 'n'
(field_1,field_2 ,field_3);- Lastly, because the CSV file we’ve exported from Airtable has the first row as the title for your fields, we’ve included this line:
IGNORE 1 ROWS- Here is a real-life example:
LOAD DATA LOCAL INFILE
'/home/susan/customers.csv'
INTO TABLE customers
FIELDS TERMINATED BY ','
ENCLOSED BY '"'
LINES TERMINATED BY 'n'
IGNORE 1 ROWS
(userId,name,email,location);
Limitations of Manual Airtable MySQL Integration
Keep in mind the following limitations before setting up Airtable MySQL Integration manually:
- Each table in your Airtable base (workspace) must be exported in a separate CSV file.
- Exports do not include comments, app content, or base and field descriptions.
- If you want to export attachments, then you have to use a third-party tool.
- This solution doesn’t allow you to export the entire base at once.
- You can only export 15,000 rows. If you have more rows than that then you have to split the table into multiple CSV files.

Use Cases to transfer your Airtable data to MySQL.
Integrating Airtable data with MySQL offers several benefits. Here are some examples of how you can use this integration:
- Advanced Analytics: With MySQL’s powerful data processing capabilities, you can perform complex queries and data analysis on your Airtable data, allowing you to extract insights that you wouldn’t be able to obtain within Airtable alone.
- Data Consolidation: If you’re using multiple data sources besides Airtable, syncing them to MySQL can centralize your data for a comprehensive view of your operations. It also enables you to set up a change data capture process so you never have any discrepancies in your data again.
- Historical Data Analysis: Airtable has restrictions on historical data, but by syncing data to MySQL, you can retain long-term data and analyze historical trends over time.
- Data Security and Compliance: MySQL offers robust data security features. By syncing Airtable data to MySQL, you can ensure your data is secure and implement advanced data governance and compliance management.
- Scalability: MySQL can handle large data volumes without affecting performance. This makes it a perfect solution for expanding businesses with growing Airtable data.
- Data Science and Machine Learning: By having Airtable data in MySQL, you can apply machine learning models to your data for predictive analytics, customer segmentation, and other purposes.
- Reporting and Visualization: Airtable provides reporting tools, but MySQL can connect to data visualization tools like Tableau, PowerBI, and Looker (Google Data Studio). This integration offers more advanced business intelligence options. If you need to convert an Airtable table to a MySQL table, Airbyte can do it automatically.
Additional Resources on Airtable MySQL Integration
Conclusion
You have learned how to export tables from Airtable in CSV format and import them into MySQL tables using LOAD DATA LOCAL. With this technique, you can safely integrate data from Airtable with your MySQL DB.
While this process allows you to move Airtable data to MySQL, it’s extremely time-consuming, and it doesn’t support exporting attachments. Hevo comes into the picture to make things easier for you.
Sign up for a 14-day free trial and simplify your data integration process. Check out the pricing details to understand which plan fulfills all your business needs.
FAQs
1. Is Airtable SQL or NoSQL?
Airtable can be considered as neither strictly SQL nor NoSQL but rather a hybrid system that incorporates features of both types of databases.
2. What database is Airtable built on?
Airtable is built on a proprietary backend, which combines aspects of relational databases with the flexibility of a spreadsheet.
3. Can you use SQL with Airtable?
Airtable does not natively support SQL queries. However, you can use third-party tools and integrations to connect Airtable to SQL environments.
4. Is Airtable a relational database?
Airtable is often described as a hybrid between a spreadsheet and a relational database. It allows users to create tables (bases) with relationships between them, similar to how relational databases work.

Share it with your connections.
-
 Share To X
-
 Share To LinkedIn
-
 Share To Facebook
-
 Copy Link


