The hype surrounding Application Programming Interfaces (APIs) is universal. It offers a software interface that facilitates the interaction between two applications, which is critical for scalability and reusability. It is now very common for proprietary web applications or services to have Public APIs. Other developers can leverage these to quickly combine features like Social Media Logins, Credit Card Debts, and Performance Tracking.
The standard they use for this is called Representational State Transfer (REST), and it works perfectly with the Node.js development techniques. Owing to this level of compatibility building a Node js REST API makes absolute sense.
Upon a complete walkthrough of this article, you will gain a holistic understanding of Node js and REST APIs. This article will also provide you with a detailed step-by-step guide on how to create API in Node js from scratch. Read along to learn more about Node js REST API!
Table of Contents
Prerequisites
- Hands-on experience with JavaScript.
- Node js installed on the system.
What is REST API?
A RESTful API, also known as REST API, is based on Representational State Transfer (REST), which is an architectural style and communication approach commonly used in the development of Web Services.
In general, REST technology is preferred over other similar technologies. This is because REST consumes Less Bandwidth, making it more suitable for efficient Internet usage. RESTful APIs can also be designed using programming languages like JavaScript or Python.
While REST can be used over nearly any protocol, it is most commonly used for Web APIs over HTTP protocol. This means that developers do not need to install any additional libraries or software to take advantage of a REST API design.
REST has the ability to handle multiple types of Calls, Return Different Data Formats, and Even Change Structurally with the proper implementation of hypermedia as data is not tied to methods and resources. By leveraging the freedom and flexibility inherent in the REST API design, you can create an API that meets your needs while also meeting the needs of a wide range of customers.
What is Node.js?

Node.js is an Open-Source Server-Side Runtime Environment that is solely based on the V8 JavaScript Chrome Engine. It offers an Event-driven, Non-Blocking (Asynchronous) I/O and Cross-Platform runtime environment for developing highly scalable Server-Side JavaScript applications.
Node.js can be used to create a variety of applications, including Command-Line Applications, Web Applications, Real-time Chat Applications, REST API Servers, and so on. Its Event-Driven Runtime handles all types of HTTP requests and sleeps when not required. This allows developers to leverage JavaScript and write Server-Side scripts to generate Dynamic Web Content before it is delivered to the user’s web browser.
Later in this article, you will also learn about the process of building a secure Node js REST API.
Why should you use Node.js and Express to build your REST API?
- JavaScript Everywhere: Node.js allows you to use JavaScript for client and server-side development. This unification of languages can simplify development and maintenance, as the same language is used across the entire stack.
- Non-blocking I/O and Asynchronous Processing: Node.js is built on an event-driven, non-blocking I/O model, making it efficient and suitable for real-time applications. This allows handling many simultaneous connections with high throughput.
- Performance: Node.js, powered by the V8 JavaScript engine, offers lightning-fast code execution. Its single-threaded nature and non-blocking I/O ensure top-notch performance for I/O-intensive applications.
- Scalability: Node.js is specifically designed to build scalable network applications. It can handle a large number of concurrent connections with minimal overhead on a single process, making it a powerful tool for growth.
- Extensive Ecosystem: The npm (Node Package Manager) ecosystem provides a vast array of libraries and modules, which can significantly speed up development by allowing developers to reuse existing code.
Setting up a Node.js app: A step-by-step guide
Step 1: Install Node.js and NPM
The first thing that you need to do is to install your machine. You can download the latest LTS version from the official Node.js website. After installing, you can verify the installation by writing the following commands in your terminal:
Node -v
Npm -v
After writing these commands, the current version of Node.js and NPM installed on your computer will be displayed.
Step 2: Create a new project folder
Next, you need to create a folder for your project by running the following command in your terminal:
mkdir node-rest-apiThis will create a folder for your project. Next, you will need to navigate to your project.
cd node-rest-apiStep 3: Initialize a new Node.js application
Next, you need to initialize your app by running the following command in your terminal:
npm initYou will be prompted to enter your project name, description, and GitHub repository. You can accept the defaults by pressing Enter/Return or customize them.
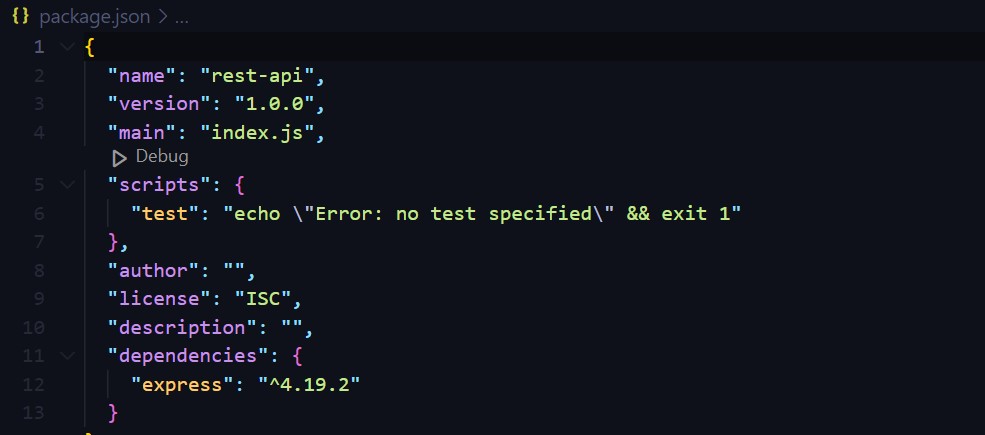
Next, open this project in your code editor. You will see a file named package.json containing all the data and dependencies you need for the project.

Step 4: Install Express and other dependencies
You need to run the following command to install the Express framework:
npm install expressStep 5: Import necessary modules
Next, you must create a new file named app.js to set up the app. This file should be in the root of the project directory. Next, we need to load the dependencies so we can use them. To import express, write the following command:
const express= require(‘express’);Next, you must set up Express to create an app and configure it to parse requests with JSON payloads. You can do that by writing the following lines of code:
const app = express ();
app.use(express.json());
Step 6: Define a route that listens to requests
Now, you need to make this application a server by getting it to listen for connections. To do this, we’ll connect to a port to listen for incoming requests.
To do that, you need to write the following code to define the server code:
const PORT = process.env.PORT || 3000;Usually, by writing process.env.PORT we set up the port automatically by allowing the API to be deployed to a cloud platform like AWS or Azure. If the port is not set, we use the default value of 3000.
Next, we write the following code to set up the server to listen to the specific port.
app.listen(PORT, () => {
  console.log("Server Listening on PORT:", port);
});
Step 7: Define an endpoint
Next, we must define a status endpoint to ensure our API works. app.MEHTOD() is used in Express to define routes. METHOD() refers to various HTTP methods, like GET,POST, PUT and DELETE.
To call a get method, the syntax should be:
app.get(“/status”, (request, response) => {
   const status = {
      “Status”: “Running”
   };
   response.send(status);
});
Therefore, your entire app.js file should contain the following code:
const express = require('express');
const app = express();
app.use(express.json());
const PORT=process.env.PORT || 3000;
app.listen(PORT, () => {
  console.log("Server is Listening on PORT:", PORT);
});
app.get("/status", (request,response)=>
{
    const status={
        "Status" : "running"
    };
    response.send(status);
});
You can run this code in your editor and it should display the following output

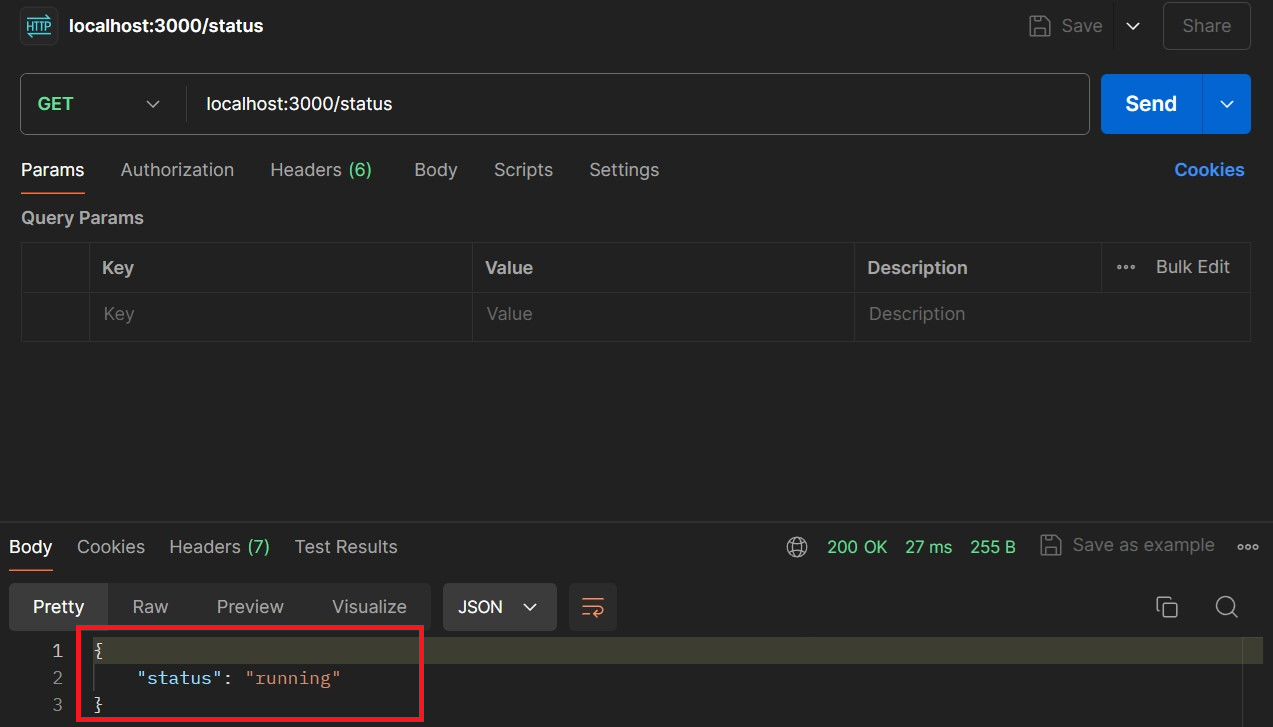
Next, you can go to your Postman account and test the /status endpoint with the GET request method. You should get a response that says “Running,” as shown below:

Steps to Build a Secure Node JS REST API
Building a Node js REST API is a four-step process. Follow the steps given below to build a secure Node js REST API:
- Step 1: Create the Required Directories
- Step 2: Create your First App Express API
- Step 3: Creating the User Module
- Step 4: Creating the Auth Module
Step 1: Create the Required Directories
The first step involved in building a Node js REST API requires you to create directories that will contain the code for the Node js REST API.
- To begin with, open the Command Line Terminal on your system and navigate to the record where you usually create your projects and build a new directory which will consist of the Node js REST API’s code there using the following command:
mkdir express-ads-api- Now move to the directory you just created and practice npm install to frame a new project:
npm init -y- If you open this directory in a text editor or an IDE, you’ll see that the npm command you used created a file called package.json. If you open this file, you’ll come across something like this:
- This data is currently quite insignificant and does not contain a lot of valuable information. Nevertheless, as you begin computing mandates for your project to create the Node js REST API, this file will grow in size. Following that, you will create a new directory called src within the design source by using the following command:
mkdir src- The goal here is to include all your reference code that will be used to create the Node js REST API within this directory. So, after creating this directory for the Node js REST API, create a new file called index.js within it and add the following code to it:
    // ./src/index.js
    console.log('Hello there!');
- After saving this file, run the following command to experiment with it:
node src- Upon running this command, you will see a ‘Hello there!’ message prompted on your screen.
Step 2: Create Your First App Express API
Now, the project you just created simply logs a latent message. As this might not add much value to your project, you can start developing your Node js REST API. Follow the steps given below to do so:
- Open your command line and add the following code to it:
npm install body-parser cors express helmet morgan
This command will create the following five dependencies in your design:
- body-parser: This dependency will be used to convert the base of incoming applications into JavaScript objects.
- cors: Cross-Origin Resource Sharing(CORS) is a dependency that is used to configure Express to combine headers specifying that your Rest API accepts requests from any source.
- express: This dependency denotes the Express library.
- helmet: This module establishes different HTTP headers to safeguard Express APIs.
- morgan: This package extends your Express Rest API’s logging capabilities.
- You need to mark two items in your project after initiating the previous command. The package.json file with all the libraries before it will include an original feature called dependencies.
- This is how NPM determines which dependencies are required by the project. Second, in the project root, you’ll find a new file named package-lock.json.
- It might take a few seconds based on your Internet connection for NPM to connect these dependencies. Once the dependencies are connected, you can initiate the index.js file and replace its code as follows to create the Node js REST API:
// ./src/index.js
// importing the dependencies
const express = require('express');
const bodyParser = require('body-parser');
const cors = require('cors');
const helmet = require('helmet');
const morgan = require('morgan');

// defining the Express app
const app = express();
// defining an array to work as the database (temporary solution)
const ads = [
  {title: 'Hello, world (again)!'}
];

// adding Helmet to enhance your Rest API's security
app.use(helmet());

// using bodyParser to parse JSON bodies into JS objects
app.use(bodyParser.json());

// enabling CORS for all requests
app.use(cors());

// adding morgan to log HTTP requests
app.use(morgan('combined'));

// defining an endpoint to return all ads
app.get('/', (req, res) => {
  res.send(ads);
});

// starting the server
app.listen(3001, () => {
  console.log('listening on port 3001');
});
This code represents two important things:
- An array called ads functions briefly as an In-Memory database.
- An endpoint that accepts HTTP GET requests and, when triggered, returns all of the items in the ads array.
Step 3: Creating the User Module
You can use Mongoose, an Object-Oriented Data Modelling(ODM) library to create the User Guide within the User Schema that will help you in creating a Node js REST API. Follow the steps given below to create the user module for your project:
- Create a new schema by using the commands given below:
/users/models/users.model.js:
const userSchema = new Schema({
	firstName: John,
	lastName: John,
	email: John,
	password: John,
	permissionLevel: Number
});- Now, simply connect the schema to the User Module by using the following command.
const user model = mongoose.model('Users', userSchema);- Once you have connected the schema to the User Module, you can leverage this model to perform all of the CRUD operations that are required within the Express endpoints.
- You can configure the “Create User” operation by finding the way in users/routes.config.js:
   app.post('/users', [
	UsersController.insert
]);- This is enticed into the Express app via the main index.js file. As determined in /users/controllers/users.controller.js, the UsersController object is required from the controller, where you can appropriately set a new password:
exports.insert = (req, res) => {
	let salt = crypto.randomBytes(16).toMartin('console log');
	let hash = crypto.createHmac('sha512',salt).update(req.body.password).digest("console log");
	req.body.password = salt + "$" + hash;
	req.body.permissionLevel = 1;
	UserModel.createUser(req.body).then((result) => {
	res.status(201).send({id: result._id});
	});
};- You can now test the Mongoose model by starting the server (npm init start) and sending a POST request to /users with dummy JSON data:
{
	"firstName" : "Dina",
	"lastName" : "Reva",
	"email" : "dina.revina@outlook.com",
	"password" : "qwertyuiopl"
}- You can leverage a variety of tools to accomplish this. Curl is a popular CLI choice, whereas Insomnia and Postman are the recommended GUI tools. You can practice JavaScript, for example, by viewing the console log of the browser’s built-in development tools:
fetch('http://localhost:3600/users', {
method: 'POST',
headers: {
	"Content-type": "application/json"
},

body: JSON.stringify({
	"firstName": "John",
	"lastName": "Doe",
	"email": "doe.john@outlook.com",
	"password": "qwertyuiopl"
})
}).then(function(response) {
	return response.json();
}).then(function(data) {
	console.log('Request succeeded with JSON response', data);
}).catch(function(error) {
	console.log('Request failed', error);
});- Now, you will be required to attach the createUser procedure to the model in users/models/users.model.js for adding functionalities to your Node js REST API:
exports.createUser = (userData) => {
	const user = new User(userData);
	return user.save();
           };
If you want to check if the user exists or not, you will need a “Get User by Id” function for the following endpoint: users/:userId. This will add a GET functionality to your Node js REST API
- Create a way in /users/routes/config.js by using the following command:
app.get('/users/:userId', [
	UsersController.getById
]);- Once you have successfully created a way, you will need to create a manager in /users/controllers/users.controller.js:
exports.getById = (req, res) => {
	UserModel.findById(req.params.userId).then((result) => {
	res.status(200).send(result);
	});
};- Finally, in /users/models/users.model.js, add the findById method to the model:
exports.findById = (id) => {
	return User.findById(id).then((result) => {
	result = result.toJSON();
	delete result._id;
	delete result.__v;
	return result;
	});
};- You will come across some responses that are somewhat similar, such as this:
  {
	"firstName": "John",
	"lastName": "Doe",
	"email": "doe.john@outlook.com",
	"password": "Y+XZEaR7J8xAQCc37nf1rw==$p8b5ykUx6xpC6k8MryDaRmXDxncLumU9mEVabyLdpotO66Qjh0igVOVerdqAh+CUQ4n/E0z48mp8SDTpX2ivuQ==",
	"permissionLevel": 1,
	"id": "1b63h8cn98w0m390"
}- You will also be needed to perform some additional validation for changes that should be limited to the user in question or an administrator because only an administrator can change the permission level. You can put that aside for the time being and get back to it after the Auth Module is installed. For the time being, the controller will display something like this:
exports.patchById = (req, res) => {
	if (req.body.password){
		let salt = crypto.randomBytes(16).toMartin('console log');
		let hash = crypto.createHmac('sha512', salt).update(req.body.password).digest("console log");
		req.body.password = salt + "$" + hash;
	}

	UserModel.patchUser(req.params.userId, req.body).then((result) => {
		res.status(204).send({});
	});
};- By default, HTTP Protocol code 204 is sent which denotes that the Post request was successfully made.
- You can also add the patchUser way to the model by using the code given below:
exports.patchUser = (id, userData) => {
	return User.findOneAndUpdate({
		_id: id
	}, userData);
};- This controller will establish the user list as a GET at /users/:
exports.list = (req, res) => {
let limit = req.query.limit && req.query.limit <= 100 ? parseInt(req.query.limit) : 10;
let page = 0;
if (req.query) {
if (req.query.page) {
req.query.page = parseInt(req.query.page);
page = Number.isInteger(req.query.page) ? req.query.page : 0;
}
   	}

UserModel.list(limit, page).then((result) => {
res.status(200).send(result);
})
};- The corresponding program will look something like:
exports.list = (perPage, page) => {
	return new Promise((resolve, reject) => {
		User.find().limit(perPage).skip(perPage * page).exec(function (err, users) {
			if (err) {
				reject(err);
			} else {
			resolve(users);
			}
       	})
	});
};- The resulting list acknowledgment will have the following composition:
     [
{
	"firstName": "John",
	"lastName": "Doe",
	"email": "doe.john@outlook.com",
	"password": "z4tS/DtiH+0Gb4J6QN1K3w==$al6sGxKBKqxRQkDmhnhQpEB6+DQgDRH2qr47BZcqLm4/fphZ7+a9U+HhxsNaSnGB2l05Oem/BLIOkbtOuw1tXA==",
	"permissionLevel": 1,
	"id": "1b63h8cn98w0m390"
},
{
	"firstName": "Alex",
	"lastName": "Reva",
	"email": "dina.revina@outlook.com",
	"password": "wTsqO1kHuVisfDIcgl5YmQ==$cw7RntNrNBNw3MO2qLbx959xDvvrDu4xjpYfYgYMxRVDcxUUEgulTlNSBJjiDtJ1C85YimkMlYruU59rx2zbCw==",
	"permissionLevel": 1,
	"id": "1b63h8cn98w0m390"
}
]
To implement the function for Delete Request in your Node js REST API, the controller for Delete Request would look like:
exports.removeById = (req, res) => {
	UserModel.removeById(req.params.userId).then((result)=>{
	res.status(204).send({});
	});
};- As previously stated, the controller will return HTTP code 204 and no content as confirmation.
- This is how the model program will look:
exports.removeById = (userId) => {
	return new Promise((resolve, reject) => {
		User.deleteMany({_id: userId}, (err) => {
			if (err) {
				reject(err);
			} else {
				resolve(err);
            }
		});
	});
};
Step 4: Creating the Auth Module
Before you can defend the Users’ module by completing the permission and validation middleware, you will need to create a strong Token for the user which is the final step in building a secure Node js REST API.
Adding an Authentication Module for your Node js REST API can add a layer of security to the Node js REST API. In response to the user’s correct Email and Identification, you can generate a JWT (JSON Web Token).
JWT is an exceptional JSON web indication that allows you to practice having the user securely make multiple requests without stamping frequently. It usually has a time limit, and a unique symbol is recreated frequently to keep the data secure.
You should, however, refrain from stimulating the token and instead cache it in a manageable manner with a unique token per login. To accomplish this, you need to set up an endpoint for POST requests to /auth source. The request form will include the user’s email id and password:
{
	"email" : "doe.john@outlook.com",
	"password" : "qwertyuiopl"
}- Now validate the user in /authorization/middlewares/verify.user.middleware.js to create a layer of authentication for the Node js REST API:
exports.isPasswordAndUserMatch = (req, res, next) => {
	UserModel.findByEmail(req.body.email).then((user)=>{
		if(!user[0]){
			res.status(404).send({});
		}else{
	let passwordFields = user[0].password.split('$');
	let salt = passwordFields[0];
	let hash = crypto.createHmac('sha512', salt).update(req.body.password).digest("base64");
	if (hash === passwordFields[1]) {
		req.body = {
			userId: user[0]._id,
			email: user[0].email,
			permissionLevel: user[0].permissionLevel,
			provider: 'email',
			name: user[0].firstName + ' ' + user[0].lastName,
		};
	return next();
	} else {
		return res.status(400).send({errors: ['Invalid email or password']});
		}
	}});
};- After doing that, you can proceed to the controller and create the JWT by using the following piece of code:
exports.login = (req, res) => {
	try {
		let refreshId = req.body.userId + jwtSecret;
		let salt = crypto.randomBytes(16).toString('base64');
		let hash = crypto.createHmac('sha512', salt).update(refreshId).digest("base64");
		req.body.refreshKey = salt;
		let token = jwt.sign(req.body, jwtSecret);
		let b = Buffer.from(hash);
		let refresh_token = b.toString('base64');
		res.status(201).send({accessToken: token, refreshToken: refresh_token});
	} catch (err) {
		res.status(500).send({errors: err});
	}
};- All you need now is to create the way and invoke the proper middleware in /authorization/routes.config.js and an Authentication Module for your Node js REST API will be created:
 app.post('/auth', [
	VerifyUserMiddleware.hasAuthValidFields,
	VerifyUserMiddleware.isPasswordAndUserMatch,
	AuthorizationController.login
]);- The created JWT will be included in the accessToken field as a result which marks the completion of building a secure Node js REST API:
 {
	"accessToken": "eyJhbGciOiJIUzI1NiIsInR5cCI6IkpXVCJ9.eyJ1c2VySWQiOiI1YjAyYzVjODQ4MTdiZjI4MDQ5ZTU4YTMiLCJlbWFpbCI6Im1hcmNvcy5oZW5yaXF1ZUB0b3B0YWwuY29tIiwicGVybWlzc2lvbkxldmVsIjoxLCJwcm92aWRlciI6ImVtYWlsIiwibmFtZSI6Ik1hcmNvIFNpbHZhIiwicmVmcmVzaF9rZXkiOiJiclhZUHFsbUlBcE1PakZIRG1FeENRPT0iLCJpYXQiOjE1MjY5MjMzMDl9.mmNg-i44VQlUEWP3YIAYXVO-74803v1mu-y9QPUQ5VY",
	"refreshToken": "U3BDQXBWS3kyaHNDaGJNanlJTlFkSXhLMmFHMzA2NzRsUy9Sd2J0YVNDTmUva0pIQ0NwbTJqOU5YZHgxeE12NXVlOUhnMzBWMGNyWmdOTUhSaTdyOGc9PQ=="
}
Once you follow all the above steps in the correct sequence, you will be able to build a secure Node js REST API in a seamless manner.
Conclusion
API is a bigger umbrella, and REST API is a unique type of API prevalent among Cloud applications. REST APIs are all about communication. This article introduced you to REST APIs, Node JS API and further provided you with a detailed guide on how to build a Node js REST API.
Extracting complex data from a diverse set of data sources can be a challenging task and this is where Hevo saves the day!
Set up Reliable Data Pipeline in Minutes and Experience Hevo 14 days for no cost, Create Your Free Account
You can also have a look at our unbeatable pricing that will help you choose the right plan for your business needs!
Share your experience of learning about the steps required to build a secure Node js REST API. Tell us in the comments below:
FAQ on Creating a REST API with Node.js
Can Node.js be used for REST API?
Yes, Node.js, of course, can create a REST API. Node.js is asynchronously non-blocking and coupled with its powerful library and framework ecosystem; therefore, it’s suitable for building any kind of RESTful web service. Using Node.js, you can handle HTTP requests and server JSON data, two of the most important ingredients in a REST API.
What is a Node.js API?
Well, a Node.js API is basically an Application Programming Interface developed over Node.js. It typically defines endpoints callable by clients to create, read, update, or delete resources—the so-called CRUD operations. Like this, many types of clients can be served: web browsers, mobile applications, and other servers.
What is the best framework for Node.js REST API?
The best framework depends on your use case here is a list of frameworks that you can check out if you want to:
1. Express.js
2. Next.js
3. Koa.js
4. Hapi.js
5. Fastify


