Users can utilize AWS Lambda functions to run their applications, code, or any backend service without having to bother about administration. AWS allows users to trigger Lambda functions on top-rated Amazon services like Amazon Redshift, EC2, S3, and more. One such service is the DynamoDB database. AWS DynamoDB is a NoSQL database that enables users to store data with minimal to no administration. DynamoDB triggers Lambda functions whenever there is any update in the DynamoDB tables or reads events from DynamoDB streams. DynamoDB streams consist of changes or modified events (insert, update, delete) of the DynamoDB items.
In this tutorial, you will get a deep understanding and learn how to use the AWS Lambda DynamoDB together.
Table of Contents
Prerequisites
The basic need for integration
What is AWS Lambda?
Developed in 2014, AWS Lambda is a serverless computing service that allows users to run their applications or code without the management of servers. You can run your application code or any backend service virtually using the Lambda function with zero administration. AWS Lambda manages all the administration like memory, CPU utility, server, resources, and more. Generally, when you purchase any server, you need to pay for it even when you are not using it. But AWS Lambda gives you the flexibility to pay only for the computation you use.
Since AWS Lambda executes your code only when required, it scales automatically from a few requests per day to thousands per second. To know when the code is required, you need to set triggers in AWS Lambda. For example, you can set a trigger when any data object is loaded into the Amazon S3 bucket. This will run the Lambda function to execute necessary tasks. AWS enables users to trigger Lambda functions over 200 AWS services and Software as a Service (Saas) applications.
What is DynamoDB?

DynamoDB is a fully managed NoSQL database developed in 2012. Owned by Amazon, DynamoDB handles all the administrative tasks like hardware provisioning, software patching, and more. Therefore, you do not have to worry about any administrative tasks.
Since DynamoDB is a NoSQL database, it does not have a fixed schema. The records in DynamoDB tables are called items. Items consist of values which are called attributes. Items are like rows, whereas attributes are like columns in a DynamoDB table. Every item in DynamoDB should have a unique value called the primary key. The primary key is used to differentiate an item from other items in DynamoDB tables.
Are you looking for an ETL tool to migrate your DynamoDB data? Migrating your data can become seamless with Hevo’s no-code intuitive platform. With Hevo, you can:
- Automate Data Extraction: Effortlessly pull data from various sources and destinations with 150+ pre-built connectors.
- Transform Data effortlessly: Use Hevo’s drag-and-drop feature to transform data with just a few clicks.
- Seamless Data Loading: Quickly load your transformed data into your desired destinations, such as BigQuery.
- Transparent Pricing: Hevo offers transparent pricing with no hidden fees, allowing you to budget effectively while scaling your data integration needs.
Try Hevo and join a growing community of 2000+ data professionals who rely on us for seamless and efficient migrations.
Get Started with Hevo for FreeHow to use AWS Lambda DynamoDB?
In this tutorial, AWS Lambda DynamoDB is used in two scenarios.
A) Building an API for AWS Lambda DynamoDB
Amazon API Gateway is a fully managed service for developers to create, maintain, publish, monitor, and secure APIs at any scale. APIs are like the front door of applications or backends accessing data or any functionality.
You can create a serverless API for AWS Lambda, which can create, read, update, and delete items from DynamoDB.
DynamoDB table can be created using the DynamoDB console. Then you have to create a Lambda function using the Lambda console. After that, you need to create an HTTP API using the API Gateway Console and then test your API. You can check the get Prerequisites for getting started with the API Gateway.
API Gateway routes the request to your Lambda function when you invoke your HTTP API. The Lambda DynamoDB interacts and then return a response to API Gateway.

You need an AWS account, an AWS Identity, and an Access Management user with console access for building an API for AWS Lambda DynamoDB.
Follow the below steps for creating an API for AWS Lambda DynamoDB.
Step 1: Create a DynamoDB table
DynamoDB is used to store data for your API. Every item in DynamoDB has a unique ID used as the partition key for the table.
Follow the below steps to create a DynamoDB table.
- Open the DynamoDB console.
- Click on Create Table.
- Enter http-crud-tutorial-items for the table name.
- Enter id for the primary key.
- Click on Create.
Step 2: Create a Lambda function
Lambda function can be created for the backend of API. The Lambda function can create, update, read, and delete items from DynamoDB tables. For the interaction with DynamoDB, the Lambda function uses events from API Gateway.
Follow the below steps for creating a Lambda function.
- Sign in to Lambda console.
- Click on Create function.
- Enter http-crud-tutorial-function for function name.
- Select ‘Change default execution role’ under ‘Permissions.’
- Click on ‘Create a new role from AWS policy templates.’
- Enter http-crud-tutorial-role for the role name.
- Select ‘Simple microservice permissions’ for policy templates. This policy is used to allow the Lambda DynamoDB to interact together.
- Click on Create function.
- Open the index.js file in the console’s code editor. Replace the contents of the index.js file with the below code. Then click on Deploy to update your function.
const AWS = require("aws-sdk");

const dynamo = new AWS.DynamoDB.DocumentClient();

exports.handler = async (event, context) => {
  let body;
  let statusCode = 200;
  const headers = {
	"Content-Type": "application/json"
  };

  try {
	switch (event.routeKey) {
  	case "DELETE /items/{id}":
    	await dynamo
      	.delete({
        	TableName: "http-crud-tutorial-items",
        	Key: {
          	id: event.pathParameters.id
        	}
      	})
      	.promise();
    	body = `Deleted item ${event.pathParameters.id}`;
    	break;
  	case "GET /items/{id}":
    	body = await dynamo
      	.get({
        	TableName: "http-crud-tutorial-items",
        	Key: {
          	id: event.pathParameters.id
        	}
      	})
      	.promise();
    	break;
  	case "GET /items":
    	body = await dynamo.scan({ TableName: "http-crud-tutorial-items" }).promise();
    	break;
  	case "PUT /items":
    	let requestJSON = JSON.parse(event.body);
    	await dynamo
      	.put({
        	TableName: "http-crud-tutorial-items",
        	Item: {
          	id: requestJSON.id,
          	price: requestJSON.price,
          	name: requestJSON.name
        	}
      	})
      	.promise();
    	body = `Put item ${requestJSON.id}`;
    	break;
  	default:
    	throw new Error(`Unsupported route: "${event.routeKey}"`);
	}
  } catch (err) {
	statusCode = 400;
	body = err.message;
  } finally {
	body = JSON.stringify(body);
  }

  return {
	statusCode,
	body,
	headers
  };
};
Step 3: Create an HTTP API
The HTTP API is used to provide an HTTP endpoint to your API. You will create an empty API. And in the later steps, you can configure routes and integration to connect to your API and Lambda function.
Follow the below steps to create an HTTP API.
- Sign in to the API Gateway console.
- Click on Create API. For HTTP API, click on Build.
- Enter http-crud-tutorial-api for the API name.
- Click on Next.
- Click on Next to skip the route creation, as you will create it later.
- Review the stages the API Gateway has created for you and click on Next.
- Click on Create.
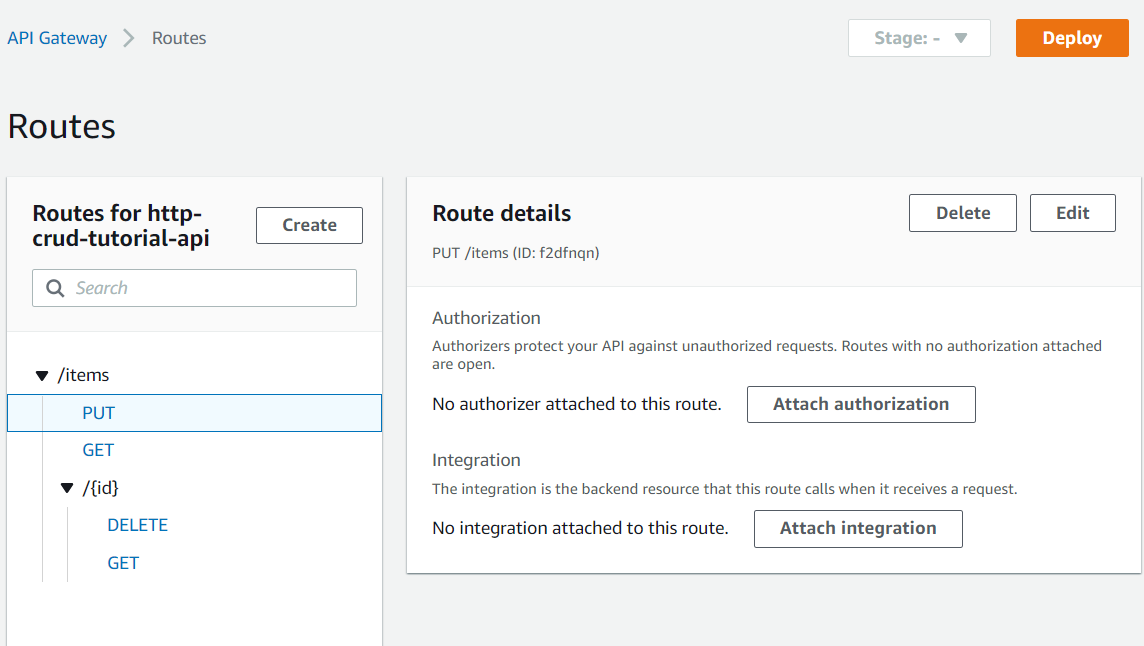
Step 4: Create Routes
Routes are used to send incoming API requests for backend resources. It consists of two parts: an HTTP method and a resource path. For example, GET /items, there can be four routes for this API as follows.
GET /items/{id}
GET /items
PUT /items
DELETE /items/{id}
Follow the below steps to create routes.
- Sign in to API Gateway Console.
- Select your API.
- Click on Routes.
- Click on Create.
- Click on Get for Method.
- Enter /items/{id} for the path, where the id at the end of the path is a path that API Gateway retrieves from the request path when a client makes a request.
- Click on Create.
- Repeat steps 4 to 7 for routes (GET /items, DELETE /items/{id}, and PUT /items).
Step 5: Create an integration
You can create an integration to connect a route to background resources. For the above API, you can create a Lambda integration that can be used for all routes.
To establish an integration, follow the steps below.
- Sign in to the API Gateway Console.
- Select your API.
- Click on Integrations.
- Click on ‘Manage integrations’ and then click on Create.
- Skip the ‘Attach integration to a route’ step. You can complete it in the later step.
- For the Integration type, click on the Lambda function.
- Enter http-crud-tutorial-function for the Lambda function.
- Click on Create.
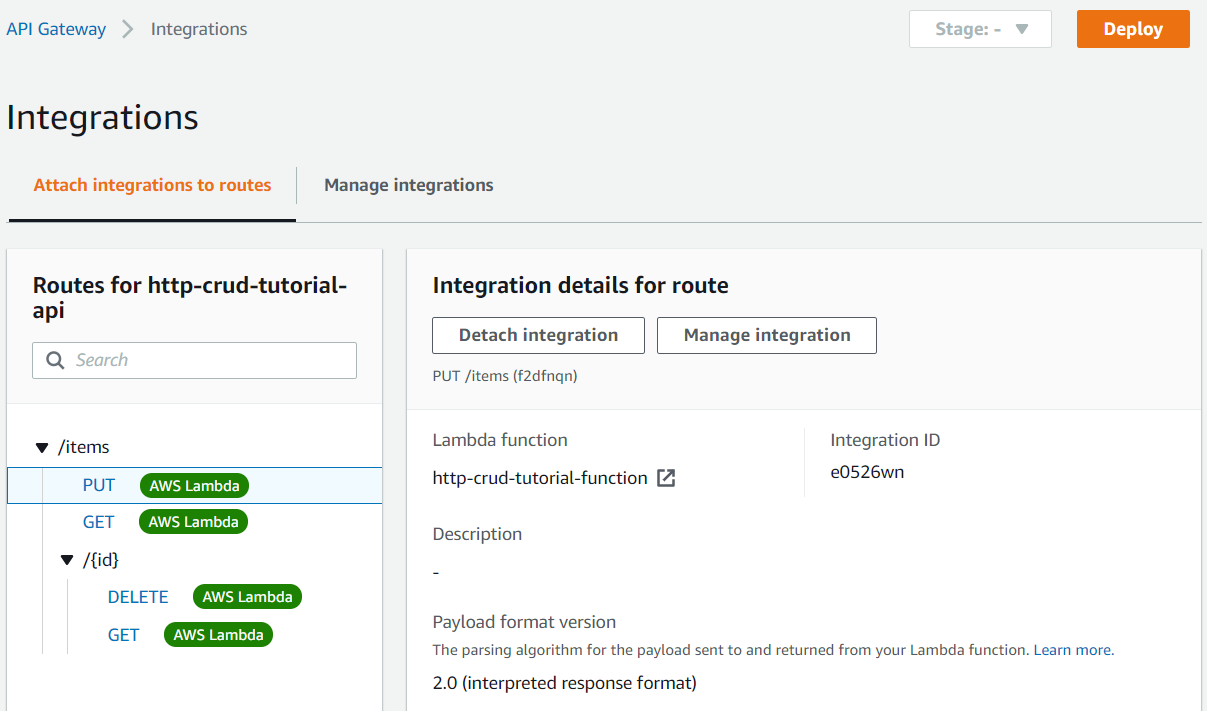
Step 6: Attach your integration to routes
You can use the same Lambda integration for all routes for the above API. After attaching the integration to all the API’s routes, the Lambda function gets invoked whenever a client calls any of your routes.
Follow the below steps to attach integration to routes.
- Sign in to the API Gateway Console.
- Select your API.
- Select Integrations.
- Select a route.
- Select http-crud-tutorial-function under the ‘choose an existing integration’ tab.
- Select Attach integration.
- Repeat steps 4 to 6 for all steps.
An AWS Lambda integration is tied to all routes.
Step 7: Test your API
You can test your API using curl.
Follow the below steps to get the URL for invoking your API.
- Sign in to the API Gateway Console.
- Select your API.
- Note your API’s invoke URL. It appears under the Invoke URL on the Details page.
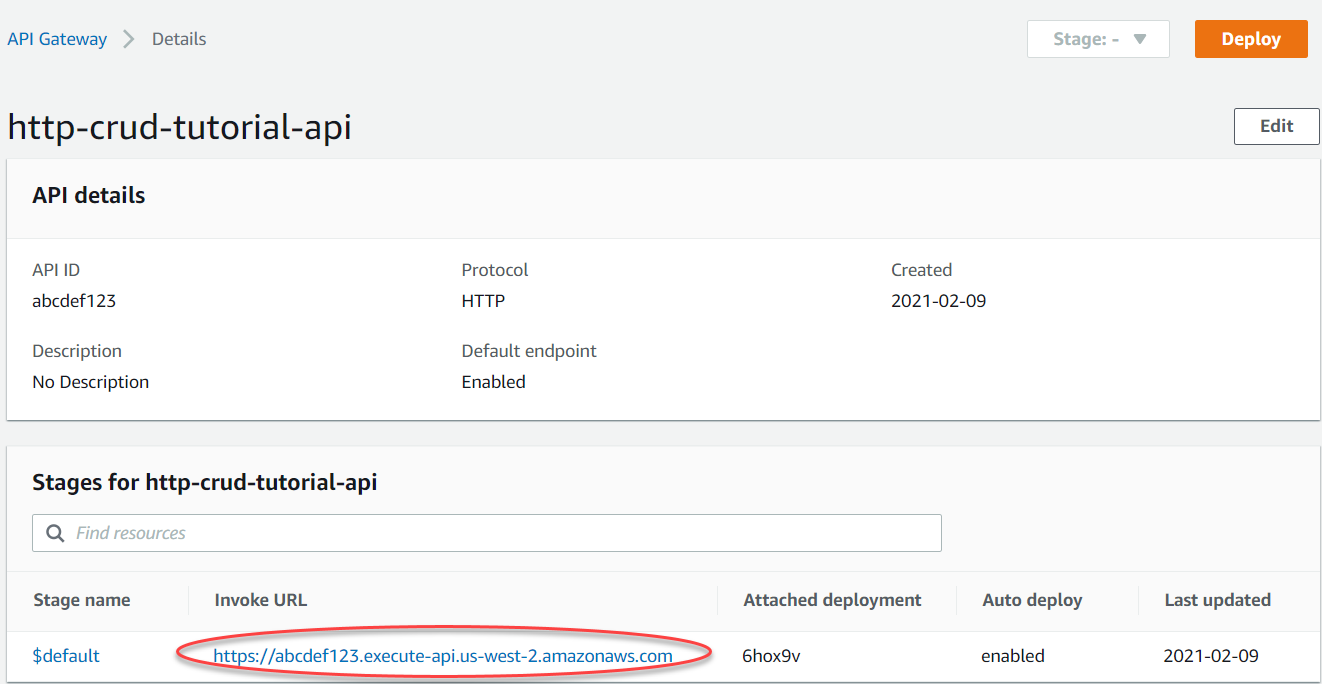
- Copy the API’s invoke URL. It looks as below.
https://abcdef123.execute-api.us-west-2.amazonaws.comUse the below command to create or update an item.
curl -v -X "PUT" -H "Content-Type: application/json" -d "{"id": "abcdef234", "price": 12345, "name	": "myitem"}"
https://abcdef123.execute-api.us-west-2.amazonaws.com/items
Use the below command to the list of all items.
curl -v
https://abcdef123.execute-api.us-west-2.amazonaws.com/items
Use the below command to get an item by its ID.
curl -v
https://abcdef123.execute-api.us-west-2.amazonaws.com/items/abcdef234
Use the below command to delete an item.
curl -v -X "DELETE" https://abcdef123.execute-api.us-west-2.amazonaws.com/items/abcdef234To get all the items that were deleted, use the below command.
curl -v
https://abcdef123.execute-api.us-west-2.amazonaws.com/items
Step 8: Clean up your API
To prevent unnecessary costs, you can delete the resources you have created. Follow the below steps to delete your API, your Lambda function, and associated resources.
Delete a DynamoDB Table
- Open the DynamoDB console.
- Select your table to delete.
- Click on Delete.
Delete an HTTP API
- Sign in to the API Gateway Console.
- On the API’s page, select the API to delete.
- Then select Delete from the Actions menu.
- Click on Delete.
Delete a Lambda function
- Open the logs groups page in the Amazon CloudWatch console.
- Select the function’s log group on the logs groups page.
- Click on Actions and then click on Delete log group.
- Click on Delete.
Delete a Lambda function’s execution rule
- In the AWS Identity and Access Management Console, go to the roles page.
- Select the function’s role.
- Click on the Delete role.
- Click on Yes, delete.
B) Using AWS Lambda with Amazon DynamoDB streams
You can create Lambda functions to consume events from the Amazon DynamoDB stream. DynamoDB streams are time-ordered flows of information about item-level modifications in the table.
You can create your first Lambda function using the Lambda console.
Step 1: Create the execution role
You can create the execution role that gives you function permission to access AWS resources.
Follow the below steps to create the execution role.
- In the AWS Identity and Access Management Console, go to the roles page.
- Click on Create role.
- Create a role with the below-mentioned properties.
- Trusted entity – Lambda
- Permissions – AWSLambdaDynamoDBExecutionRole
- Role name – lambda-dynamodb-role
The AWSLambdaDynamoDBExecutionRole consists of the function’s permissions to read items from DynamoDB and write logs to CloudWatch logs. CloudWatch logs in AWS are used to monitor, access, and store logs from EC2, AWS CloudTrail, and other sources.
Step 2: Create the function
The below code receives a DynamoDB event input and processes the message it contains. For example, the code can write some of the events to the CloudWatch logs.
index.js consists of:
console.log('Loading function');

exports.handler = function(event, context, callback) {
	console.log(JSON.stringify(event, null, 2));
	event.Records.forEach(function(record) {
    	console.log(record.eventID);
    	console.log(record.eventName);
    	console.log('DynamoDB Record: %j', record.dynamodb);
	});
	callback(null, "message");
};
Follow the below steps to create a function.
- Copy the sample code into a file called index.js.
- Create a deployment package with the below command.
zip function.zip index.js- Create a Lambda function using the create-function command.
aws lambda create-function --function-name ProcessDynamoDBRecords
--zip-file fileb://function.zip --handler index.handler --runtime nodejs12.x
--role arn:aws:iam::123456789012:role/lambda-dynamodb-role
Step 3: Test the Lambda function
In this step, you will invoke your Lambda function manually using the AWS Lambda CLI command and the below sample DynamoDB event.
Example input.txt
{
   "Records":[
  	{
     	"eventID":"1",
     	"eventName":"INSERT",
     	"eventVersion":"1.0",
     	"eventSource":"aws:dynamodb",
     	"awsRegion":"us-east-1",
     	"dynamodb":{
        	"Keys":{
           	"Id":{
              	"N":"101"
           	}
        	},
        	"NewImage":{
           	"Message":{
              	"S":"New item!"
           	},
           	"Id":{
              	"N":"101"
           	}
        	},
        	"SequenceNumber":"111",
        	"SizeBytes":26,
        	"StreamViewType":"NEW_AND_OLD_IMAGES"
     	},
     	"eventSourceARN":"stream-ARN"
  	},
  	{
     	"eventID":"2",
     	"eventName":"MODIFY",
     	"eventVersion":"1.0",
     	"eventSource":"aws:dynamodb",
     	"awsRegion":"us-east-1",
     	"dynamodb":{
        	"Keys":{
           	"Id":{
              	"N":"101"
           	}
        	},
        	"NewImage":{
           	"Message":{
              	"S":"This item has changed"
           	},
           	"Id":{
              	"N":"101"
           	}
        	},
        	"OldImage":{
           	"Message":{
              	"S":"New item!"
           	},
           	"Id":{
              	"N":"101"
           	}
        	},
        	"SequenceNumber":"222",
        	"SizeBytes":59,
        	"StreamViewType":"NEW_AND_OLD_IMAGES"
     	},
     	"eventSourceARN":"stream-ARN"
  	},
  	{
     	"eventID":"3",
     	"eventName":"REMOVE",
     	"eventVersion":"1.0",
     	"eventSource":"aws:dynamodb",
     	"awsRegion":"us-east-1",
     	"dynamodb":{
        	"Keys":{
           	"Id":{
              	"N":"101"
           	}
        	},
        	"OldImage":{
           	"Message":{
              	"S":"This item has changed"
           	},
           	"Id":{
              	"N":"101"
           	}
        	},
        	"SequenceNumber":"333",
        	"SizeBytes":38,
        	"StreamViewType":"NEW_AND_OLD_IMAGES"
     	},
     	"eventSourceARN":"stream-ARN"
  	}
   ]
}
Run the below invoke-command.
aws lambda invoke --function-name ProcessDynamoDBRecords --payload file://input.txt outputfile.txtIf you use AWS CLI version 2, then the cli-binary-format is required. You can configure this format in your AWS config file.
Step 4: Create a DynamoDB table with an enabled stream
Follow the below steps to create a DynamoDB table with a stream enabled.
- Open the DynamoDB Console.
- Click on Create table.
- Create the table with the below settings.
Table name – lambda-dynamodb-stream
Primary key – id (string)
- Click on Create.
Follow the below steps to enable streams.
- Open the DynamoDB Console.
- Select Tables.
- Click on the lambda-dynamoDB-stream table.
- Click on the ‘DynamoDB stream details’ under the ‘Exports and streams’ tab.
- Click on Enable.
- Click on Enable stream.
Step 5: Add an event source in AWS Lambda
You can create an event source mapping in AWS Lambda. This event source mapping is used to connect Lambda function to DynamoDB stream. After creating this event source mapping, AWS Lambda starts polling the stream. Polling is used for reading new records in streams.
Run the below AWS command create-event-source-mapping command. After running these commands, you will get a UUID used for referring event source mappings in any commands.
aws lambda create-event-source-mapping --function-name ProcessDynamoDBRecords
 --batch-size 100 --starting-position LATEST --event-source DynamoDB-stream-arn
The above command will create a mapping between the specified DynamoDB stream and the Lambda function. You can connect a DynamoDB stream with the multiple Lambda functions and connect the same Lambda DynamoDB streams. Although, the Lambda DynamoDB will share the read throughput for the stream they share.
You can get a list of event source mappings by running the below command.
aws lambda list-event-source-mappingsThis list returns all the event source mappings you created. For each mapping, it will show the LastProcessingResult. This field provides an informative message if there are any problems. Values like No records processed indicate that the AWS Lambda has not started polling or there are no records in the stream. OK means AWS has successfully read records from the stream and invoke your Lambda function.
Step 6: Test the setup
DynamoDB writes event records to the stream when you conduct table updates. When the AWS Lambda DynamoDB stream conducts a poll, it will detect new records in the stream and invoke Lambda DynamoDB on your behalf by passing events to the function.
- In the DynamoDB console, whenever there are add, update, delete or create items actions in the DynamoDB table, DynamoDB will record these actions to the DynamoDB stream.
- When the AWS Lambda DynamoDB stream conducts a poll, it will detect updates to the stream. The AWS Lambda will then invoke your Lambda function by passing in the event data it finds in the stream.
- Your Lambda function then runs and creates logs in Amazon CloudWatch. You can check your logs in the Amazon CloudWatch console.
Step 6: Clean up resources
This step is the same as the last step mentioned in Building an API with AWS Lambda DynamoDB.
Learn More About:
Conclusion
In this tutorial, you learned to use AWS Lambda DynamoDB. This tutorial focuses on using the AWS Lambda DynamoDB Streams and DynamoDB items.
Since executing Lambda functions are event-driven, organizations automate several tasks while reducing costs. AWS Lambda allows you to connect with different AWS services together and only pay for the service you are using instead of managing the entire infrastructure. Companies need to analyze their business data stored in multiple data sources. Data needs to be loaded from data sources such as Amazon DynamoDB to the Data Warehouse to get a holistic view of the data. This is where Hevo comes into the picture.
Hevo Data with its strong integration with 150+ sources (including 60+ free sources) such as Amazon DynamoDB allows you to not only export data from your desired data sources & load it to the destination of your choice, but also transform & enrich your data to make it analysis-ready so that you can focus on your key business needs and perform insightful analysis.
Want to take Hevo for a spin? SIGN UP for a 14-day free trial and experience the feature-rich Hevo suite first hand. You can also have a look at the unbeatable pricing that will help you choose the right plan for your business needs.
Frequently Asked Questions
1. Can Lambda Connect to DynamoDB?
Yes, AWS Lambda can connect to DynamoDB. Lambda functions can interact with DynamoDB to read, write, or modify data.
2. What is the Difference Between Lambda and DynamoDB?
AWS Lambda is a serverless compute service that runs code in response to events and automatically manages the underlying compute resources.
Amazon DynamoDB is a fully managed NoSQL database service that provides fast and predictable performance with seamless scalability.
3. What is the Limit of Lambda Trigger in DynamoDB?
DynamoDB Streams can trigger AWS Lambda functions, but there are some limits:
-The maximum batch size for a Lambda function triggered by DynamoDB Streams is 1,000 records.
-The maximum number of concurrent executions of Lambda triggered by DynamoDB is limited by your account’s concurrency limit.


