


Loading CSV data into Amazon Redshift can be tricky. CSV files seem simple, but issues like incorrect data types, null values, and character encoding can derail your imports.
Thankfully, Redshift offers multiple methods to import CSV data to avoid these pitfalls. This article explores 4 ways to load CSV to Redshift to get your data online faster.
Learn how to use the COPY command, AWS Data Pipeline, Python boto3 library, and ETL tools to effortlessly ingest CSVs regardless of size, complexity, or current data infrastructure.
Also, learn how to export your data from Redshift using 2 methods: the UNLOAD command and Reverse ETL.
Effortlessly manage data in Amazon Redshift by unloading and loading CSV files using Hevo’s no-code data pipeline. With automated processes and real-time sync, Hevo ensures seamless and efficient data transfer, making your Redshift operations hassle-free.
Don’t just take our word for it—listen to customers, such as Thoughtspot, Postman, and many more, to see why we’re rated 4.3/5 on G2.
Get Started with Hevo for FreeTable of Contents
Methods to Load CSV to Redshift
Some standard methods are devised for loading data into Amazon Redshift. Some of these offer an added convenience for loading CSV files. While the ways listed below are independently easy to follow up with, you can choose one that fits your data requirements.
Below are these four methods to load CSV files to Redshift:
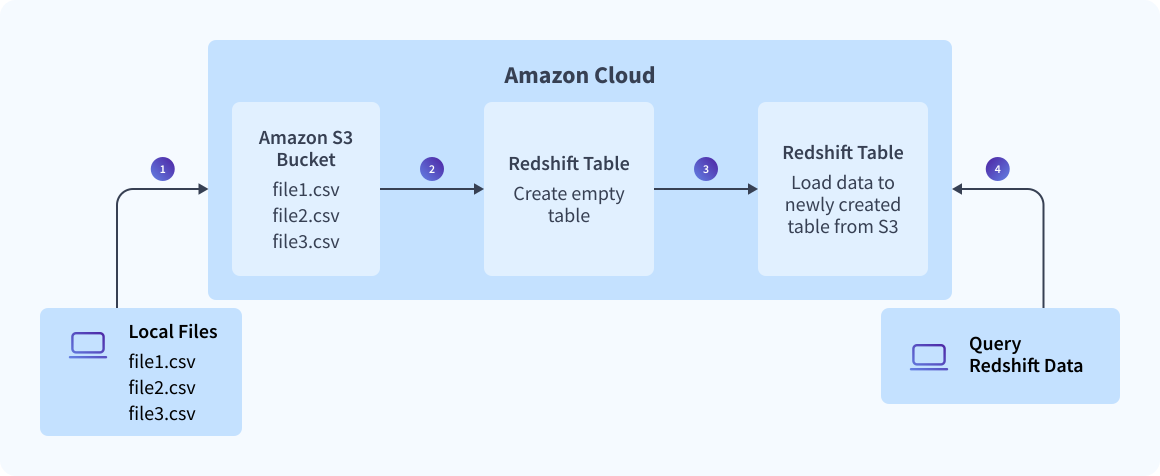
Method 1: Load CSV to Redshift Using Amazon S3 Bucket
One of the simplest ways of loading CSV files into Amazon Redshift is using an S3 bucket. This process involves two stages: loading the CSV files into S3 and loading the data from S3 to Amazon Redshift.
Step 1: Create a manifest file containing the CSV data to be loaded. Upload this to S3, and preferably gzip the files.
Step 2: Once loaded onto S3, run the COPY command to pull the file from S3 and load it to the desired table. If you have used gzip, your code will be of the following structure:
COPY <schema-name>.<table-name> (<ordered-list-of-columns>) FROM '<manifest-file-s3-url>'

CREDENTIALS'aws_access_key_id=<key>;aws_secret_access_key=<secret-key>' GZIP MANIFEST;
Here, using the CSV keyword is of significance to help Amazon Redshift identify the file format. You also need to specify any column arrangements or row headers to be dismissed, as shown below:
COPY table_name (col1, col2, col3, col4)
FROM 's3://<your-bucket-name>/load/file_name.csv'
credentials 'aws_access_key_id=<Your-Access-Key-ID>;aws_secret_access_key=<Your-Secret-Access-Key>'
CSV;

-- Ignore the first line
COPY table_name (col1, col2, col3, col4)
FROM 's3://<your-bucket-name>/load/file_name.csv'
credentials 'aws_access_key_id=<Your-Access-Key-ID>;aws_secret_access_key=<Your-Secret-Access-Key>'
CSV
INGOREHEADER 1;
This process will successfully load your desired CSV datasets to Amazon Redshift in a pretty straightforward way.
An alternate way to unload data to Redshift using S3 buckets is to use UNLOAD Command to Export Data from Redshift. To use this command, follow the steps mentioned below:
- You can choose the data you want to move from Redshift and then give a valid path to your S3 bucket.
- Use a filter to get the data using the select statement and export your data as needed. When your query is ready, use a command to proceed with the following steps:
UNLOAD ('SELECT * FROM test.sample_csv')
TO 's3://csv-redshift-221/Unload_'
credentials 'aws_access_key_id=AKIA46SFIWN5JG7KM7O3;aws_secret_access_key=d4qfQNq4zYL39jcy4r4IWAxn4qPz4j8JgULvKa2d'
CSV;
Method 2: Load CSV to Redshift Using an AWS Data Pipeline

You can also use the AWS Data Pipeline to extract and load your CSV files. The benefit of using the AWS Data Pipeline for loading is eliminating the need to implement a complicated ETL framework. Here, you can implement template activities to carry out data manipulation tasks efficiently.
Use the RedshiftCopyActivity to copy your CSV data from your host source into Redshift. This template copies data from Amazon RDS, Amazon EMR, and Amazon S3.
The limitation can be seen in a lack of compatibility with some data warehouses that could be potential host sources. This method is essentially manual, as the copy activity is implemented after every iteration of data loading. For a more reliable approach, especially when dealing with dynamic data sets, you might want to rely on something that is self-managed.
Method 3: Load Data from S3 to Redshift Using Python
Prerequisites
Installations
You should have the boto3 python library installed.
Redshift Serverless
We will use Redshift Serverless, which is easy to set up and offers a pay-as-you-go model and auto-scaling. If your workspace is not set up, you can follow the steps below; if it is already set up, you can skip to the steps below.
- Sign in to the AWS Management Console and open the Redshift Console.
- Open the left pane and click on “Serverless Dashboard.”
- Make a workgroup and choose a name for it. Then, check out the workgroup’s configurations. You can leave the values to the default.
- In the next step, fill in your namespace. You do not need to edit the admin user credentials.
- You can keep the rest of the options and proceed to “Review and Create.” Note your database name; it is usually created as “dev.”
IAM Role
- Choose IAM, then Users → Create New User.
- Click IAM → Security Credentials → Create Access Key. Save its name and value somewhere; you can also save it as a CSV by clicking on
S3 Bucket
You need to create a bucket that will store the loaded data
- Click Amazon S3 → Create Bucket.
- Fill in the required fields, such as the bucket name, but remember that the bucket name should be unique to the entire region. Then click on Create.
Python Script
Once you have set everything up, let’s build the code to run our data process.
- Import the necessary libraries and define your bucket constants. Replace <S3_Bucket_Name>, <Workgroup_Name>, and <Databse_Name> with your own values.
import sys
import os
import logging
import boto3
import time
import uuid

S3_BUCKET = '<S3_Bucket_Name>'
TEMP_FILE_PREFIX = 'redshift_data_upload' #Temporary file prefix
REDSHIFT_WORKGROUP = '<Workgroup_Name>'
REDSHIFT_DATABASE  = '<Database_Name>’ #default "dev"
MAX_WAIT_CYCLES = 5- Mention your AWS Access key and AWS Secret Key. The CSV file you previously downloaded contains these values.
AWS_ACCESS_KEY = "<Access_Key>"
AWS_SECRET_KEY = "<Secret_Key>"

os.environ['AWS_ACCESS_KEY_ID'] = AWS_ACCESS_KEY
os.environ['AWS_SECRET_ACCESS_KEY'] = AWS_SECRET_KEY- Define the function for loading the local file to the S3 bucket.
def load_file_to_s3(local_file_path, temp_file_name):
  s3 = boto3.resource('s3')
  s3.Object(S3_BUCKET, temp_file_name).put(Body=open(local_file_path, 'rb'))
logging.info(f'Uploaded {local_file_path} to S3')- Create the function to Run your SQL Queries.
def run_redshift_statement(sql_statement):
  """
  Generic function to handle redshift statements (DDL, SQL..),
  it retries for the maximum MAX_WAIT_CYCLES.
  Returns the result set if the statement returns results.
  """

  res = client.execute_statement(
    Database=REDSHIFT_DATABASE,
    WorkgroupName=REDSHIFT_WORKGROUP,
    Sql=sql_statement
  )

  has_result_set = False
  done = False
  attempts = 0

  while not done and attempts < MAX_WAIT_CYCLES:
    attempts += 1
    time.sleep(1)
    desc = client.describe_statement(Id=res['Id'])
    query_status = desc['Status']
    if query_status == "FAILED":
      raise Exception('SQL query failed: ' + desc["Error"])
    elif query_status == "FINISHED":
      done = True
      has_result_set = desc['HasResultSet']
    else:
      logging.info("Current working... query status is: {} ".format(query_status))

  if not done and attempts >= MAX_WAIT_CYCLES:
    raise Exception('Maximum of ' + str(attempts) + ' attempts reached.')

  if has_result_set:
    data = client.get_statement_result(Id=res['Id'])
return data- Now, we will create a function to create a Table in Redshift. Replace with your preferred <table_name> and the <columns> with their respective <datatypes>.
def create_redshift_table():
 create_table_ddl = """
 CREATE TABLE IF NOT EXISTS public.<table_name> (
  <column1> <Datatype> <Constraint> ENCODE az64,
  <column2> <Datatype> <Constraint>  ENCODE lzo
 ) DISTSTYLE AUTO;
 """

 run_redshift_statement(create_table_ddl)
logging.info('Table created successfully.')- Once our Table is created, we will import our s3 file to the table created here.
def import_s3_file(file_name):
  """
  Loads the content of the S3 temporary file into the Redshift table.
  """

  load_data_ddl = f"""
    COPY <table_name>
    FROM 's3://{S3_BUCKET}/{file_name}'
    DELIMITER ','
    IGNOREHEADER as 1
    REGION '<region-name>'
    IAM_ROLE <role_name>
  """

  run_redshift_statement(load_data_ddl)
  logging.info('Imported S3 file to Redshift.')
Note: Keep the region name the same as that of your AWS account and <table_name> the same to which you created the table and define your <role_name>.

- Optionally, you can create a function to query your results from your database.
def query_redshift_table():
  # You can use your own SQL to fetch data.
  select_sql = 'SELECT * FROM employee;'
  data = run_redshift_statement(select_sql)
  print(data['Records'])
I have used a simple query, i.e., to select all data from my table.
- Now, we need to set up our core logic.
client = boto3.client('redshift-data', region_name='<region_name’')

if __name__ == "__main__":
 logging.basicConfig(level=logging.INFO)
 logging.info('Process started')
 local_file_path = "<your file path"
 temp_file_name = TEMP_FILE_PREFIX + '_' + str(uuid.uuid1()) + '.csv'
 load_file_to_s3(local_file_path, temp_file_name)

 create_redshift_table()
 import_s3_file(temp_file_name)
 query_redshift_table()
 logging.info('Process finished')
Run your Python script using the command:
python <your_filename>.pyIf all goes well, you will see the following output screen
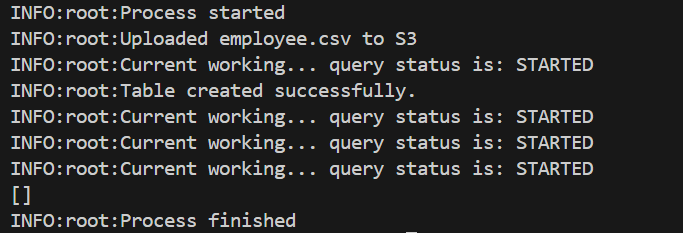
The query status will try about 5 times to configure the steps. This 5 is defined as per our MAX_WAIT_CYCLES; you can change it as you wish.
Method 4: Load CSV to Redshift Using Hevo Data
You can simulate CSV data loading with Hevo in 2 simple steps:
Step 1: Import your CSV file into Google Sheets and set up Google Sheets as your Source. After configuring your details, click Test & Continue.

Step 2: Configure Redshift as your target destination and done.

Significance of Performing Redshift CSV Load
While data can be loaded after conversion into other formats onto your destination Warehouse, loading CSV to Redshift has several benefits.
- Ease of Import:
- CSV files are easily imported into various storage databases, regardless of the software used.
- Their plain text format ensures compatibility across different platforms.
- Standard Data Representation:
- CSV files provide a standard format for data representation.
- The plain-text nature of CSV files makes them human-readable.
- Business Utility:
- CSV files are excellent for businesses that handle large volumes of data.
- The simplicity of CSV files facilitates easier organization, transfer, and cross-platform interpretability.
- Data Manipulation and Conversion:
- Businesses can manipulate and convert CSV files in various ways.
- CSV files are neither hierarchical nor object-oriented, offering a straightforward structure.
- The simple structure of CSV files makes them easy to import, convert, and export according to business requirements.
How to Unload CSV from Amazon Redshift
We have successfully loaded our files into Redshift. But how do we export them back to a CSV file? Let’s look at 2 methods of doing so:
Export data from Redshift using Unload Command
AWS provides us with a very handy command called ‘UNLOAD.’ Let’s examine how to use it.
Continuing with our same example of the employee table. We’ll use the following command to do so:
unload ('select * from employee)
to 's3://mybucket/unload/'
iam_role 'arn:aws:iam::<account_id>:role/<iam_role_name>'
CSV;
Note: If we want to export our file in another format, such as JSON, we can replace the keyword CSV with JSON.
And by default, the delimiter in CSV files is ‘,’. We can change that as well; use this code:
unload ('select * from employee)
to 's3://mybucket/unload/'
iam_role 'arn:aws:iam::<account_id>:role/<iam_role_name>'
CSV DELIMITER AS '|';
And our delimiter will be changed from ‘,’ to ‘|’.
Using Reverse ETL
To unload CSV data from Amazon Redshift, we can use a process known as reverse ETL.
What is Reverse ETL?
Reverse ETL is about moving data from your data warehouse, like Redshift, back into your everyday operational tools—think CRMs, marketing platforms, or other databases. Unlike the usual ETL (Extract, Transform, Load) process that pulls data into a data warehouse, reverse ETL extracts data from the warehouse, transforms it if needed, and loads it into the tools you use daily.
Using reverse ETL, we can seamlessly export data from Redshift, ensuring it’s readily available in the systems you rely on daily.
Learn More on How to Unload and Load CSV to Redshift and How to Load Data from CSV to BigQuery
Conclusion
You can use any method to load your CSV files into Redshift. However, manually loading data efficiently requires some technical knowledge. While it can be one method for quickly loading CSV data, manual monitoring can be very difficult for larger chunks of data.
See how to enhance your data integration strategy with Redshift, including connecting Twilio data efficiently. Discover our detailed resources here.
You can use Hevo to automate data integration with Redshift to simplify this process. Hevo is a fully managed, no-code data pipeline that can help create an automated data manipulation, transfer, and platform integration environment.
Additionally, you can export your files from Redshift, ensuring a seamless data flow in and out of your warehouse.
To experience seamless data migration, sign up for Hevo’s 14-day free trial.
FAQ on CSV to Redshift
How do I load a CSV file into Redshift?
1. Using AWS Management Console
2. Using ‘COPY’ Command (Command-Line)
How do I import data from Excel to Redshift?
1. Save Excel as CSV
2. Upload CSV to S3
3. Run ‘COPY’ command
How do I transfer data to Redshift?
1. Using ‘COPY’ command
2. Using Data Migration services
3. Using ETL tools
4. Using Amazon Redshift Spectrum
How to import CSV in DB?
1. Prepare CSV file
2. Access Database
3. Load CSV using SQL command


Share it with your connections.
-
 Share To X
-
 Share To LinkedIn
-
 Share To Facebook
-
 Copy Link


