

 Key Takeaways
Follow any of the methods below to load data into Snowflake:
Hevo Data: Connect any source (e.g., MySQL) to Snowflake in two clicks. Hevo handles schema mapping, transformations, and real-time ingestion without coding.
SQL Commands (SnowSQL + COPY): Stage files to an internal or external location, then run COPY INTO <table> to bulk load CSV, JSON, Parquet, or ORC files. Requires a running virtual warehouse for best performance.
Snowpipe: Configure an internal or external stage and use Snowpipe’s auto-ingest features for near real-time, micro-batch loading. No dedicated warehouse needed—Snowflake handles compute automatically.
Web Interface (Snowsight): Log in to Snowsight, select or create your table, click “Load Data,” choose your local file or cloud storage location, configure file format and error options, and let Snowflake upload rows via the chosen warehouse.
Snowflake has become a significant participant in the quickly changing field of cloud-based data warehousing, enabling companies to improve operational effectiveness and obtain insightful knowledge about customer behavior and product performance.
This article explores the nuances of how to load data into Snowflake and identifies four best practices. As the approaches differ in their methods and uses, this guide will help you choose the strategy that best suits your requirements for loading data.
Let us see how you can use Snowflake to unlock actionable intelligence for your company and optimize your data integration processes.
Table of Contents
Overview of Snowflake

Snowflake is a cloud-based, Software-as-a-Service (SaaS) data warehouse that fully supports ANSI SQL. It also features a unique architecture that allows users to simply create tables and start querying data with minimal administration or DBA activities required.
Key Features of Snowflake
- Multi-cluster shared data architecture: It allows point-to-point scaling of computing resources independent of storage.
- Separate Storage and Compute: Optimizes cost performance with the ability to independently scale storage and compute.
- Data Security with Sharing: Enables data sharing in real-time without losing privacy and security.
- Data Governance and Compliance: Advanced security features incorporate end-to-end encryption, complying with regulations.
What are the Methods of to Load Data into Snowflake?
- Method 1: Using Hevo Data for Loading Data to Snowflake
- Method 2: Using SQL Commands for Loading Data to Snowflake
- Method 3: Data ingestion into Snowflake using Snowpipe
- Method 4: Using the Web Interface for Loading Data to Snowflake
Method 1: Using Hevo Data for Loading Data to Snowflake
Imagine having to master every data source your organization uses and manually code all data movements—an overwhelming task. With Hevo, you can easily extract data from hundreds of sources, transform it on the go, and load it into your chosen destination.
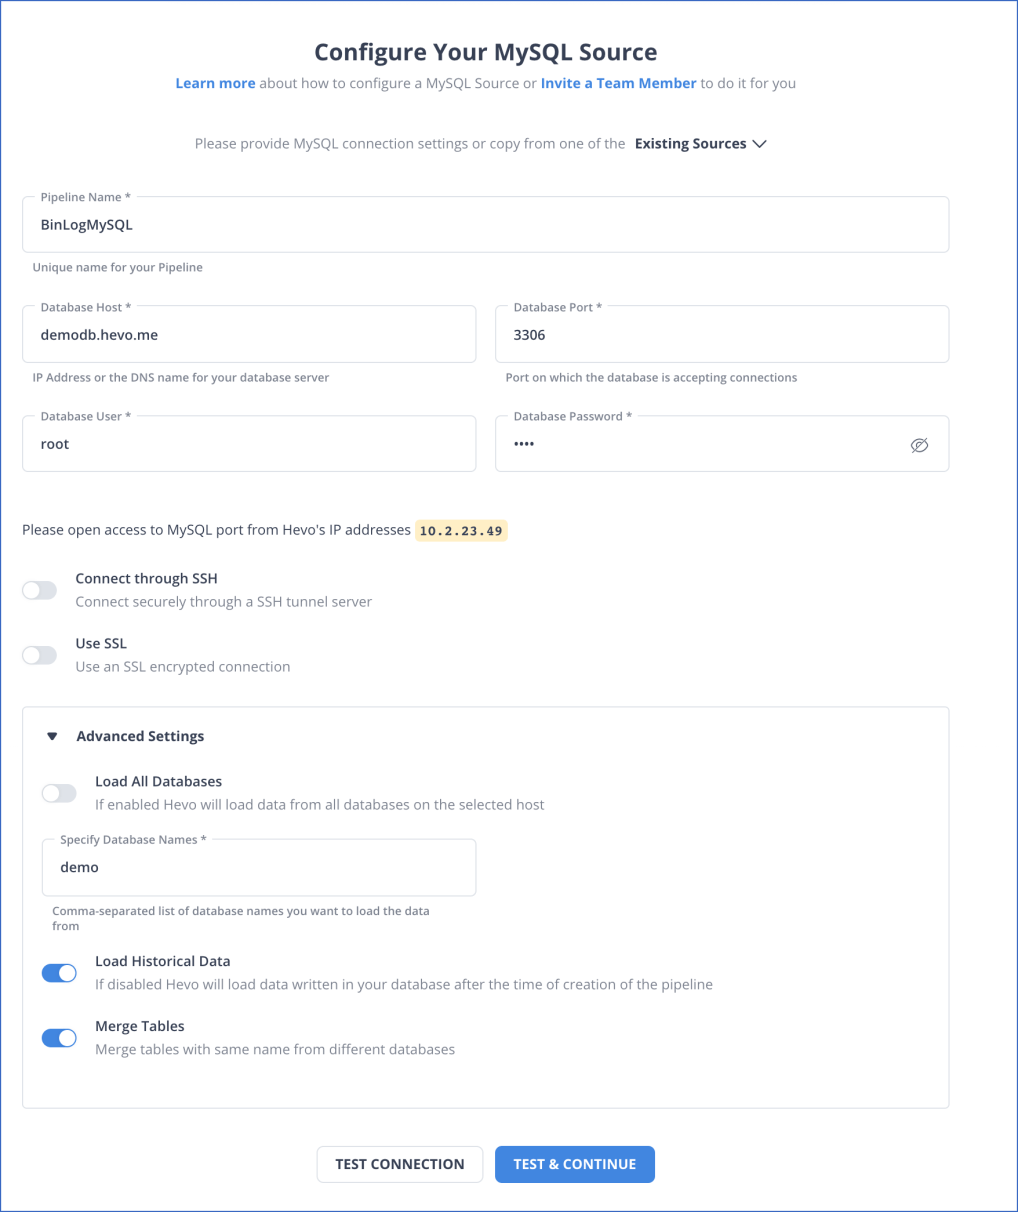
We shall take a look at how easy it is to load data from a MySQL database to your Snowflake data warehouse.
Step 1.1: Configure MySQL as your Source
Step 1.2: Configure your Snowflake Destination
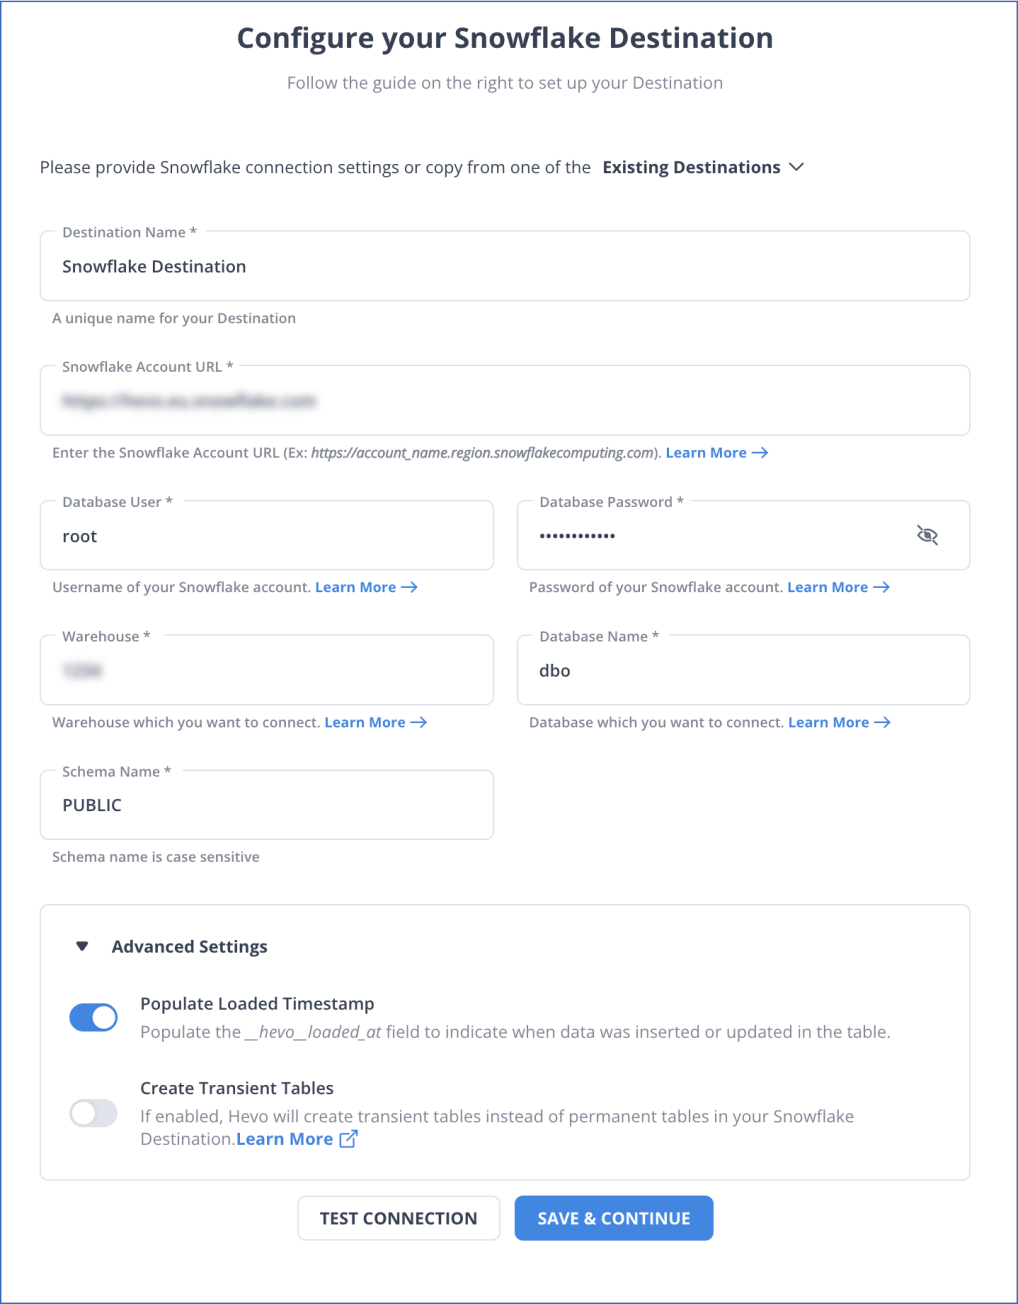
You have successfully connected your source and destination with these two simple steps. From here, Hevo will take over and move your valuable data from MySQL to Snowflake.


Method 2: Using SQL Commands for Loading Data to Snowflake
You can seamlessly use SQL commands to perform bulk loading into Snowflake using the powerful SnowSQL client.
This method is limited to loading data from standard delimited plain-text files, such as comma-delimited CSVs, as well as semi-structured sources like JSON, AVRO, Parquet, or ORC files.
Bulk loading is performed in 2 phases:
Step 2.1 – Staging the Files
Snowflake lets you stage files in internal locations called stages. Each table and user has a stage. Snowflake also supports creating named stages, for example, demo_stage. Staging can be done as follows:
- First, you upload your data files to a location where Snowflake can access your files. This is referred to as staging your files.
- Then, you load your data from these staged files into your tables.
Internal stages enable convenient and secure data file storage without requiring external resources. However, if your data files are already staged in a supported cloud storage location, such as GCS or S3, you can skip staging and load directly from these external locations. You need to supply the URLs for the locations as well as access credentials if the location is protected. You can also create named stages that point to your external location.
Step 2.2 – Loading the Data
Loading data to Snowflake requires a running virtual data warehouse. The warehouse extracts the data from each file and inserts it as rows in the table. Data warehouse size can impact loading performance. When loading large numbers of files or large files, choose a more extensive data warehouse.
You will now learn how to use the SnowSQL SQL client to load CSV files from a local machine into a table named Contacts in the demo database demo_db. CSV files are more straightforward to import into database systems like Snowflake because they can represent relational data in a plain-text file.
You will use a named internal stage to store the files before loading. Now, the following steps are required for data loading in Snowflake:
Step 2.2.1: Use the demo_db Database
Last login: Sun Jun 30 15:31:25 on ttys011
Superuser-MacBook-Pro:Documents hevodata$ snowsql -a bulk_data_load
User: johndoe
Password:
* SnowSQL * V1.1.65
Type SQL statements or !help
johndoe#(no warehouse)@(no database).(no schema)>USE DATABASE demo_db;
+----------------------------------------------------+
| status                                             |
|----------------------------------------------------|
| Statement executed successfully.                   |
+----------------------------------------------------+
1 Row(s) produced. Time Elapsed: 0.219s
Step 2.2.2: Create the Contacts Table
Use the following SQL command to create the Contacts table:
johndoe#(no warehouse)@(DEMO_DB.PUBLIC)>CREATE OR REPLACE TABLE        contacts (  id NUMBER   (38, 0)  first_name STRING,  last_name STRING,  company STRING,  email STRING,  workphone STRING,  cellphone STRING,  streetaddress STRING,  city STRING,  postalcode NUMBER   (38, 0));
+----------------------------------------------------+
| status                                             |
|----------------------------------------------------|
| Table CONTACTS successfully created.               |
+----------------------------------------------------+
1 Row(s) produced. Time Elapsed: 0.335s
Step 2.2.3: Populate the Table with Records
The Contacts table should contain records like this;
1, Chris, Harris, BBC Top Gear, harrismonkey@bbctopgearmagazine.com, 606-237-0055, 502-564-8100, PO Box 3320 3 Queensbridge, Northampton, NN4 7BF
2, Julie, Clark, American Aerobatics Inc, julieclark@americanaerobatics.com, 530-677-0634, 530-676-3434, 3114 Boeing Rd, Cameron Park, CA 95682
3, Doug, Danger, MotorCycle Stuntman LA, dougdanger@mcsla.com, 413-239-7198, 508-832-9494, PO Box 131 Brimfield, Massachusetts, 01010
4, John, Edward, Get Psyched, information@johnedward.net, 631-547-6043, 800-860-7581,  PO Box 383
Huntington, New York, 11743
5, Bob, Hope, Bob Hope Comedy, bobhope@bobhope.com, 818-841-2020, 310-990-7444, 3808 W Riverside Dr-100, Burbank, CA 91505
Step 2.2.4: Create an Internal Stage
Next, you will create an internal stage called CSV files.
johndoe#(no warehouse)@(DEMO_DB.PUBLIC)>CREATE STAGE csvfiles;

+----------------------------------------------------+
| status                                             |
|----------------------------------------------------|
| Stage area CSVFILES successfully created.          |
+----------------------------------------------------+
1 Row(s) produced. Time Elapsed: 0.311s
Step 2.2.5: Execute a PUT Command to Stage the Records in CSV Files
johndoe#(no warehouse)@(DEMO_DB.PUBLIC)>PUT file:///tmp/load/contacts0*.csv @csvfiles;
contacts01.csv_c.gz(0.00MB): [##########] 100.00% Done (0.417s, 0.00MB/s),
contacts02.csv_c.gz(0.00MB): [##########] 100.00% Done (0.377s, 0.00MB/s),
contacts03.csv_c.gz(0.00MB): [##########] 100.00% Done (0.391s, 0.00MB/s),
contacts04.csv_c.gz(0.00MB): [##########] 100.00% Done (0.396s, 0.00MB/s),
contacts05.csv_c.gz(0.00MB): [##########] 100.00% Done (0.399s, 0.00MB/s),


+----------------+-------------------+-------------+------------------------+
| source         | target            | source_size | target_size | status   |
|---------------------------------------------------------------------------|
| contacts01.csv | contacts01.csv.gz |         534 |         420 | UPLOADED |
| contacts02.csv | contacts02.csv.gz |         504 |         402 | UPLOADED |
| contacts03.csv | contacts03.csv.gz |         511 |         407 | UPLOADED |
| contacts04.csv | contacts04.csv.gz |         501 |         399 | UPLOADED |
| contacts05.csv | contacts05.csv.gz |         499 |         396 | UPLOADED |
+------------------+-------------------+-------------+----------------------+
5 Row(s) produced. Time Elapsed: 2.111s
Notice that:
- This command uses a wildcard contacts0*.csv to load multiple files.
- The @ symbol specifies where to stage the files – in this case, @csvfiles;
- By default, the
PUTcommand will compress data files using GZIP compression.
Step 2.2.6: Confirm that the CSV Files have been Staged
To see if the files are staged you can use the LIST command.
johndoe#(no warehouse)@(DEMO_DB.PUBLIC)>LIST @csvfiles; Step 2.2.7: Specify a Virtual Data Warehouse to Use
Now we are ready to load the files from the staged files into the CONTACTS table. First, you will specify a virtual warehouse to use.
johndoe#(no warehouse)@(DEMO_DB.PUBLIC)>USE WAREHOUSE dataload;

+----------------------------------------------------+
| status                                             |
|----------------------------------------------------|
| Statement executed successfully.          |
+----------------------------------------------------+
1 Row(s) produced. Time Elapsed: 0.203s
Step 2.2.8: Load the Staged Files Into a Snowflake Table
johndoe#(DATALOAD)@(DEMO_DB.PUBLIC)>COPY INTO contacts;
                    FROM @csvfiles
                    PATTERN = ‘.*contacts0[1-4].csv.gz’
ON_ERROR = ‘skip_file’;INTOspecifies where the table data will be loaded.PATTERNspecifies the data files to load. In this case, we are loading files from data files with names that include the numbers 1-4.ON_ERRORtells the command what to do when it encounters errors in the files.
Snowflake also provides robust options for error handling as the data is loading. You can check out the Snowflake documentation to learn more about these options.
If the load was successful, you can now query your table using SQL:
johndoe#(DATALOAD)@(DEMO_DB.PUBLIC)>SELECT * FROM contacts LIMIT 10;Learn More About:
How to Setup TikTok Ads Snowflake Integration
A Snowflake-native app to monitor Fivetran costs

Method 3: Data ingestion into Snowflake using Snowpipe
Let’s look into how to ingest data into Snowflake using the SnowSQL client. SnowSQL is the command-line client for Snowflake. Here’s an essential guide:
- Install SnowSQL: Download the SnowSQL client on your local machine. Follow the installation instructions provided by Snowflake.
- Configure SnowSQL: Run the following command to configure SnowSQL with your Snowflake account details:
bash

     snowsql
Follow the prompts to enter your account URL, username, password, and other necessary details.
- Prepare Data: Ensure your data is in a compatible format (CSV, JSON, etc.) and stored in a location accessible by Snowflake, such as a cloud storage service.
- Write SQL Commands: Create a table or ensure the target table already exists in Snowflake. For example:
sql

     CREATE TABLE IF NOT EXISTS your_table (

         column1 DataType,

         column2 DataType,

         -- Add other columns as needed

);- Generate a Stage URL: Use a Snowflake internal stage or an external stage URL to specify the location of your data files. For example:
sql

CREATE STAGE IF NOT EXISTS your_stage URL = 's3://your-s3-bucket/your-folder/';- Load Data: Use the
COPY INTOcommand to load data from your files into the table. Adjust the file format and stage URL accordingly.
sql

     COPY INTO your_table

     FROM @your_stage/your_data_file.csv

     FILE_FORMAT = (TYPE = 'CSV' FIELD_OPTIONALLY_ENCLOSED_BY = '"' SKIP_HEADER = 1);
Ensure that @your_stage points to the correct stage, and adjust the file format options based on your data.
- Execute Commands using SnowSQL: Save your SQL commands in a file, e.g., load_data.sql. Then, execute it using SnowSQL:
bash

snowsql -f load_data.sql- Monitor Load Progress: Check the progress and status of your queries using the Snowflake web interface or SnowSQL.
- Verify Data: After the load is complete, use SQL queries to check the data in your table and ensure it matches your expectations.
- Handle Errors: If there are any errors during the data load, review the error messages provided by Snowflake and troubleshoot accordingly.
Remember to replace placeholders like your_table, your_stage, and your_data_file.csv with your actual table name, stage, and file details. Always refer to the Snowflake documentation for the most accurate and up-to-date information.
However, there are a few pitfalls associated with this method.
- Incorrect or incomplete data formatting (consider using the VALIDATE command after using COPY INTO to return all errors).
- Insufficient credentials or permissions (consider running the CREATE THREAD request with the privileged user OWNERSHIP, ensuring the role is granted necessary access rights).
- Latency and network connectivity issues during the data loading (check the network connectivity stability and latency for acceptable limits).
You can also use Snowpipe in Snowflake for bulk loading data to your Snowflake warehouse, particularly from files staged in external locations. Snowpipe in Snowflake uses the COPY command with additional features that let you automate this process.
Snowpipe also eliminates the need for a virtual warehouse; instead, it uses external compute resources to load data as files are staged continuously, and you are charged only for the actual data loaded.
Method 4: Using the Web Interface for Loading Data to Snowflake
- Log in to your Snowflake account. Select an existing table or create a new one to load your data.
- In the Table details, click on the Load button. This will open the Data Wizard that you can use to load the desired file into your table, including selecting the required data warehouse.
- You can select local files or a cloud storage location such as GCP, Microsoft Azure, Amazon S3, etc.
- In the dropdown list, select a file format or create a new one.
- Finally, set the load options in case of an error. Click the Load button to allow Snowflake to load data to the selected table via the warehouse.
Loading data from your local device into an existing table
- Log in to your Snowsight account.
- Choose Data » Databases in the navigation menu.
- Choose your desired database and schema.
- Select the table that you want to load data into in the object explorer.
- Click on Load Data.
- In the Load Data into Table option, click on Browse.
- Add data files (structured or semi-structured).
- Select a warehouse if you do not have a default warehouse set for your user.
- Click Next.
- Execute one of the following tasks:
- Choose a file format from your current database.
- Choose a file type to customize, then select the relevant settings for your data file.
- Click on Load.
Snowsight will load your file and display the number of rows inserted into the table. - Execute one of the following tasks:
- Select Query Data to open a worksheet with SQL syntax.
- Select Done to close the dialog.
If your file cannot be loaded, for instance, because the columns in the file do not match the columns provided in the table, an error notice appears. To change your options, click Back.
Snowflake Data Ingestion Best Practices
1. Choose the Right Ingestion Method
- Batch Loading: Use COPY INTO with Snowflake Stage (Internal/External) for large structured files (CSV, Parquet, JSON).
- Continuous Streaming: Use Snowpipe for near real-time ingestion.
- ETL/ELT Pipelines: Utilize tools like Hevo, Fivetran, dbt, Airflow for automated ingestion.
2. Optimize File Formats & Sizes
- Prefer Parquet or ORC over CSV for efficient columnar storage.
- Keep file sizes between 100MB–250MB to balance ingestion speed and query performance.
3. Use Staging for Efficient Loading
- Use Internal Staging (
Snowflake Internal Stages) for structured storage. - For cloud storage (AWS S3, Azure Blob, Google Cloud Storage), use External Staging to optimize cost and flexibility.
4. Leverage Auto-Ingestion with Snowpipe
- Automate real-time ingestion with Snowpipe and cloud event notifications.
- Ensure file deduplication to avoid duplicate records.
5. Implement Data Partitioning & Clustering
- Use date-based partitioning for time-series data.
- Apply clustering keys on frequently queried columns to improve query performance.
What are the Supported File Locations?
- The data files in cloud storage in Snowflake are called a stage.
- The
COPY INTO <table>command for bulk and continuous data loading (i.e. Snowpipe) supports both the cloud storage accounts controlled by your organization (external stages) and the cloud storage within your Snowflake account (internal stages).
1. Bulk Loading Using the COPY Command
This option lets you import data in batches from cloud storage. You can also transfer files from a local system to Snowflake’s internal storage first. Afterward, load the data into tables using the transfer command.
2. Continuous Loading Using Snowpipe
- This option is intended to import small amounts of data (micro-batches) and gradually prepare them for analysis.
- Snowpipe loads data in minutes after adding files to a stage and submitting them for ingestion. This ensures that consumers receive the most recent findings as soon as the raw data is accessible.
What are the Alternatives to Loading Data?
1: External Tables (Data Lake)
- External tables allow you to query existing data saved in external cloud storage for analysis without initially putting it into Snowflake.
- The external cloud storage serves as the data’s single source of truth. Data sets created in Snowflake using materialized views are read-only.
- This technique is beneficial for accounts with a large quantity of data saved in external cloud storage but only want to query a subset of it, such as the most recent data.
- Users can use materialized views on portions of this data to improve query performance.
2: Working With Amazon S3-compatible Storage
- External stages and tables can be created on devices and software, on-premises, or in a private cloud that fully complies with the Amazon S3 API.
- This functionality simplifies and improves data management, governance, and analysis, regardless of its location.
Read through these essentials to gain a deeper insight into Snowflake:
- How to Integrate Salesforce to Snowflake: 3 Easy Methods
- MySQL to Snowflake: 2 Easy Methods of Replication
Conclusion
The article explained the four methods of loading data to Snowflake step-by-step.
Each method has unique benefits, and you can select one according to your requirements.
The manual method will work if you seek a more granular approach to your migration. However, if you are looking for an automated and zero solution for your migration, book a demo with Hevo.
FAQs
1. How do I load data into a Snowflake database?
Using Snowflake Web Interface
Using SnowSQL Command Line Interface
Using Python with Snowflake Connector
Using JDBC or ODBC
2. How do I import data from Excel to Snowflake?
Convert Excel to CSV
Stage the CSV
Copy Data from the Stage into Table
3. Can we load data from SQL Server to Snowflake?
Yes, you can load data from SQL Server to Snowflake. You can manually export the files from SQL Server and then load them into Snowflake or use Hevo Data to automate this process.
4. How to load JSON data into Snowflake?
Prepare the JSON data.
Create the Target Table.
Stage the JSON file.
Define the file format.
Copy data from the stage into the table.
5. How do you copy data into a Snowflake?
You can load data into your target table using the COPY INTO command.
6. Best platforms for merging Snowflake data with marketing automation tools?
Hevo Data, Fivetran, Zapier, etc.
Share it with your connections.
-
 Share To LinkedIn
-
 Share To Facebook
-
 Share To X
-
 Copy Link


