


Airflow is a Task Automation tool. It helps organizations schedule their tasks so they are executed when the right time comes. With the automation capabilities of this tool, you don’t have to worry about doing tasks repetitively. The core concept of Airflow is a DAG (Directed Acyclic Graph), which collects Tasks and organizes them with dependencies and relationships to specify how they should run.
In this article, you will gain information about Python DAG in Airflow. Read along to learn the steps for implementing a Python DAG in Airflow and gain in-depth information about Python DAG in Airflow.
Table of Contents
Key Terminologies
Before getting started on creating Python DAG in Airflow, particularly using the python operator in Airflow, let us understand some of the key terminologies we will use frequently in this article:
- Operator: An operator is the task in your DAG. The DAG nodes are referred to as operators in Airflow.
- Dependencies: Dependencies are specified relationships between your operators. The directed edges of DAG in Airflow can be referred to as dependencies.
- Tasks: In Airflow, tasks are units of work. Every task can serve as a hook, a sensor, or an operator.
Task Instances: It is the execution of a task at a specific point in time. These are executable entities. Task Instances belong to a DagRun in Airflow.
Looking for the best ETL tools to connect your data sources? Rest assured, Hevo’s no-code platform helps streamline your ETL process. Try Hevo and equip your team to:
- Integrate data from 150+ sources(60+ free sources).
- Utilize drag-and-drop and custom Python script features to transform your data.
- Risk management and security framework for cloud-based systems with SOC2 Compliance.
Implementing your Python DAG in Airflow
There are 4 steps to follow to create a data pipeline. Let’s take the following picture of the DAG into reference and code the Python DAG.

- Building Python DAG in Airflow: Make the Imports
- Building Python DAG in Airflow: Create the Airflow Python DAG object
- Building Python DAG in Airflow: Add the Tasks
- Building Python DAG in Airflow: Defining Dependencies


Step 1: Make the Imports
The first step is to import the necessary classes. In order to create a Python DAG in Airflow, you must always import the required Python DAG class. Following the DAG class are the Operator imports. Basically, you must import the corresponding Operator for each one you want to use.
To execute a Python function, for example, you must import the PythonOperator. If you want to run a bash command, you must first import the BashOperator. Finally, because your DAG requires a start date, the datetime class is usually the last to be imported.
from airflow import DAG
from airflow.operators.python import PythonOperator, BranchPythonOperator
from airflow.operators.bash import BashOperator
from datetime import datetime
Step 2: Create the Airflow Python DAG object
The second step is to create the Airflow Python DAG object after the imports have been completed.
A DAG object must have two parameters:
- a dag_id
- a start_date
The dag_id is the DAG’s unique identifier across all DAGs. Each DAG must have its own dag id. The start_date specifies when your DAG will begin to be scheduled.
Note: If the start_date is set in the past, the scheduler will try to backfill all the non-triggered DAG Runs between the start_date and the current date. For example, if your start_date is defined with a date 3 years ago, you might end up with many DAG Runs running at the same time.
In addition to those two arguments, two more are typically specified. The catchup and schedule_interval arguments.
The schedule_interval argument specifies the time interval at which your DAG is triggered. Every 20 minutes, every hour, every day, every month, and so on.
There are two ways to define the schedule_interval:
- Either with a CRON expression (most used option), or
- With a timedelta object
Secondly, the catchup argument prevents your DAG from automatically backfilling non-triggered DAG Runs between the start date of your DAG and the current date. If you don’t want multiple DAG runs running at the same time, it’s usually a good idea to set it to False.
with DAG("my_dag", # Dag id
start_date=datetime(2021, 1 ,1), # start date, the 1st of January 2021
schedule_interval='@daily',  # Cron expression, here it is a preset of Airflow, @daily means once every day.
catchup=False  # Catchup
) as dag:
It’s worth noting that we use the “with” statement to create a DAG instance. Because “with” is a context manager, it allows you to manage objects more effectively.

Step 3: Add the Tasks
Once you have made the imports and created your Python DAG object, you can begin to add your tasks. (A task is an operator). Therefore, based on your DAG, you have to add 6 operators.
The different tasks are as follows:
A) Training model tasks
The PythonOperator is used to implement the training models A, B, and C. Because real machine learning models are too complicated to train here, each task will return a random accuracy. This accuracy will be calculated using the python function, _training_model.
from random import randint # Import to generate random numbers
def _training_model():
return randint(1, 10) # return an integer between 1 - 10
with DAG(...) as dag:
# Tasks are implemented under the dag object
training_model_A = PythonOperator(
task_id="training_model_A",
python_callable=_training_model
)
training_model_B = PythonOperator(
task_id="training_model_B",
python_callable=_training_model
)
training_model_C = PythonOperator(
task_id="training_model_C",
python_callable=_training_model
)
The three tasks in the preceding code are very similar. The only distinction is in the task ids. As a result, because DAGs are written in Python, you can take advantage of this and generate tasks dynamically, as shown in the following example.
training_model_tasks = [
PythonOperator(
task_id=f"training_model_{model_id}",
python_callable=_training_model,
op_kwargs={
"model": model_id
}
) for model_id in ['A', 'B', 'C']
]
By defining a list comprehension, you are able to generate the 3 tasks dynamically comparatively cleaner and easier.
For better understanding of the PythonOperator, you can visit here.
As an alternative to operators, you can also use Airflow decorators to define tasks. The @task decorator allows you to replace the traditional PythonOperator to simplify the DAG authoring experience by eliminating boilerplate code. Here’s an example of how to write a Taskflow API:
from airflow.decorators import task
def example_dag_basic():
@task()
def extract():
data_string = '{"1001": 301.27, "1002": 433.21, "1003": 502.22}'
order_data_dict = json.loads(data_string)
return order_data_dict
B) Choosing Best Model
“Choosing Best ML” is the next task. Because this task executes the whether the task is “accurate” or “inaccurate” based on the best accuracy, the BranchPythonOperator appears to be the ideal candidate for that. It enables you to carry out one task or another based on a condition, a value, or a criterion.
The BranchPythonOperator is one of the most commonly used Operator. To implement it, you can refer the following code.
def _choosing_best_model(ti):
accuracies = ti.xcom_pull(task_ids=[
'training_model_A',
'training_model_B',
'training_model_C'
])
if max(accuracies) > 8:
return 'accurate'
return 'inaccurate'
with DAG(...) as dag:
choosing_best_model = BranchPythonOperator(
task_id="choosing_best_model",
python_callable=_choosing_best_model
)
The BranchPythonOperator first runs a Python function i.e, _choosing_best_model in this function. The task id of the next task to execute must be returned by this function. As indicated by the return keywords, your Python DAG should be either “accurate” or “inaccurate.”
What is xcom_pull?
When using Airflow, you need to use XCOMs to share data between tasks. XCOM is an acronym that stands for Cross-Communication Messages. It is a mechanism that allows small data to be exchanged between DAG tasks. An XCOM is an object that contains a key that serves as an identifier and a value that corresponds to the value you want to share.
By returning the accuracy from the python function _training_model_X, you create an XCOM with that accuracy and then use xcom_pull in _choosing_best_model to retrieve that XCOM back corresponding to the accuracy. You specify the task ids of these three tasks as you want the accuracy of each training_model task.
C) Assigning “Accurate” or “Inaccurate”
“Accurate” and “inaccurate” are the final two tasks to complete. To do so, use the BashOperator and run a simple bash command to print “accurate” or “inaccurate” in the standard output.
    accurate = BashOperator(
task_id="accurate",
bash_command="echo 'accurate'"
)
inaccurate = BashOperator(
task_id="inaccurate",
bash_command=" echo 'inaccurate'"
)
Bash commands are executed using the BashOperator.
Step 4: Defining Dependencies
After you’ve completed all of the tasks, the final step is to put the glue between them, or to define their Dependencies. This can be accomplished by utilising Bitshift operators.
It’s really simple in this case because you want to execute one task after the other.
 with DAG(...) as dag:
training_model_tasks >> choosing_best_model >> [accurate, inaccurate]
training_model_tasks are executed first, then after all of the tasks are completed, choosing_best_model is executed, and finally, either “accurate” or “inaccurate“.
Use a list with [ ] whenever you have multiple tasks that should be on the same level, in the same group, and can be executed at the same time.
The Final Python DAG in Airflow
The full code of the Python DAG in Airflow is as follows:
from airflow import DAG
from airflow.operators.python import PythonOperator, BranchPythonOperator
from airflow.operators.bash import BashOperator
from datetime import datetime
from random import randint
def _choosing_best_model(ti):
accuracies = ti.xcom_pull(task_ids=[
'training_model_A',
'training_model_B',
'training_model_C'
])
if max(accuracies) > 8:
return 'accurate'
return 'inaccurate'
def _training_model(model):
return randint(1, 10)
with DAG("my_dag",
start_date=datetime(2021, 1 ,1),
schedule_interval='@daily',
catchup=False) as dag:
training_model_tasks = [
PythonOperator(
task_id=f"training_model_{model_id}",
python_callable=_training_model,
op_kwargs={
"model": model_id
}
) for model_id in ['A', 'B', 'C']
]
choosing_best_model = BranchPythonOperator(
task_id="choosing_best_model",
python_callable=_choosing_best_model
)
accurate = BashOperator(
task_id="accurate",
bash_command="echo 'accurate'"
)
inaccurate = BashOperator(
task_id="inaccurate",
bash_command=" echo 'inaccurate'"
)
training_model_tasks >> choosing_best_model >> [accurate, inaccurate]
If you want to test it, copy the code into a file called my_first_dag.py and save it in the Airflow folder dags/. After that, run it from the UI and you should get the following output:
For further information about the example of Python DAG in Airflow, you can visit here. Before wrapping up, let’s understand some basics as well.
Basics of DAG
In Apache Airflow, a DAG is similar to a Data Pipeline. As a result, whenever you see the term “DAG,” it refers to a “Data Pipeline.” Finally, when a DAG is triggered, a DAGRun is created. A DAGRun is an instance of your DAG with an execution date in Airflow.
Here’s a basic example of DAG:
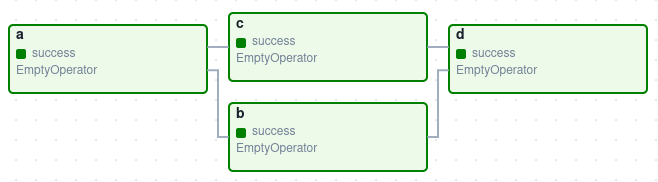
It defines four Tasks – A, B, C, and D. It also specifies the order in which they must be executed, as well as which tasks are dependent on which others. It will also specify how frequently the DAG should be run, such as “every 2 hours starting tomorrow” or “every day since May 15th, 2022.”
The DAG is not concerned about what is going on inside the tasks. Rather, it is truly concerned with how they are executed – the order in which they are run, how many times they are retried, whether they have timeouts, and so on.
A DAG in Airflow is simply a Python script that contains a set of tasks and their dependencies. The operator of each task determines what the task does. Using PythonOperator to define a task, for example, means that the task will consist of running Python code.
What is an Airflow Operator?
In an Airflow DAG, Nodes are Operators. In other words, a Task in your DAG is an Operator. An Operator is a class encapsulating the logic of what you want to achieve. For example, you want to execute a python function, you will use the PythonOperator.
When an operator is triggered, it becomes a task, and more specifically, a task instance. An example of operators:
from airflow.operators.dummy import DummyOperator
from airflow.operators.bash import BashOperator
# The DummyOperator is a task and does nothing
accurate = DummyOperator(
task_id='accurate'
)
# The BashOperator is a task to execute a bash command
commands = BashOperator(
task_id='commands'
bash_command='sleep 5'
)
Both Operators in the preceding code snippet have some arguments. The task_id is the first one. The task_id is the operator’s unique identifier in the DAG. Each Operator must have a unique task_id. The other arguments to fill in are determined by the operator.
What are Dependencies in Airflow?
A DAG in Airflow has directed edges. Those directed edges are the Dependencies between all of your operators/tasks in an Airflow DAG. Essentially, if you want to say “Task A is executed before Task B,” then the corresponding dependency can be illustrated as shown in the example below.
task_a >> task_b
# Or
task_b << task_a
The >> and << represent “right bitshift” and “left bitshift,” or “set downstream task” and “set upstream task,” respectively. On the first line of the example, we say that task_b is a downstream task to task_a. The second line specifies that task_a is an upstream task of task_b.
Conclusion
In this article, you have learned about Airflow Python DAG. This article also provided information on Python, Apache Airflow, their key features, DAGs, Operators, Dependencies, and the steps for implementing a Python DAG in Airflow in detail. For further information on Airflow ETL, Airflow Databricks Integration, Airflow REST API, and Python REST API framework, you can visit the following links.
Hevo is the only real-time ELT No-code Data Pipeline platform that cost-effectively automates data pipelines that are flexible to your needs. With integration with 150+ Data Sources (40+ free sources), we help you not only export data from sources & load data to the destinations but also transform & enrich your data, & make it analysis-ready.
Visit our Website to Explore HevoWant to give Hevo a try?
Sign Up for a 14-day free trial and experience the feature-rich Hevo suite first hand. You may also have a look at the amazing Hevo Price, which will assist you in selecting the best plan for your requirements.
Share your experience of understanding Apache Airflow Redshift Operators in the comment section below! We would love to hear your thoughts.
Resources – Steps for creating first dag
FAQ
What is a DAG in Python?
A Directed Acyclic Graph (DAG) in Python represents a set of tasks connected by directed edges, ensuring that there are no cycles. It’s commonly used in scheduling and workflow management systems.
How to Draw a DAG in Python?
You can use libraries like networkx and matplotlib to visualize a DAG. Create the nodes and edges using networkx.DiGraph() and then plot it with matplotlib.
What is Airflow DAG Used For?
An Airflow DAG defines a workflow, where each task represents a step in the process. It’s used to schedule, execute, and monitor tasks in an order, ensuring dependencies are respected.
How to Visualize a DAG?
A DAG is defined in Python code and visualized in the Airflow UI.
Share it with your connections.
-
 Share To LinkedIn
-
 Share To Facebook
-
 Share To X
-
 Copy Link


